This mod is for the installation of “Snap Vents”. These vents were used on the 66 Le Mans cars as well as other years but they are best known on the #2 winning MKII of 1966. They are actually windows designed for use on experimental aircraft but can be found on many general aviation and helicopter aircraft. They are easy to install but you MUST have the right tools or you will destroy your windows. Also be very careful handling the windows. They are Lexan and can flex quite a bit but they can break if you are careless and they scratch VERY easily. Thanks to Mike Gelb for the use of the REMGRIT saw.
Snap Vents are available from the manufacturer or from aviation supply stores on the Web like Lockwood aviation Supply. The cost is about $15/pr with shipping extra.
The first order is to do the layout. This is somewhat subjective but after a fair amount of research I have determined where I “think” they should go.
With the window removed and on a soft clean cloth on the bench, measure 11 inches from the lower front corner and 4 inches up from the bottom. Where the two points intersect, make a mark with an awl or other sharp object.
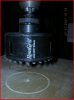
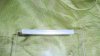
It is a good idea to put masking tape all over the area where you will be making the hole to prevent scratches as the hole saw rotates. Use a 3 ¼ inch REMGRIT hole saw. These are not cheap but it is the ONLY way to get a clean cut in this material. DO NOT try to use a regular “tooth” type hole saw. The results will be disastrous and will likely ruin a very expensive window. It's best to cut part way through then finish it from the other side.
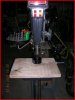
Also note that this MUST BE DONE ON A DRILL PRESS. There is no way to use a hand drill and get a clean smooth hole. I've included a lot of warnings here but take it from someone who has done all these things wrong in the past; you'll be sorry (like I was) if you don't heed my advice.
************************* YOU HAVE BEEN WARNED ************************
As shown below, use a large piece of wood to lay the window on. You may also place a cloth around the outside edge of the wood or put tape on the corners. This will prevent scratches as you press the window down with the hole saw. The window is not flat, but being Lexan, it will go flat as you bring the press down. DO NOT put a rag under where the hole saw will punch through. The saw will “pick it up” and get it spinning, horribly scratching the window. Again, use tape for this. Use as slow a cutting speed as you press will allow. When done, use fine sand paper to clean up the edge as necessary being very careful not to scratch around the edge of the hole.
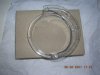
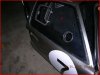
Before you insert the vents, remove the wire bale. It makes it easier to install. I run the vents under warm water to “heat” them up a bit making them softer to get through the hole. Reinstall the bale and you are done.
Snap Vents are available from the manufacturer or from aviation supply stores on the Web like Lockwood aviation Supply. The cost is about $15/pr with shipping extra.
The first order is to do the layout. This is somewhat subjective but after a fair amount of research I have determined where I “think” they should go.
With the window removed and on a soft clean cloth on the bench, measure 11 inches from the lower front corner and 4 inches up from the bottom. Where the two points intersect, make a mark with an awl or other sharp object.
It is a good idea to put masking tape all over the area where you will be making the hole to prevent scratches as the hole saw rotates. Use a 3 ¼ inch REMGRIT hole saw. These are not cheap but it is the ONLY way to get a clean cut in this material. DO NOT try to use a regular “tooth” type hole saw. The results will be disastrous and will likely ruin a very expensive window. It's best to cut part way through then finish it from the other side.
Also note that this MUST BE DONE ON A DRILL PRESS. There is no way to use a hand drill and get a clean smooth hole. I've included a lot of warnings here but take it from someone who has done all these things wrong in the past; you'll be sorry (like I was) if you don't heed my advice.
************************* YOU HAVE BEEN WARNED ************************
As shown below, use a large piece of wood to lay the window on. You may also place a cloth around the outside edge of the wood or put tape on the corners. This will prevent scratches as you press the window down with the hole saw. The window is not flat, but being Lexan, it will go flat as you bring the press down. DO NOT put a rag under where the hole saw will punch through. The saw will “pick it up” and get it spinning, horribly scratching the window. Again, use tape for this. Use as slow a cutting speed as you press will allow. When done, use fine sand paper to clean up the edge as necessary being very careful not to scratch around the edge of the hole.
Before you insert the vents, remove the wire bale. It makes it easier to install. I run the vents under warm water to “heat” them up a bit making them softer to get through the hole. Reinstall the bale and you are done.