I was wondering about that but then I have to extend the wiring to the control knob A LOT. I guess better than all the heat . Thanks for the tipNice progress Hector, one thing to think about. If you put the HCV in the car, then hot water will always be traveling along the side and into the passenger compartment just adding more heat.
A better location is in the engine compartment.

You are using an out of date browser. It may not display this or other websites correctly.
You should upgrade or use an alternative browser.
You should upgrade or use an alternative browser.
Restarting my SLC project in West Texas
- Thread starter felizguy
- Start date
Joel, you are absolutely right, the hot water will circulate all the way to the footbox constantly , I don't know what I was thinking, I guess I was not thinking at all. I guess I saw a build that did it that way and seemed like a logical way to connect everything at a good location, except for the heat issue , which being in West Texas is a big deal .
Again thanks for your help, now I have to brake a bunch of Oetiker clamps and start over, but better now than latter. Thanks again for the heads up.
Again thanks for your help, now I have to brake a bunch of Oetiker clamps and start over, but better now than latter. Thanks again for the heads up.
Joel K
Supporter
Joel, you are absolutely right, the hot water will circulate all the way to the footbox constantly , I don't know what I was thinking, I guess I was not thinking at all. I guess I saw a build that did it that way and seemed like a logical way to connect everything at a good location, except for the heat issue , which being in West Texas is a big deal .
Again thanks for your help, now I have to brake a bunch of Oetiker clamps and start over, but better now than latter. Thanks again for the heads up.
Your welcome, glad I could provide some good advice. You probably saw Stephan’s evaporator setup. He is using a different HCV which totally closes the coolant flow. His is a very different setup with an electric water pump.
I made the same mistake. Better to extend the harness than heat up the cabin in Houston
Joel, you are absolutely right, the hot water will circulate all the way to the footbox constantly , I don't know what I was thinking, I guess I was not thinking at all. I guess I saw a build that did it that way and seemed like a logical way to connect everything at a good location, except for the heat issue , which being in West Texas is a big deal .
Again thanks for your help, now I have to brake a bunch of Oetiker clamps and start over, but better now than latter. Thanks again for the heads up.
Today reminds me why a/c and a cool cabin is a must, sure is hot in the garageI made the same mistake. Better to extend the harness than heat up the cabin in Houston
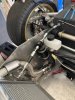
I put my valve in engine bay for that reason too (obv very different car), then attached it to a simple aluminum cover.


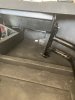
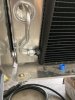
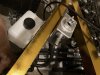
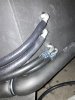
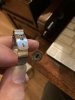
Happy Father's day everyone. Spent most of it in my favorite place, the garage . Got 90% of the a/c and heater plumbing done , came close to finishing , which was my goal for the weekend, but Unlimited air sent me 2 , # 6 u bend em, and not a number 8. Getting around the inner part of the cage was tricky, but got it done, relocated the heater control valve to the back, will secure it to the floor . Bending the u bend em line was tricky, but easier than the stainless steel brake lines. I ended up using the same tools . I should be able to finish tomorrow. I will post more pictures when all is complete . the #6 line turned out very well, I like the location of the drier next to the lift kit reservoir .
Hate the $12 plastic catch tank, will have to change that . Did not think it would bother me , but it does .
Hope to move on to the electrical stuff soon and mount the graziano.
Hate the $12 plastic catch tank, will have to change that . Did not think it would bother me , but it does .
Hope to move on to the electrical stuff soon and mount the graziano.
Attachments
Ken Roberts
Supporter
I would definitely mount your coolant surge tank higher. At the most it should be 2/3 full and should be at the highest point.
very nice work. !! Any reason for the cover? protection form engineer heat? damage by debris? I understand is made of plastic not very strong part.
Thanks for sharing
This is a couple of feet from an open wheel, with no protection (fenderless hot rod), so it solved the protection problem, plus you need to mount it somehow (and tidy it up).
Thanks Ken. I guess I will have to make a bracket to mount it higher . I appreciate your helpI would definitely mount your coolant surge tank higher. At the most it should be 2/3 full and should be at the highest point.
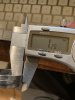
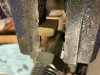
I absolutely hate Chinese garbage copies. Oetiker clamps are twice as thick, and the tab that holds everything together is much thinner. (similar diameter clamps) I really wonder what factor of safety was engineered on the original clamp design , and where the Chinese cheap copies fall. And the sad part is that price is not even that different. Scary stuff. what if a heater hose fails and spills hot water all over your legs. That junk should be illegal.
Attachments


Joel K
Supporter
Hector, you asked a question in Mason’s thread about a loose fitting pilot bearing. I had that and sent my flywheel to Ron McCall and his Machinists installed a shim ring and press fit the bearing in. If your’s is loose like mine I would recommend doing that.
You can reference post #54 in my build thread which shows some pics and two videos showing how loose the bearing was and the installed shim ring.
You can reference post #54 in my build thread which shows some pics and two videos showing how loose the bearing was and the installed shim ring.
Thanks Joel, I will look at that . Not quite there yet, finishing the heater a/c installation and hoses .Hector, you asked a question in Mason’s thread about a loose fitting pilot bearing. I had that and sent my flywheel to Ron McCall and his Machinists installed a shim ring and press fit the bearing in. If your’s is loose like mine I would recommend doing that.
You can reference post #54 in my build thread which shows some pics and two videos showing how loose the bearing was and the installed shim ring.
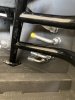
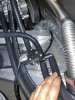
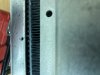
Well, bending the a/c lines was a PIA, it is always about the right tools, which I did not have, but got it done, I realized I don't have the final pics , I will post them later, got both #8 and #6 lines through the passenger radiator hole. It took a while and not there prettiest, but it will work . Took a few tips from Joel about gently bending tubes using whatever you can come up with and lots and lots of patience.
Attachments
So I told my son he can do one mod, as long as it does not affect the design or performance significantly and not too expensive , he chose an air horn, plus a "nice friendly horn" he came up with a form design that does not use a tank and works great and it will fit on the front wall outside the foot box. He also created an Arduino circuit to an amp and a speaker so we can download tons of different noises or horn sounds, that comes handy to get peoples attention in a kind way. Now for those being a-holes or texting and driving we got the train horn LOL . Well the 5 second video wouldn't upload. I will try later
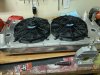
So a little mess up while installing the shroud I nicked the radiator, a quick stop for a pressure test at the local radiator shop owned/operated by the most awesome hispanic lady, true example of the american dream. All was good
Attachments

Similar threads
- Replies
- 18
- Views
- 2K