SPF GT- Water/air sealing, the "DIY" thread

Rick Muck- Mark IV

GT40s Sponsor
Supporter
I propose that this thread become the interactive posting spot for all information on improving the water and air sealing of the SPF GT40s. Understand that running changes and improvements have been made as production has progressed so all these "fixes" will not apply to all cars.

There are three areas of concern that will be covered: Water/air intrusion via the front tub/dash area, water/air via the doors/vent and water/air by way of the rear bulkhead and associated openings.

All suggestions, fixes, experiences are welcome here. I certainly do not have all of the answers and the chassis's I am working with are recent builds (P2269, 2270 and 2271) so some may or may not apply to your chassis.

Also the units I am working with are pre-sale chassis and as such are still rollers, we will be finishing one to make a demonstrator buy that will not be drivng until the snow flies here so "real world" on-the-road testing will not take place for a while. I am using water and pressurized water/air to test out my fixes.

I will be posting pictures here as we uncover ideas and fixes. Please add your experiences and ideas as well as pictures. I welcome emails at rick(AT)timemachinesauto.com and will reply as time permits or call 716 407 0975.

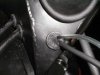
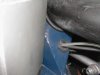
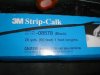
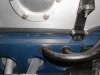
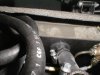
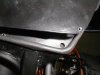
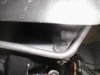
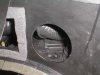
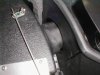
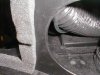
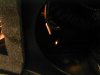
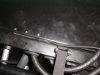
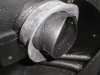
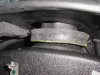
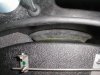
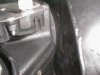
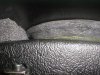
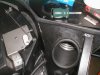
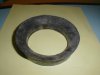
In the front of the tub where numerous hoses pass into the cockpit area SPF has used nice rubber grommets, however as some of the hoses are smaller than the grommet opening or pass through on an angle they are not fully sealed. These can be sealed with silicone however I prefer 3M Strip Clauk in black as it stays fexible and can be removed easily whereas the silcone is more permanent.

I roll it into a small "snake" and apply it from both inside and outside so as to "sandwich" the hose and improve sealing chances.

This is where the washer fluid hose enters the tub. This is P2269 before the sealing
 

Attachments

  • P9180006.jpg
    P9180006.jpg
    42.7 KB · Views: 739
  • P9180007.jpg
    P9180007.jpg
    31.4 KB · Views: 698
  • P9180012.jpg
    P9180012.jpg
    34.2 KB · Views: 683
  • P9180008.jpg
    P9180008.jpg
    39.3 KB · Views: 696

Rick Muck- Mark IV

GT40s Sponsor
Supporter
Here is where the heater hose enters the tub, the hose has been sealed to the grommet with some strip caulk. Although the opening was not large, it would admit a fair amount of water at speed. Keep in mind the entire front tub area is "wet", that is, it is exposed to ambient air and water from the tires, radiator byflow, etc. and that water being a nasty devil will seep/creep/leak into any place it is not wanted!
 

Attachments

  • P9180013.jpg
    P9180013.jpg
    50 KB · Views: 688
Last edited:

Rick Muck- Mark IV

GT40s Sponsor
Supporter
Here is a spot on top of the dash area that has the closure panels screwed to them On both left and right apnels on screw goes into a 5/16" hole that is not sealed by the foam under the closure panel. This will allow water that is thrown up on the panel by the front tires (and we will addres that later) to drip into the cockpit. Some caulk seals these openings.
 

Attachments

  • P9180016.jpg
    P9180016.jpg
    35.7 KB · Views: 675
  • P9180017.jpg
    P9180017.jpg
    37.5 KB · Views: 621
  • P9180018.jpg
    P9180018.jpg
    29.3 KB · Views: 643
MarkIV
The top of the dash area is where I saw some light from the drop light I used outside the tub. The older cars don't have the number of holes drilled into the square tubing that the newer cars show. However the light was from the foam seal having a break that would allow water to enter. But once you fixed the leaks you move on to the next point of entry.

Did you fabricate (foam) something to go around the steering gearbox opening in the tub? That is a large opening to deal with and the shape is odd.

I cut some 1/4" thick foam w/PSA into a circle to cover missing access plugs or inspection holes in the 'A' pillow for the fuel hose clamps. Easy to remove. I've obtained some some plastic Caplugs to try and use but not a deep enough lip to lock into the rolled metal hole.

How about a cap (plug) for the backside of the front wheel spindle to cover the wheel bearing as it open to outside? I've measured you will need a custom molded rubber plug ~83mm diameter. The problem is the hollow section of the spindle and where it meets that ~83 mm hole.

These are openings I worked on to close. The last one is most important to close because of the open bearing.
Grady
 
Last edited:
I used 5/8 inch closed cell foam around the stering box and other tub holes, sometimes held in place with black silicone. I still think the key to sealing around the door frame, especially around the roof area is to have some kind of mechanism to pull the door down as it closes. I found that with thicker weatherstripping you had to lift the door up as you closed it, otherwise it dragged on the weatherstripping at the back of the door cutout in the roof and tore it over time.
 

Rick Muck- Mark IV

GT40s Sponsor
Supporter
MarkIV
The top of the dash area is where I saw some light from the drop light I used outside the tub. The older cars don't have the number of holes drilled into the square tubing that the newer cars show. However the light was from the foam seal having a break that would allow water to enter. But once you fixed the leaks you move on to the next point of entry.

Did you fabricate (foam) something to go around the steering gearbox opening in the tub? That is a large opening to deal with and the shape is odd.

I cut some 1/4" thick foam w/PSA into a circle to cover missing access plugs or inspection holes in the 'A' pillow for the fuel hose clamps. Easy to remove. I've obtained some some plastic Caplugs to try and use but not a deep enough lip to lock into the rolled metal hole.

How about a cap (plug) for the backside of the front wheel spindle to cover the wheel bearing as it open to outside? I've measured you will need a custom molded rubber plug ~83mm diameter. The problem is the hollow section of the spindle and where it meets that ~83 mm hole.

These are openings I worked on to close. The last one is most important to close because of the open bearing.
Grady

I will be working on the steering as well as some other areas. I have more pictures and fixes to post as I go.
 

Rick Muck- Mark IV

GT40s Sponsor
Supporter
Here is a major possible leak, where the fresh air intake hose enters the AC/heater box. The hose takes air from the LH NACA duct and routes in between the brake and clutch cans on a LHD car. The hose then snakes back out of the tub and attaches to the plastic box with the HVAC works. The hose about 3" diameter but the hole it comes through is 4.0" diameter. SPF uses foam to seal the other entries from the HVAC unit to the cockpit. You could use foam here also but I have someone working on a 4.25" ID seal with PSA on it. This allows you to pull the HVAC box forward or out but will seal to the tub front face. My preference in for the PSA to seal to the HVAC box and let the seal mate to the tub.

These photos show the size difference between the tube and the tub opening not to mention that the there is 3/8" between the HVAC box and the tub. the dark pictures shows a light inside the cockpit and where water that enters at the opening has a path right onto your legs.
 

Attachments

  • P9180009.jpg
    P9180009.jpg
    56.8 KB · Views: 641
  • P9180010.jpg
    P9180010.jpg
    59.8 KB · Views: 603
  • P9180014.jpg
    P9180014.jpg
    66.9 KB · Views: 566
  • P9180015.jpg
    P9180015.jpg
    19.5 KB · Views: 593

Rick Muck- Mark IV

GT40s Sponsor
Supporter
MarkIV
How about a cap (plug) for the backside of the front wheel spindle to cover the wheel bearing as it open to outside? I've measured you will need a custom molded rubber plug ~83mm diameter. The problem is the hollow section of the spindle and where it meets that ~83 mm hole.

I had someone at the shop Friday looking a possible solution for the hub seal.
 

Steve C

Steve
GT40s Supporter
Rick,

Hope you will sell some of the parts you are fabbing to us SPF owners.

Such as the hub seal, HVAC 4.25" seal , steering shaft/ gearbox opening closure ect......

OK?

I have fixed a lot but not all.

Thanks, Steve P2125
 

Rick Muck- Mark IV

GT40s Sponsor
Supporter
Rick,

Hope you will sell some of the parts you are fabbing to us SPF owners.

Such as the hub seal, HVAC 4.25" seal , steering shaft/ gearbox opening closure ect......

OK?

I have fixed a lot but not all.

Thanks, Steve P2125

HELL YES!!! Anything we fab will be available, anything we source I will post information so you can find it.
 

Jack Houpe

GT40s Supporter
Rick I agree with you about the area between the AC unit and the tub. I really think this area is one of the biggest culprits for water intrusion. Also the pan just under the AC unit has the same foam seal as the rest of the panels.
 

Rick Muck- Mark IV

GT40s Sponsor
Supporter
Also the pan just under the AC unit has the same foam seal as the rest of the panels.

Yep,
I suggest that the closure panel over the pedals be sealed with the "Dum-Dum" (strip caulk) as it can be rolled off if the panel needs to be removed. I ran water on one and there was some intrusion. The foam does seal it, but not 100%. In this photo I am sealing the closure with the sealer.
 

Attachments

  • P9180024.jpg
    P9180024.jpg
    37.2 KB · Views: 646

JimmyMac

Lifetime Supporter
This original piece is going onto my car and the picture might give someone an idea.
The heater plenum covers most of the holes in the top of the front scuttle. This is part number 1/2624 and the two intake holes on this particular chamber were blanked off.
 

Attachments

  • Plenum.jpg
    Plenum.jpg
    248.9 KB · Views: 605

Rick Muck- Mark IV

GT40s Sponsor
Supporter
I will have the sample for the HVAC to tub seal within the next couple of days. I will post pictures and results.

Back to the BatCave and more "sealing".........I will provide pictures and results.
 
Rick and group. Part 2 is up in the "How To" section. I can't believe it, I hate writing but this is great. It's will be interesting to see how we all go about solving different problems.

Jimmy, I've seen pictures of this part before with the holes. Are you going to add them, if not where does the fresh air come from. Were the holes fed from the NACA scopes?
 

JimmyMac

Lifetime Supporter
Richard,
There are slotted venturis running inside the two rounded sides of the chamber and these are fed by connections from the scoops.
This plenum came with the front holes blocked with plates and pop rivets which will be removed as I am fitting functioning heater/demister equipment. I will also be adding butterfly shutters inside the tubes.
The whole unit is a close fit to the upper scuttle and fixes with screws and rubber seals.
 
Last edited:
Richard,
Thank you for the posts. I am sure that many of us here, like me, were looking for a simple solution to building our own cars by buying a roller from SPF. My God, what a sieve! You would think that more attention would be given to water intrution for rust concerns, or at least offer buyers to specify some sealant treatment from the factory at extra cost if they desire. It pays to build a scratch model in one way at least, in that you can correct these problems as you go.

Your work and the efforts of others on this forum are greatly appreciated. All of this is now going into my plans for my own build.
By the way, do these same problems exist for other makes of replicas? I would welcome comments. If I have violated rules regarding posts, please forgive me, I am "just looking for the facts, mam".
Garry
 

Rick Muck- Mark IV

GT40s Sponsor
Supporter
New seal available, HVAC to tub scuttle!!!!

Ok,

Here it is, the prototype of the seal between the Superformance HVAC box and intake air inlet and the left hand "hole in tub" that the ducting runs through.

This is a moulded, closed cell foam piece with a "skin". At first, I thought it would need to be attached to the box with pressure sensitive adhesive or glued on, but during trial fitting I found it worked best just sliding in on the large "nipple" on the box. This allows the seal to compress on both the box and the tub face. The seal is designed so that the tub side is tapered and "flares" out to maximixe the sealing surface.

It requires a little pressure on the HVAC box to allow the three retaining bracket screws to be installed but that keeps the seal in place and functioning.

This is our part number GT40P/18A569 and is $28.95 post paid in the USA. Please inquire for other locations shipping cost (the part is $24.95 without shipping)

Order from Rick(AT)timemachinesauto.com or call 716-407-0975

We have more to come and I am looking at the steering rack to tub sealing situation (however I think the best option is Dum-Dum as the shape would require an expensive die to mould a seal)
 

Attachments

  • P9220001.jpg
    P9220001.jpg
    25.4 KB · Views: 534
  • P9220002.jpg
    P9220002.jpg
    33.2 KB · Views: 506
  • P9220003.jpg
    P9220003.jpg
    58 KB · Views: 497
  • P9220005.jpg
    P9220005.jpg
    52.6 KB · Views: 489
  • P9220006.jpg
    P9220006.jpg
    63.2 KB · Views: 472
  • P9220007.jpg
    P9220007.jpg
    69.7 KB · Views: 469
  • P9220008.jpg
    P9220008.jpg
    52.3 KB · Views: 526
  • P9220009.jpg
    P9220009.jpg
    63.3 KB · Views: 475
  • P9220017.jpg
    P9220017.jpg
    50.5 KB · Views: 508

Rick Muck- Mark IV

GT40s Sponsor
Supporter
I am waiting for some industrial sealant a friend uses in his business to test on the steering shaft/rack opening. I think this may be the best option at that location, a moulded seal would be difficult.

The HVAC to tub seal was a simple mould that didn't require special tooling, just a simple two piece aluminum die that was reasonable to make.

I need someone else to test this seal, so the first to request one gets it no cost....no shipping, no hassle. Just let me know how it worked for you.
 

Attachments

  • P9220001.jpg
    P9220001.jpg
    25.4 KB · Views: 494
  • P9220007.jpg
    P9220007.jpg
    69.7 KB · Views: 484
Back
Top