Chuck's Jaguar D Type Build

Chuck

Supporter
Wiring, Instrument Panel, Part I

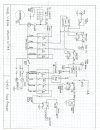
Wiring patterns were drafted for the ignition system, turn signals, and panel. (The ignition system was previously temporarily wired so the engine could be test started).

1703816627561.jpeg


1703816664618.jpeg


1703816700839.jpeg

Comments on the wiring design:

1. Multiple relays were used so no high current loads would pass through the panel switches. Exceptions are the head light wires coming from the DIP switch and the turn signal wires coming from the Lucas pneumatic switch, both of which are high current devices.

2. The turn signals / four-way flashers required three relays and a separate flasher unit. (There may be easier ways to accomplish this with prefabricated units.) The flasher module is designed to work with LED lights as well as standard filament bults in case we chose to use LEDs, such as for the tail and brake lights.

3. The power source from the battery to the panel runs through a 50-amp fuse. The large black volage regulator to the right of the fuse boxes is essentially a non-functional replica, but it does include a 50-amp fuse which was utilized in the wiring. (Although we have an original type silver colored voltage regulator as per the original, we opted for the reproduction because we prefer the black color and the internal fifty-amp fuse – a deviation from the original look).

IMG_6990.JPG


IMG_6989.JPG

4. The top panel switch is for the fuel pump so that it can be turned off to the drain the carbs before the ignition is turned off. The fuel pump has its own fuse and breaker to assure it will continue to function in the event another device’s breaker or fuse blows.

5. The bottom panel switch turns the radiator fan on and off. We opted not to incorporate a thermostatic switch at this time, although it could be added later if necessary. Although the original had only three switches on the left side, the fourth actually better balances the look; another deviation from the original.

5. Lucas components were used for all the switches, fuse boxes, and ignition components, as itemized in a prior post.

More details to some.
 

Attachments

  • WiringPanel.jpg
    WiringPanel.jpg
    263.2 KB · Views: 59
Last edited:

Chuck

Supporter
Wiring, Instrument Panel, Part II

A large selection of 20, 16, and 14 gauge stranded wire was purchased from Summit, along with relays, relay holders, and other bits, to assure the wiring process would not get stalled for lack of parts. Multiple colors of were wire used to ease tracing circuits down the road.

IMG_6993.JPG


The instrument panel and fuse panel were placed on the work bench for the initial wiring. This is a tedious process, one wire at a time. As the wiring progressed, circuits were checked.

This looks like a chaotic mess. With the initial wiring complete, the panels will be placed back in the car and additional wiring completed including placement of the gauges, wires organized and tied into position, and then the panel will be removed for more attention to details.


IMG_6958.JPG


IMG_6916.JPG


IMG_6959.JPG


IMG_6955.JPG


Chuck

Supporter
Wiring, Instrument Panel, Part III

After the initial wiring on the work bench, the panels were returned to the D Type and held in place with clecos. Additional wiring was added including joining the ignition wires, placing and wiring the gauges. Once done a battery was hooked up to confirm proper function.

IMG_7013.JPG


The fuel gauge glowed red when power was applied; an unexpected surprise. The red glow is a low fuel warning, which can be programmed.

The alternator warning light is a pricey component – around $50 – which is wound with a length of resistance wire to reduce the brightness of the bulb. I am not sure why, but for now we do not intend to modify it to first determine if it will be bright enough to be seen under real life conditions.

The white glow of the Smiths gauges and the Classic gauges is similar, which had been a concern. The speedometer and tachometer will be illuminated by the external light. The brightness of all the panel lights is adjustable with the dimmer switch.

The high – low beam indicator is a soft blue and looks great. Recall that on the original a cover was typically placed to further reduce the distraction to the driver.

A one volt drop between the battery and the volt gauges was disconcerting until we discovered it was caused by the alternator relay. The wiring of the Lucas alternator with those multiple external components is a real challenge. A modern single wire alternator would be so much easier.

IMG_7019.JPG


Next we will be removing the panel (again) so that terminal blocks can be added to the chassis and initial chassis wiring completed.
 
Beautiful wiring diagrams! I would expect nothing less with your build thus far...

I would encourage you to install a Ford (or other) fuel inertia cutoff module between your 5A ignition fuse and the fuel pump relay 86 trigger pin. Keeps things less exciting if you have an incident that compromises fuel line integrity. If you do, I would install it in an accessible location, perhaps under the dash, in case it triggers with a bump, off-track excursion, etc. I've installed this module in my Cobra, GTM, and Esprit. I did have it trigger in my Cobra with cornering g's on a track...it was installed in the trunk and I got a "tow of shame" back to the pits.

https://www.ebay.com/itm/185740175721

s-l1600.jpg
 

Davidmgbv8

Supporter
Don’t know if MGB inertia switches are still available but pretty simple device and you can trigger yourself as anti theft device
 

Ken Roberts

Supporter
I'd be careful with using general purpose "primary wire" in the engine compartment. The higher heat can cause the insulation to shrink back at the ends exposing the bare conductor. A TXL type of wire is the preferred wire for the engine bay.
 

Chuck

Supporter
Beautiful wiring diagrams! I would expect nothing less with your build thus far...

I would encourage you to install a Ford (or other) fuel inertia cutoff module between your 5A ignition fuse and the fuel pump relay 86 trigger pin. Keeps things less exciting if you have an incident that compromises fuel line integrity. If you do, I would install it in an accessible location, perhaps under the dash, in case it triggers with a bump, off-track excursion, etc. I've installed this module in my Cobra, GTM, and Esprit. I did have it trigger in my Cobra with cornering g's on a track...it was installed in the trunk and I got a "tow of shame" back to the pits.

https://www.ebay.com/itm/185740175721

s-l1600.jpg
Excellent suggestion. I had one in the trunk of the Cobra built a dozen years ago and frankly had forgotten about that option. I will follow up on that. Thanks.
 

Chuck

Supporter
I'd be careful with using general purpose "primary wire" in the engine compartment. The higher heat can cause the insulation to shrink back at the ends exposing the bare conductor. A TXL type of wire is the preferred wire for the engine bay.
Good point. Most of the wire used on the panel is GPT with a temp rating up to 80 degrees C (185 degrees F). The jumper wire on the starter - probably the one wire exposed to the highest temps - is an AWG with a temp rating up to 105 degrees C (220 degrees F). Virtually all of the wire under the hood is covered with a sleeve except at the ends, where temperature extremes are less likely. The XL wire does indeed have a higher temp rating and I agree would be preferable where under hood heat is an issue. Here is a useful chart found on line:


Screenshot 2024-01-09 at 09-33-31 Types of Automotive Primary Wire Explained IEWC.com.png
 
Last edited:

Ian Anderson

Lifetime Supporter
Try s-v-c

Vehicle Wiring Products

And Rimmers

and off course Car builder solutions

Ian
 

Chuck

Supporter
I get all my British wire and connectors from British Wire. All the right sizes and colors, tools and great service. https://www.britishwiring.com/Default.asp

I checked Moss Motors, the old MGB inertial switch is not available but their modern version they sell for $61 can be found on Ebay for $10
Good info. Thanks.

The wire sold by British for the Series I XKE (the closest to the D Type) looks like the cloth covered wire I obtained from Brillman, noted in a post long ago, which was reassuring.

I will likely go with the standard Ford inertia switch, but still looking around.
 

Chuck

Supporter
Try s-v-c

Vehicle Wiring Products

And Rimmers

and off course Car builder solutions

Ian
Thanks Ian. Good references. I have used several British suppliers, most frequently Moss, but those look like possibilities for the hard to find parts that others don't have.
 

Ken Roberts

Supporter
Here is the inertia switch I use and recommend. It’s widely available by Standard Motor Products and AC Delco as well. I believe Porsche used it in the 928.
 

Attachments

  • image.jpg
    image.jpg
    362.7 KB · Views: 61

Chuck

Supporter
Here is the inertia switch I use and recommend. It’s widely available by Standard Motor Products and AC Delco as well. I believe Porsche used it in the 928.
Good tip Ken. Just ordered it. Appears to be a Standard FV-7 which is indeed even used on several British cars!
Thanks.
 
Good tip Ken. Just ordered it. Appears to be a Standard FV-7 which is indeed even used on several British cars!
Thanks.
Chuck, I am confident that you have the ability to mill or otherwise fabricate a housing for it to pass concours scrutiny that it is an original Lucas module. A pre-soak in The Glenlivet prior to installation would further assure Lucas authenticity...
 

Chuck

Supporter
Chuck, I am confident that you have the ability to mill or otherwise fabricate a housing for it to pass concours scrutiny that it is an original Lucas module. A pre-soak in The Glenlivet prior to installation would further assure Lucas authenticity...
The Glenlivet pre-soak would probably be more effective in assuring passage of inspection if directed instead toward the scrutineers in a glass for immediate consumption . . . .
 
Last edited:

Chuck

Supporter
Wiring, Instrument Panel, Part IV

With the panel out of the car it was time to complete the chassis wiring. The starting point was placement of three wiring blocks (fourteen (14) connection points) on the driver’s side which would serve to join the panel wires to the chassis wires. This will enable removal of the panel from the car. Alternatively, several plugs could have been used (as was done on our GT40 build) but due to the variation in the wire types and sizes this seemed the better option. In addition, modifying the wiring, such as adding an inertia switch to the fuel pump circuit as suggested by Dave and Ken, will be easier with wiring blocks.

IMG_7116.JPG


The wires going to the rear were passed through the 7/8” grommet on the chassis placed long ago and then passed through a Thermo Tec sleeve for heat protection. It was secured with 5/8” nylon fasteners.

IMG_7087.JPG


These wires were threaded up through the aft vertical tunnel. The left red and right green blinker wires and fuel gauge sender wire were passed through a grommet on the rear fire wall. The brake wire and tail light were routed to the junction box where two wires for the brake and tail lights, left and right, will be connected later. The short section of braided wire sleeve is like what was seen on the original.

IMG_7179.JPG


IMG_7178.JPG


The headlight, turn signal, and parking light wires that pass through the engine compartment are fabric covered for a vintage look. They terminate in a period correct Lucas junction box, as was used on the original D Type. The chassis radiator support, not used with the original type radiator, was an ideal location for the junction box. A section of braided wire sleeve was used not only to protect the wiring from engine heat but also to keep the wires bundled together. Wiring will be added later going from this junction box to the headlights, blinkers, and parking lights.

IMG_7144.JPG


IMG_7146.JPG


The dash firewall panel was prepped for the replacement of the instrument panel. The holes were drilled and tapped for ¼” bolts that will support the three panels. The dimmer switch is a bit stiff, so to prevent the instrument panel from flexing, 10/24 screws that hold it in place were extended to the dash panel, holes drilled and tapped, and sleeves placed to add rigidity to the panel. The picture shows the HDPE spacer fabricated to set the DIP switch in the proper position, screws, and spacers ready for installation with the panel.

IMG_7098.JPG


The dimmer switch spacer was made from HDPE Sea Board, cut and trimmed, to assure that the dimmer button would extend the appropriate distance from the front of the panel.

 
Back
Top