

You are using an out of date browser. It may not display this or other websites correctly.
You should upgrade or use an alternative browser.
You should upgrade or use an alternative browser.
Vaughn's RCR Build
- Thread starter Vaughndo
- Start date
Nice work Vaughn....I am please to see you make it yours ...
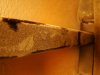
If I recall Vaughn added the tubes so he could weld a side intrusion bar from the hinge post to the striker plate, inside the door pocket..another nice touch....
Keep up the good work...
If I recall Vaughn added the tubes so he could weld a side intrusion bar from the hinge post to the striker plate, inside the door pocket..another nice touch....
Keep up the good work...
Jack-- The dash is definitely different. Thanks for the good words.
Randy-- Yes, those are the standard hinges that Fran builds. Which are more than strong enough to hold the doors in place. All I did was beef them up a little bit so that I could do some things to the interior of the door. I did the same thing to a cobra that I built a few years ago. I will try to post some pictures of the interior of the door, but Fans description is right on. But, as they say a picture is worth a thousand words. That's why I'm so thankful for all you guys that post. Man has it saved me time!
Vaughn
Vaughn,
Your work is absolutely great, and I'm enjoying following your build. Incidentally, the built-in side protection steel in our Australian DRB's seems to really stiffen up the door by running from hinge to door catch, and giving both of those ends some solid steel (inside the door) to connect to.
You mentioned that you are an amputee, and also that you are getting a ZF transaxle. Do you go OK with the manual transmission, if you don't mind me asking? You have had a cobra, so obviously are a driving enthusiast from way back.
Cheers,
Dalton
Dalton
Thanks for the words of encouragement. As far as my build is concerned I have to credit Fran for that. His RCR 40 is a fantastic piece of workmanship so to do anything less than the best would be criminal. Yes, I am an amputee on my left side so adding a little protection in the doors gives me a little bit more security. And you're right about stiffening up the doors it does help. Because of being an amputee I lean on the doors more than the average guy. By the way I have no problems with you asking questions about how I'm able to maneuver with a manual transmission. It is a problem with the floor mounted foot pedal assemblybut, what I'm planning to do is build up a pad on the clutch pedal which will allow me to shift it without any problems. I think it'll be a really simple fix. As far as the hanging pedal assembly it's not a problem because you don't need the ankle flexibility in order to shift. To drive these cars with anything other than a manual transmission would be sinful. Yes, you're right I have always been a driving enthusiast and I've had a lot of fast cars, but I've always wanted a GT 40 and after investigating and shopping the RCR was the best choice for me.
Take care
Vaughn
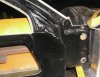
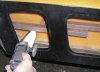
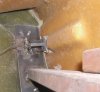
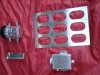
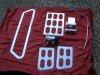
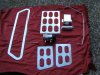
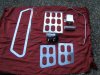
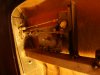
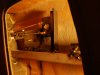
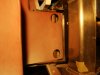
These are the pictures that I wanted to post concerning inside stabilizer plates and crossmembers. The crossmembers will be bolted together once everything is in place and there are also corresponding bolts on either end of the stabilizing plates. I have only one picture as of yet, but these were taken before I decided to put a rod through the door hinge. I will post another picture later showing the plate that corresponds with the door other hinge. I hope this makes sense.
Vaughn
Vaughn
Attachments
Chris Kouba
Supporter
Vaughn-
Caught your PM and replied. Sorry it took so long to notice.
CK
Caught your PM and replied. Sorry it took so long to notice.
CK
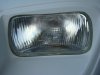
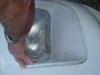
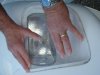
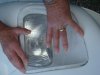
Well, I'm back again. Had some health problems that slowed me up in my build, but I'm finally back in the saddle again. I have been doing a lot of polishing as of late and thought I'd post a few pictures. I even polished the air-conditioning pump. Also spent a lot of time sitting the glass on the front end. I deepened the bezel's to allow the glass to flow with the body. It was a lot of work but I really think it paid off. I've gotten a few other things done as well but I will not say much about that until I can post some pictures. This car has been a real pleasure to work on and Fran has been a lot of help. I'm not exactly setting any speed records getting it done, but I will get it finished before I'm too old to drive it.
Vaughn
Vaughn
Attachments
Vaughn spends his summers in Alaska....lucky man.
")
Nice to see you back on the horse Vaughn....more pics
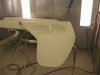
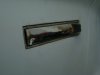
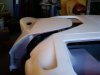
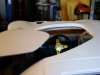
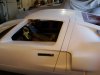
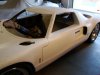
Well, I have finally figured it out with the help of my wife and my grandson I can post. Yes Virginia you can teach an old dog new tricks. The bodywork is done and I really like how everything lines up. Spent a lot of time on the doors but I think it was worthwhile. These doors are strong and also add side impact protection. They sound like a Cadillac when they shut. The Door lever is encased by an aluminum body and bezel. The edge of the bezel will be polished and will give a real clean look to the door handle. It will also protect the body from any possible chipping of the paint. The doorhandle does not pullout to open the door it pushes in. I tried to show that in the pictures. I think Fran would be proud. I'm not exactly setting the world on fire when it comes to this build. I've had a lot of obstacles to get over but, with God's help I will get this build finished. I don't want to give the impression I'm on my deathbed. I actually feel like million dollars all green and wrinkled. Well, as it stands right now all the bodywork is done all the glass is fitted. Now I will start on the plumbing and electrical. I got a build manual from Chuck and Ryan which will be a big help. I don't know where they found time to do a build manual but it's first rate just like their car. It should save me a lot of time. Hope you enjoy the pictures.
Vaughn
Vaughn
Attachments
-
 GT40 12-08 002.JPG89.9 KB · Views: 422
 -
 GT40 12-08 007.JPG94.5 KB · Views: 480
 -
 GT40 - Vaughn's 018.JPG114.1 KB · Views: 444
 -
 GT40 - Vaughn's 025.JPG110.8 KB · Views: 405
 -
 GT40 - Vaughn's 027.JPG107.2 KB · Views: 398
 -
 GT40 - Vaughn's 031.JPG119.7 KB · Views: 405
 -
 GT40 - Vaughn's 033.JPG104.2 KB · Views: 427
 -
 GT40 - Vaughn's 034.JPG98.6 KB · Views: 386
 -
 GT40 - Vaughn's 035.JPG110.7 KB · Views: 459
 -
 GT40 - Vaughn's 037.JPG114.2 KB · Views: 435
Similar threads
- Replies
- 24
- Views
- 3K
- Replies
- 13
- Views
- 534