
Since the post buy Tim OZ (Review RF85 8/2/06) I did some checking of my own.
I did some reading & swatting up on a few things.
So I’m not an expert in this area so hopefully I won’t say anything stupid.
A few things got said in the review that also gave a few hints as to where to look.
Thank you Russ Noble (my new friend).
The rear bump steer problem is 2 areas.
The hight of the front location of the trailing links (To high).
With the reverse A lower arm it shows up big time because of it general shape.
I had not given it much thought until now & the easiest way to explain is you are looking down at the car from above.
You string a line through the centre of the inner arm location point from the left to the right so you are 90deg to the centre line of the chassis.
The part of the arm that goes to the front location of the upright is pointing forward (a lot).
Now you have to look at the car from the side.
If the front location of the front link is high the trailing link will go through an arc as the rear is raised it will get longer untill it gets to the same hight as the front location point.
As it gets longer it pushes the upright back, because the lower arm pivots at the chassis from one pick up point(looking from the top again) it will push the arm back in an arc & make the upright toe out.
Looking from the top again.
If you run 2 equal length parallel links from the upright to the chassis instead of the arm.
If you imagine the chassis the links & upright make a box.
When the trailing link arcs and lengthens the box turns into a parallelogram.
Keeping the upright in the straight ahead position not like the A arm which will arc out.
Several days ago I put dial gauges on the rear end & checked for bump steer & was getting 2.5 mm of toe out through the working range of travel.
I did a dummy up using clamps & brackets, made some links ECT.
Straight away with an ordinary mounting set up it was down to .010” toe out.
So I cut the inner mount & did everything properly the out come is excellent & not what I would call major surgery.
The end result is at 2” of droop .010” toe in
1” drop .003” toe in
1” bump 0
2” bump 0
Toe in will add stability so its ok.
All these figures are with zero caster on the upright.
This is with zero caster
1.5-2 mm toe in.
1deg neg camber.
I have pretty much completed one side.
I have pics that might explain better.
This is how I went about it.
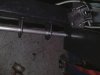
Pic 1 made a punch to mark the spot using bracket as guide.
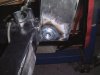
Pi2 machined spud with thread & weld in hole.
Pic2 Make brackets.
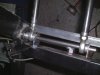
Made aligning tool to locate rear brackets.
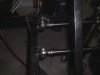
Pic3 links.
The front lower rose joint did go between the shock bracket & the upright.
To get it to line up to the chassis it had to be moved to the other side of the bracket & a spacer is fitted where it used to live.
I drilled all the link bolt holes in the upright to ½ “& put larger bolts.
If this can help anyone good luck.
I did some reading & swatting up on a few things.
So I’m not an expert in this area so hopefully I won’t say anything stupid.
A few things got said in the review that also gave a few hints as to where to look.
Thank you Russ Noble (my new friend).
The rear bump steer problem is 2 areas.
The hight of the front location of the trailing links (To high).
With the reverse A lower arm it shows up big time because of it general shape.
I had not given it much thought until now & the easiest way to explain is you are looking down at the car from above.
You string a line through the centre of the inner arm location point from the left to the right so you are 90deg to the centre line of the chassis.
The part of the arm that goes to the front location of the upright is pointing forward (a lot).
Now you have to look at the car from the side.
If the front location of the front link is high the trailing link will go through an arc as the rear is raised it will get longer untill it gets to the same hight as the front location point.
As it gets longer it pushes the upright back, because the lower arm pivots at the chassis from one pick up point(looking from the top again) it will push the arm back in an arc & make the upright toe out.
Looking from the top again.
If you run 2 equal length parallel links from the upright to the chassis instead of the arm.
If you imagine the chassis the links & upright make a box.
When the trailing link arcs and lengthens the box turns into a parallelogram.
Keeping the upright in the straight ahead position not like the A arm which will arc out.
Several days ago I put dial gauges on the rear end & checked for bump steer & was getting 2.5 mm of toe out through the working range of travel.
I did a dummy up using clamps & brackets, made some links ECT.
Straight away with an ordinary mounting set up it was down to .010” toe out.
So I cut the inner mount & did everything properly the out come is excellent & not what I would call major surgery.
The end result is at 2” of droop .010” toe in
1” drop .003” toe in
1” bump 0
2” bump 0
Toe in will add stability so its ok.
All these figures are with zero caster on the upright.
This is with zero caster
1.5-2 mm toe in.
1deg neg camber.
I have pretty much completed one side.
I have pics that might explain better.
This is how I went about it.
Pic 1 made a punch to mark the spot using bracket as guide.
Pi2 machined spud with thread & weld in hole.
Pic2 Make brackets.
Made aligning tool to locate rear brackets.
Pic3 links.
The front lower rose joint did go between the shock bracket & the upright.
To get it to line up to the chassis it had to be moved to the other side of the bracket & a spacer is fitted where it used to live.
I drilled all the link bolt holes in the upright to ½ “& put larger bolts.
If this can help anyone good luck.
Attachments

Last edited:
")