Widebody RCR40

Brian Kissel

Staff member
Admin
Lifetime Supporter
Dart heads are noted for core shift. Most of the Dart heads you see at swap meets are seconds. This certainly doesn’t guarantee that the ones you buy at the big stores or your engine builder will be good. I have sold a ton of Dart heads in the past and have run into it MANY times. That’s why they have a parts only warranty. The likelihood of a “accidental offset” is virtually zero. I have been dealing with them since 1987. I do still like their heads however.
Your results may vary

Regards Brian

Yeah, was pretty certain of core shift in the coolant passages that was cut into when they hogged out the ports for the 225 CNC. What a waste of money using their product. Was $1880 in labor and parts and they are willing to cover $95. If I build an engine again from untested parts I won't use Dart. They certainly aren't cheap heads at $1500 each in standard trim.
 

Brian Kissel

Staff member
Admin
Lifetime Supporter
Adam, just glad that you found out now instead of when you were out on a trip somewhere. I had a customer once that had about 200 miles on his engine before they started to leak. They were machined paper thin, but didn’t leak on start up.
Good luck with your next set, whatever you decide to put on it.

Regards Brian
 
Moving along to the final phase of the project. Car is now almost completely apart and I'm tying up some loose ends before paint and reassembly. As I'm disassembling (and making the car exponentially larger) a good paint strategy is becoming necessary. I'm planning on shooting the chassis first. Followed by rockers, spider, doors, subframes and secondary panels. I'd then get the car back together and wired/running. Set that aside and spray the front and rear clamshells. I'm working out of a 20X30 building so things are TIGHT.

The engine was finally brought to life and tuned. A few other issues from the Borla 8 stack. They didn't drill the fuel crossover fittings from left to right bank. and the pin outs on the idle air weren't correct but after that was rectified the engine made 575 hp and 490 something ft-lbs at 6500 RPM. Engine started to break up at 6800 RPM which was suspected as valve float. For a 363 built on a 4.125 bore Dart 302 I was happy. Wanted something to rev to 7k but DON'T need any more power.

Lastly, I was working on my pedals and couldn't find a lot of info on how people finished them off. Specifically, master cylinders, throttle cable, fittings, etc.

- Front brake master, .625 Tilton 76 series
- Rear brake master , .700 Tilton 76 series
- Clutch, .625 Tilton 76 series
- throttle cable- Lokar LOK-TC-1000U96 96" cable
- Wilwood -3 AN to 3/8-24 steel adapters. Don't get the Tilton ones they don't have the flange width to seal the crush seal.
- -4 AN to -4 AN unions plus crush washers

Some things to be noted about putting the stuff together. The area where the Lokar clevis attaches to the pedal needs to be a narrowed to .185 (ish) from the .250. Also, the top mount hole needs to be enlarged to .313.
 

Attachments

  • IMG_2182.JPG
    IMG_2182.JPG
    387.3 KB · Views: 934
  • IMG_2183.JPG
    IMG_2183.JPG
    406 KB · Views: 1,056
Need some help. Bought a Kennedy flywheel and stage 2 clutch and upon assembling it to the engine I found the flywheel contacts the RCR adapter plate. It seems to have about a .020 interference. I imagine the Kennedy adapter is thinner allowing the trans to sit closer to the engine. I ordered some flexplate spacers from JEGS to understand the spacing better. My theory is that because the adapter is thicker the flywheel should also be moved away from the engine accordingly. Either I move the flywheel out or things need to be remachined...

Anyone have a recommendation??????
 

Attachments

  • Flywheel space 2.png
    Flywheel space 2.png
    1.2 MB · Views: 854
  • Flywheel space 1.png
    Flywheel space 1.png
    777 KB · Views: 785
Found the issue. Kennedy machines a relief to clear the transmission's locating bead and that was not cut deep enough. I thought it was a Kennedy adapter plate vs RCR issue. The flywheel would have had the issue with their own adapter plates. So back it goes to Kennedy...
 
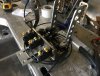
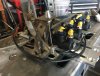
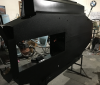
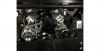
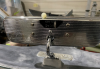
I've been busy for the last couple months, painting parts, assembling, and fighting the ever present questions of why I'm doing this. It's got pretty cold in Ohio so painting requires military like planning. Most of the paint I've been spraying has been SPI black epoxy, which like most is suited for 65+ deg. Very nice product as a durable chassis coating, much, much tougher than any top coat I've used. There was a last bit of mock up in placing the brake lines in the driver's foot well. The lines are designed for the right hand drive model but with some creativity can work for the left hand version. I hit everything with 80 grit and wiped it down with SPI's water based degreaser.

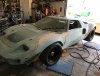
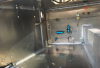
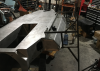
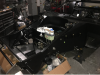
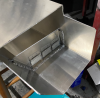
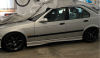
Before the weather changed in late Oct the goal was to spray the chassis, cage, many suspension parts, and some fiberglass paneling. I'm working out of a 2 1/2 car garage so it's a ballet of prepping parts, hanging drop clothes, moving things outside the garage to prevent overspray...etc. I originally planned to spray the chassis in halves (bottom then top) but after running the mental math I realized it would be better the spray it all with it placed on edge. I built some steel stands that grabbed the rocker panel lip and bolted to existing holes in the chassis. After shooting the epoxy I masked the chassis for Raptor liner. I sprayed that on the bottom, front wheel wells, and the rear (fuel tank) ends. I debated not doing the liner but figured in the end the 30ish oz's of weight is worth the added protection.

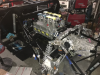
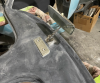
Once everything was sprayed (and this took a few rounds of tent building and spraying) I started on the assembly. One thing is certain, there is A LOT of random hardware to put this thing together. Strange lengths. Difficult to find configurations. All of that. Much was self inflicted due to the changes and additions I've made but none the less, a pain. Hats off to the people using large engines in this chassis. My 302 base is plenty big enough.


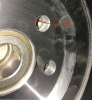
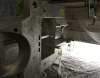
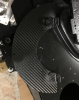
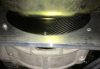
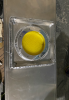
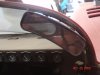
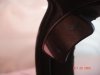
The last item I finished up last night was a carbon cover panel for the window in the adapter plate. I looked at the area and though it's be my luck to have something wedge up in there during a track day or something.
 

Attachments

  • Brake lines.png
    Brake lines.png
    872.3 KB · Views: 695
  • Flip fixture.png
    Flip fixture.png
    832.1 KB · Views: 674
  • Chassis on edge.png
    Chassis on edge.png
    1 MB · Views: 676
  • Painted chassis.png
    Painted chassis.png
    941.3 KB · Views: 727
  • Rear engine.png
    Rear engine.png
    1.2 MB · Views: 714
  • Front assembly.png
    Front assembly.png
    1.1 MB · Views: 749
  • Carbon fly cover.png
    Carbon fly cover.png
    595.3 KB · Views: 676
  • Carbon fly cover 2.png
    Carbon fly cover 2.png
    1,018.9 KB · Views: 724
Just finished reading through your build thread. Tremendous job so far putting you car together.


Thanks for the kind words.

Before this project was started I co planned something vintage to build that would be similar money. The other plan was a 70 'cuda coupe with Viper V-10/6 speed, Roadster Shop frame, integrated roll cage, big rubber, big brakes...etc. What hedged the decision was the idea of building something different that I could get done a little faster. I built a '55 Chevy Cameo pro touring truck before the RCR so it seemed like the opposite end of the spectrum. As things start to close out I think the car will be different but in no way was it faster than the alternative. Many of the things I thought would go smoothly didn't. Many of the things I thought would be sufficient from the factory weren't. Lessons learned. Experiences gained.

I have 4 and 7 year old sons so the goal is to start using the cars I have to give them some experiences to remember in hopes they will keep the hobby/profession going. I spend considerable time in the garage and very little time driving and participating in the car culture. I'd like to get back to that.
 
Mounting the engine accessories was more difficult than I anticipated. There wasn't enough room to run a single serpentine so I went with a dual row and mounted the AC compressor on the back and the alternator on the front. I also wanted some version of a Ford alternator to work but the 105A from a Chevy 4.8/5.3 LS was able to position itself better. I also hoped there were parts from various SBF alternator brackets I could make work but in the end I had to make all the parts. It's all hand cut 1/4" aluminum plate with some 3/4" pieces to act as adapters to the heads. Now I can focus on the getting the dash together...
 

Attachments

  • Eng ACC.png
    Eng ACC.png
    1 MB · Views: 753
Well, the world is shut down so I might as well post some stuff. Much of my time has been dedicated to getting the fuel tanks in. This should be a relatively simple process but not for me...! I put a 3 qt Accusump in the drivers side pontoon so that tank needed to be shortened by about 8". While I shortening it I thought about making it more of a "track oriented" tank with some trap door baffles. This probably isn't necessary (as I have a surge tank in the system) but while I'm in there, F it. I also wanted to add some ATL tank foam to keep the fuel from moving too much. That poses a problem with the RCR tanks as the largest openings are the fuel sender holes. So more self inflicted pain. I added some recessed cleanouts to insert and service the foam. Also, the fuel senders supplied with the tanks were too long. Speedhut claimed that shortening them to the correct length may damage them but I'm happy to report that they work properly after running through a recalibration.
 

Attachments

  • Baffle.PNG
    Baffle.PNG
    1.3 MB · Views: 572
  • Cleanout.PNG
    Cleanout.PNG
    992.4 KB · Views: 524
Getting the spider ready to shoot some epoxy on the inside I realized I didn't have a rearview mirror. I suppose something modern could be glued to the windshield but I like the look of the Lucas vintage unit. I found that the Jag XKE used the same mirror but the mounting was different. It needs to be mounted to the inner fiberglass but (unless you really bend the mounting rod) must be hung at about a 25 deg angle from that surface. So an aluminum block was machined and bonded to the inner fiberglass to act as that mount point. I got the mirror new from a company selling vintage Jag restoration parts. I thought it was going to be a Chinese knockoff but it was an actual Lucas from England.

Unrelated to the GT, I bought some new wheels for my E36 M3. Some Bimmerworld TA5R in dark gray. The weather is starting to improve so driving season is near.
 

Attachments

  • Rearview 1.PNG
    Rearview 1.PNG
    1.6 MB · Views: 550
  • Rearview2.PNG
    Rearview2.PNG
    1.9 MB · Views: 520
  • M3.PNG
    M3.PNG
    1.4 MB · Views: 552

Neil

Supporter
Adam,

I may have posted about mirrors before, if so I apologize for being repetitive.

I have a street- licensed Manta Mirage (tube chassis, 350 Chevrolet mid-engine, fiberglass body) that had outside mirrors mounted on top of the front fenders. These were totally unsatisfactory, the rear viewing angle was tiny and changing lanes was dangerous.

A long time ago there were many aircraft salvage yards here in Tucson and in one were a few F-86 Saberjets. I found that each F-86 canopy had a curved rear view mirror mounted inside so I removed a couple of them and paid a few $. They are metal mirrors with a slight convex shape which turned out to be a good replacement for the old mirrors. I mounted a mirror inside the windshield hoop on each side. Since they are not far from my eyes in driving position and with their convex surface, the rear & side view through the side windows is excellent.

I doubt that there are many F-86 rear view mirrors out there for sale but you might find something similar and try mounting them inside the front hoop.
 

Attachments

  • Manta2 RH Mirror a.jpg
    Manta2 RH Mirror a.jpg
    64.2 KB · Views: 535
  • Manta2 LH Mirror a.jpg
    Manta2 LH Mirror a.jpg
    37 KB · Views: 548
Getting the spider ready to shoot some epoxy on the inside I realized I didn't have a rearview mirror. I suppose something modern could be glued to the windshield but I like the look of the Lucas vintage unit. I found that the Jag XKE used the same mirror but the mounting was different. It needs to be mounted to the inner fiberglass but (unless you really bend the mounting rod) must be hung at about a 25 deg angle from that surface. So an aluminum block was machined and bonded to the inner fiberglass to act as that mount point. I got the mirror new from a company selling vintage Jag restoration parts. I thought it was going to be a Chinese knockoff but it was an actual Lucas from England.

Unrelated to the GT, I bought some new wheels for my E36 M3. Some Bimmerworld TA5R in dark gray. The weather is starting to improve so driving season is near.
Adam, lovely Lucas mirror. I assume it was from a company in the states
 
Back
Top