I got the Body from Chris Arden 440-983-0772 gt-reproductions.com He got it built in 6 weeks.Build is looking good. Where did you source your body from?

You are using an out of date browser. It may not display this or other websites correctly.
You should upgrade or use an alternative browser.
You should upgrade or use an alternative browser.
Alans Scratch build
- Thread starter hiiesalu
- Start date
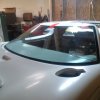
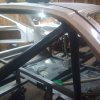
Got the glass in today and it fits nicely, next step mount and bond spider and doors, then recheck glass fit. Then I will store the glass in a safe place.Starting the welding jig squared up ends on the Hass using XYZ to make measurement. View attachment 106163
Attachments
Having GT 40 Fun
Tig welding the frame. Got an AMICO 225HF DC Tig welder for $359.00 (Ebay) and it works great.
BUT learning how to tig weld takes some time, i had a lot of stick welding time so that helped. It took 3 days and a lot of You tube videos to get a pretty good weld weld. Make sure you grind the metal clean, use acetone to wipe clean, use 90 to 125 amps for 1/8" steel grind your tungstun tip @ 30 degrees and do not touch the molten metal or your you will have to regrind.USE PURE ARGON GAS for steel. AND practice a whole lot. AND keep watching the YOU TUBE videos.
Attachments
Another good information or "trick" ;
Use stainless steel rods for material to weld , you will have a cleaner weld aspect and a much more efficient "mobilitiy " on welded areas ( those being always very stiff no problem at all )
Using those and welding properly ( say on variuos area depending on the frame evolution ) you will prevent alot of " warping" , bending and shrinking
bad effects
Be carefull too to check the temp of wires when welding long welds , you can damage internal connections of the tungsten holder ; those "cheap " welders are nice and Ok but with no water cooling they can live short cuts or watever connection issues when coming hot after long welding session at more than 90 amp ( say welding in one shot for more than 5mn !!)
Chek also frequently status of the wire end bolted to the minus ( tends after some monthes of use to delaminate and become hot ( so have to be shorten a little and bolted again after may be ayear or so
Just my 2 cts
We have been using Stainless steel rods for decades to weld steel chassis with a lot of sucess and absolutly no issues at all ; this is a trick many "old crocodile welders" have shown to us and since we have used this we noticed that warping and other surprising movment of chassis after welding had minimised a lot ( some of parts and chassis done like so have been used in long distance races with absolute success)
Burt as usual and as said on the previuos post it is only "my 2 cts" ...... So anyone doing his proper project can decide or not to do test to check what sort of improvment this expertise can give ........
Of course ; yes those rods are much more pricy .......
Burt as usual and as said on the previuos post it is only "my 2 cts" ...... So anyone doing his proper project can decide or not to do test to check what sort of improvment this expertise can give ........
Of course ; yes those rods are much more pricy .......
Like Mic, I too have been using stainless rod for about the last 45 years. I have experienced no ill effects from using it. Proper prep and heat and penetration and it's worked fine for me. Your results may vary.
Regards Brian
Regards Brian
That's pretty cool that it works so well for you guys. Nothing beats experience! The elongation is 10%+ more than steel filler....
Many ways to skin the cat. I remember when high end dragsters were brazed together.
Sorry if this got the thread off topic. You can learn so much from the highly experienced and talented people on here.
Many ways to skin the cat. I remember when high end dragsters were brazed together.
Sorry if this got the thread off topic. You can learn so much from the highly experienced and talented people on here.
I am going to stick with steel rod ER70S-2
Wanted to share my thoughts on the floor as there was not a lot about it, anyway having fun today with the GT 40 I got a sheet of 16 gauge steel for the floor and cut it into 5 squares 2 for driver, passenger 2 for rear motor area 1 for front suspension area. Each section (.057 thick) was welded to frame (.125 wall) since I am just trying Tig welding out. I would like to share these thoughts. Gas flow 15 CFH Amp 110 cup size #6 Radnor 1/16 electrode ground to 30 degree tip. I used an aluminium block to keep thin metal cooler and to hold it down. Otherwise it will warp real bad.
They welds look like they penetrated good and the pool of melted metal was clean with no bubbles or splatter, and the welds were nice shiny color.
The thickness at 16 gauge was nice and stiff and not heavy. I also did each weld about and inch with a 1/4 gap between each weld for crack out if that were to happen. I think I will send out a sample section to NDT testing for mag, just for fun to see if the welds are correct. Thanks for all your thoughts and suggestions.
Attachments
Thanks for that, I am sticking with steel filler rod. Building this car is a lot of fun.I would advise come caution and research before using a stainless wire to weld carbon steel. That can lead to some hot cracking, need proper ferite content, and mismatched strength and ductility issues. Also stainless steel filler is more expensive. Just a suggestion. Build looks great!
So far about 300 hours into the build
Thanks for the advice on stainless rod, for now sticking with steel filler but will try stainless down the road.Another good information or "trick" ;
Use stainless steel rods for material to weld , you will have a cleaner weld aspect and a much more efficient "mobilitiy " on welded areas ( those being always very stiff no problem at all )
Using those and welding properly ( say on variuos area depending on the frame evolution ) you will prevent alot of " warping" , bending and shrinking
bad effects
Be carefull too to check the temp of wires when welding long welds , you can damage internal connections of the tungsten holder ; those "cheap " welders are nice and Ok but with no water cooling they can live short cuts or watever connection issues when coming hot after long welding session at more than 90 amp ( say welding in one shot for more than 5mn !!)
Chek also frequently status of the wire end bolted to the minus ( tends after some monthes of use to delaminate and become hot ( so have to be shorten a little and bolted again after may be ayear or so
Just my 2 cts
hiI got the Body from Chris Arden 440-983-0772 gt-reproductions.com He got it built in 6 weeks.
which welding machine you use to tell me about it I have a site the name my welding yard on this site we collect the welding data or review and guide
from people
plz contribute with us and share your welding machine or plasma cutter experience
thanks
thankshi
which welding machine you use to tell me about it I have a site the name my welding yard on this site we collect the welding data or review and guide
from people
plz contribute with us and share your welding machine or plasma cutter experience
thanks
Hi John, The welder tis Amico Tig 225 H ($350.00) It makes very nice welds. Use straight Argon gas. I use 10 to 15 Cfh argon. Unit has Argon delay shut off for the end of weld (cooling) I started at 110Volt had to use higher amperage. At 220 volt much lower amperage. Unit will not pulse weld and is DC only so no aluminum.
Recommend getting a water cooled torch, after a short time it gets too hot. The one thing about tig welding is it takes a lot of practice and watch the You Tube vides if you have never done tig. When i was building frame I used a cheap Harbor freight wire welder ($200.00) to tack it all together when everything went together correct then I tig welded the frame
Recommend getting a water cooled torch, after a short time it gets too hot. The one thing about tig welding is it takes a lot of practice and watch the You Tube vides if you have never done tig. When i was building frame I used a cheap Harbor freight wire welder ($200.00) to tack it all together when everything went together correct then I tig welded the frame
thanks for contribute with usHi John, The welder tis Amico Tig 225 H ($350.00) It makes very nice welds. Use straight Argon gas. I use 10 to 15 Cfh argon. Unit has Argon delay shut off for the end of weld (cooling) I started at 110Volt had to use higher amperage. At 220 volt much lower amperage. Unit will not pulse weld and is DC only so no aluminum.
Recommend getting a water cooled torch, after a short time it gets too hot. The one thing about tig welding is it takes a lot of practice and watch the You Tube vides if you have never done tig. When i was building frame I used a cheap Harbor freight wire welder ($200.00) to tack it all together when everything went together correct then I tig welded the frame
Bryan Koehler
Supporter
I am using a Hobart handler mvp 210 Mig. And a Everlast power pro 256si tig stick plasma combo welder.hi
which welding machine you use to tell me about it I have a site the name my welding yard on this site we collect the welding data or review and guide
from people
plz contribute with us and share your welding machine or plasma cutter experience
thanks
GT 40 Fun
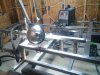
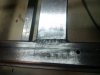
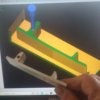
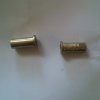
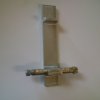
Working on door handles, I attached a copy of a Hass CNC program to make a nice set. Any machine shop could make them. Use a 1.250 X 1.250 X 5.750 stock to cut them out. (X Y zero is in the lower RH corner.) When fitting belt sand the front stop till it fits flush to door also sand rear stop to fit flush. machine 2 1.000 X 3/8 flange bushings as shown hold bore tight .250 to .251 and rough up od surface for fiber glass. Drill some small holes in door to get location close. I was a 1/4 inch off. The fiberglass fixes that. Use a long 1/4 20 stainless steel cap screw with a lock nut as shown. Glass in bushings and before it sets make sure handle is in correct position for open close. Note the rear boss will act as a stop so handle only open about 3/4 of an inch sand to fit. In my case this is very strong and will never wear out. Thanks for all your advice and input on this build.
Working on door handles, I attached a copy of a Hass CNC program to make a nice set. Any machine shop could make them. Use a 1.250 X 1.250 X 5.750 stock to cut them out. (X Y zero is in the lower RH corner.) When fitting belt sand the front stop till it fits flush to door also sand rear stop to fit flush. machine 2 1.000 X 3/8 flange bushings as shown hold bore tight .250 to .251 and rough up od surface for fiber glass. Drill some small holes in door to get location close. I was a 1/4 inch off. The fiberglass fixes that. Use a long 1/4 20 stainless steel cap screw with a lock nut as shown. Glass in bushings and before it sets make sure handle is in correct position for open close. Note the rear boss will act as a stop so handle only open about 3/4 of an inch sand to fit. In my case this is very strong and will never wear out. Thanks for all your advice and input on this build.
Attachments
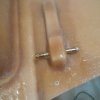
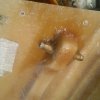
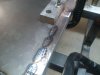
Rough up od of bushing before glassing in to prevent rotation of bushingsGT 40 Fun
Working on door handles, I attached a copy of a Hass CNC program to make a nice set. Any machine shop could make them. Use a 1.250 X 1.250 X 5.750 stock to cut them out. (X Y zero is in the lower RH corner.) When fitting belt sand the front stop till it fits flush to door also sand rear stop to fit flush. machine 2 1.000 X 3/8 flange bushings as shown hold bore tight .250 to .251 and rough up od surface for fiber glass. Drill some small holes in door to get location close. I was a 1/4 inch off. The fiberglass fixes that. Use a long 1/4 20 stainless steel cap screw with a lock nut as shown. Glass in bushings and before it sets make sure handle is in correct position for open close. Note the rear boss will act as a stop so handle only open about 3/4 of an inch sand to fit. In my case this is very strong and will never wear out. Thanks for all your advice and input on this build.
GT 40 Fun
Working on door handles, I attached a copy of a Hass CNC program to make a nice set. Any machine shop could make them. Use a 1.250 X 1.250 X 5.750 stock to cut them out. (X Y zero is in the lower RH corner.) When fitting belt sand the front stop till it fits flush to door also sand rear stop to fit flush. machine 2 1.000 X 3/8 flange bushings as shown hold bore tight .250 to .251 and rough up od surface for fiber glass. Drill some small holes in door to get location close. I was a 1/4 inch off. The fiberglass fixes that. Use a long 1/4 20 stainless steel cap screw with a lock nut as shown. Glass in bushings and before it sets make sure handle is in correct position for open close. Note the rear boss will act as a stop so handle only open about 3/4 of an inch sand to fit. In my case this is very strong and will never wear out. Thanks for all your advice and input on this build.
Attachments
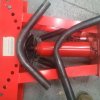
The Dreaded Harbor Freight tube bender.
That is what the You Tubers call it, any way I wish they (harbor freight) would test the bender before selling it.
It can work, as sold it will kink tubing. How ever if you grind the 1.00 die as shown to fit a 1.500 dia exactly, it will bend a very nice part. Bend in steps say 1" 2" 3" right of center 1" 2" 3" left of center, 5 to 10 pumps and move.
The 1.500 dia die is way too big and as you bend your tube it will flatten and expand to say 1.600 dia and kink. Buy some cheap 1.500 dia tube to test your set up and if good the use DOM .130 X 1.500 tube approved for roll bars.
Order the following dies get 2 they are cheap
32888/38024 1IN BENDING DIE | 23049 | 1 | $6.80 | $6.80 |
Attachments
Similar threads
- Replies
- 7
- Views
- 852
- Replies
- 10
- Views
- 1K
- Replies
- 15
- Views
- 1K