Doug’s RCR Jaguar D Type Build.

Doug M

Supporter
For many reasons, such as getting in and out with an artificial leg, theft deterrent, etc, the removable steering wheel adapter provided by RCR is quite nice. But, the Nardi wheel options aren’t as historically accurate for my taste. I don’t like the ‘T’ shape spokes that were common on the E Type wheels. I’ve seen pictures of many replicas using them and, personally, I think they just look weird.

I bought a beautiful 16” OEM D Type steering wheel and steering wheel boss from Moto-Lita in the U.K.

https://www.moto-lita.co.uk/steering-wheels/jaguar-d-type-oem/?filters=46

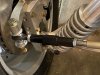
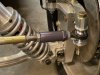
Long story short … After many moons of web searching, I was unable to find an adapter or easy way to mate the Moto-Lita wheel to the RCR provided 3/4 DD steering shaft, so I took a chance with my below average fabrication skills and started chopping metal. I sliced off and sanded down the top part of the Moto-Lita boss so it would fit flush on the RCR quick release hub. I then clamped the pieces together and drilled nine holes into the hub using the Moto-Lita boss as a guide. Hooked it all together with 10-24 x 1 inch bolts anDremeled off the excess.

Side note : I found the square nuts in my container of old leftover nuts and bolts… there’s a reasonably good chance they came from the Erector Set (Mecanno) I had as a child. Seemed rather fitting.

Anyway, very happy with the results… functional, yet looks very period and proper.
397F87F8-4443-4BB7-B7C7-93FBAAC27DD2.jpeg
849EADC4-B2FB-4AB3-940C-62BF1B85325B.jpeg
6F1A5167-086F-46FC-A357-59922AC1EB80.jpeg
246C863C-3043-43DF-A68C-1D6A421291E0.jpeg
38CBC130-ADE8-4D80-98D2-1508AA91FA8D.jpeg
40A8DCBC-49C1-4B10-B26D-079BCC26AE80.jpeg
 

Doug M

Supporter
Doug, I wouldn't trust those square nuts on a tricycle!
I appreciate that. They’re thread-locked on and are only there to keep the bolts from falling out. The stainless steel bolts only get lateral stress, and the work load is divided nine ways.
 
Except.....steering wheels are not only subject to steering (rotational) loads.
There can be a lot more going on! Situations which can be combining the shear loads with other loads.
 
Too late now, but could you not have tapped the holes in to the hub, rather than a through hole and a nut on the back?

You could get 2 C shaped pieces of 8 mm ally laser cut and tap those though.
 

Doug M

Supporter
That’s a good idea, but anything too thick and it interferes with the hub quick release action.

Thank you all. The input is appreciated. There’s nine bolts, and they were all torqued down with my NM wrench and they didn’t budge, strip, cone, etc. I will revisit this and look into upgrading the nuts before I take it out on the road at speed. I’ll add it to the list of winter tasks. For now, they will do the job.
 

Doug M

Supporter
I decided to order a customized fuel tank from RCI. The one provided by RCR is an off the shelf model, and while it’s a perfectly fine product, in my opinion, the design and layout is inefficient and potentially problematic because of the solid back-end of this D Type kit. It would be a major disassembly job to remove the fuel tank if it ever needed to be replaced. Also, because of the layout, it would be a challenge to replace a line or faulty fuel level sender on the stock RCI tank provided by RCR.

The tank I ordered is 35x17x7 inches instead of the stock 30x17x7. This gives me three extra gallons of gas, and the extra width fills in what was originally wasted space between the tank and the fender/trunk panels.

Additionally, all of the connectors and
sender opening have been moved from the center area to the corner so they can be easily accessed via the hole underneath the headrest hump.

Also, I took a page from the B.O.C. and made a tank support structure similar to Chucks, though the width between supports is a little narrower and I used tank straps from RCI. Support pieces were made with 1.5 inch square tubing and each are connected to the tub with three 1/2 inch Grade 8 bolts. The 110 degree angle Chuck provided is perfect.
08726077-3C0D-4368-A151-77ECCFE2D3A3.jpeg

8C30F9A1-1EAF-4F10-8662-D106A7F25257.jpeg
DCA2A484-8A62-4A28-8C23-A030C95CF99A.jpeg
88091551-2E83-484B-ADB2-C113D22A3D6D.jpeg
 

Doug M

Supporter
Even though I’m forced to use an automatic, I’m still wanting my D Type to look the part when sitting still. Since I’m using a transmission from a Series 2 XJ6 sedan, it made sense to just get a gear selector from a Series 2 XJ6 sedan. David at EverydayXJ.com had the part for a great price.

A B&M shift cable connects the two with almost zero modification. Also got a bent shifter rod and gear knob from Moss motors. These things will all fall into place eventually, for now, a lot of experimenting and test fitting.

E2BB96A5-74B4-45FE-A332-9D4CEC86A8E6.jpeg
 

Doug M

Supporter
Tech question for you fine folks. I attempted to align the front wheels to be reasonably close to straight, and in order to do so, I basically extended the rod ends to the point where they’re only hanging on by a few threads. Surely this cannot be right. Are there any other methods for adjusting the rod length? I thought I would ask you all before I loosened or removed the steering rack rubber boots.

Another option might be to replace the 2 inch threaded sleeves with longer ones, but I can’t seem to find any in the 1/2-20 threads.

0E842770-01F3-4D47-BF6C-454A5EEFC7BB.jpeg
 
Look at Summit, Billet Aluminum Tie Rod Sleeves. They have many options. Also on Amazon, MOOG ES3368S Tie Rod Adjusting Sleeve $13.58
Good luck
 

Doug M

Supporter
Thank you. I finally found a good quality set that should do the trick.
 

Attachments

  • 6957CC71-3CE8-4CF6-A51D-1E72E719ACB4.jpeg
    6957CC71-3CE8-4CF6-A51D-1E72E719ACB4.jpeg
    337.9 KB · Views: 151

Sean S.

Supporter
Thank you. I finally found a good quality set that should do the trick.


Hi Doug,

It looks like you have it sorted out, but wanted to offer another solution especially if you need a longer rod in the future. You can get the tube adaptors to fit chromoly tubing to make them any length you want.


Chuck

Supporter
Doug

Not to beat a dead horse, but you might want to take a look at my posts from a couple of years ago on the steering bump steer issue. I suspect RCR is using the same steering rack as came with my car. To address the bump steer issue the pivot point between the outer tie rod and the steering arm needs to be extended. As noted in a post on November 9, 2020:

";The steering arm extending straight forward on original D Type is an excellent means of addressing Ackerman geometry. But next we have to figure out how to keep the desired tie rod length of approximately 9 inches to minimize the bump steer. The solution is to extend the pivot points on the steering rack outward approximately two inches."

Here is a picture of what we used to extend the pivot point:

IMG_7965.jpg


This is a Heidts Rack and Pinion Extension Kit MP-037-4, available from Summit. (Discussed in post on November 1, 2020)

So why this long discussion?

By adding these extenders you are addressing the bump steer issue inherent in the RCR design and at the same time closing the gap shown in your pictures. Hope this helps.
 

Doug M

Supporter
Chuck, a thousand thanks. Your expertise is always welcome and I often find myself going back to your build log to consult the ‘Book of Chuck’. I might go so far as to suggest that you edit your very first post to include an index to make things easier to find. =)

I’ll certainly take your advice. I ended up using a combo of parts from two different kits, but the upside is that they are now parallel threads, so I can adjust the steering angle with just a wrench.

I also did a search on YouTube, and learned a lot from this video about extenders. I will certainly be making the upgrade you suggest.


Attachments

  • F1E45AAD-5C59-44E9-B713-B05294AF4471.jpeg
    F1E45AAD-5C59-44E9-B713-B05294AF4471.jpeg
    407.5 KB · Views: 95
  • D9C2738E-5573-46C7-BF8F-5E94CB8E7016.jpeg
    D9C2738E-5573-46C7-BF8F-5E94CB8E7016.jpeg
    417.2 KB · Views: 82

Neil

Supporter
Chuck, a thousand thanks. Your expertise is always welcome and I often find myself going back to your build log to consult the ‘Book of Chuck’. I might go so far as to suggest that you edit your very first post to include an index to make things easier to find. =)

I’ll certainly take your advice. I ended up using a combo of parts from two different kits, but the upside is that they are now parallel threads, so I can adjust the steering angle with just a wrench.

I also did a search on YouTube, and learned a lot from this video about extenders. I will certainly be making the upgrade you suggest.


Good information.
 

Doug M

Supporter
I was running out of room in the transmission tunnel, and after much staring and head scratching, it occurred to me that since I have to build a small platform for the gear selector anyway, why not just make it the length of the opening and build it so that it could be removed with a few minutes of work.

I sent some measurements and a template to my local metal place and they made the pieces out of 3/16 aluminum. Two pieces with a 90 degree bend of 1 inch ‘lip’ material which doubles up the inside walls of the transmission tunnel and one flat top piece which keeps lines, wires, cables, etc away from the spinning driveshaft.

Because I only have my right arm and it’s a right hand drive car, having the brake handle on the stock left side would be inconvenient and almost useless in an emergency. Having an emergency brake handle on the right side would not only get in the way, but would be tough to link up and be reliable. Also, there’s not enough room in the footwell for a foot activated one. So, I opted for an electric emergency brake for safety and aesthetic reasons.

Side note… the modification to to the XJ6 gear selector went easier than I thought it would. With a proper sized shift boot, it should look reasonably like a stock D Type setup.

So anyway, as for the two tier transmission tunnel… it might be a tougher fit for you all using a stick shift, but feel free to copy my idea if it helps you.

FD3DA3B6-2926-46ED-BB84-08AEF36DC2AC.jpeg
ADDB5037-CCF3-45C0-BCA6-E1653EF88A2A.jpeg
C29A41C3-8D9F-42B6-8061-D82DB32F0825.jpeg
 
Back
Top