A.J.'s SL-C build thread

Scott, that is a very sweet Merc! Excellent color. Incidentally I have switched my powertrain choice over to the 1UZFE. I think you and I are going to be playing in the same sand box.

Yes Pete, there's a nice concentration of SLCs in the area. I dream of the day we can all do meet-ups, much less track days. But I can't get ahead of myself, gotta stay focused...

I'm sitting in the car drinking my morning coffee and the ideas are coming faster than I can process them.

Time to get to work. Inventory done, back to removing the adhesive from the body. There HAS to be a better tape to use that doesn't cause hours of labor removing the residue. By the way, Goof Off works well, but it's still time consuming. Not to be confused with Goo Gone. The former is a solvent (good, powerful), the latter is citrus based (sucks).

A.J.
 
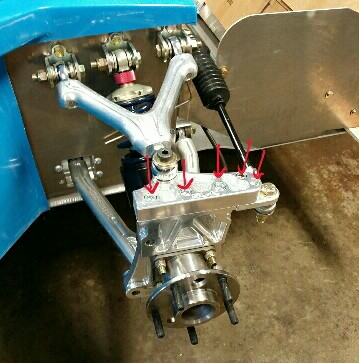
The build manual says to put washers under every nut and bolt. Even the recessed bolts that are flush with the surface?
2015-05-171.jpg
 
Yes. Not using washers will almost always gall the aluminum underneath. You can find washers that are exactly the size of the bottom of the head, and if they are difficult to find, grind down a set with a grinder.
 

Fran Hall RCR

GT40s Sponsor
AN washers are very thin and small and will fit under the heads of the bolts you point to.

If you are going to that extreme you will want to use bolt assembly lube too...or as I recommend for those bolts, red Loctite as you wont be undoing them again for any reasonable reason....:thumbsup:..

AN hardware is available from any good nut and bolt supplier or from Pegasus Racing.
 
I am probably going to make my own intake based off of an itb kit, so I will probably be selling the custom billet intake that is on my 1uz now. Will hit you up to see if you have any interest in it.
 

Dr. David

Lifetime Supporter
A washer under every bolt and nut is a must, particularly with aluminum billet parts. AN aircraft-spec washers generally come in two thicknesses, .032 and .063, although those in stainless steel are more variable, but are reported and precise. Aircraft Spruce and Allen's Fasteners are other vendors, as well as Pegasus. Do yourself a favor and buy an assortment kit from Pegasus. Comes with an assortment of both thicknesses. You can use them everywhere. They are so precise you can use them to adjust the clearances for things, such as clutch slave cylinders.

Just my opinion,
David
 

Fran Hall RCR

GT40s Sponsor
They are included all over the car...not AN though.

AJ is pointing to an area where we don't use them as those bolts get locked in place and there is no reason to remove, hence my comment about locktite.
 
Excellent info, thanks.

Scott, I never did look at your motor :-( Troy is also doing the 1UZFE and will be handling the custom work. Intake, exhaust, etc. You may get with him to share ideas.

Fran, that bolt already had anti seize on it...? I don't see what a washer will help on that application if it's never going to come back out (galling). Not like its going to distribute the clamp load any better. I'm not sure I can clean off the anti seize thoroughly enough to ensure the thread lock bonds properly. Maybe I'll soak em ;-)

A.J.
 
Just for the record, I was overreacting to the build manual with regards to the washers and torques. There's a bit of cya built in to the statements in the manual. Everything on my car is correct, I didn't wind up adding any washers. I did become intimately familiar with all the bolts and screws, which is the ultimate intent. And I used red loctite on the permanent joints.

A.J.

As I've learned through my build... There's always a lot of anxiety about "do I do this right??!!!" but in the end... It all works out.
 
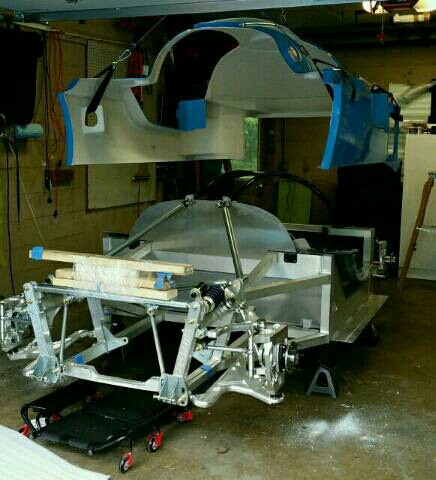
I got the body off this weekend using a pulley system. Being single has its obvious advantages during a build, but there are one or 2 disadvantages. One is I have to be able to lift the body off by myself (check!)

hang.jpg


I'm aware this is potentially bad for the body and wondered where it might be necessary to support the shape of the body. Typically I read about bodies sitting on the ground that sag and are widened, which need to have the width maintained. In my situation it looks like the sides are brought together. Will this still need to be spread apart? I hope not, because working under it won't exactly be convenient, and having supports going across will be far worse. I have the front clam stored upright with the nose in the air, and the rear clam is also vertical, the bumper/spoiler area sitting on 2 dolly carts. I don't expect much dimensional change there either. Space is a premium and I can't store the body in car position all taped together as recommended. I left the front and rear window cutouts in place for strength.

I cleaned out the fuel tank, making sure there are no shavings inside. I only heard a few moving around before starting. I rinsed it with a hose, then set it on end and ran water through it trying to move any shavings to the lowest point. Then I sucked out the water with a commercial vacuum (ninja) and inspected all 3 chambers with a video inspection camera (illuminated video camera on the end of a 2' cable). No shavings! Next is a pressure test, though I have no idea where to have that done at this point.

My son helped me with the Second Skin Damplifier. Allen recommended I get the "seconds" material at a substantial discount. I have 40lbs to use. Considering the fact that I spent the weekend driving at Grattan - and met Garry, his son and the rotary beast - I'm pleased I got done as much as I did. Garry did mention that he has issues with the interior tub moving around and squeaking, so I will be sure to bolt mine down somehow for NVH :thumbsup:

A.J.
 
I'd add a sort of platform to the bottom of the body, so it was being held up by that, similar to how it would be when actually mounted on the car. Just a couple of 2X4s would probably do it.

OTOH, I stored mine on the wall of my garage, hanging from the top, for some time. It didn't seem to have a really detrimental effect.

I've heard of cases of FG bodies being a bit out of shape in the past; the solution advanced was to get the body out in the sun (works when you are in FL in August, I guess), form it to the right shape with weight bags or similar, and let the heat do the work.
 

Howard Jones

Supporter
I don't think I would let it hang like that for months on end but a few days at a time won't hurt it. I would, however, just lower it back down in position whenever the process allows or when you intend to take a few days off from working on it.

When I had mine off for a couple of months I cut a piece of 1X1 90 degree aluminum angle to the same length as the width of the mount points would otherwise be and screwed the center section to them at the front and back corners across the bottom of the body. The real danger is breaking it by accident, it can be very weak in some places when unsupported like that.

Here's a picture. Wear a ball cap to save you noggin. Better that trying to fix a broken center section.
 

Attachments

  • HPIM1563.jpg
    HPIM1563.jpg
    171.1 KB · Views: 635
I don't think I would let it hang like that for months on end but a few days at a time won't hurt it. I would, however, just lower it back down in position whenever the process allows or when you intend to take a few days off from working on it.

When I had mine off for a couple of months I cut a piece of 1X1 90 degree aluminum angle to the same length as the width of the mount points would otherwise be and screwed the center section to them at the front and back corners across the bottom of the body. The real danger is breaking it by accident, it can be very weak in some places when unsupported like that.

Here's a picture. Wear a ball cap to save you noggin. Better that trying to fix a broken center section.

That's sort of what I was talking about.

The GTM guys, perhaps because this is common with the Cobra builds from the same company, often build complete body bucks to hold the body while they are working on the chassis.

Allan has specific bucks for the SLC body parts that he uses when doing bodywork as well. It's a great idea, both for storage, and as a platform for working on the body.

If I were building a body buck (as opposed to just trying to store the pieces somehow, which is the OP's point), I'd make it so the roof was supported, and the sides were mounted in the same position as they would be on the chassis (meaning, not allowing them to flex in or out).
 

Michael Fling

Supporter
If you have the space... this works well. Body sits into pins that are at exactly the width when the body sits on the chassis. The body is supported in the middle so that when fitting doors/door motors or doing bodywork, it is well supported. On wheels for easy movement.

IMG_6732.jpg
 
If you have the space... this works well. Body sits into pins that are at exactly the width when the body sits on the chassis. The body is supported in the middle so that when fitting doors/door motors or doing bodywork, it is well supported. On wheels for easy movement.

IMG_6732.jpg

Nice job!
 
Back
Top