I might try to tweak the doors in-out...depending on what is needed, as long as that doesn't affect my door seam or roof line too much. I'm thinking I'm going to have to do a creative cut and reposition for the clam corners so that I don't have to build up the fiberglass too much on the clam corner or the doors.

You are using an out of date browser. It may not display this or other websites correctly.
You should upgrade or use an alternative browser.
You should upgrade or use an alternative browser.
And so it begins...the AP build.
- Thread starter jlwdvm
- Start date
Lots of steps to get the front clam rocker latches mounted in the right spot, and then getting the latch mounted to the clam. Back and forth around the front of the car about a hundred times trying to get everything symmetrical…even though you can only see one side at a time! I mount the latch to the rocker first, then make sure the angle is correct prior to mounting the latch to the clam with fortified epoxy. Sanding starts tomorrow.


That’s looking so good! Good job!
The front clam clamps and pins function as they should, but the clam sides where they meet the door are rather flimsy. I know some original cars had bracing up the leg that tied in with the top of the clam. That’s on the agenda after I get the top corners where the clam meets the doors figured out.
….and we clamp. My car was shipped without inner bracing on the A-pillars, since it also originally came with a roll cage. Chris shipped me an inner roof panel and A-pillar pieces after I inquired about finishing the interior. I started by getting them fitted using a little heat and clamping. In case I need to sand the windshield surround, I filled the inner cavity with fortified epoxy. Probably overkill for the amount of sanding I might have to do, but might as well do it while the area is exposed. I suppose it might add a little strength and stiffness too.
I also checked proof of concept for the new rad support area. Definitely couldn’t do this with the original design. I almost wonder if RCR car front ends are strong enough to use as a jacking point, or tow hook mount.
Devin
Supporter
Looking good Joe, keep up the good fight!The front clam clamps and pins function as they should, but the clam sides where they meet the door are rather flimsy. I know some original cars had bracing up the leg that tied in with the top of the clam. That’s on the agenda after I get the top corners where the clam meets the doors figured out.
….and we clamp. My car was shipped without inner bracing on the A-pillars, since it also originally came with a roll cage. Chris shipped me an inner roof panel and A-pillar pieces after I inquired about finishing the interior. I started by getting them fitted using a little heat and clamping. In case I need to sand the windshield surround, I filled the inner cavity with fortified epoxy. Probably overkill for the amount of sanding I might have to do, but might as well do it while the area is exposed. I suppose it might add a little strength and stiffness too.
I also checked proof of concept for the new rad support area. Definitely couldn’t do this with the original design. I almost wonder if RCR car front ends are strong enough to use as a jacking point, or tow hook mount.View attachment 153691View attachment 153692View attachment 153693View attachment 153694View attachment 153695
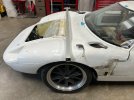
With the frame ride heights even side to side just inside the front wheel well, the front clam fender tops and wheel lip heights are off side to side. Driver is 28 1/2” to the top and wheel lip is 25 3/16”, while the passenger is 28” and 24 3/16”. Wondering if this is something I should chase down and get measurements as close to equal side to side, or if it is just compounding differences from the frame maybe being off, the front clam molds being off, warpage, things not being symmetrical from the start, etc. I should probably just quit measuring!


Attachments
Devin
Supporter
I’ve learned my lesson on measuring too much…first off make sure your tire pressures are all good and the ride height from corner to corner. IMO after all the panels start looking like they fit together nicely, all that matter really is our obsession with symmetry LOL. I did learn on my Cobra replica that any cars prior to the 70s were notorious about asymmetrical sides especially on these hand built cars.
All that being said, I’m going to measure those same points on my project to see how they compare.
All that being said, I’m going to measure those same points on my project to see how they compare.
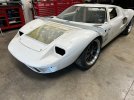
As far as I can tell, the front clam needed to swoop in the meet the front of the door (that should have a subtle curve to it). I first applied heat and pressure, but that didn’t work. Since the upper corner was going to need a lot of work to get it shaped and gapped to meet the door and lower spider, I decided to cut it off. Then with a few strategic cuts, heat, clamps, and fortified resin, I think things are moving in the right direction.


Chris Kouba
Supporter
I almost wonder if RCR car front ends are strong enough to use as a jacking point, or tow hook mount.
Definitely not as built.
It will be a while before I need these, but wanted to verify that they will work. It also looks like the filler caps will visit too low if mounting the chassis in its current state. I still think there is a possibility my chassis wasn’t built high enough in the dash area because everything has to be propped up with significant spacers to fit properly.


.....right, but why does everything want to sit higher than the top of the chassis? If the chassis was raised 1-1.25", the lower windshield lip would then sit on the top of the chassis and be in the correct spot with out the spacers. I'm either going to widen the lower lip to make it higher, or raise the top of the chassis in the dash-foot box area.
I ordered mine with tanks, filler caps, and hose...but no mounts came.
How do your lower spider corners under the windshield fit the chassis? Do you have to use a bunch of spacers...or does the fiberglass frame of the spider under the windshield look taller than mine?My AP car came with a mount that raises the cap about 1" It's a piece of aluminum that's bent _|--------|_ without the top part of the verticals and a tube welded to the middle of the top part.
Right now, mine is all apart, but I do recall the spider only having maybe 1/4 to 1/2" worth od spacers.
My body came sort or roughly mounted to the frame, and all margins were reasonably in range of what I though would be a easy fitting.
But now that it's been apart and stored here and there, I'm a more concerned I'll have some headaches coming when I get there.
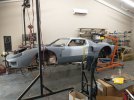
Here's a pic of it being unloaded from the trailer 4 years ago.
edit- BTW, mine is the 4" stretch model.
My body came sort or roughly mounted to the frame, and all margins were reasonably in range of what I though would be a easy fitting.
But now that it's been apart and stored here and there, I'm a more concerned I'll have some headaches coming when I get there.
Here's a pic of it being unloaded from the trailer 4 years ago.
edit- BTW, mine is the 4" stretch model.
Attachments
Similar threads
- Replies
- 11
- Views
- 2K