Ball Joint Drilling

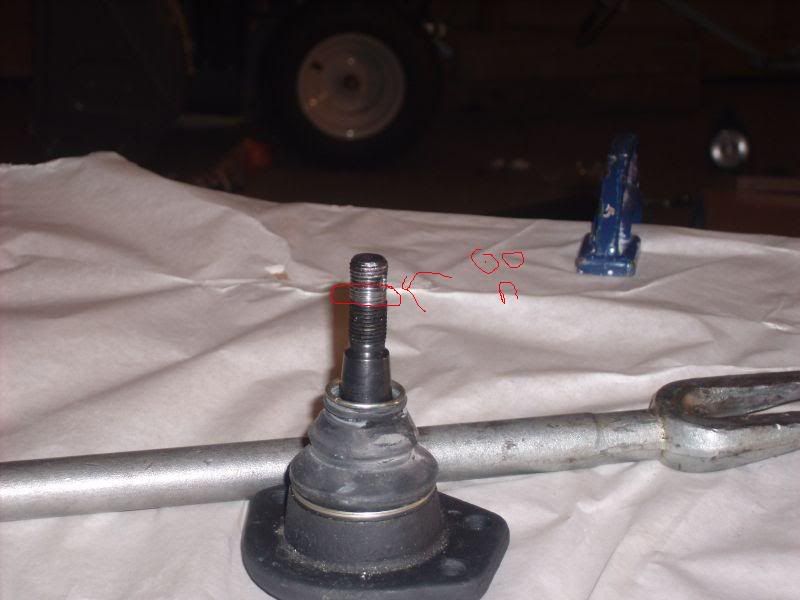
Quick question, what would you use to drill the hardened stud coming out of the ball joint to pin the castle nut. The pre drilled holes are 1/2" above the castle nut. Titanium, Cobalt?
I've heard these are difficult/pain in the ass to drill.
In the rear i could add a 1/2"-20 grade8 nut to get the height right. Is this a bad idea due to most of the weight of the car being on this joint?
 

Attachments

  • ball joint stud.jpg
    ball joint stud.jpg
    38.7 KB · Views: 510
Maybe forget the cotter pin idea and drill a hole in a nut for safety wire? Use a different nut - like a nylock, or better yet, a nut with a serrated belleville washer and then the safety wire.

That jam nut on the bottom of the pushrod there is loose too - but you probably already know that. Just in case!:blank:
 
Get to work on the lathe & make up a single thick spacer/washer that puts the nut at the correct height...... Might pay to look thru the bag of tricky bits from RCR just in case they are already in there though.
 
All,
If someone can get correct measurements of the machine spacers needed for all ball joints, I can have a friend make up a bunch for us.

Do the fronts need the same thing ? (not on my radar yet).
 
All,
If someone can get correct measurements of the machine spacers needed for all ball joints, I can have a friend make up a bunch for us.

Do the fronts need the same thing ? (not on my radar yet).

Mesa, yup the front studs pre drilled holes are off too. the only problem is the hubs are in the front are much closer to the end of the stud. see pic. I can't even get a jam nut on there or the castle nut off. I'd rather not yank the hub or ball joint off but is that easier then drilling hardened steel in place?

A spacer in the back would be great except there is limited height to get a spacer of the right height on. Stacking 2 grade 8 washers and nylocking might be in my future in the back.

What do you guy think is best in the front?
 

Attachments

  • front hub.jpg
    front hub.jpg
    47.1 KB · Views: 363

Howard Jones

Supporter
The first time I looked at this I thought flat square plate of correct thickness with hole in it. Slide it into place with "balljoint bolt" out and then reinstall. It won't rotate or move around, has a nice big surface loading area and would "look right".

Fran.........got any of thouse laying around that CNC machine?

Howard, sounds like a nice solution in the back. in the front the castle bolt is stuck. What do you think the success rate would be to drill that front 1/2"-20 hardened bolt in place?
 

Howard Jones

Supporter
Jac, It might not have enough clearance to the wheel. It's pretty tight already. If it does your idea would work just fine. Top or bottom, shimming is how I'll do it more than likely.

Cam, It would be doable to drill a hole if setup in a drill press and a V-block. But I don't think I could do it square on the car. Also the correct bit for the material would be necessary. My GUESS is the stud is at least grade 8. You might go through a few to do 4 holes at that small of a diameter.

Shimming isn't a bad idea. As in Jacs. I think a nice hard material and a wide shoulder would be best if it goes under the bolt. I don't particularly like stacking washers, one piece would be better, at least thats what I think.
 
Jac, It might not have enough clearance to the wheel. It's pretty tight already. If it does your idea would work just fine. Top or bottom, shimming is how I'll do it more than likely.

Think you might not have a handle on what I meant Howard... I meant remove the lower block from the upright assy in order to get a ring spanner/socket on the ball joint stud ( I assume it bolts on with capscrews etc from underneath). Then while its off make a thick washer or your square block/washer setup to bring the nut up to the split pin hole.

Fitting a spacer in the manner you appear to have picked up on in my post would mess with the roll center height etc..

The lower ball joint I assume is from a Vette which in production form fits into an alloy upright & is quite robust at that point & the nut would not sit as far down the thread.
 
Cam, you'll hate life many times over if you try to drill it. Go try drilling a grade 8 bolt first before doing it on the balljoint. You'll see what i mean - no fun!

This seems pretty easy to me.

-stack washers
-tighten down castle nut
-insert cotter pin

balljoint.jpg


The lower ball joint I assume is from a Vette which in production form fits into an alloy upright & is quite robust at that point & the nut would not sit as far down the thread.

No, it's from some chevy 4x4. I forget now, but it's not corvette.

I still can't understand though how the threads are so weak. Usually lower bjs say to torque to 100ft-lbs, or 30ft-lbs+270* ... well, at 50ft-lbs he was fine. At 60ft-lbs he was not so fine....... :/ (4threads completely ripped off the stud)

You'd think it would be able to handle more than 60ft-lbs before stripping since it comes from some american-built 4x4?

bj1.jpg
 

Seymour Snerd

Lifetime Supporter
I still can't understand though how the threads are so weak. Usually lower bjs say to torque to 100ft-lbs, or 30ft-lbs+270* ... well, at 50ft-lbs he was fine. At 60ft-lbs he was not so fine....... :/ (4threads completely ripped off the stud)

You'd think it would be able to handle more than 60ft-lbs before stripping since it comes from some american-built 4x4?

Wow, that's doesn't look right. Bad nut? Did the nut spin on nicely before torqueing? Defective metallurgy in the stud? Made in China/India/...?
 
30 ftlb then 270 deg or 100 ft lb,I think that sounds way to high, I dont use a torque wrench on any of that stuff, it is second nature to me but I think you will find that once it has nipped up with light force you would go another 1-2 holes on the castleated nut at most.

In my head that is more likely 20-30 ft lb plus 60-120 deg depending where the castle lands and you always tighten to the hole for the pin, never back off (bad karma).
Its in a tapper it doesnt have to have the snot tightened out of it.

If you do want to drill them they are not that hard,if they are I use masonry drills and resharped to suit (remove the back rake)

As Jac said machine some collars. S/Steel with a 45deg tapper it will make it look like you care.

Jim
 
Last edited:
If you can file the thread you can drill it. The speed have to be low otherwise it is quite easy to work hardened. If you drill on the drill press it will be a lot easier to control the feed. You need some cutting oil for drilling. Metric , UNC and UNF thread angle 60 deg drill point 118 deg. If you have never drill before I would like to suggest that you drill through the nut. Hope this will help.

LIM
 
30 ftlb then 270 deg or 100 ft lb,I think that sounds way to high, I dont use a torque wrench on any of that stuff, it is second nature to me but I think you will find that once it has nipped up with light force you would go another 1-2 holes on the castleated nut at most.

From what I can recall, cobra is 100ft-lbs, corvettes are 30+270* (but then again, both are using locking nuts and not a castle nut with a cotter pin)
 
It's the taper that firmly holds the ball joint post to the upright, not the nut. That's why you typically need a ball joint breaker bar or hydraulic press with fingers to get them apart after the securing nut has been removed. In other words, that nut, and the threads, don't actually have to take a lot of pressure.

A cotter pin on top of a stack of washers or a proper spacer would work OK, but that's missing the magic of a castleated nut - the cotter pin prevents any rotation of the nut at all, not just loosening up to a threshhold limit.

How about a second castled "lock nut" stacked on top of the lower one, using the cotter pin and hole in the intended manner (engaged into the upper castleated lock nut)?

Indicentally, great to see that RCR uses a (presumably, hardened) steel plate with bored taper for the ball joint location, rather than straight into aluminum as I have seen on some other GT40s (yikes!)
 
Back
Top