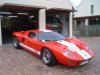
Having recently completed my CAV kit I thought I would share some of the fun I had building the car with the forum.
After being an avid GT40 fan for many years and then discovering that the factory was not ten minutes from where I live in Cape Town, I paid them a visit.
After deliberating for about 35 seconds I purchased the kit in January 2004 which was during the transition period from the liquidation of CAV to the new beginnings of the car with Autofutura run by Jean Fourie and John Spence.
The basic setting up of the body was done on the premises in Cape Town, South Africa and was then sent to a sprayshop downtown where the body work preparation and spray painting was done. It took three and a half months to complete but the results speak for themselves. The finish is superb. The sprayed car was delivered to my house in Cape Town and I promptly stripped off the body and got to work.
The hard part was fitting in the building with my job. As an airline pilot doing two weeks on and two weeks off it was a huge inconvenience going to work and leaving my fledgling project all alone, but armed with GT40 literature and a laptop computer full of pictures I got by.
With an average of eighteen hours a day when at home (and on one occasion 25 hours with out rest, much to my wife’s disgust), the first drive took place two months after starting the assembly. It was a thrill like no other and certainly turned a few heads in the neighborhood. It still took another few months to finish off the finer points because I was having too much fun driving around, minus carpeting and trimming and door windows etc. but I am now extremely happy with the finished product.
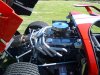
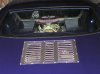
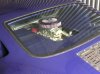
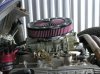
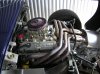
I fitted a 302 with all the “go faster” bits like ally heads and fancy cam, Holly 600 carb and Edelbrock inlet manifold. It was dyno tested at 390hp and coupled to an Audi 016 transaxle – which after 1500 miles started to self destruct and was then replaced with an Audi / Porsche hybrid built in Johannesburg by the same company that built the motor. The stainless headers were sprayed with a molten aluminum process which really makes the engine look stunning but the rest of the car is standard CAV. The service and support I received from Autofutura was second to none. I had my share of problems with the construction – a lot of which were a case of not observing the old rule of “R.T.F.B.” - but all were handled expeditiously and professionally by Jean and John and more than once Jean met me at the factory after hours to help with small issues. The cooling system when fully operational is very efficient but it did give me a few grey hairs initially in purging the air. Again one of the reasons was a mix up on my part but that is another story all by itself.
The quality and finish of all the components is superb and there have been many improvements on the car since being under new ownership. I have been a regular visitor to the factory and have been watching with great interest the research and development being carried out by the team. My next car which I intend to start in a few months is going to be that much better firstly due to my “knowledge” and secondly to all the subtle revisions that have been made to the vehicle which include among other things – lowering of the floor pan by one inch and a re-designed seats to cater for the taller drivers, revised suspension, fuel fillers, new style pedal assembly and numerous chassis mods to strength the structure and provide easier access to hidden components.
From an ease of building point of view I have been re-building cars for many years as a hobby so I obviously know one end of a spanner from the other but I feel any person with a good grasp of D I Y should not have too much trouble building the car. I can say with a certain amount of pride that apart from the initial body set up and paint job this was a solo project. The only time I had a buddy over was to help carry the body panels down from their storage spot in the roof of my garage. I even fitted the engine / gearbox assembly single handedly (at 3am). Very few specialized tools are required – the obvious spanners and sockets and the rest - but you do need a good drill with a selection of high quality bits for stainless steel drilling. Most holes are pre drilled with captive nuts fitted where necessary but a fair amount still need to be done mainly for trimming and fitting of inspection panel etc. The only tool I had to source was a rivnut gun (thanks again to Jean for the loan). A bench grinder / belt sander are essential for the fitting of the polycarbonate door glass, headlamp and side lamp covers which are shaped and curved but need to be trimmed to suit the individual car. The first edition instruction manual was a little too brief and the photo sequence could be improved but I am sure this has already been amended as I write.
In conclusion I can say that this has been an incredible experience for me and I have not had this much fun for many years, both in building and driving the car and wish I could have had it at eighteen years old and not at 44. If any one would like to make contact with me for more details and or advice on the CAV GT40 please feel free either directly by e-mail or through the forum. I am always happy to discuss my car or any other car at any time.