As your fans wItvwith bated breath for the next chapter!
You are using an out of date browser. It may not display this or other websites correctly.
You should upgrade or use an alternative browser.
You should upgrade or use an alternative browser.
Chuck's Jaguar D Type Build
- Thread starter CESLAW
- Start date
Yea, me too. Someday I will retire and have a bit more time to work on these projects.As your fans wItvwith bated breath for the next chapter!
Plus - Side Pipes are just sexier....
You’re doing a phenomenal job as usual Chuck. I don’t comment much, but read every post and consume every photo and I’m sure a number of others do the same...
Thank you for sharing your builds with us here on GT40s.com ....
You’re doing a phenomenal job as usual Chuck. I don’t comment much, but read every post and consume every photo and I’m sure a number of others do the same...
Thank you for sharing your builds with us here on GT40s.com ....
Exhaust system, Headers
We will start with the headers. Jaguar XKE headers, unpainted, were selected, since they are readily available and fit well in the RCR chassis. We obtained the two headers and needed parts from SNG Barrett. Here are the parts:
1. Exhaust manifolds, unpainted; C18397/U and C18396/U.
https://www.sngbarratt.com/English/#/US/parts/e40b8106-8794-4734-8f7f-891b4bef0340?fromList=Search for `XKE front exhaust manifold`
https://www.sngbarratt.com/English/#/US/parts/be91789b-3baa-427c-9132-e3ed635a3364?fromList=Search for `C18397/U `
2. Exhaust manifold gaskets, C2318AF. https://www.sngbarratt.com/English/#/US/parts/bb85c11e-6ede-4fa1-8c7d-49a8cb55d2c6?fromList=Related Products&fromCategory=e40b8106-8794-4734-8f7f-891b4bef0340
3. Exhaust Flange, C18401, down pipe flange
https://www.sngbarratt.com/English/#/US/parts/393dbffd-ae8a-489f-9dc9-1244c3277743?fromCategory=EXHAUST SYSTEM & COMPONENTS(3265)
4. Exhaust flange gasket, C495
https://www.sngbarratt.com/English/#/US/parts/5706e763-2aa7-4dca-b71f-7b8792c9220e?fromList=Related Products&fromCategory=3cfd3a28-f2f2-4246-a49d-a8db97221aad
5. Manifold nuts, brass. C30787 (16)
https://www.sngbarratt.com/English/#/US/parts/01c793ec-65c8-49ab-89c4-a12487562bb2?fromList=Search for `C30787 `
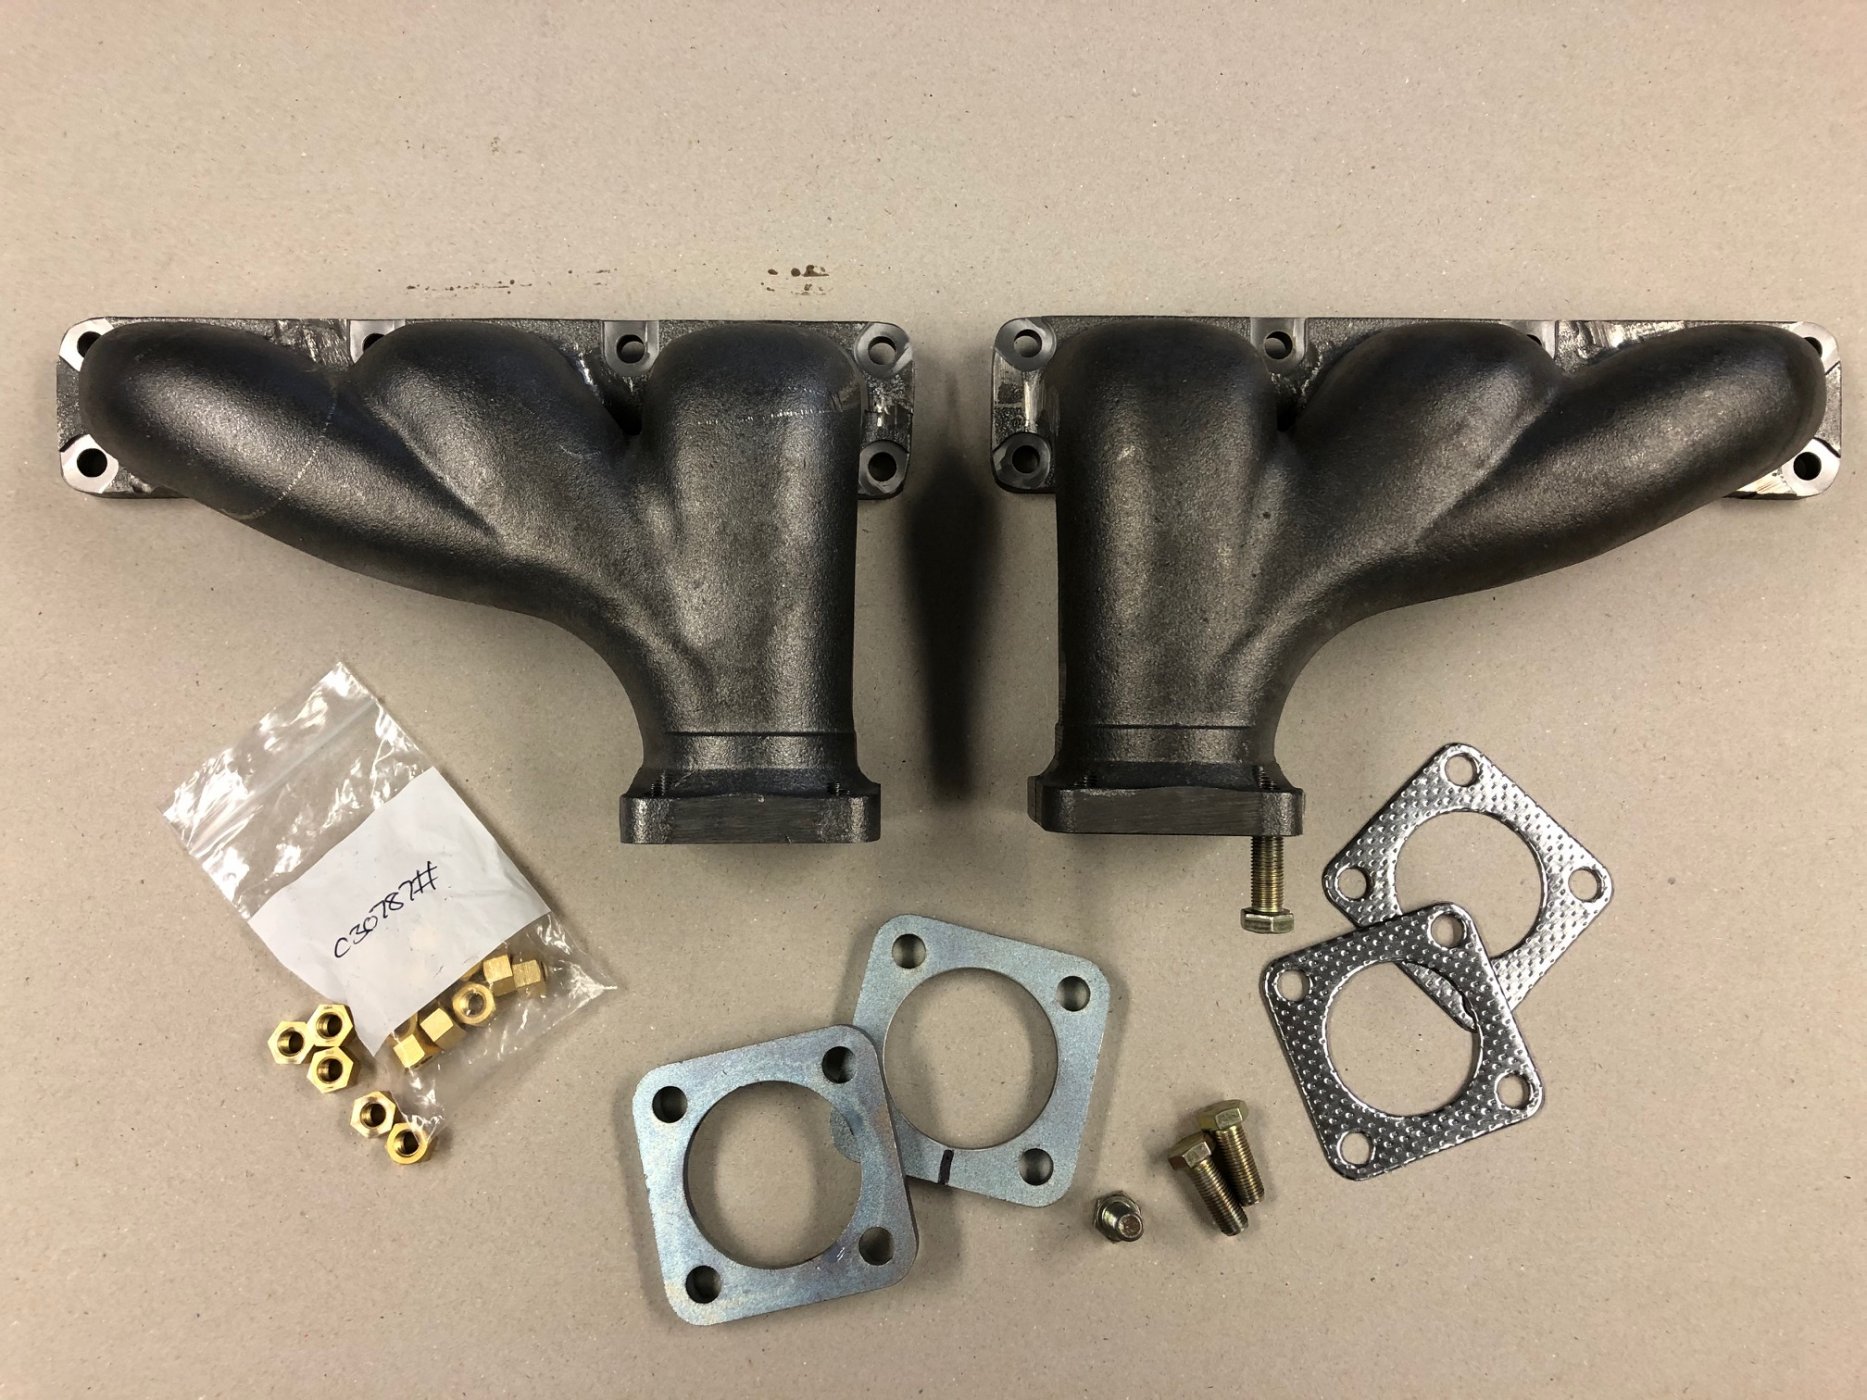
The original Jaguar XKE header – exhaust pipe connection uses a compression ring gasket on a two inch pipe but the portion of the pipe that extends through the flange is 2 1/8”. If this does not make sense, simply stated it would make fabricating the connection difficult. So a more simple solution was found.
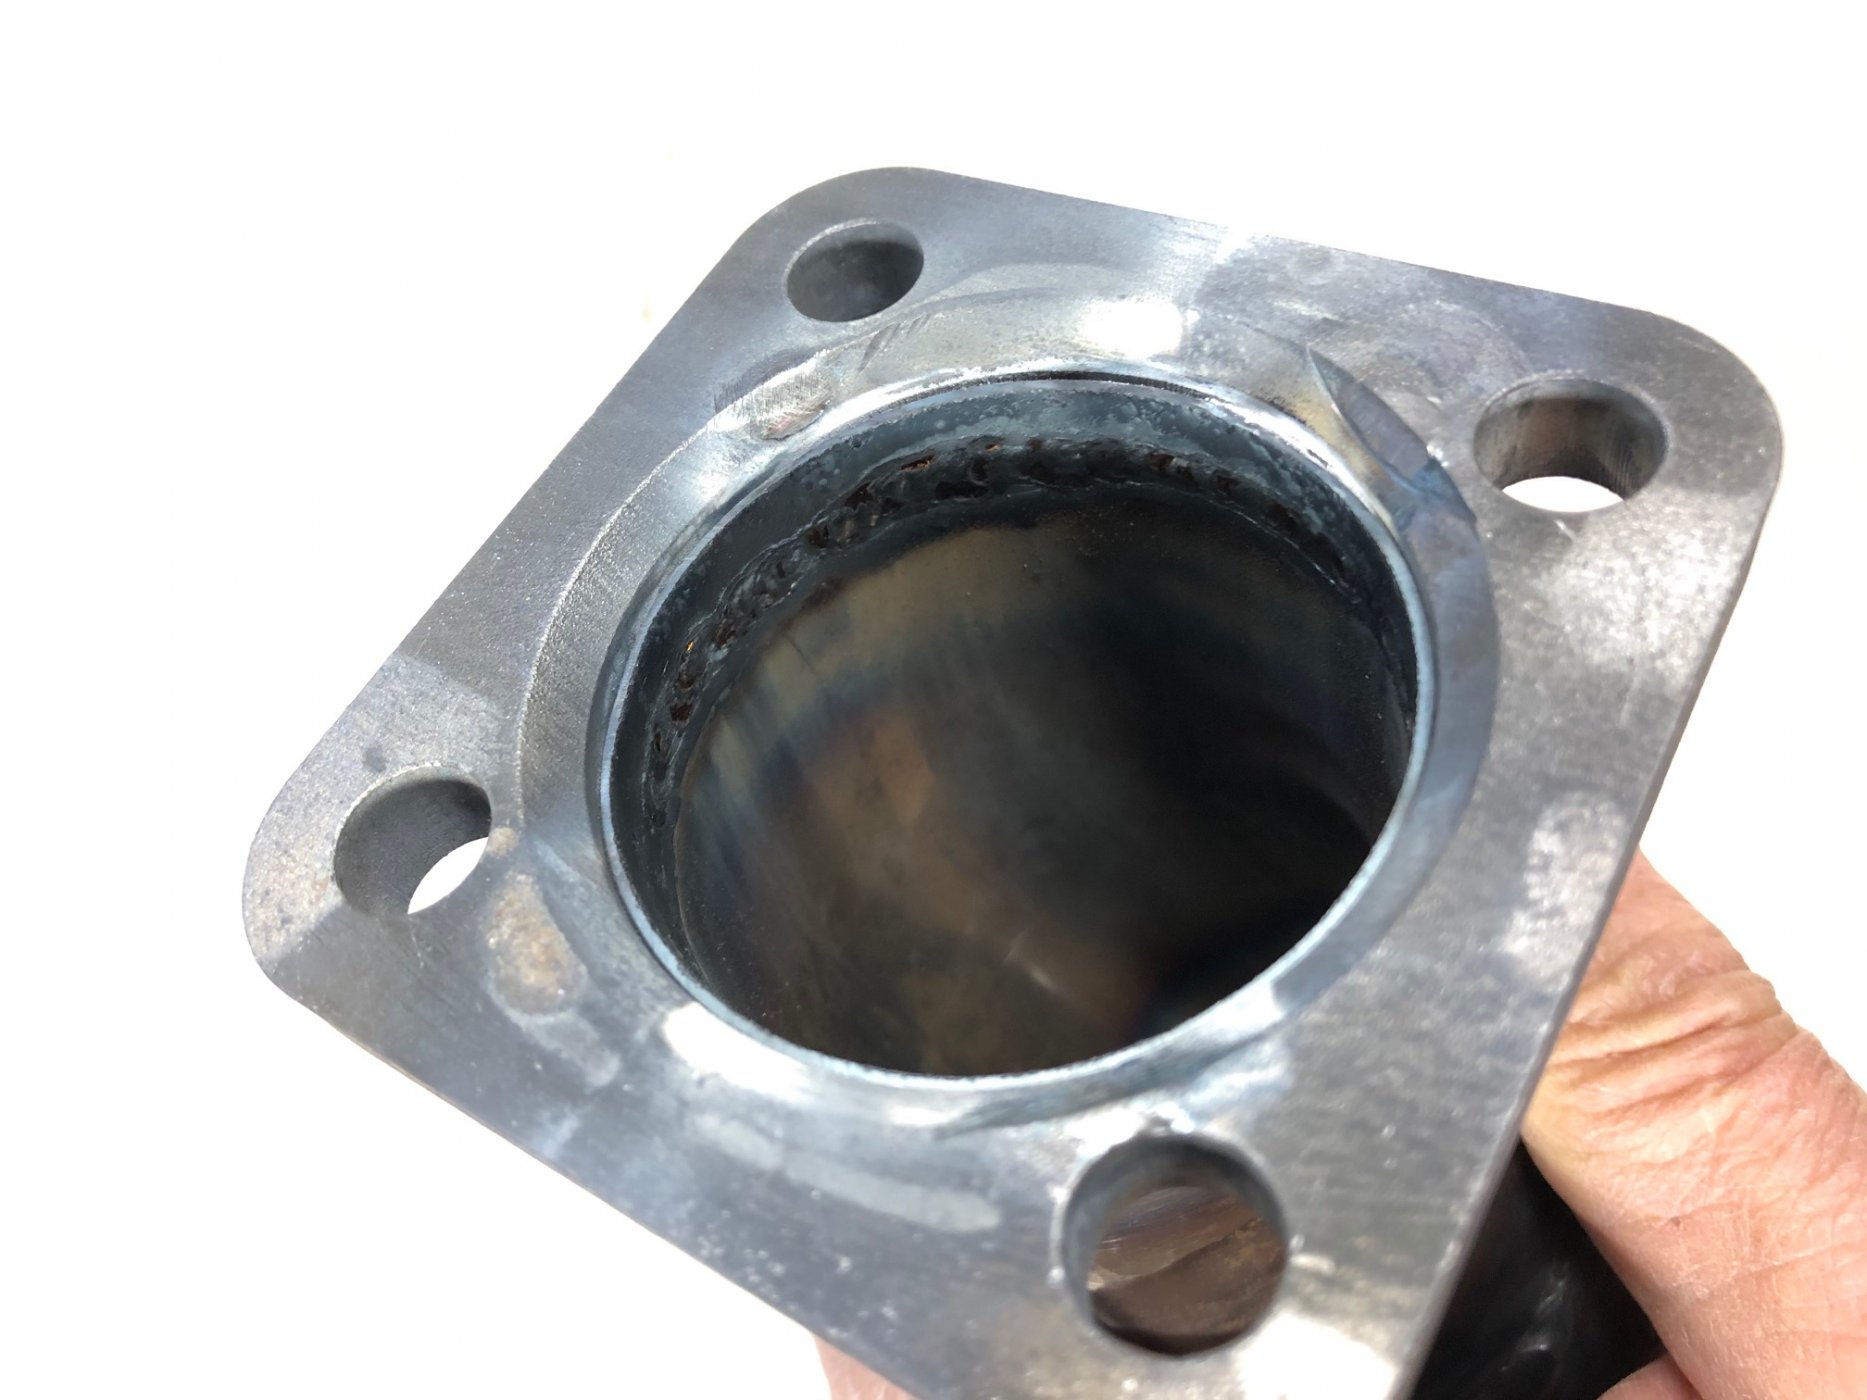
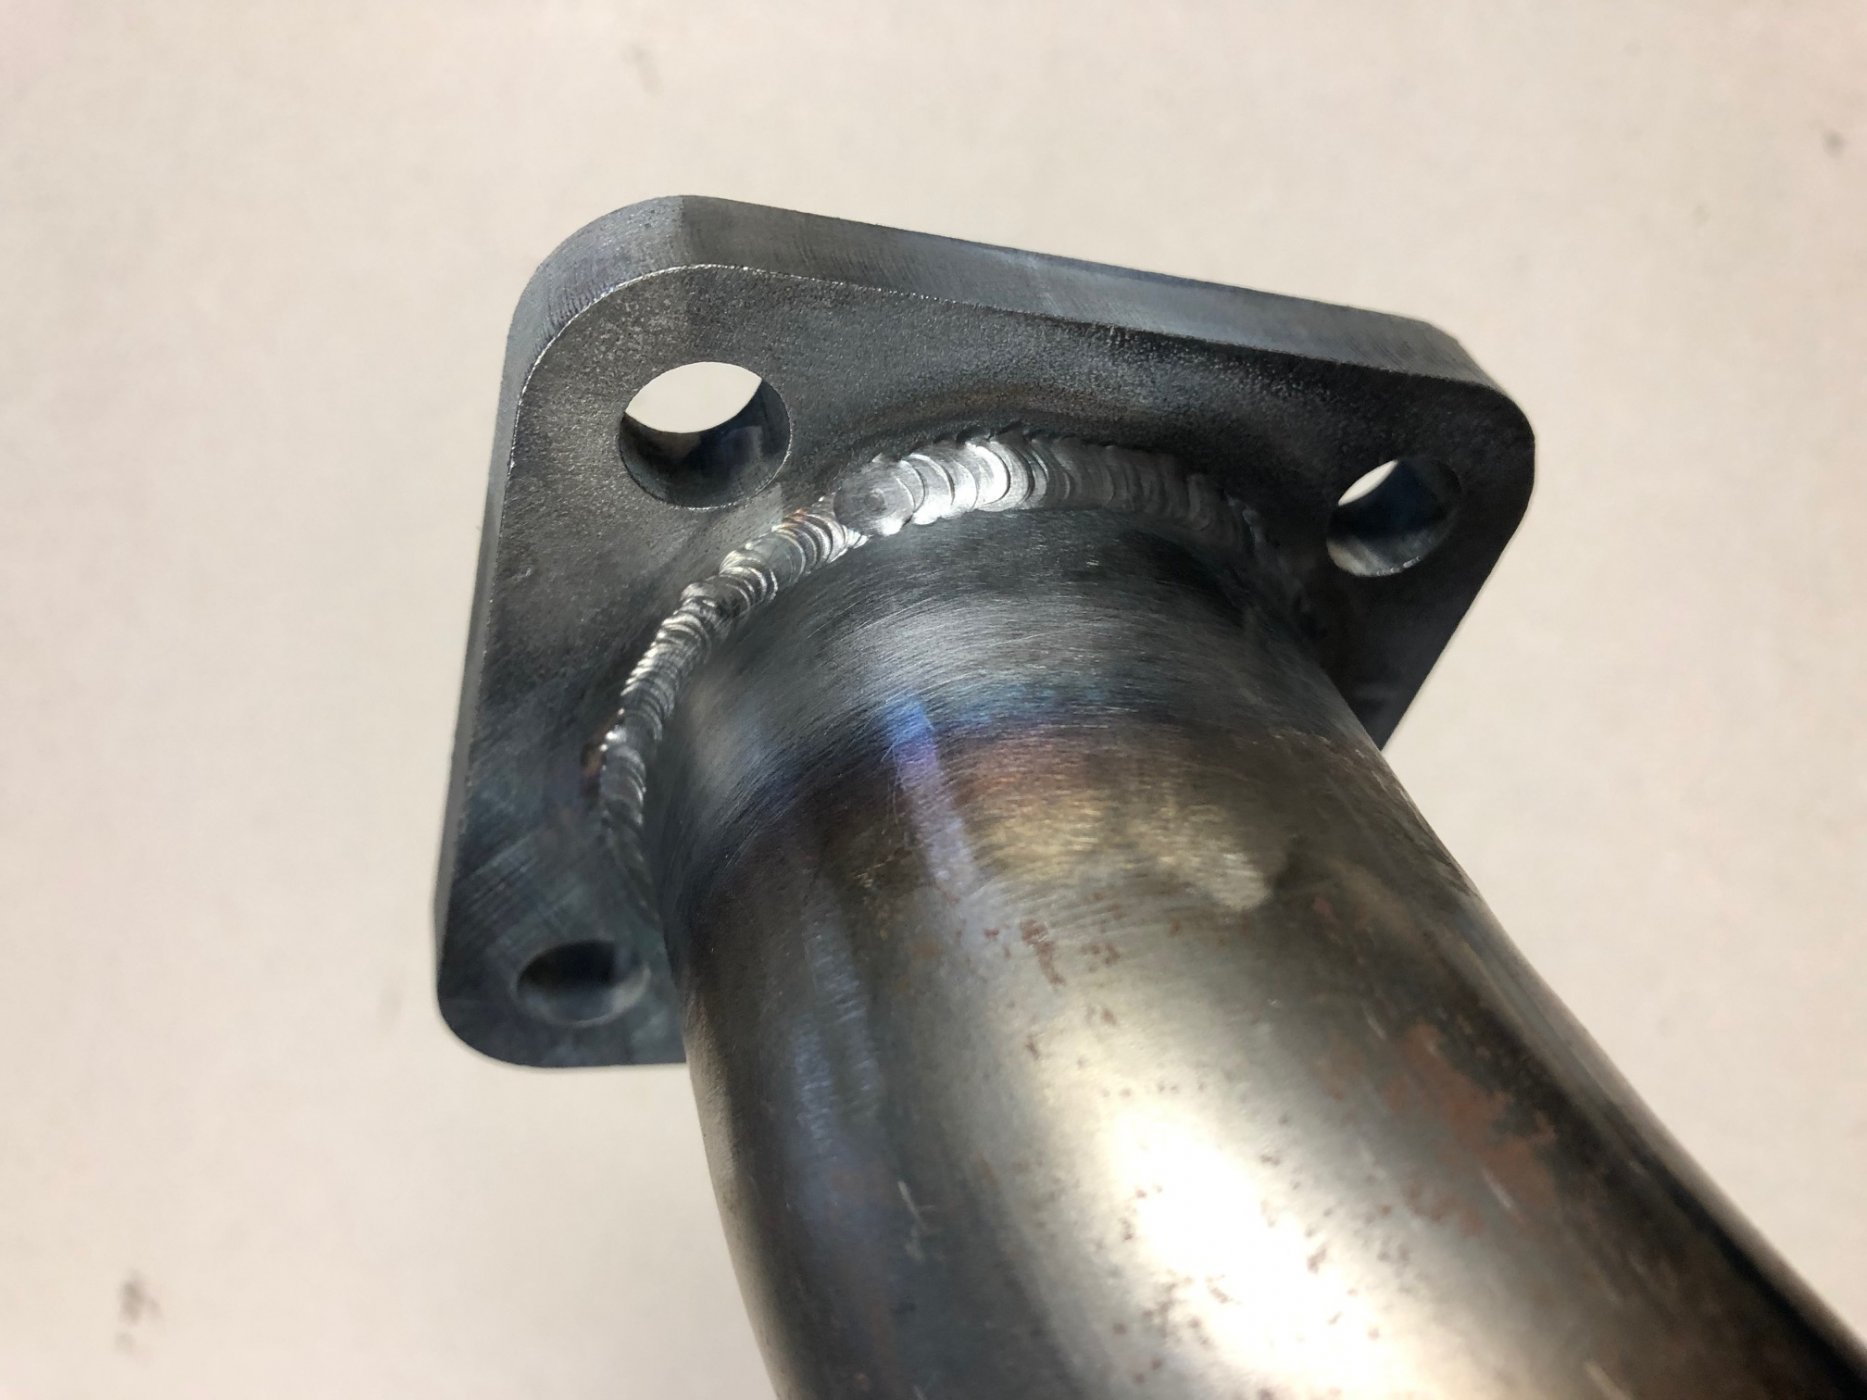
Two and one eighth inch (2 1/8”) pipe was used throughout the exhaust system, based on the size of the opening of the down pipe flange plate. A suitable gasket to seal the gap between these connections was then found, listed above. Stubs were cut and welded, providing the starting point for the exhaust system. Note that the stubs were only tacked pending final alignment with the rest of the exhaust system. (The pictures were taken after final welding.) Several of the connections had to be untacked and modified as this process unfolded.
Note that the tapered side of the flange went upwards and that the final welding was on the outside to assure there would be no interference between the mating surfaces.
Once the headers and stub connections were preliminarily determined, work on the side pipes could begin.
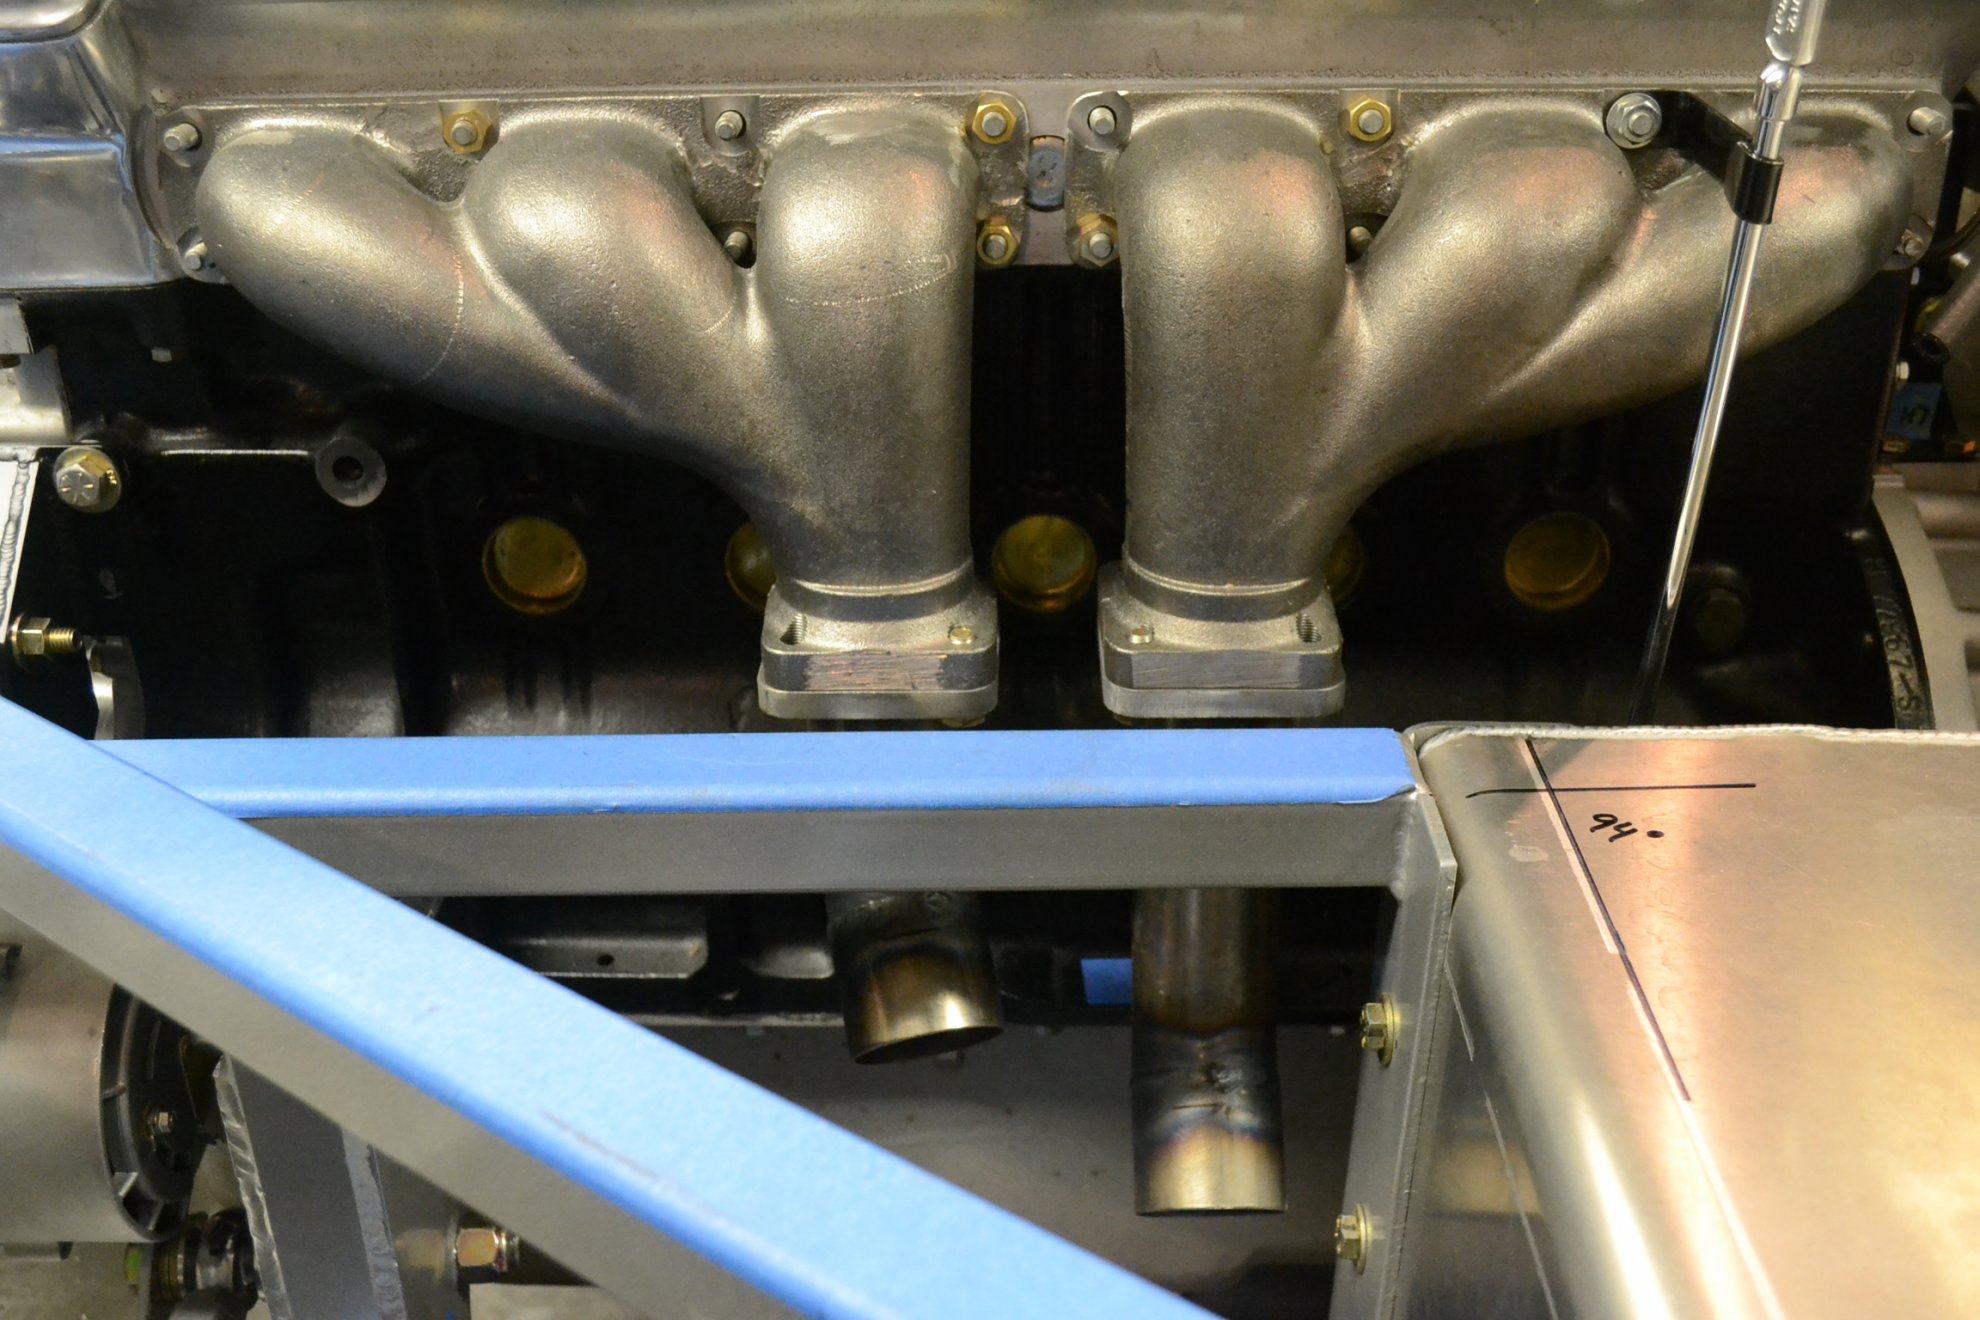
We will start with the headers. Jaguar XKE headers, unpainted, were selected, since they are readily available and fit well in the RCR chassis. We obtained the two headers and needed parts from SNG Barrett. Here are the parts:
1. Exhaust manifolds, unpainted; C18397/U and C18396/U.
https://www.sngbarratt.com/English/#/US/parts/e40b8106-8794-4734-8f7f-891b4bef0340?fromList=Search for `XKE front exhaust manifold`
https://www.sngbarratt.com/English/#/US/parts/be91789b-3baa-427c-9132-e3ed635a3364?fromList=Search for `C18397/U `
2. Exhaust manifold gaskets, C2318AF. https://www.sngbarratt.com/English/#/US/parts/bb85c11e-6ede-4fa1-8c7d-49a8cb55d2c6?fromList=Related Products&fromCategory=e40b8106-8794-4734-8f7f-891b4bef0340
3. Exhaust Flange, C18401, down pipe flange
https://www.sngbarratt.com/English/#/US/parts/393dbffd-ae8a-489f-9dc9-1244c3277743?fromCategory=EXHAUST SYSTEM & COMPONENTS(3265)
4. Exhaust flange gasket, C495
https://www.sngbarratt.com/English/#/US/parts/5706e763-2aa7-4dca-b71f-7b8792c9220e?fromList=Related Products&fromCategory=3cfd3a28-f2f2-4246-a49d-a8db97221aad
5. Manifold nuts, brass. C30787 (16)
https://www.sngbarratt.com/English/#/US/parts/01c793ec-65c8-49ab-89c4-a12487562bb2?fromList=Search for `C30787 `
The original Jaguar XKE header – exhaust pipe connection uses a compression ring gasket on a two inch pipe but the portion of the pipe that extends through the flange is 2 1/8”. If this does not make sense, simply stated it would make fabricating the connection difficult. So a more simple solution was found.
Two and one eighth inch (2 1/8”) pipe was used throughout the exhaust system, based on the size of the opening of the down pipe flange plate. A suitable gasket to seal the gap between these connections was then found, listed above. Stubs were cut and welded, providing the starting point for the exhaust system. Note that the stubs were only tacked pending final alignment with the rest of the exhaust system. (The pictures were taken after final welding.) Several of the connections had to be untacked and modified as this process unfolded.
Note that the tapered side of the flange went upwards and that the final welding was on the outside to assure there would be no interference between the mating surfaces.
Once the headers and stub connections were preliminarily determined, work on the side pipes could begin.
Last edited:
Exhaust System, Side Pipes
Looking at pictures of the originals, variations can be seen, which means we have some freedom in setting up the exhaust and still keep it reasonably authentic looking. For example the angle at which the exhaust tips set and their overall length varies from one original D Type to another. I suspect these side pipes were changed frequently and often fabricated in the field in the day.
Natural pipe 2 1/8” O.D. 18 gauge was used throughout. We opted for 18 gauge rather than heavier pipe to simplify cutting and trimming. Multiple straight and curved sections were used, with a lot of cutting and welding. Here is a list of the parts used to fabricate the exhaust. This may seem like a random list of parts, but every item listed was used.
1. Flex pipe exhaust repair kit, 18” long (2 each). https://www.summitracing.com/parts/wlk-36323
2. Hedman 90 degree mandrel bends, 12015 (2 each). https://www.summitracing.com/parts/hed-12015
3. Patriot exhaust tubing H7758, 5 feet length (2 each). https://www.summitracing.com/parts/pte-h7758
4. Patriot 180 degree bend, H7046 (1 each). https://www.summitracing.com/parts/pte-h7046
Setting up the side pipes involved a lot of cutting, fitting, tack welding, more cutting, and more tack welding, with a lot of ‘do overs.’ A cut off saw was used, followed by cleaning the connections with a rotary bench sander. Following are pictures with rough dimensions marked for the primary sections.
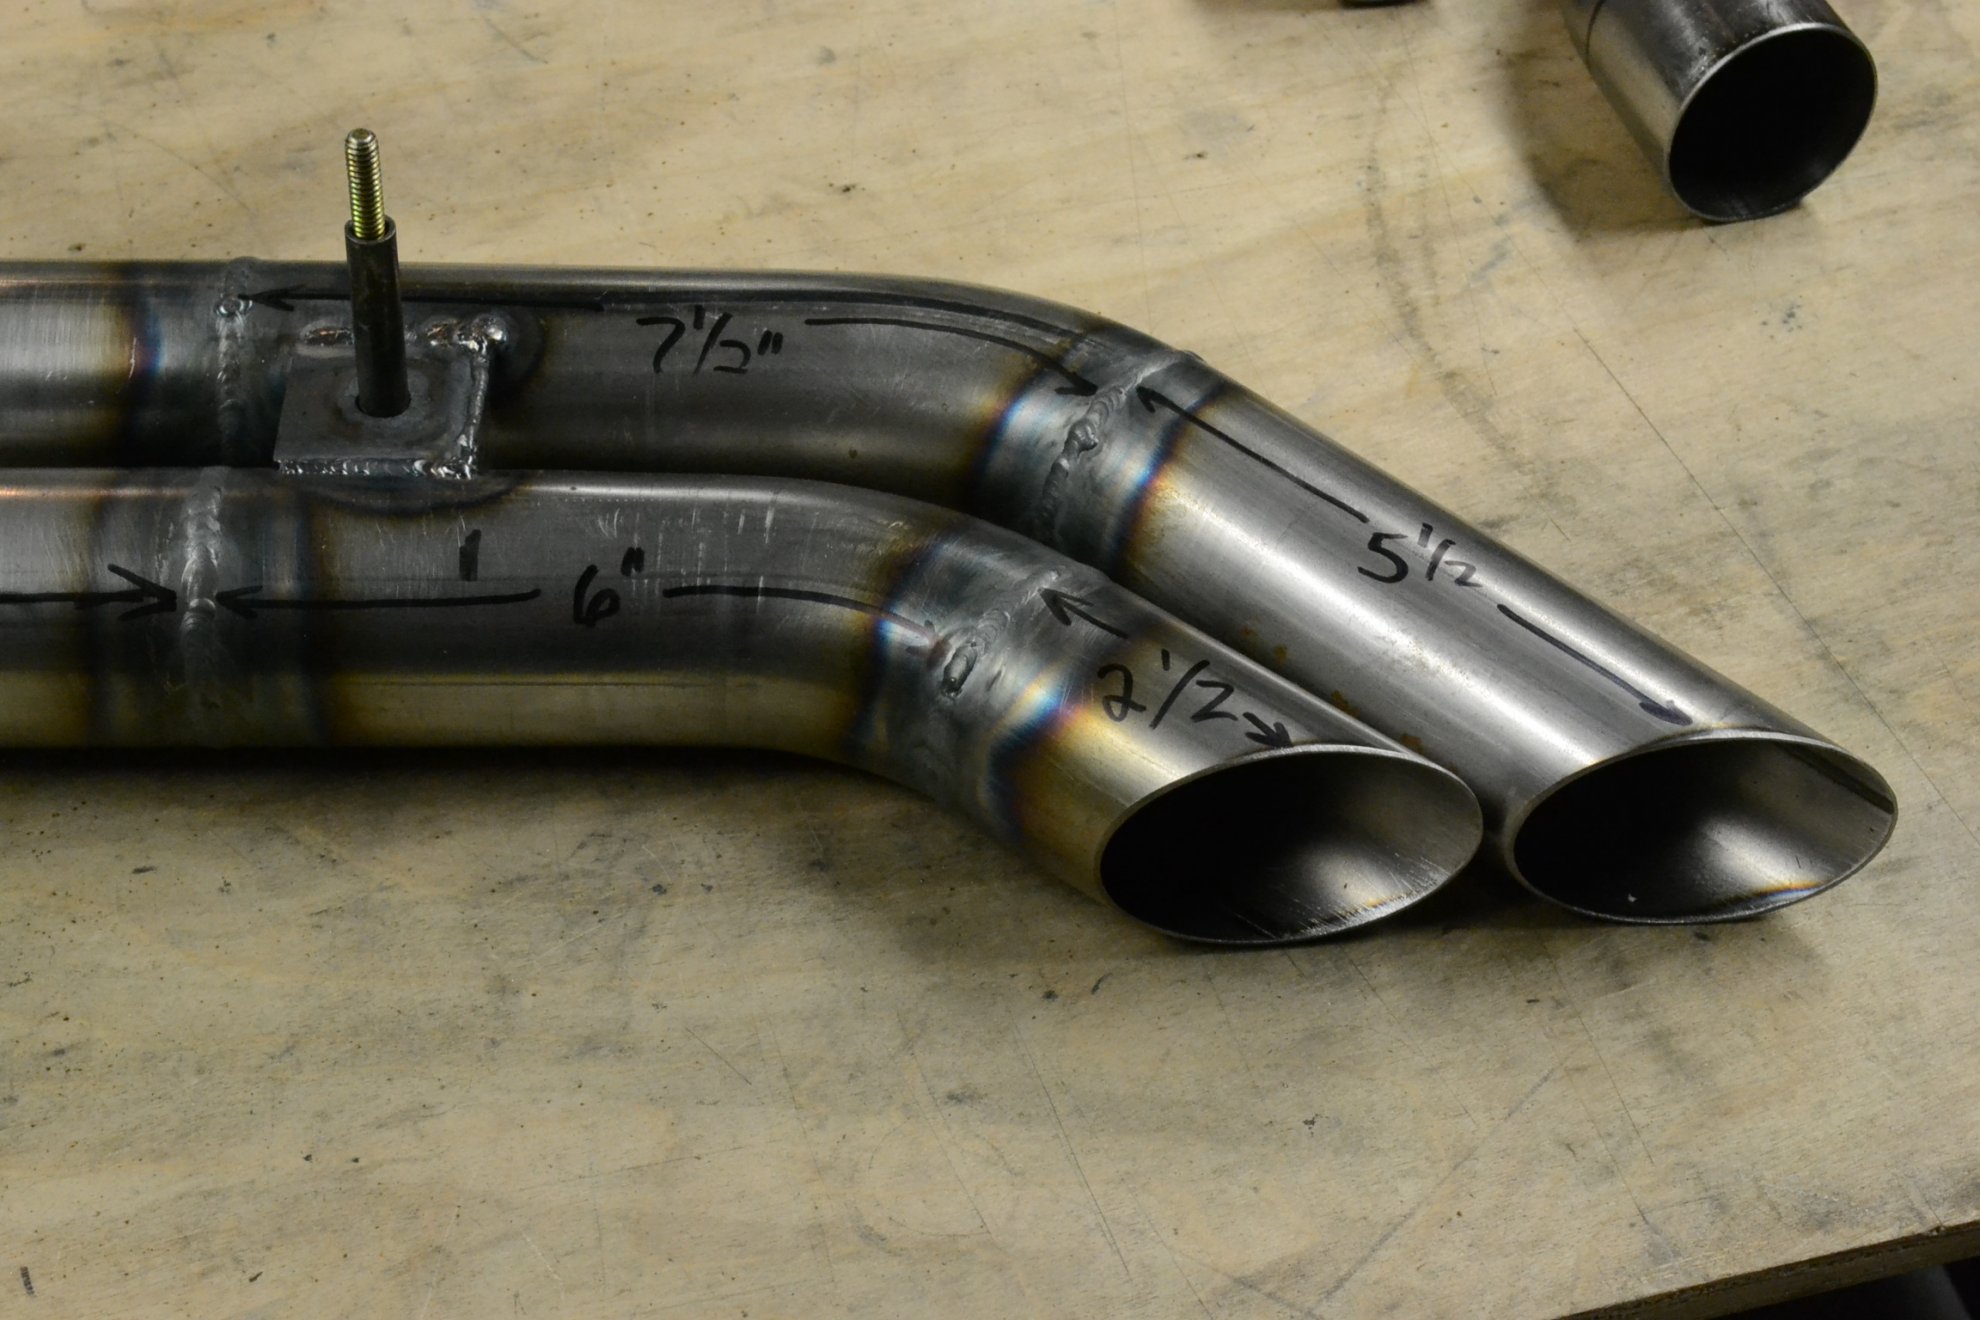
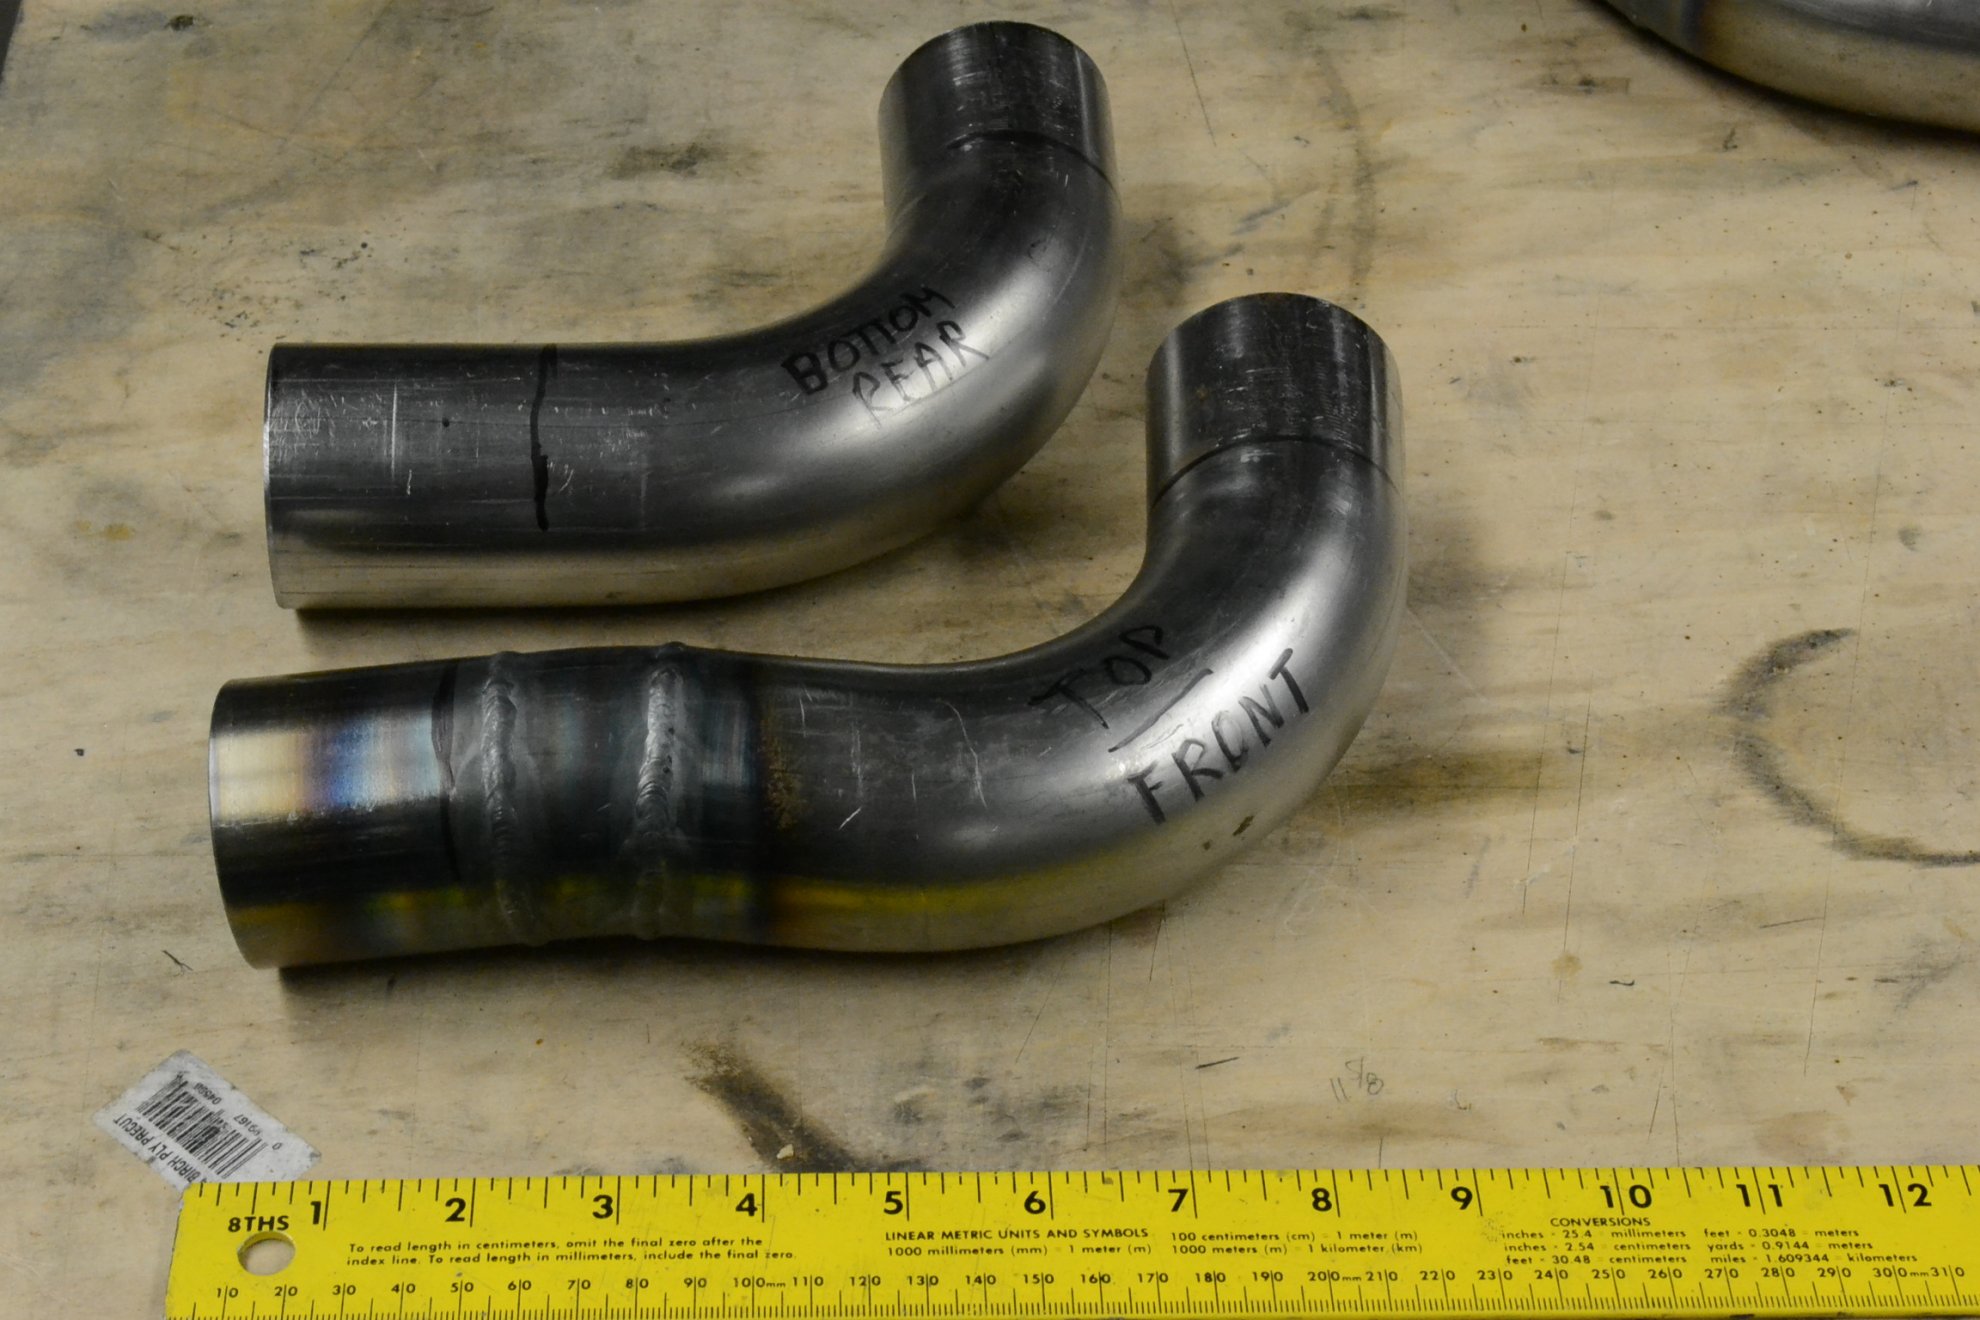
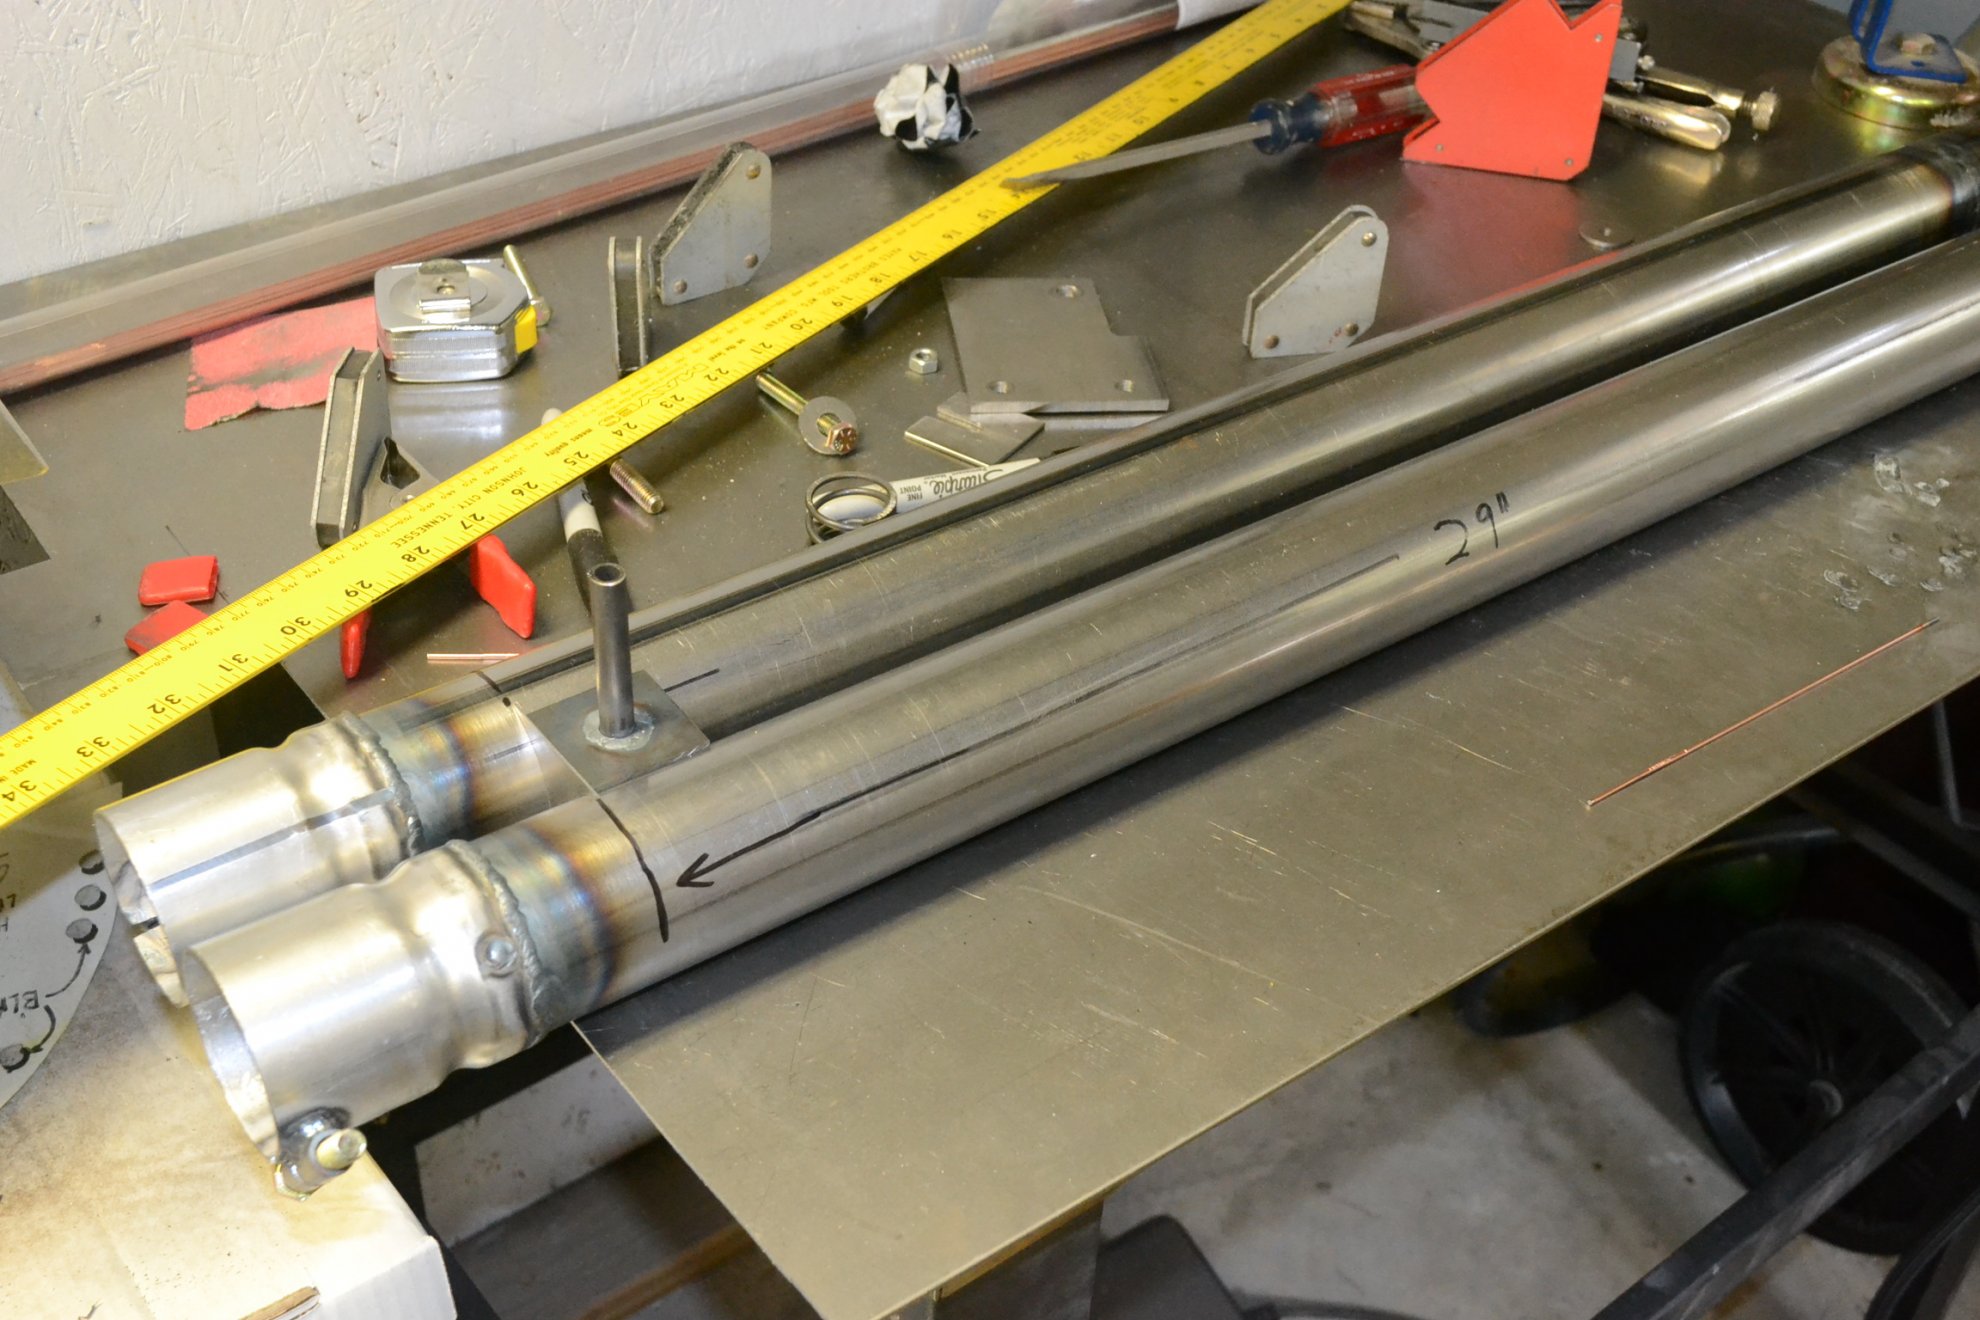
Once the main side pipe sections were complete, the forward connections could be fabricated.
Looking at pictures of the originals, variations can be seen, which means we have some freedom in setting up the exhaust and still keep it reasonably authentic looking. For example the angle at which the exhaust tips set and their overall length varies from one original D Type to another. I suspect these side pipes were changed frequently and often fabricated in the field in the day.
Natural pipe 2 1/8” O.D. 18 gauge was used throughout. We opted for 18 gauge rather than heavier pipe to simplify cutting and trimming. Multiple straight and curved sections were used, with a lot of cutting and welding. Here is a list of the parts used to fabricate the exhaust. This may seem like a random list of parts, but every item listed was used.
1. Flex pipe exhaust repair kit, 18” long (2 each). https://www.summitracing.com/parts/wlk-36323
2. Hedman 90 degree mandrel bends, 12015 (2 each). https://www.summitracing.com/parts/hed-12015
3. Patriot exhaust tubing H7758, 5 feet length (2 each). https://www.summitracing.com/parts/pte-h7758
4. Patriot 180 degree bend, H7046 (1 each). https://www.summitracing.com/parts/pte-h7046
Setting up the side pipes involved a lot of cutting, fitting, tack welding, more cutting, and more tack welding, with a lot of ‘do overs.’ A cut off saw was used, followed by cleaning the connections with a rotary bench sander. Following are pictures with rough dimensions marked for the primary sections.
Once the main side pipe sections were complete, the forward connections could be fabricated.
Last edited:
I am exhausted just thinking about all the work going into these!Exhaust System, Side Pipes
Looking at pictures of the originals, variations can be seen, which means we have some freedom in setting up the exhaust and still keep it reasonably authentic looking. For example the angle at which the exhaust tips set and their overall length varies from one original D Type to another. I suspect these side pipes were changed frequently and often fabricated in the field in the day.
Natural pipe 2 1/8” O.D. 18 gauge was used throughout. We opted for 18 gauge rather than heavier pipe to simplify cutting and trimming. Multiple straight and curved sections were used, with a lot of cutting and welding. Here is a list of the parts used to fabricate the exhaust. This may seem like a random list of parts, but every item listed was used.
1. Flex pipe exhaust repair kit, 18” long (2 each). https://www.summitracing.com/parts/wlk-36323
2. Hedman 90 degree mandrel bends, 12015 (2 each). https://www.summitracing.com/parts/hed-12015
3. Patriot exhaust tubing H7758, 5 feet length (2 each). https://www.summitracing.com/parts/pte-h7758
4. Patriot 180 degree bend, H7046 (1 each). https://www.summitracing.com/parts/pte-h7046
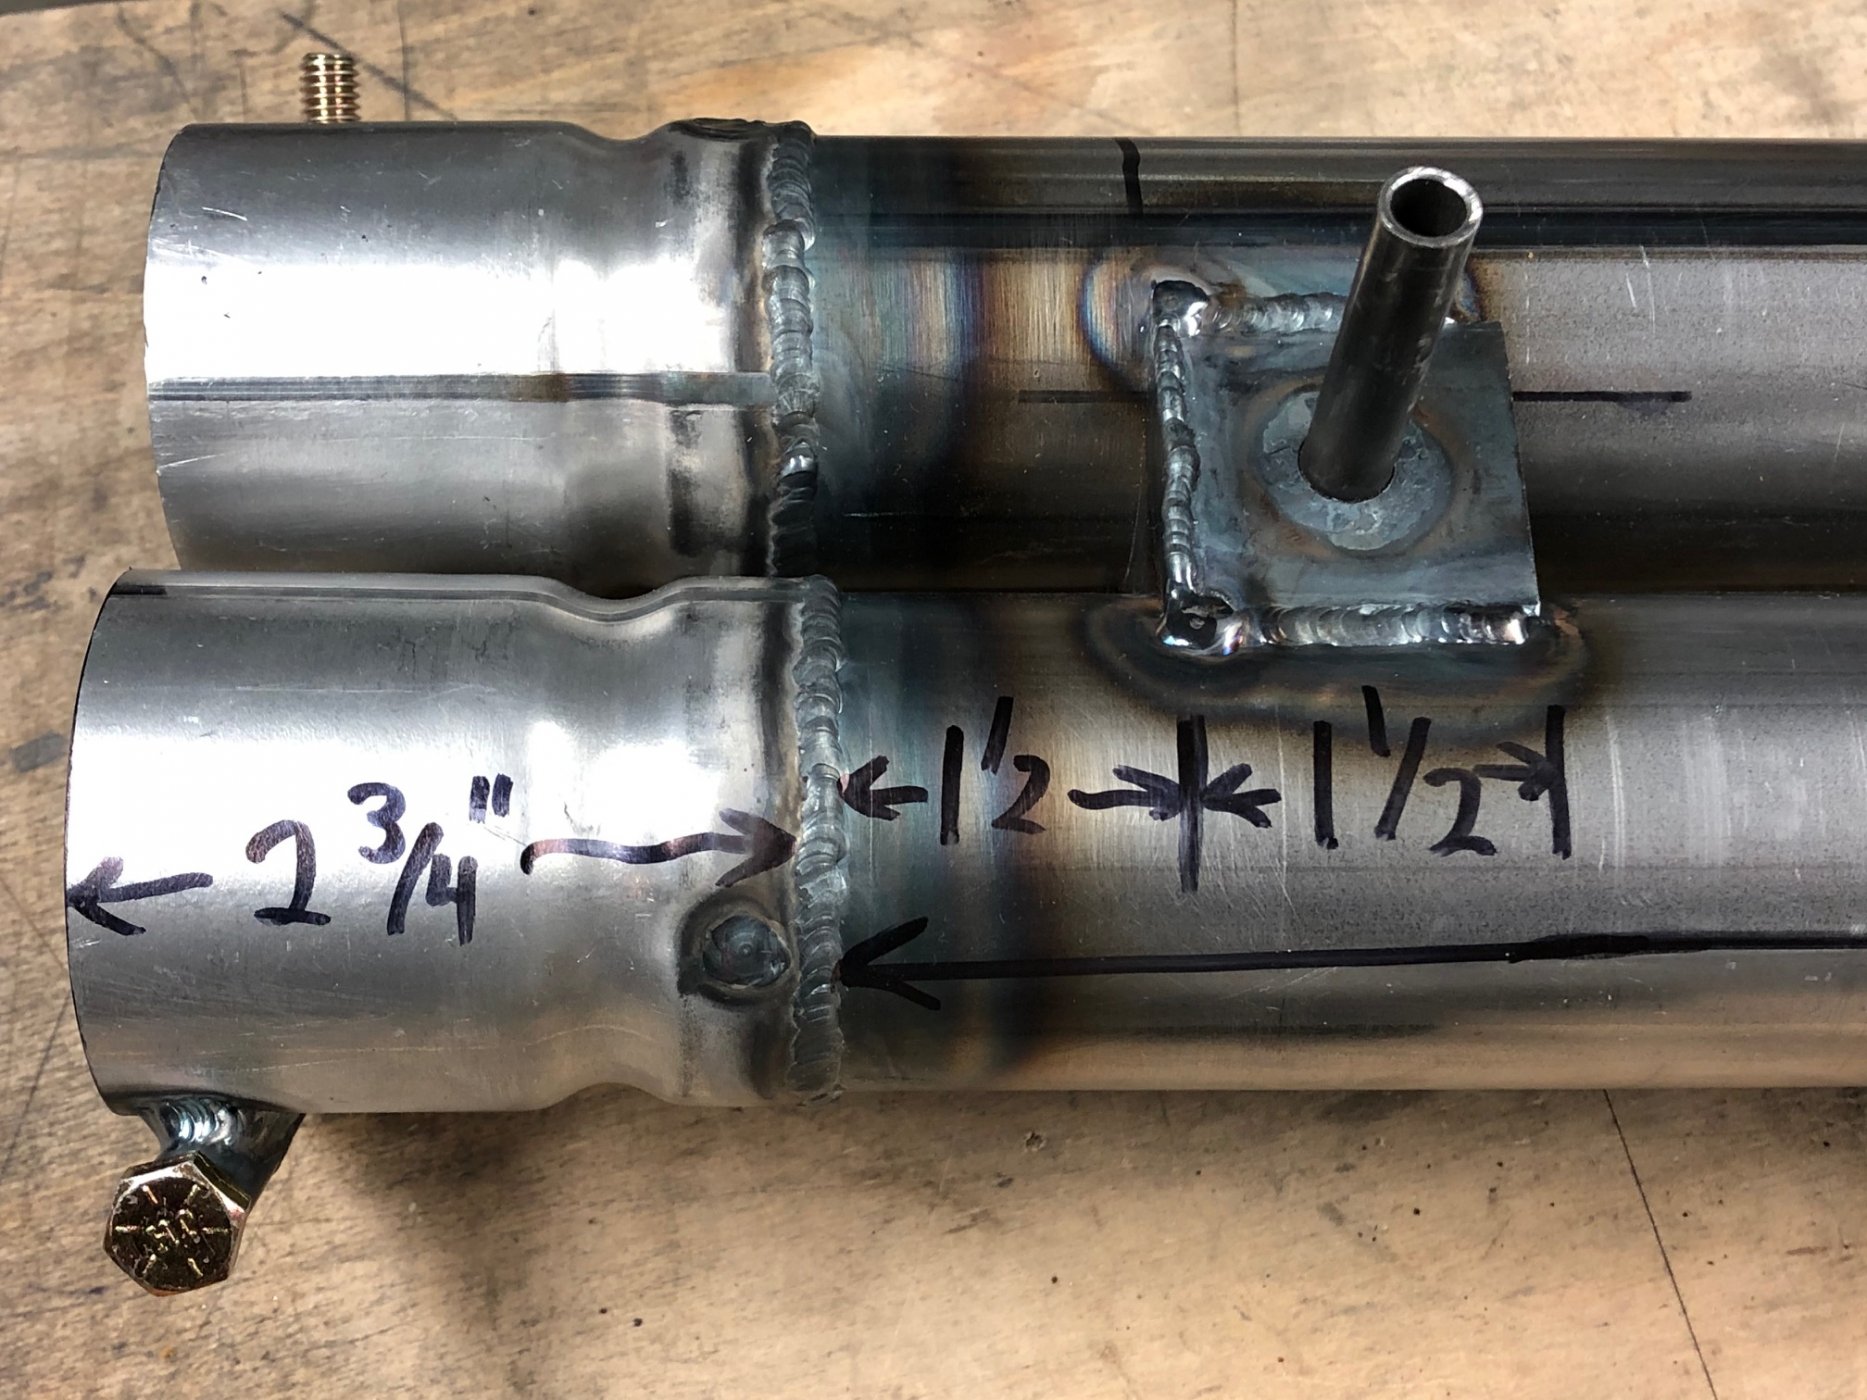
Setting up the side pipes involved a lot of cutting, fitting, tack welding, more cutting, and more tack welding, with a lot of ‘do overs.’ A cut off saw was used, followed by cleaning the connections with a rotary bench sander. Following are pictures with rough dimensions marked for the primary sections.
View attachment 111642
View attachment 111643
View attachment 111644
Once the main side pipe sections were complete, the forward connections could be fabricated.
Exhaust system, Forward Connection Details
The connection between the side pipes and the curved forward section is removable. The vertical locking bolt is a visible feature on the original, which we wanted to duplicate.
The joint started with the connecting section. Walker exhaust pipe connectors 41948 (2 each). https://www.summitracing.com/parts/wlk-41948. This was cut to length after the slot was cut.
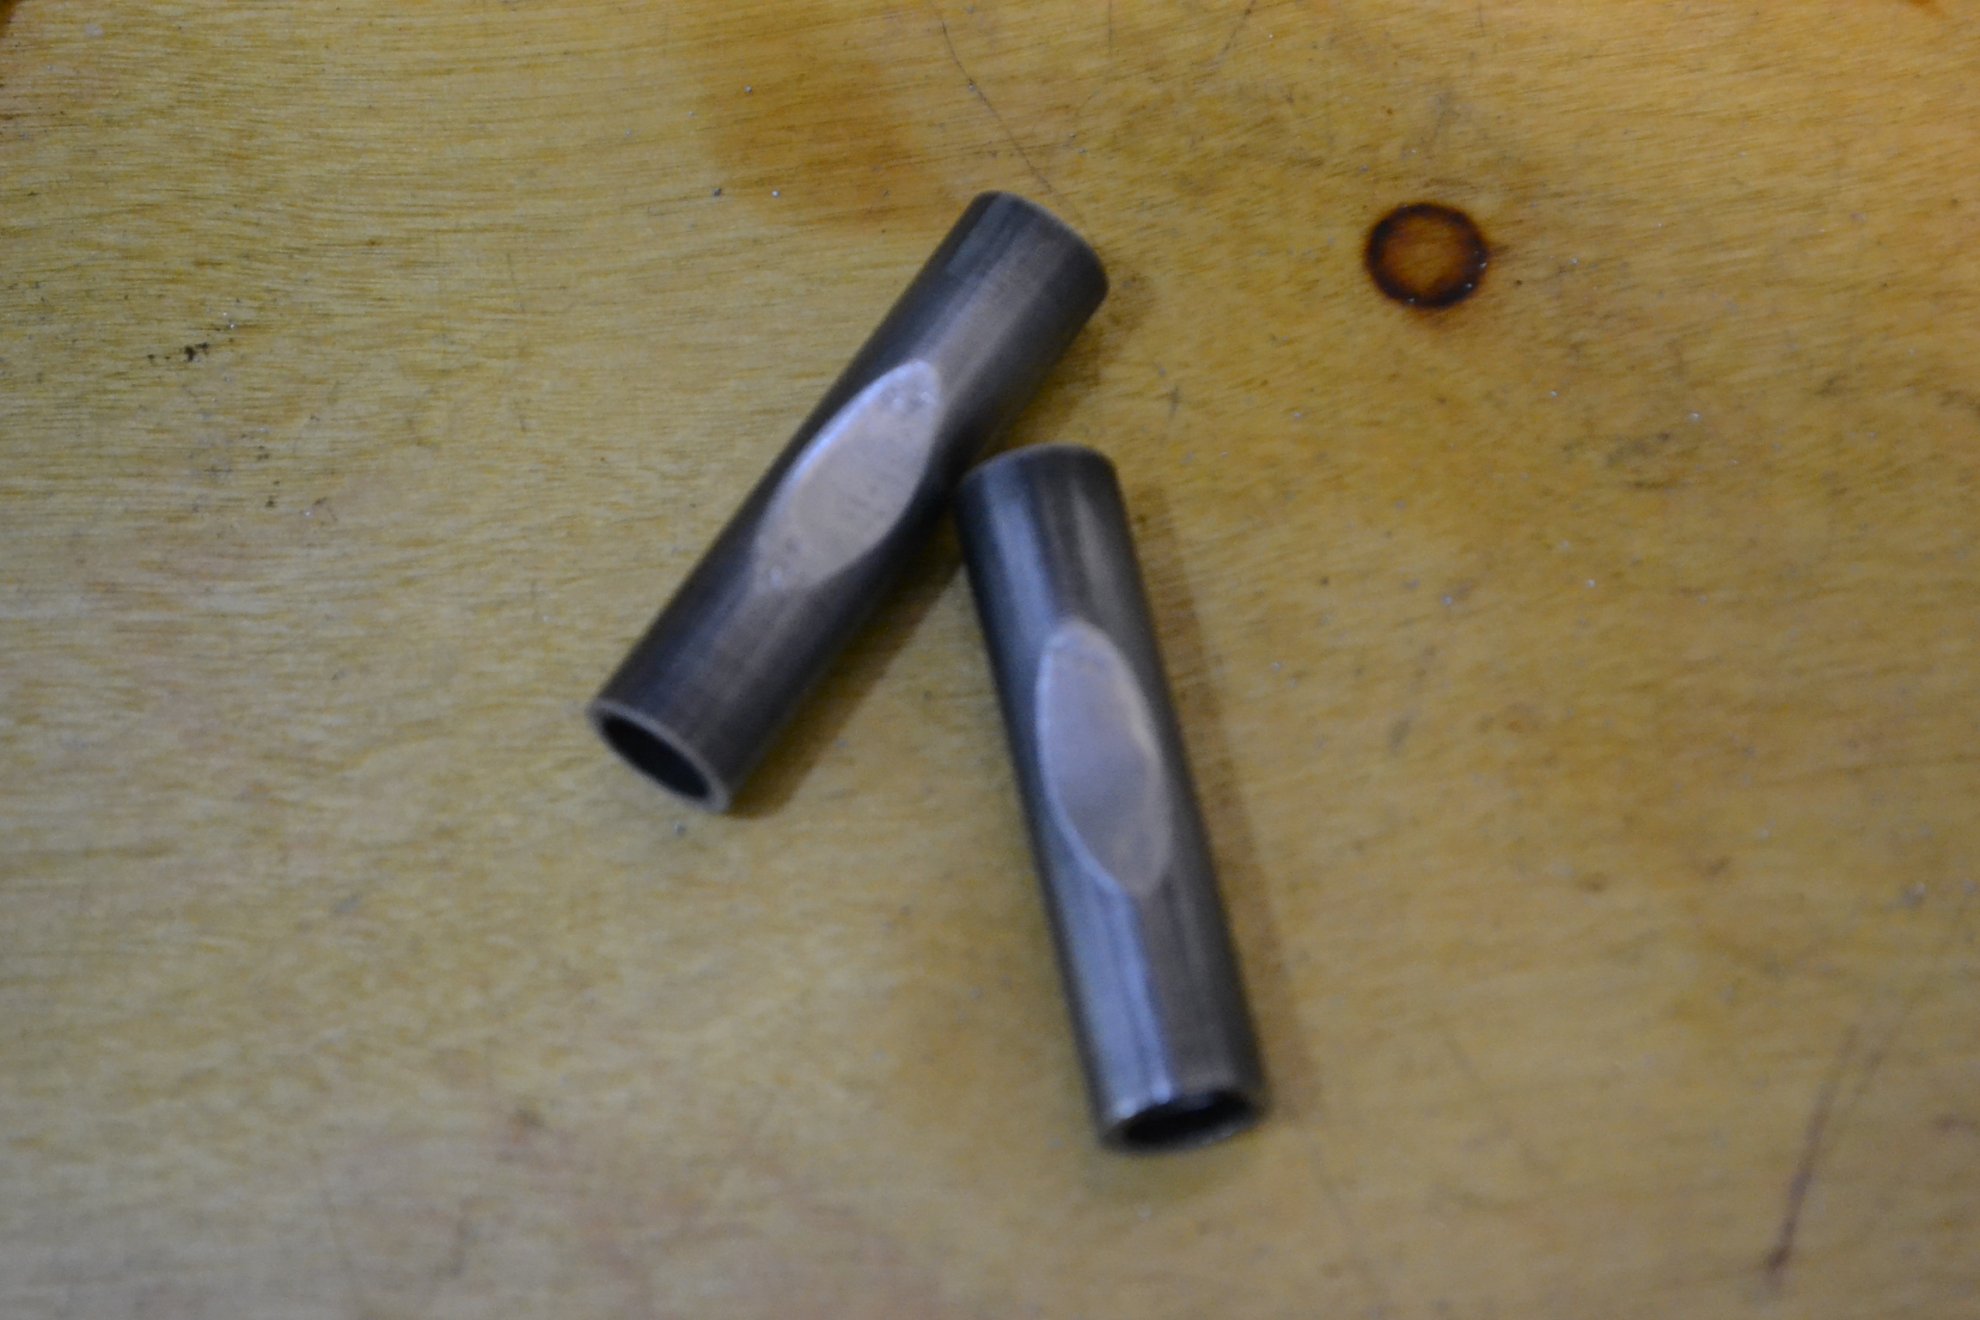
A two inch length of 5/16” ID, 3/8” OD steel tube was welded to the end of each pipe. One side of this tube was filed with an arc to match the curve of the connector pipe. A slot 1 1/8” was cut after which the 3/8” tube was welded in place. After welding the tube in place a matching slot was cut through the 3/8" tube, which assured that the slots would align.
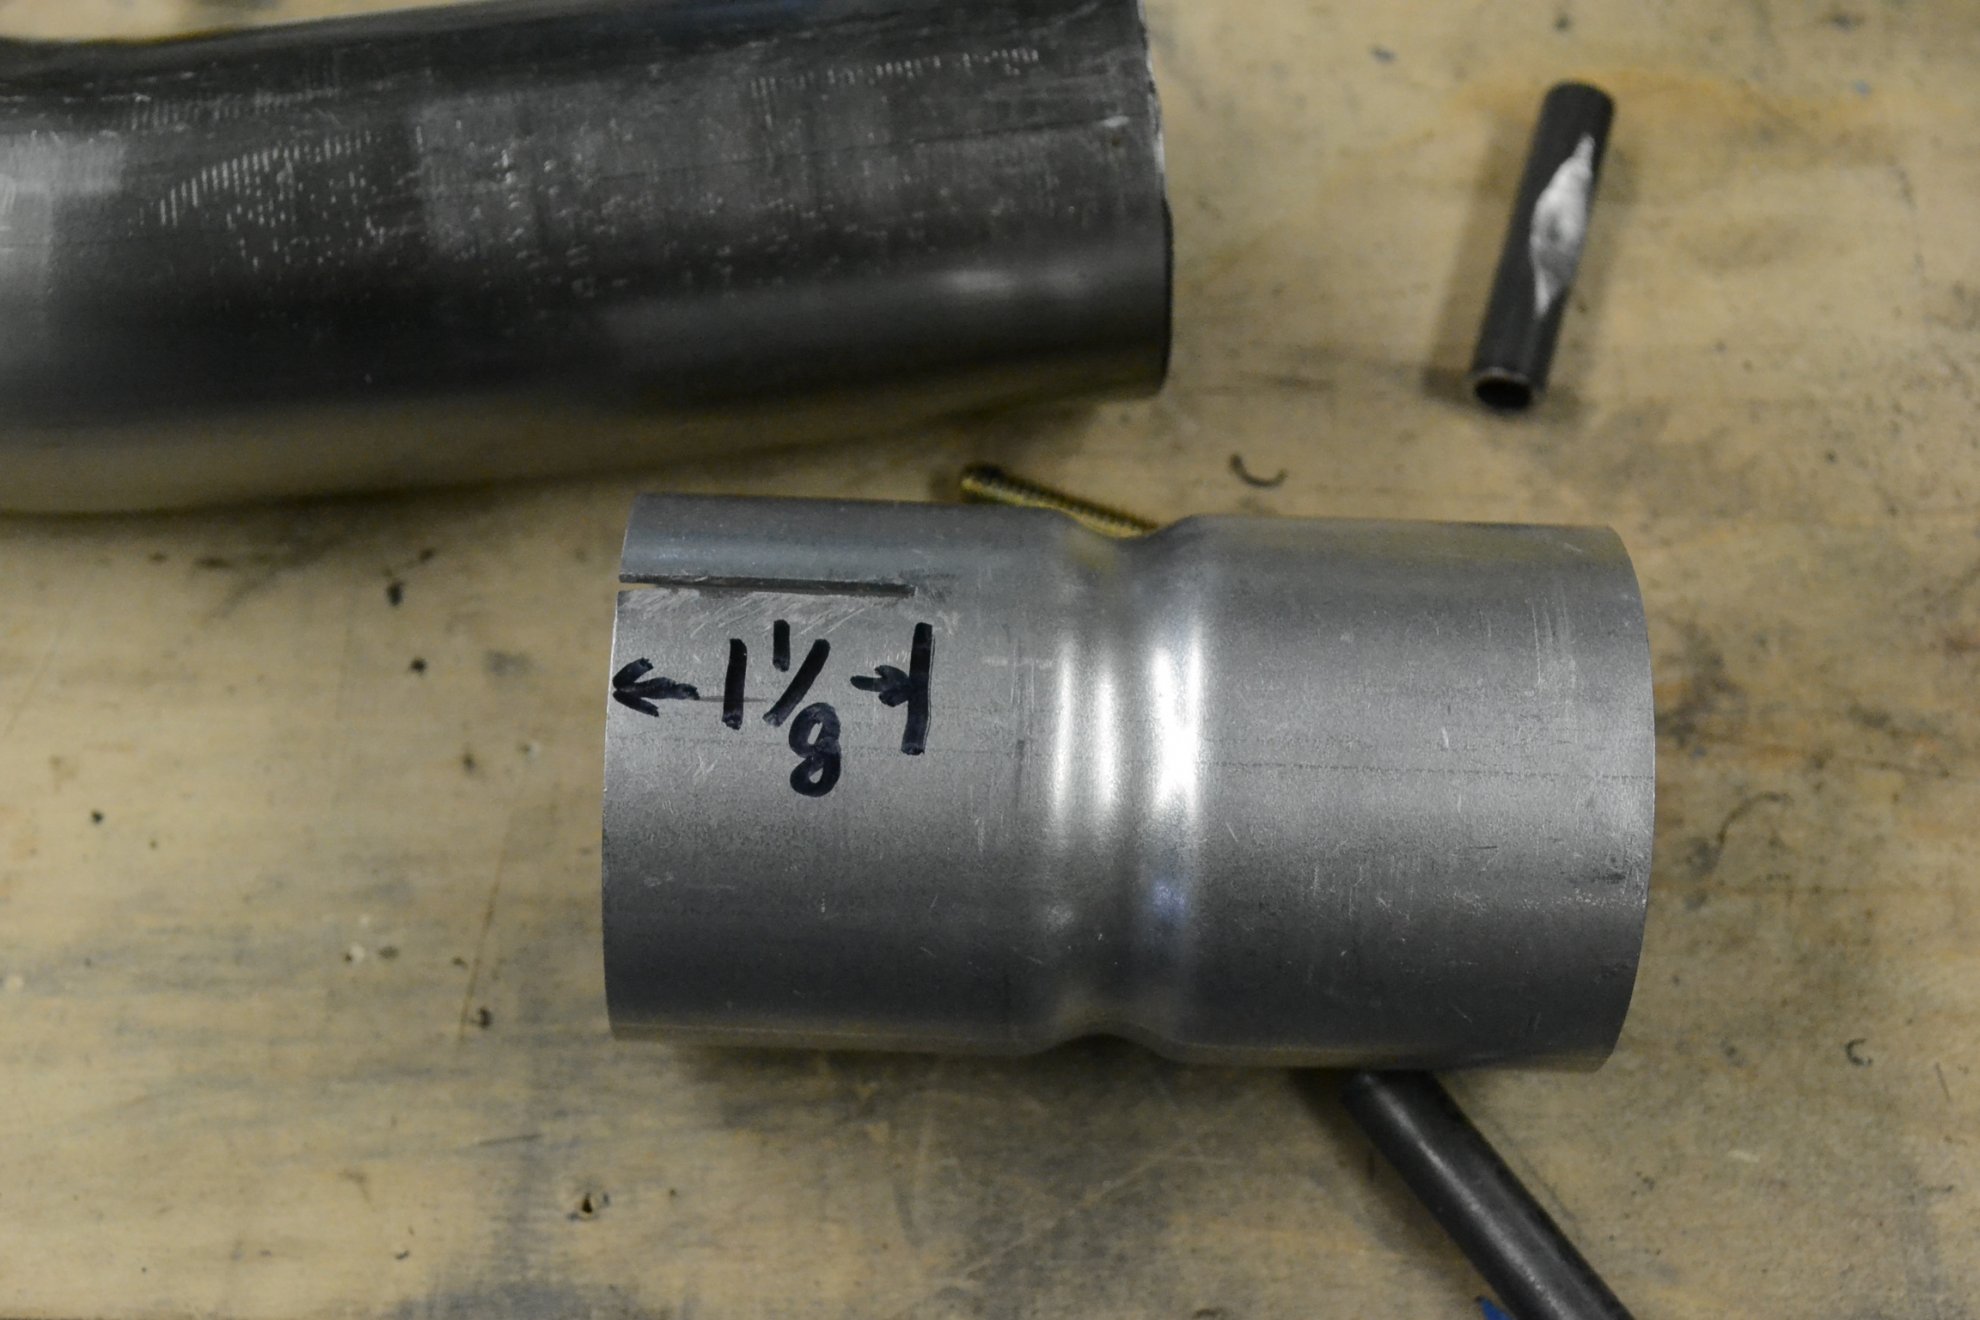
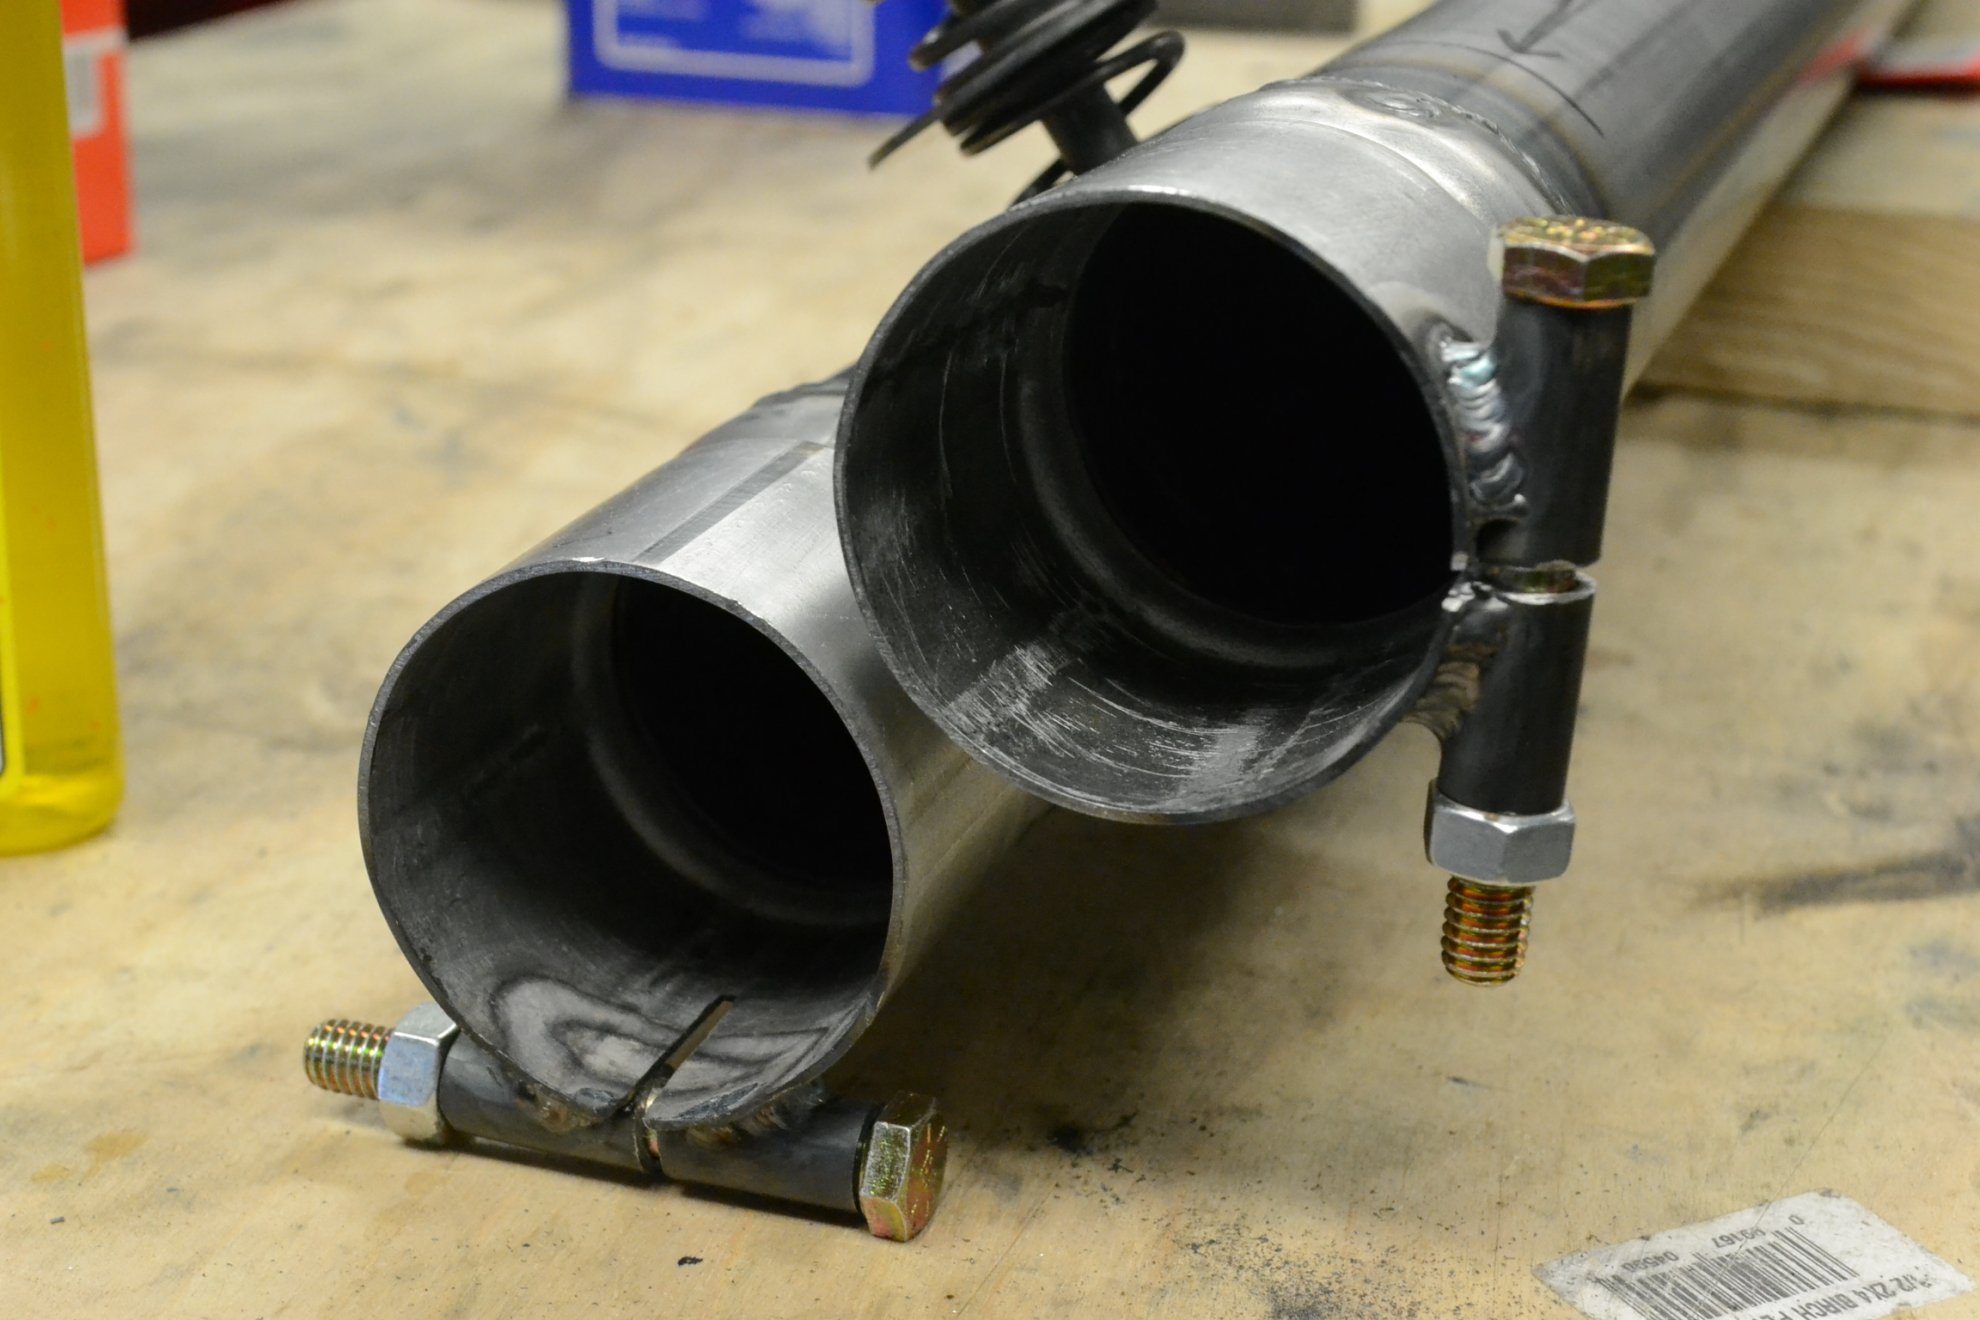
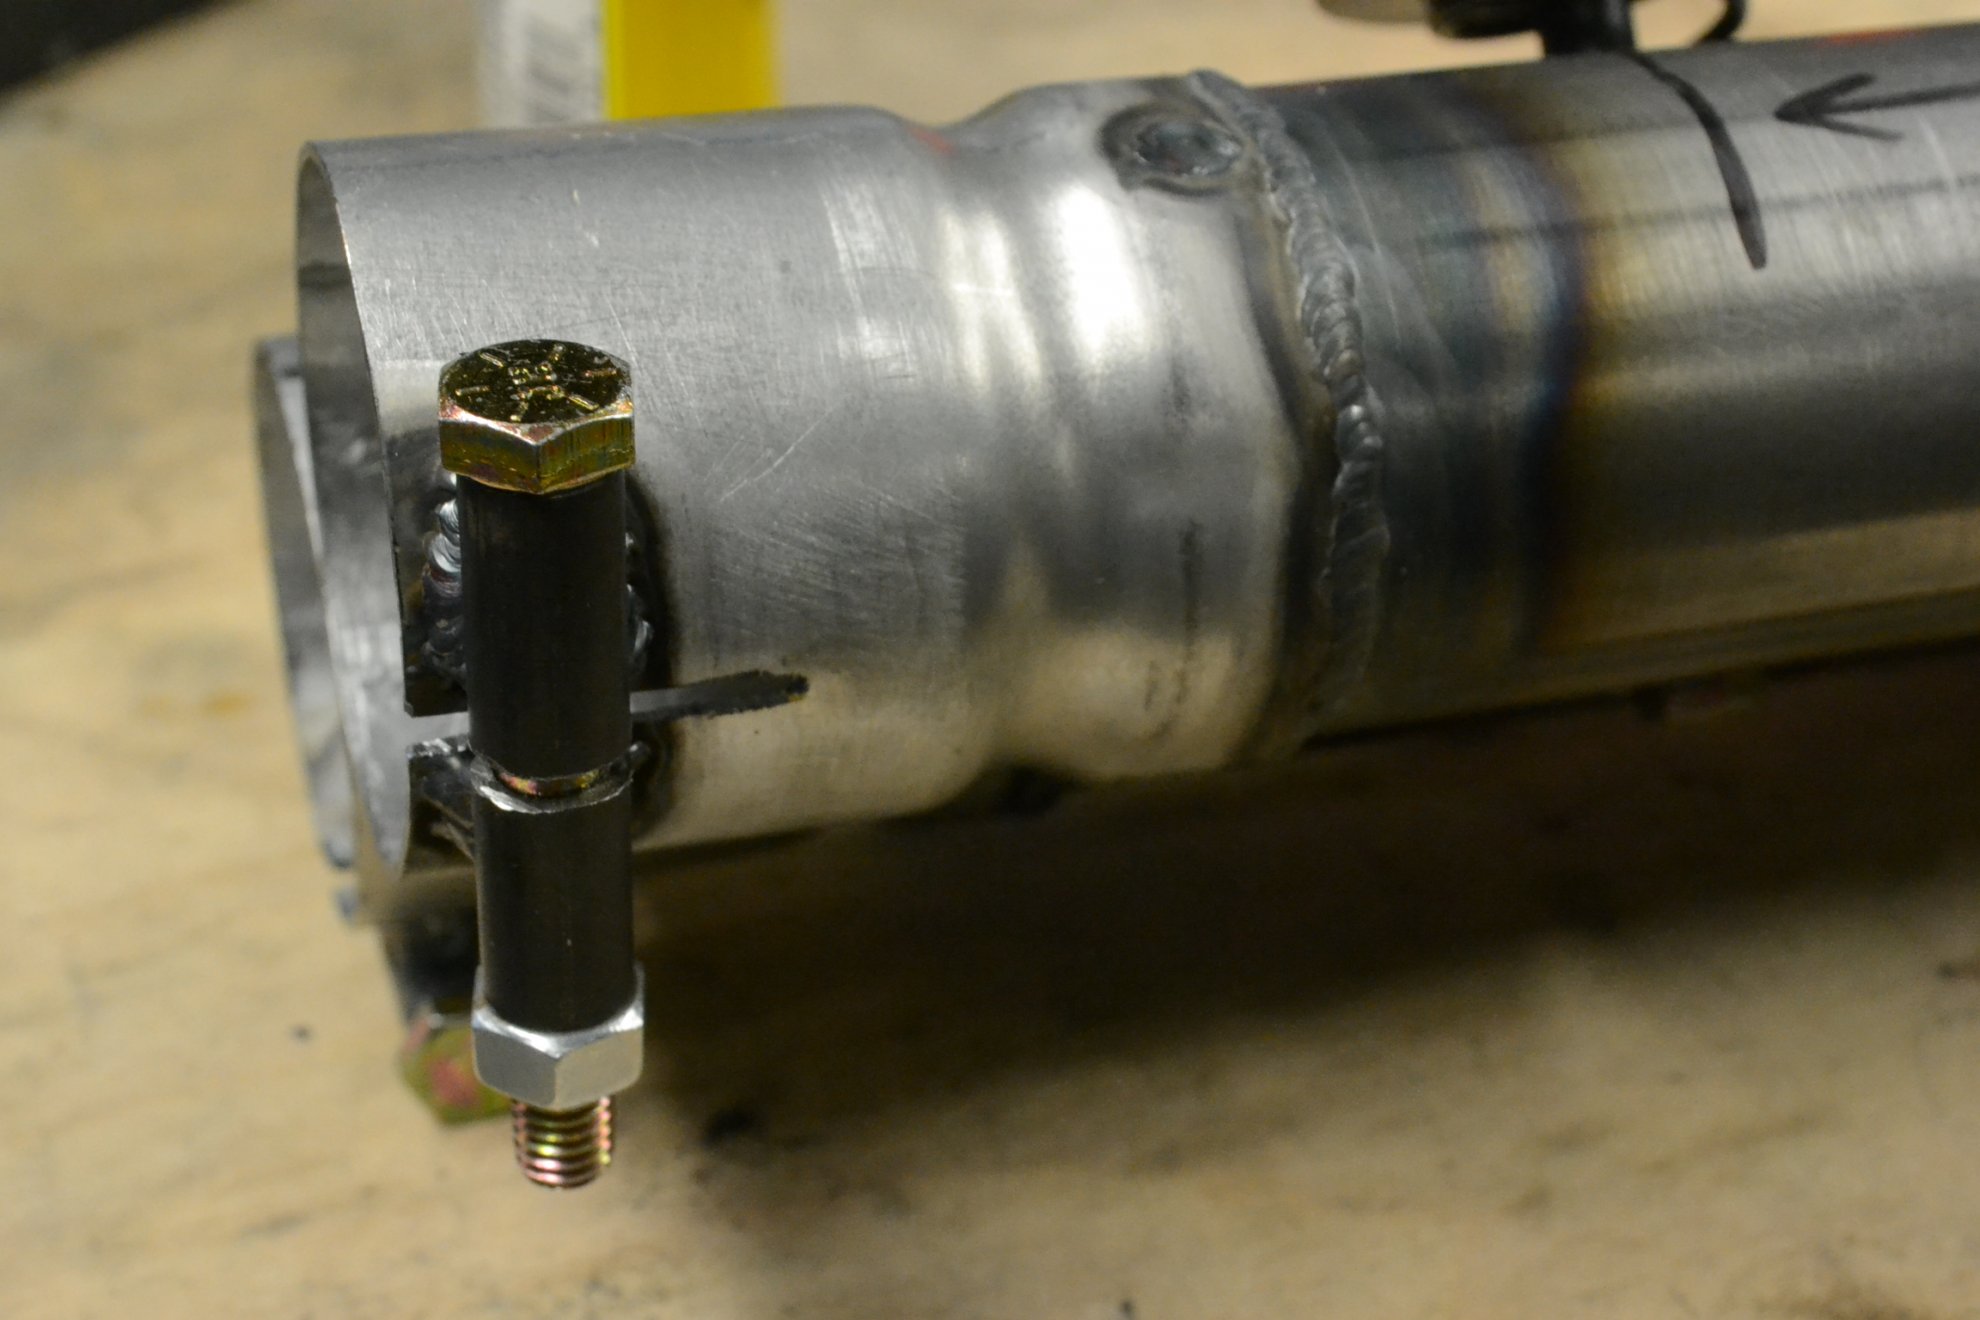
Note that the two bolts are at a 90 degree angle to one another. The upper outer bolt is the one that is visible and it needs to be vertical. The lower one will not be seen and is horizontal to make it accessible when the exhaust pipes are installed.
The connection between the side pipes and the curved forward section is removable. The vertical locking bolt is a visible feature on the original, which we wanted to duplicate.
The joint started with the connecting section. Walker exhaust pipe connectors 41948 (2 each). https://www.summitracing.com/parts/wlk-41948. This was cut to length after the slot was cut.
A two inch length of 5/16” ID, 3/8” OD steel tube was welded to the end of each pipe. One side of this tube was filed with an arc to match the curve of the connector pipe. A slot 1 1/8” was cut after which the 3/8” tube was welded in place. After welding the tube in place a matching slot was cut through the 3/8" tube, which assured that the slots would align.
Note that the two bolts are at a 90 degree angle to one another. The upper outer bolt is the one that is visible and it needs to be vertical. The lower one will not be seen and is horizontal to make it accessible when the exhaust pipes are installed.
Last edited:
Exhaust System, Chassis Connection, Part I
The connections to the body presented challenges. As noted in a prior post, the hangers used two springs on each connection with the body sandwiched between. This would permit a bit of both inward and outward movement. Duplicating this design was the goal.
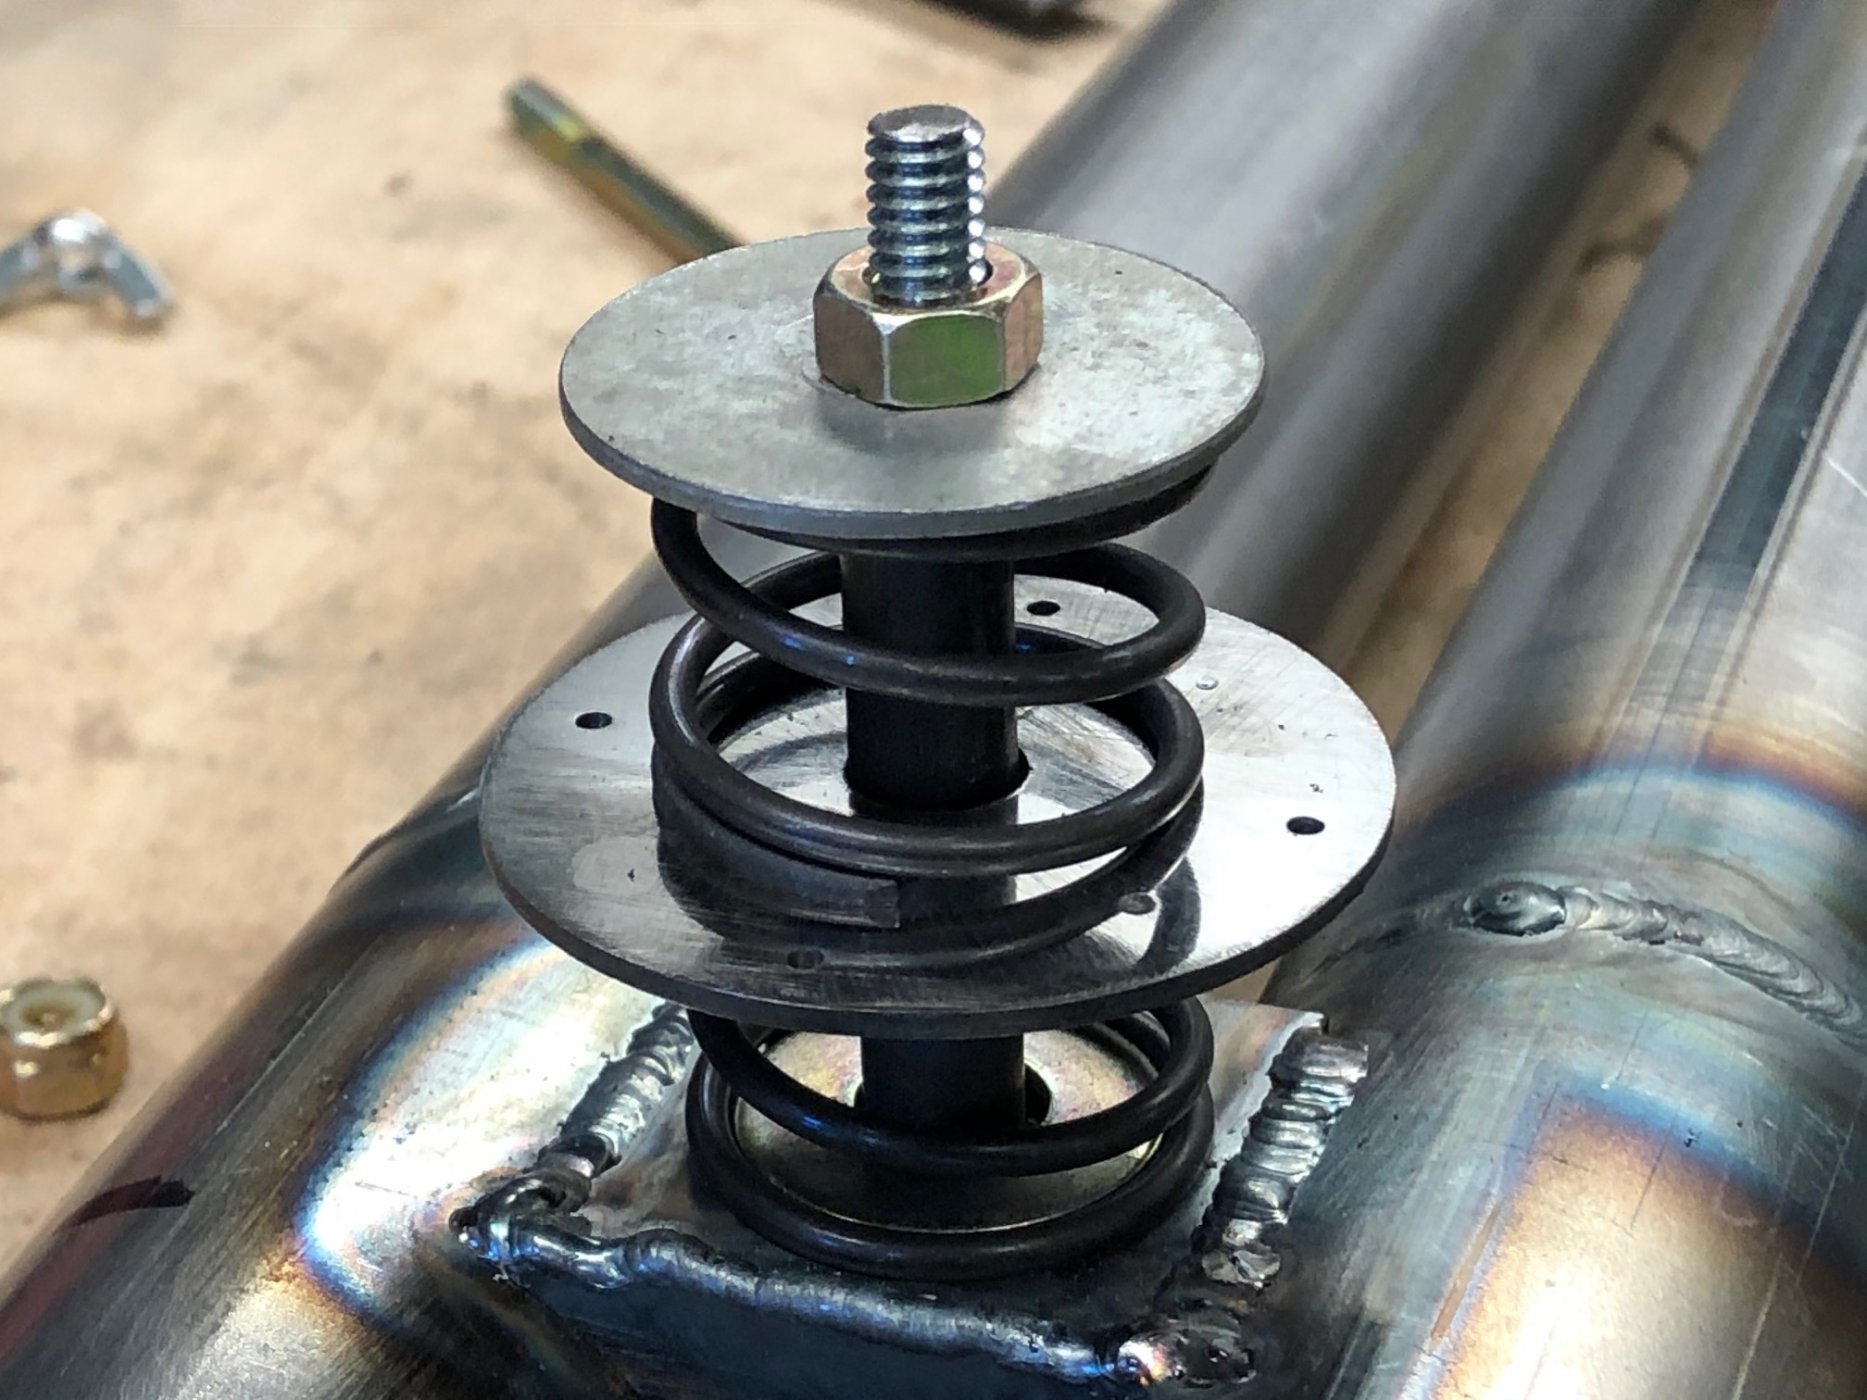
A quarter inch bolt passing through a 3/8” OD tube provides the primary connection. The 1” diameter springs keep the connection in tension but permits some flexibility, in and out. The compression springs came from McMaster-Carr, part number 9657K527.
Plans were drawn up for the hanger.
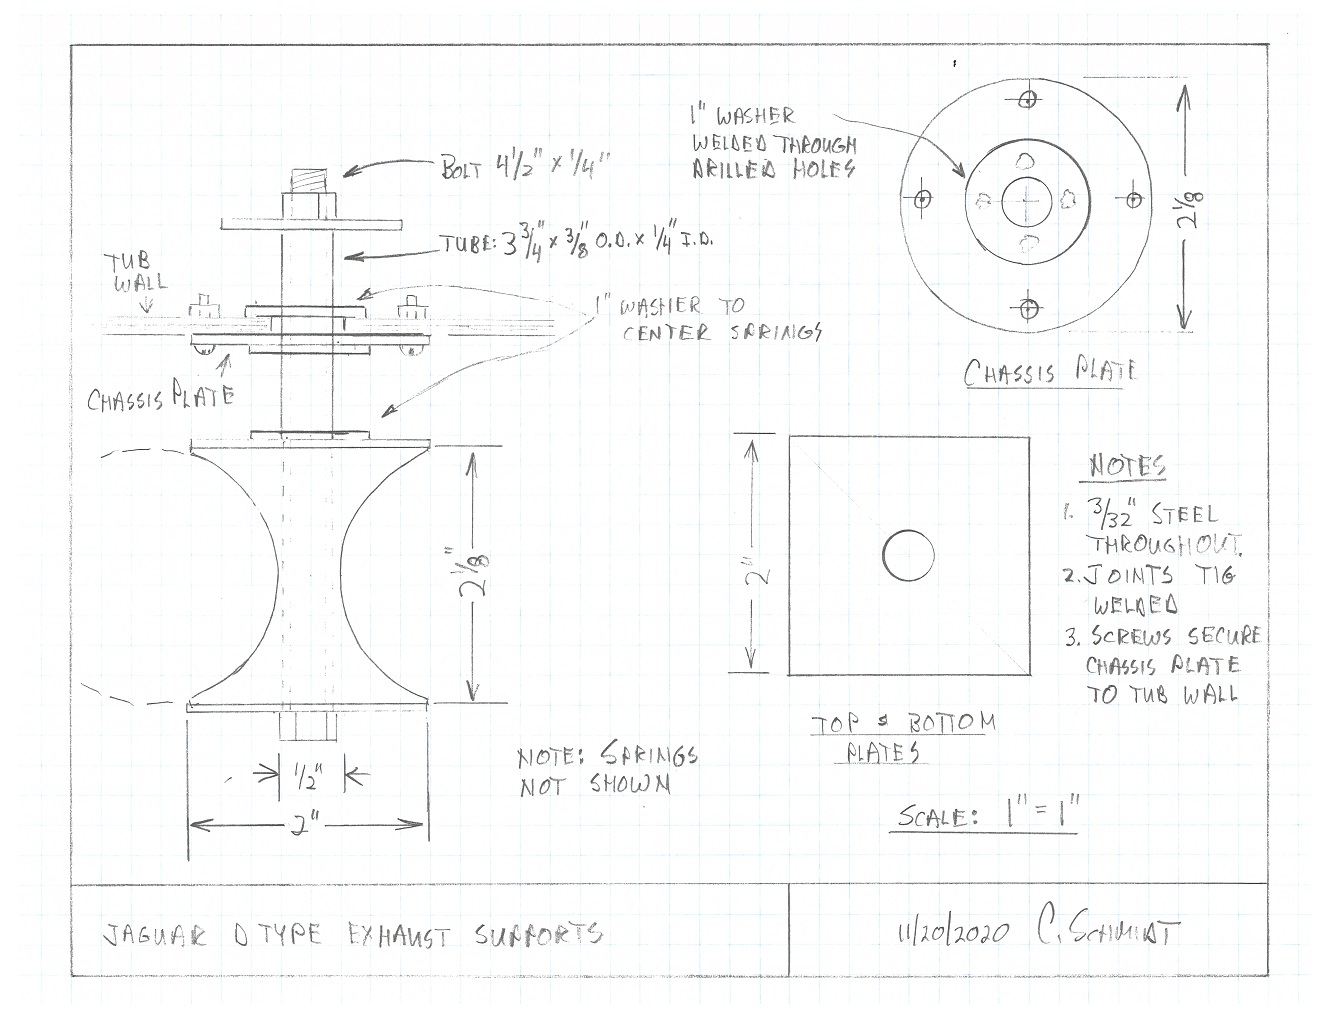
The hour glass shaped sections, top and bottom plates, welded to the pipes not only provide the means of connecting them to the body, but also hold the two pipes a half inch apart.
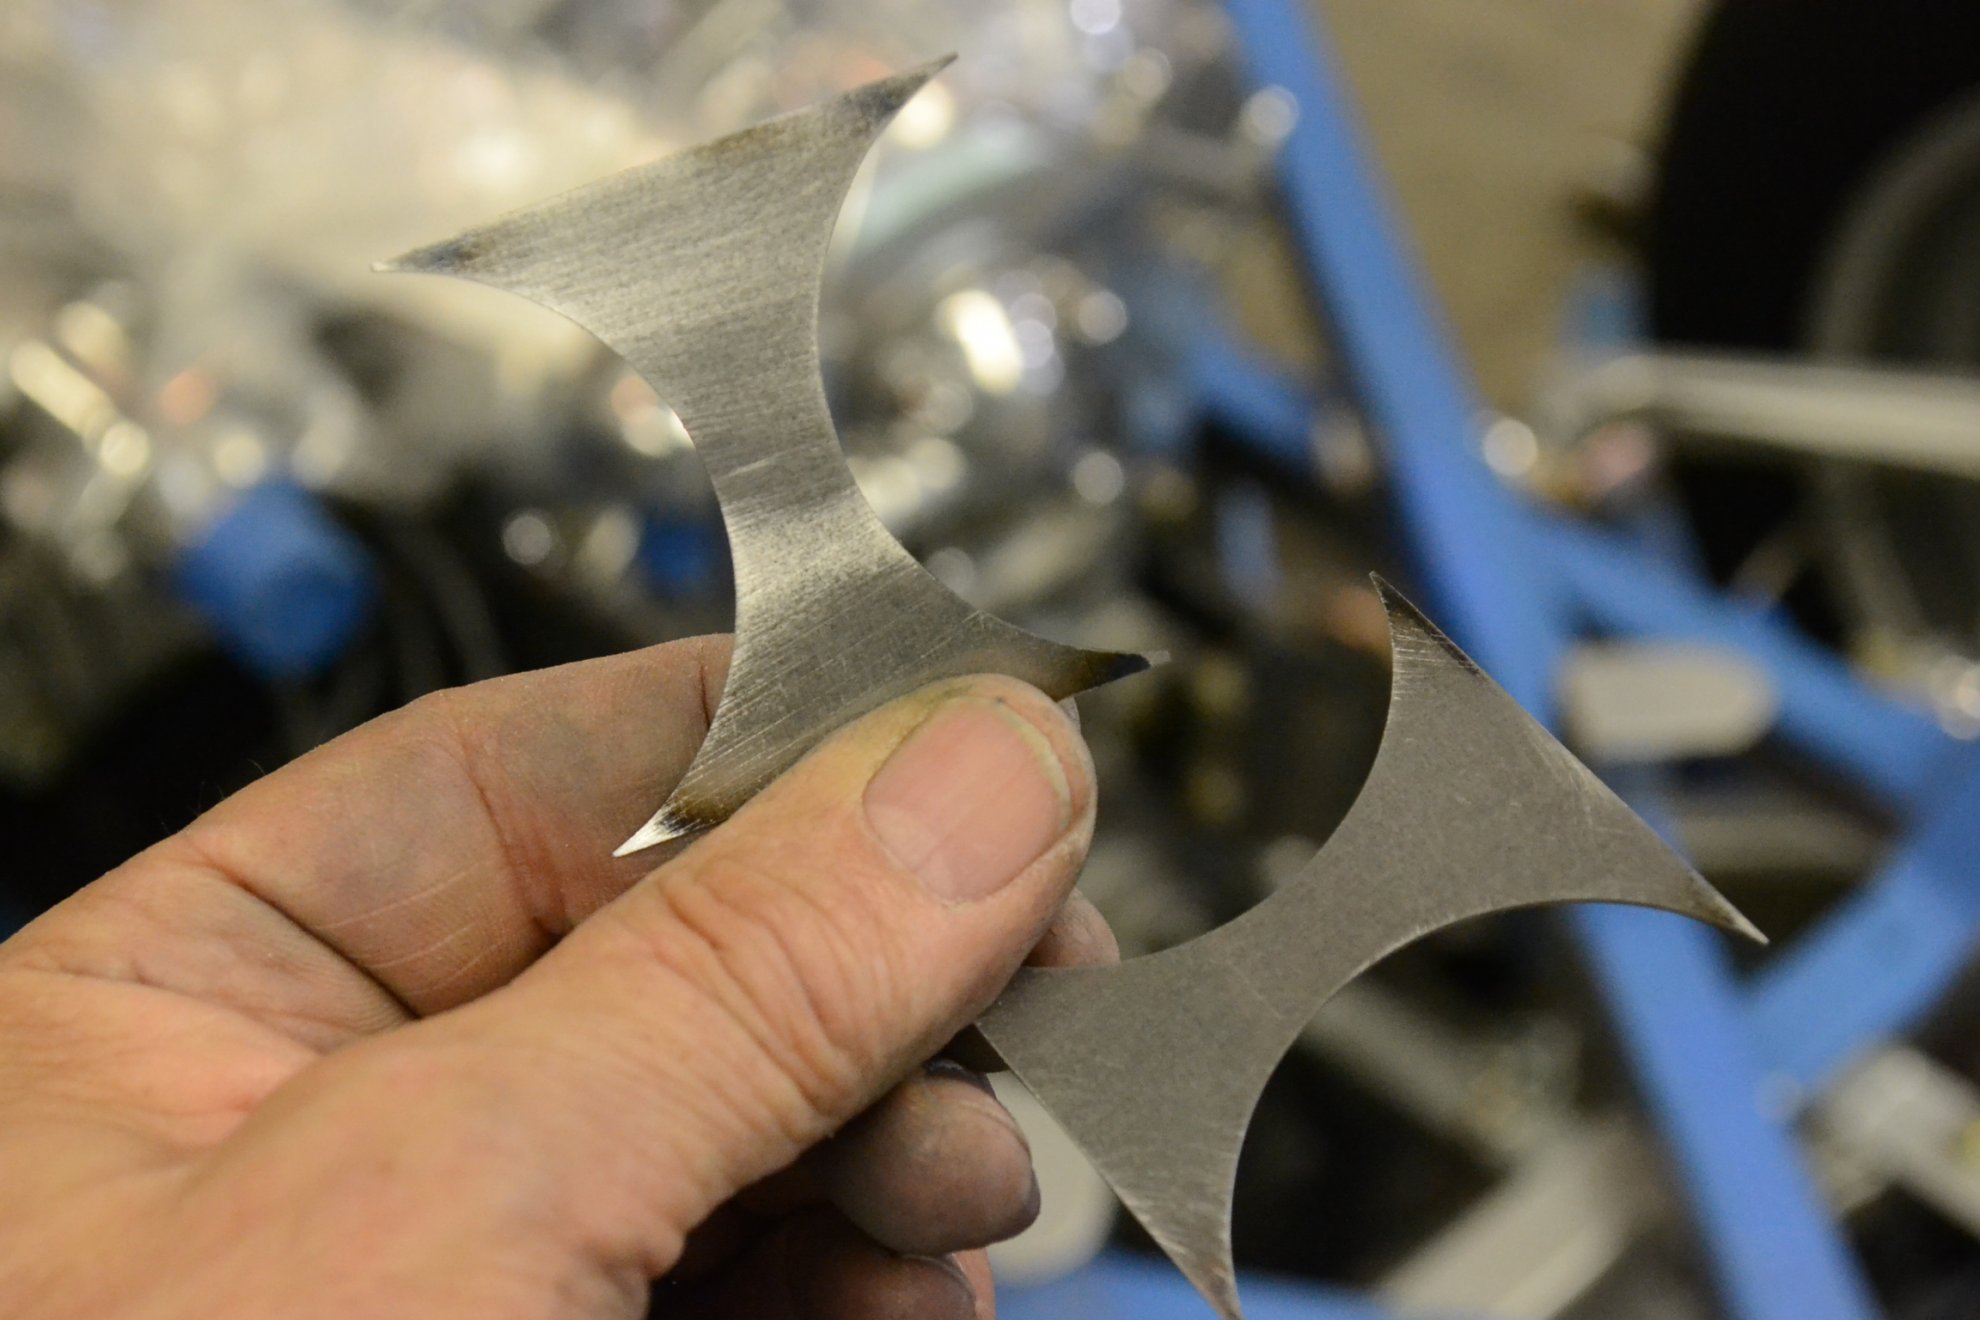
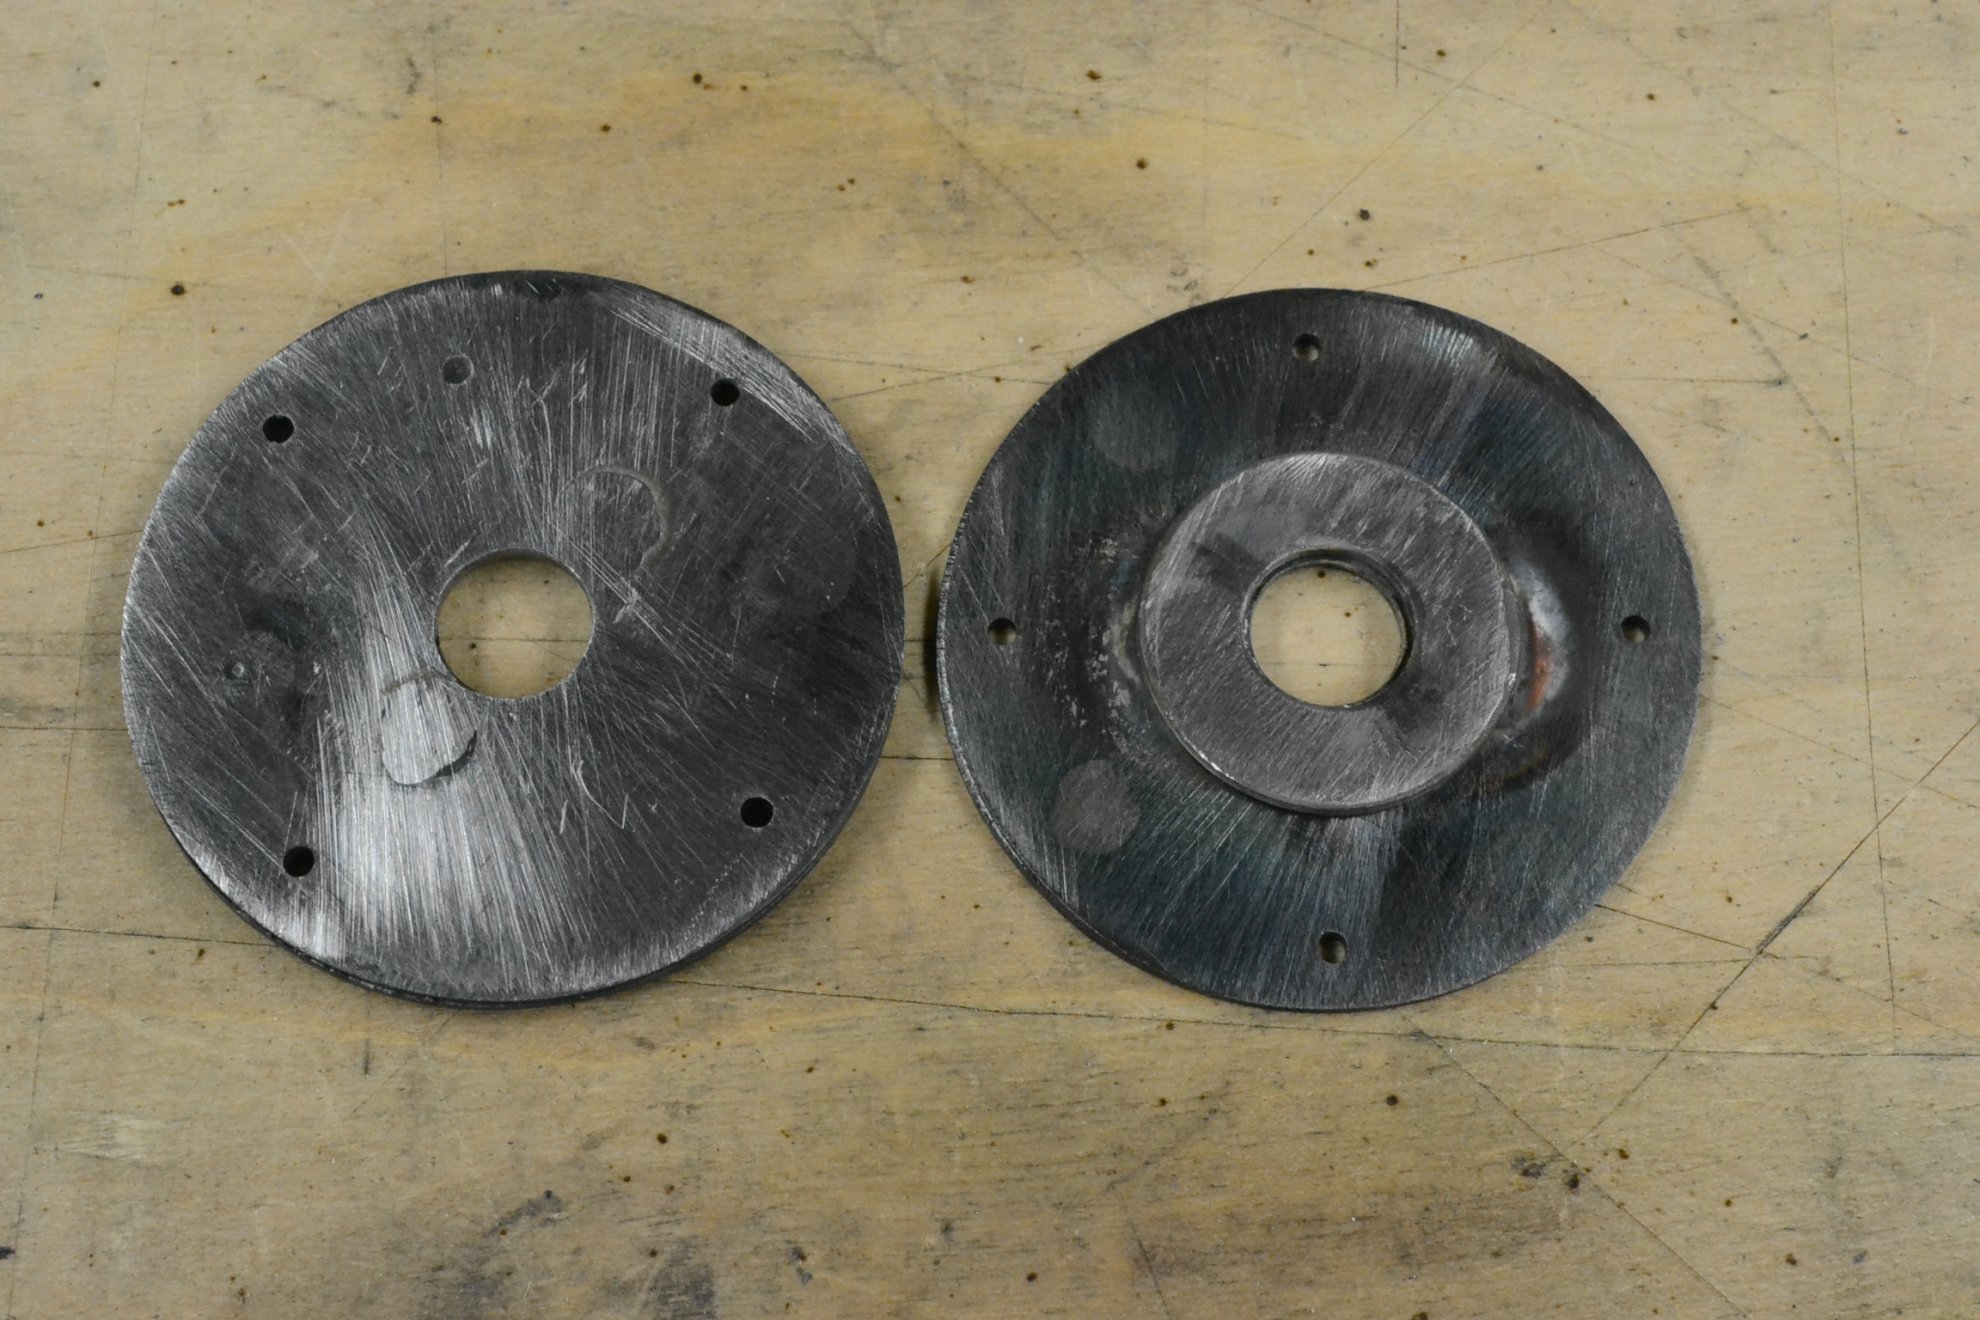
A two inch round plate is located at the top of the outer spring where it contacts the body. A washer was carefully welded to the center of the plate which centers the spring. This was accomplished by drilling holes in the plate and then making a rosette type weld so that the edges of the washer would remain smooth. The weld was then ground down flush for aesthetic reasons.
Here is the completed hanger assembly. The large plate between the springs will be connected to the outside of the chassis using four small screws and nuts. One spring will be outside and the other inside the chassis. When assembled the top bolt is tightened down against the 3/8 tube centering the plate that is connected to the tub. The springs are always under tension. The side pipes can then move both inward and outward, centered by the spring tension: the same way the original worked.
The connections to the body presented challenges. As noted in a prior post, the hangers used two springs on each connection with the body sandwiched between. This would permit a bit of both inward and outward movement. Duplicating this design was the goal.
A quarter inch bolt passing through a 3/8” OD tube provides the primary connection. The 1” diameter springs keep the connection in tension but permits some flexibility, in and out. The compression springs came from McMaster-Carr, part number 9657K527.
Plans were drawn up for the hanger.
The hour glass shaped sections, top and bottom plates, welded to the pipes not only provide the means of connecting them to the body, but also hold the two pipes a half inch apart.
A two inch round plate is located at the top of the outer spring where it contacts the body. A washer was carefully welded to the center of the plate which centers the spring. This was accomplished by drilling holes in the plate and then making a rosette type weld so that the edges of the washer would remain smooth. The weld was then ground down flush for aesthetic reasons.
Here is the completed hanger assembly. The large plate between the springs will be connected to the outside of the chassis using four small screws and nuts. One spring will be outside and the other inside the chassis. When assembled the top bolt is tightened down against the 3/8 tube centering the plate that is connected to the tub. The springs are always under tension. The side pipes can then move both inward and outward, centered by the spring tension: the same way the original worked.
Last edited:
Exhaust System, Chassis Connection, Part II
With the hanger assembly complete, the connection to the chassis was next.
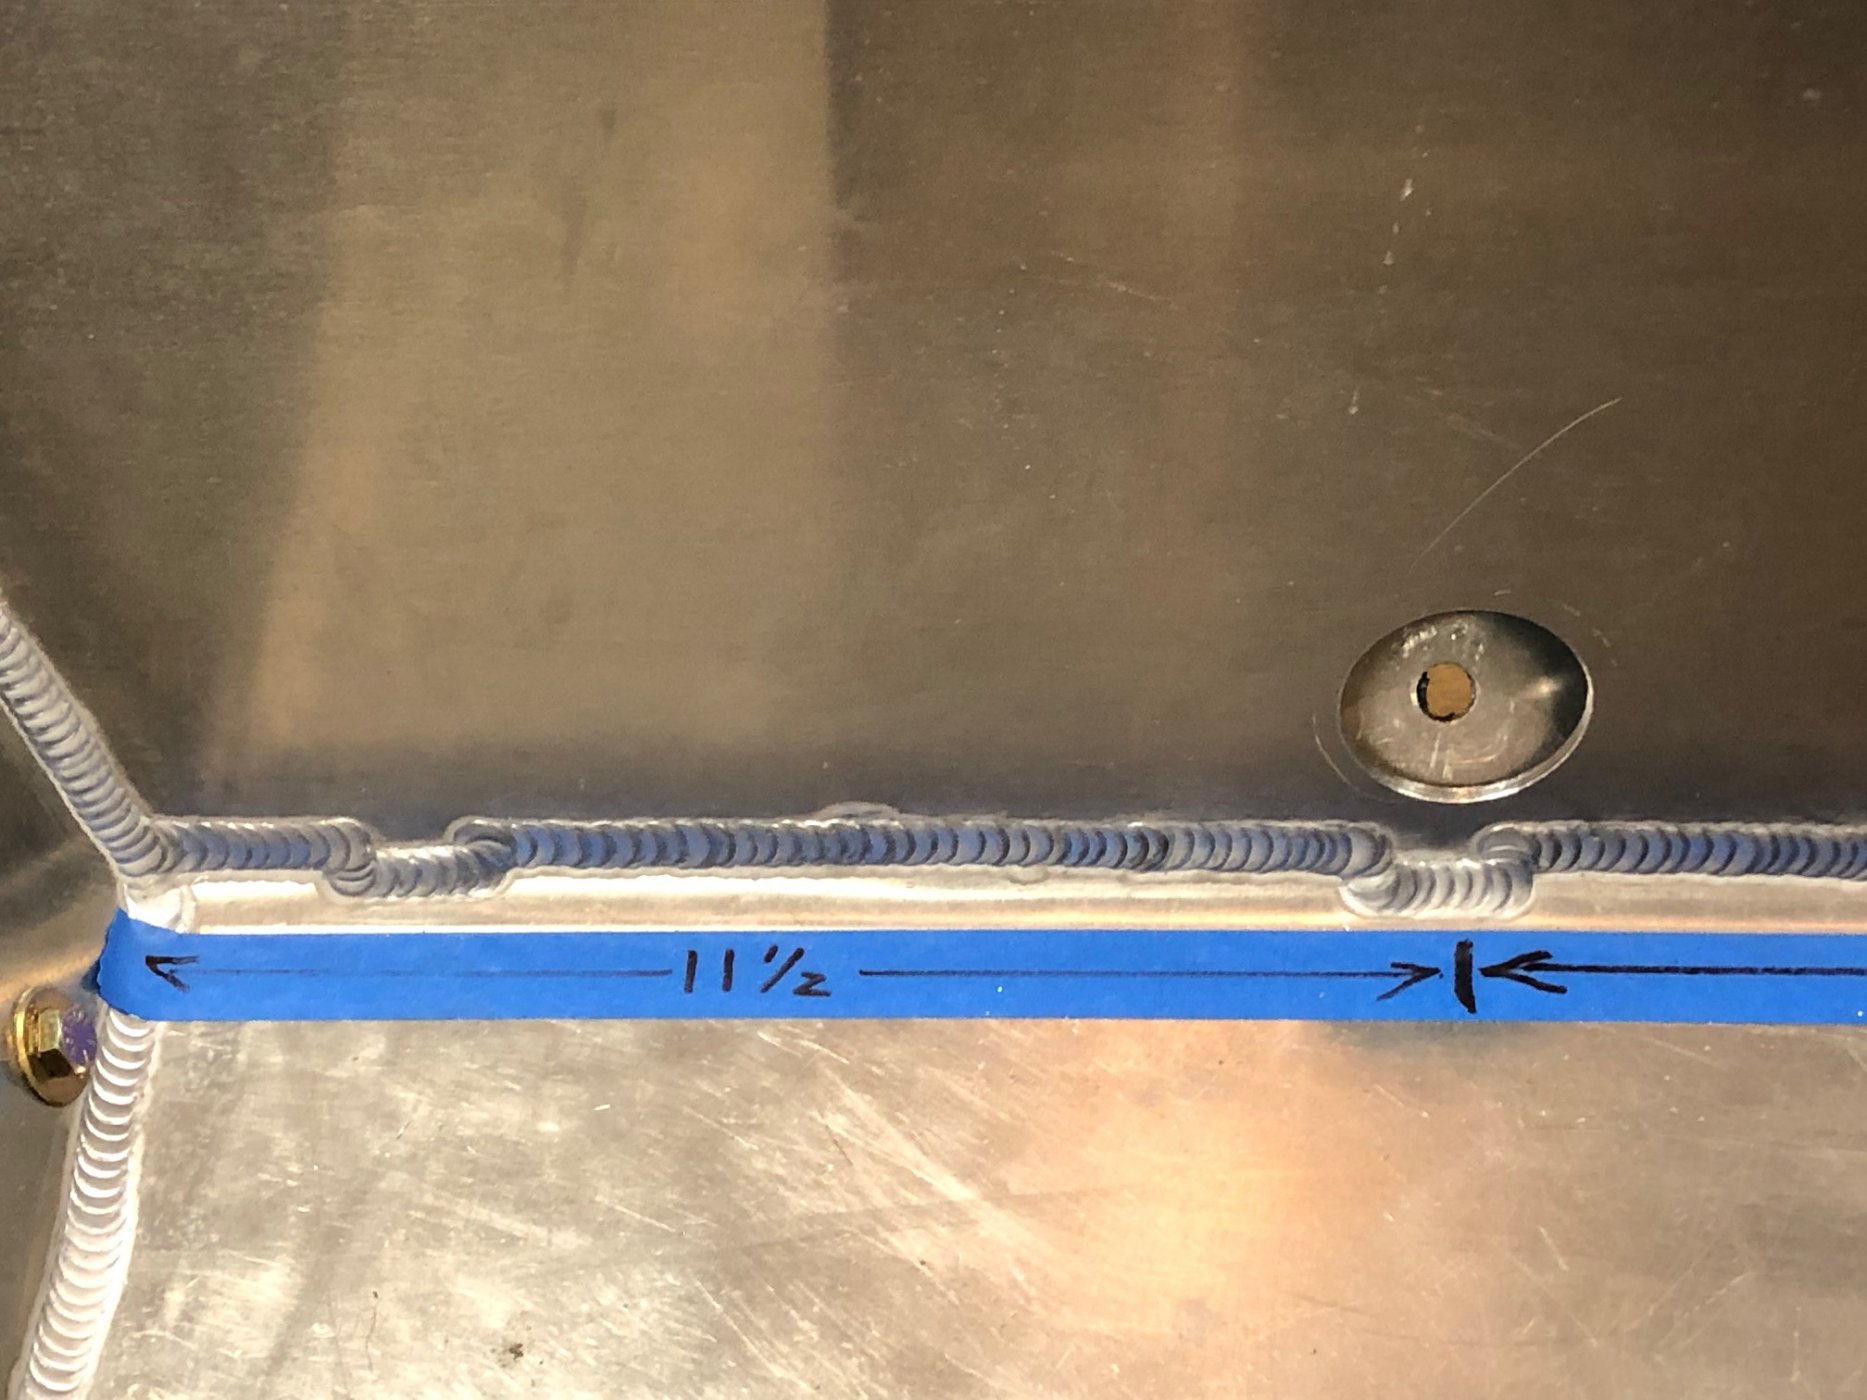
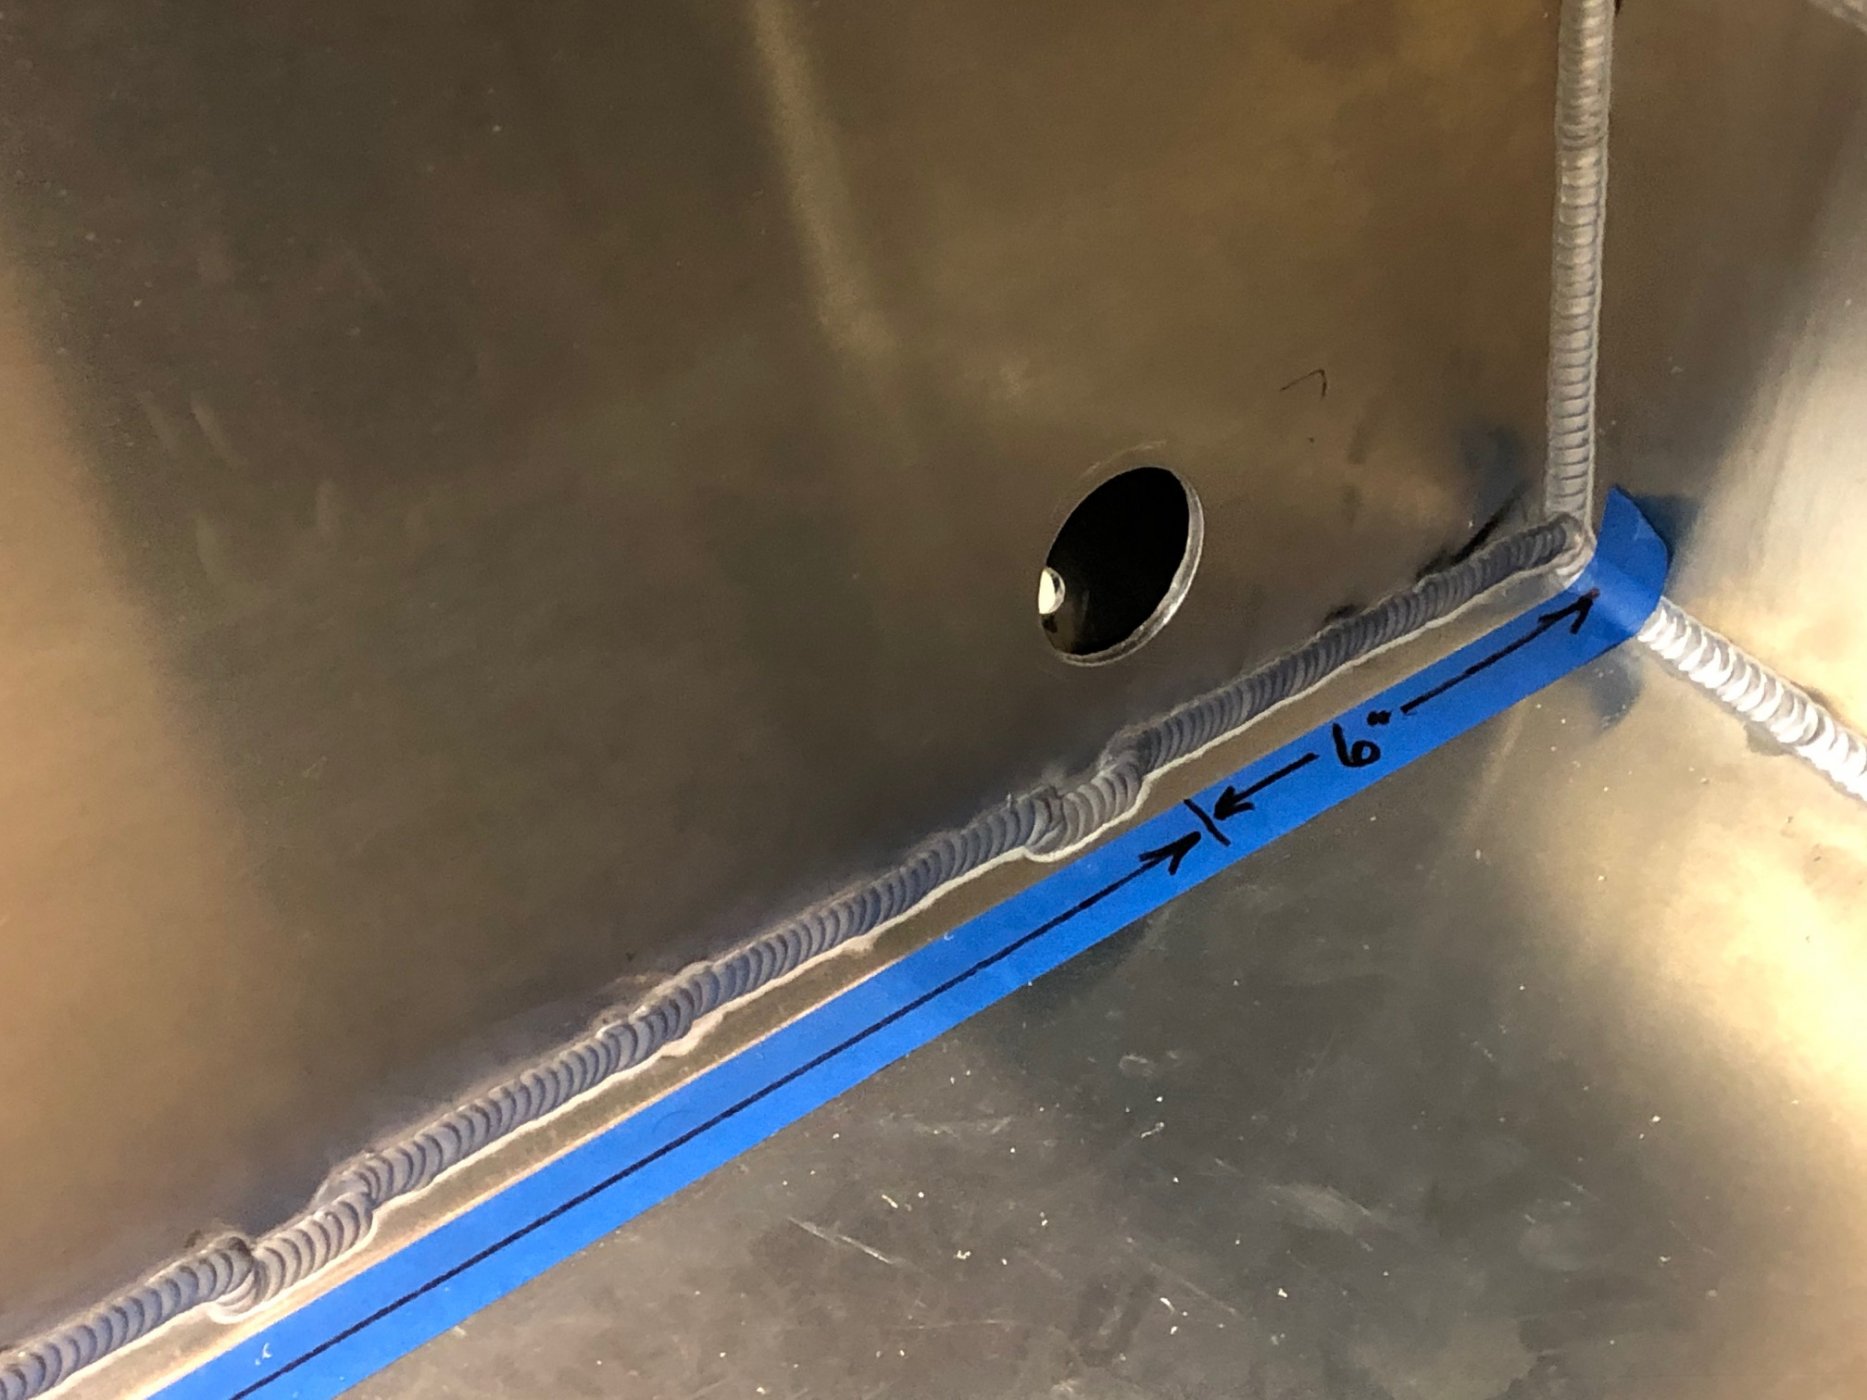
Two inch access holes were cut on the inside of the chassis to provide access. The hole on the outside of the chassis is 3/8”. Note the forward hole is higher than the aft hole so that the pipes will ‘run downhill’. More on that later.
A guide hole was drilled from the outside perpendicular to the lower angled return. The two inch hole on the inside was then drilled at the location of the guide hole.
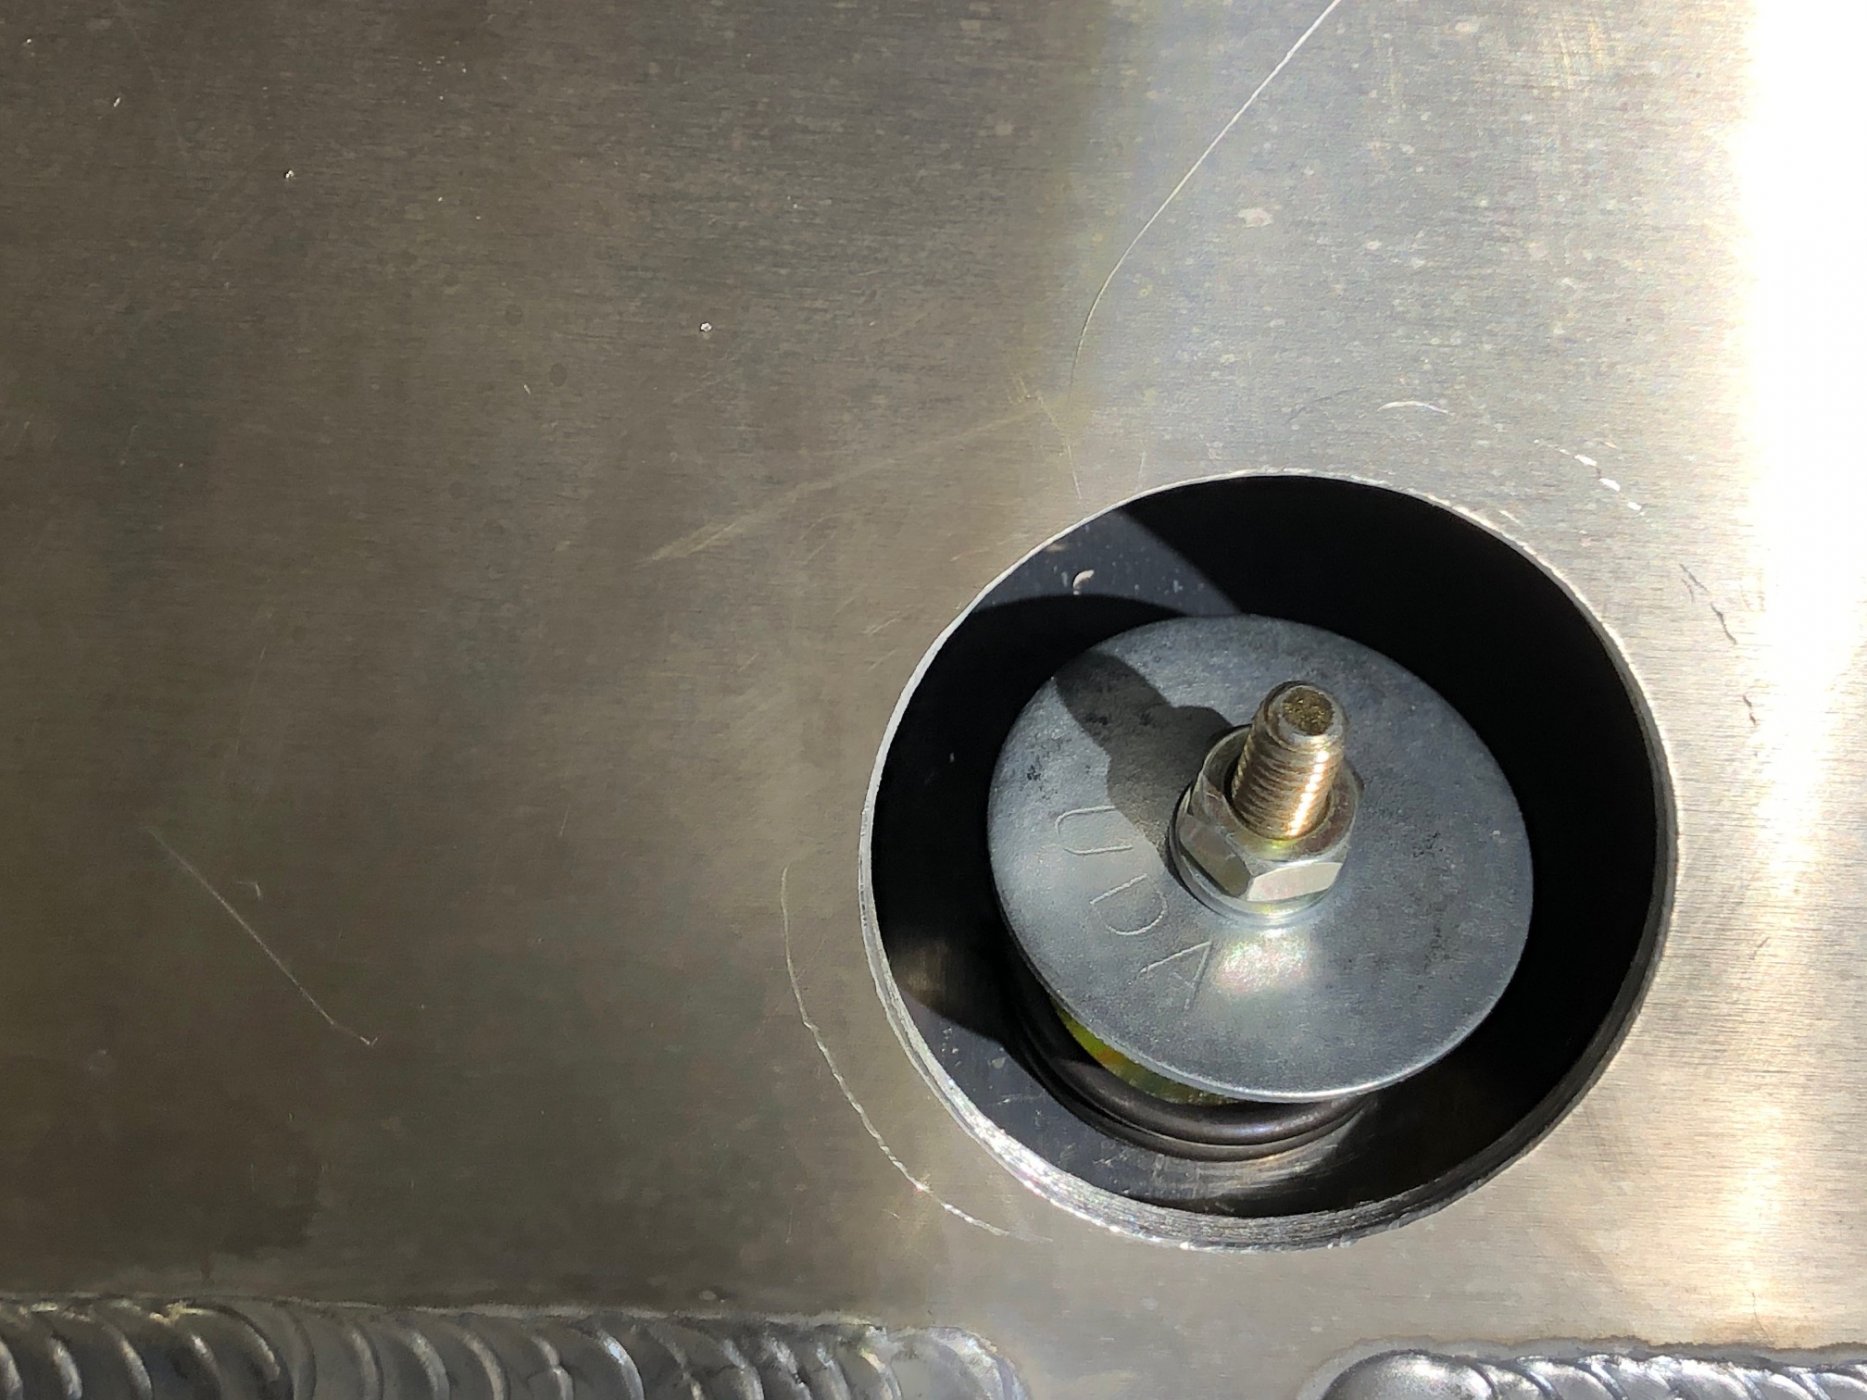
Here is the hanger installed. A one inch OD, 3/8” ID washer keep the spring centered. The top one is a 1 ½” fender washer.
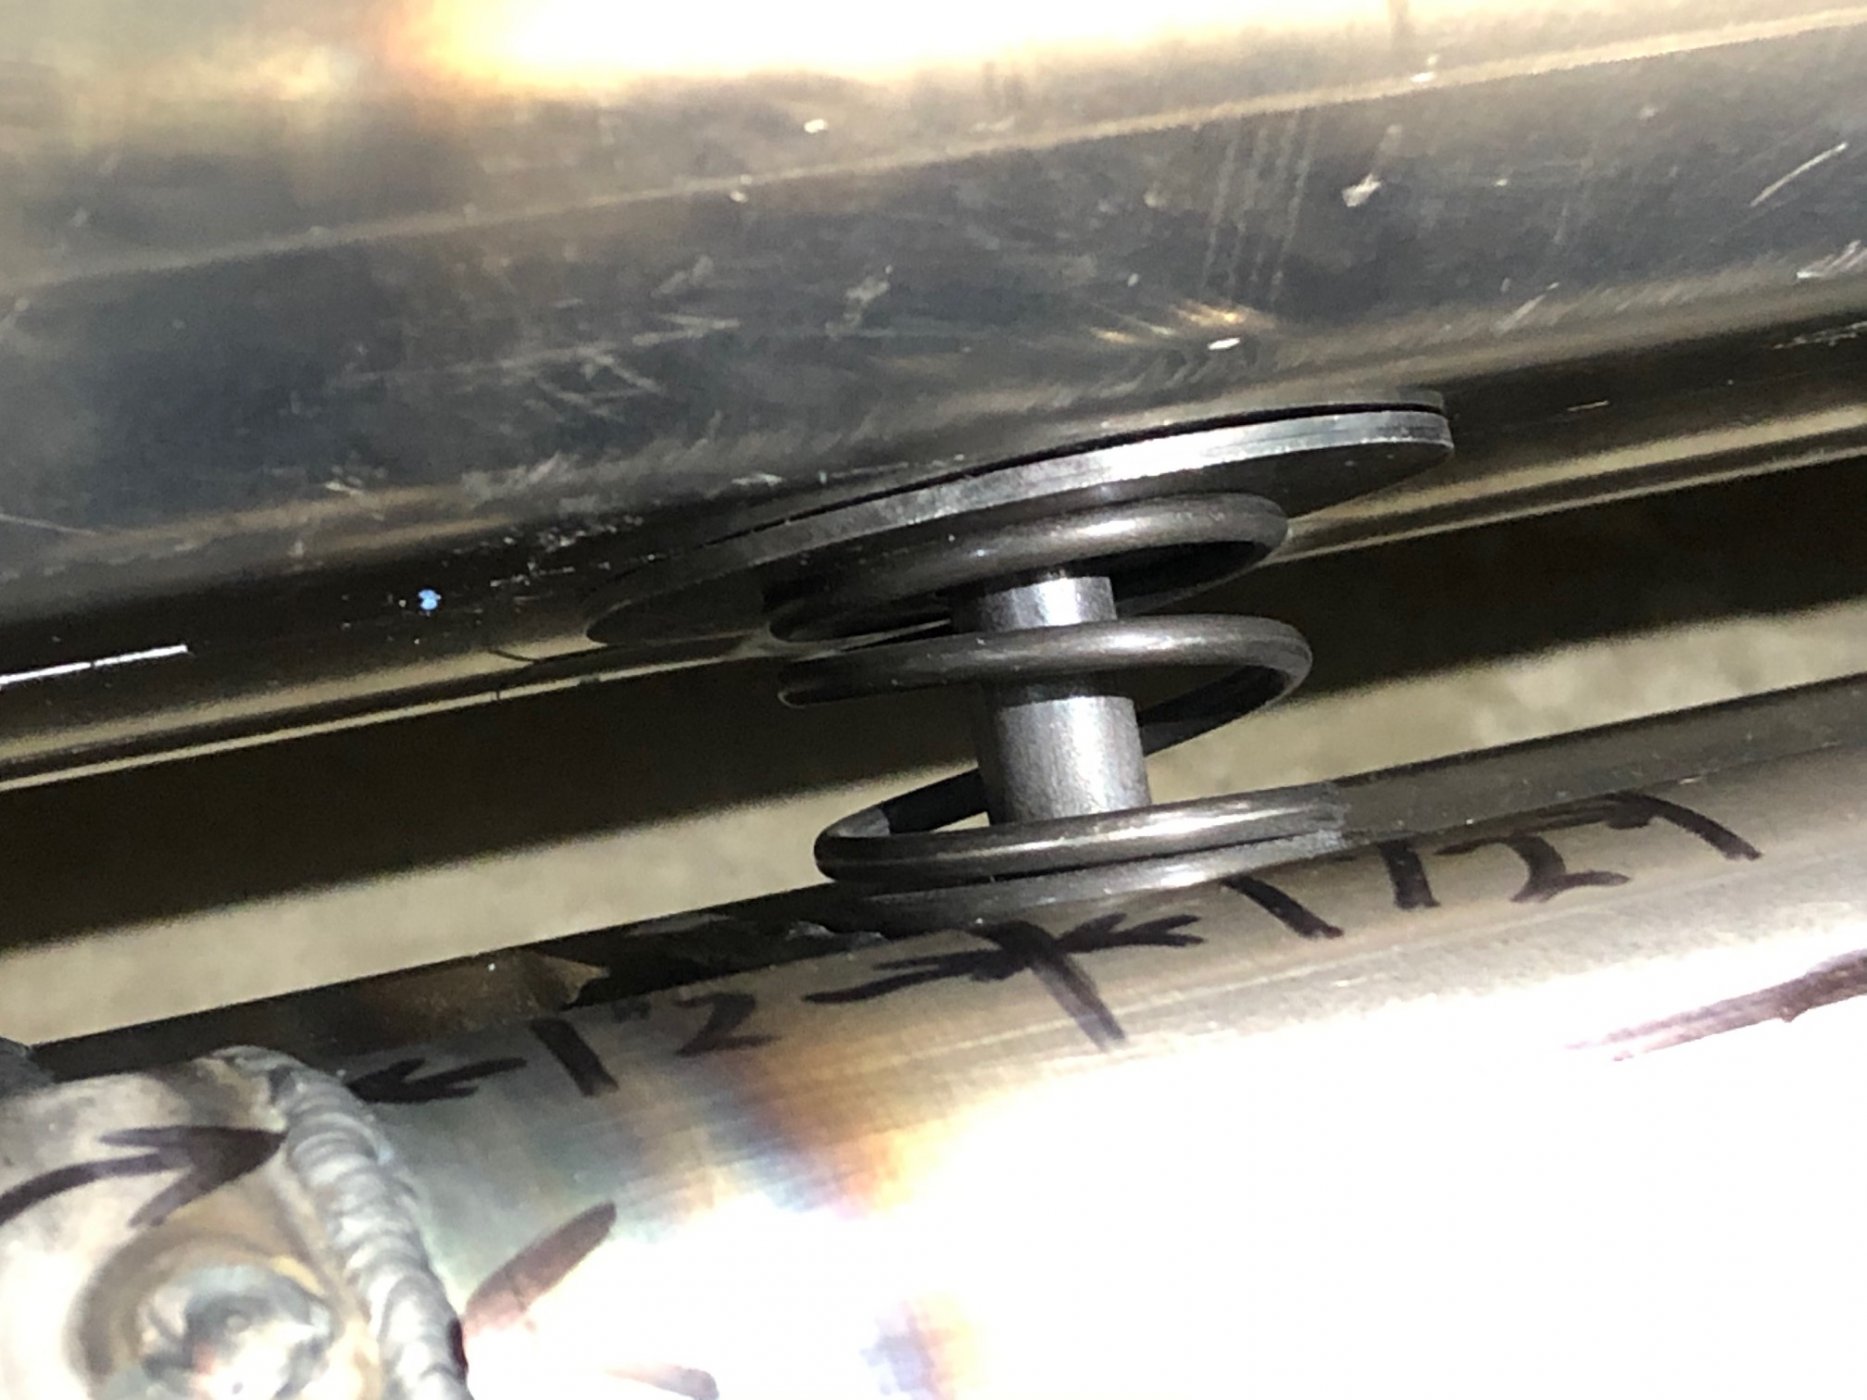
The goal of this exercise was to capture the look of the original. Here are pictures of our version and the original version.
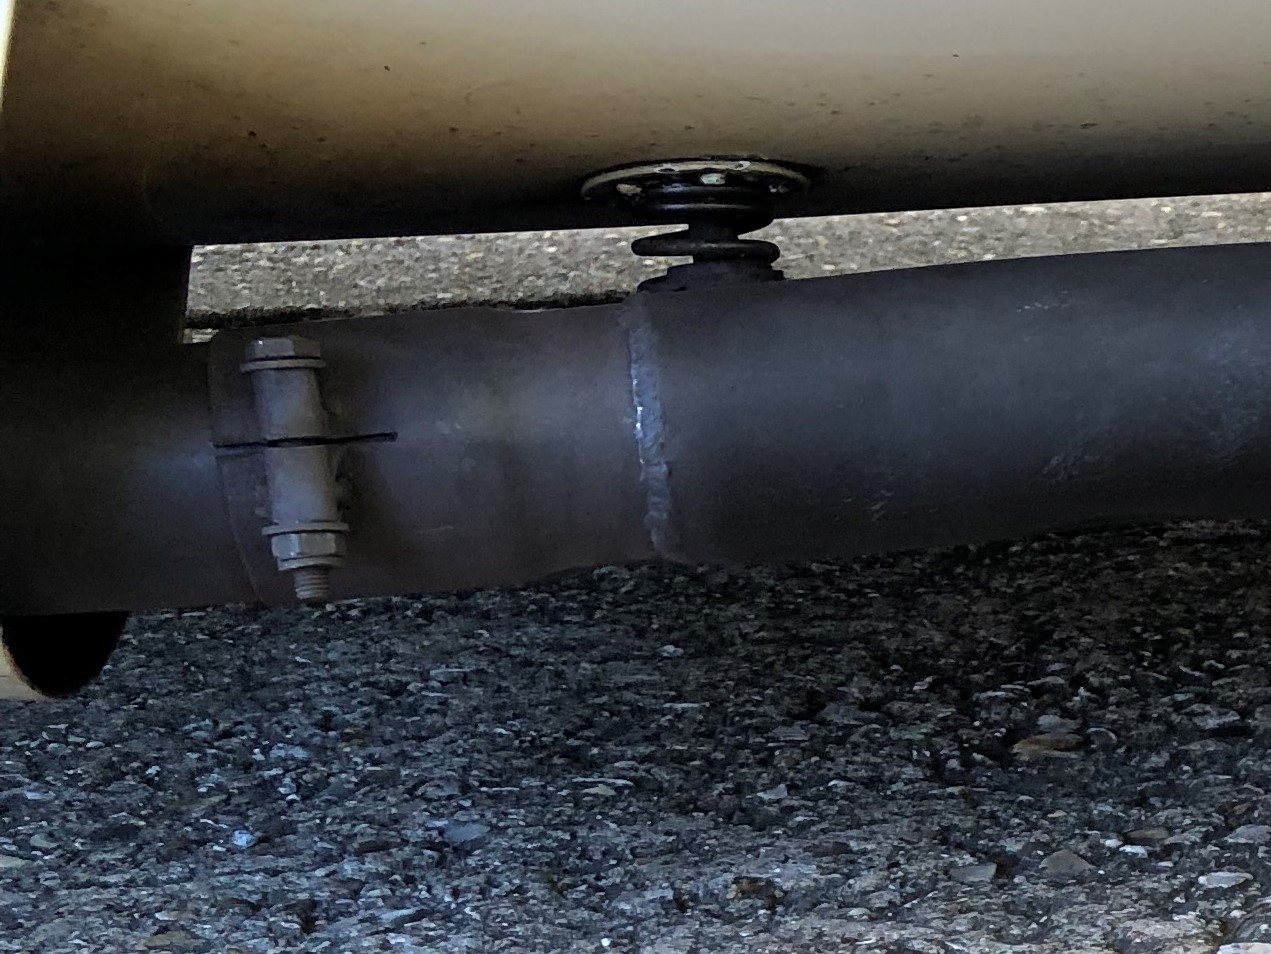
With the hanger assembly complete, the connection to the chassis was next.
Two inch access holes were cut on the inside of the chassis to provide access. The hole on the outside of the chassis is 3/8”. Note the forward hole is higher than the aft hole so that the pipes will ‘run downhill’. More on that later.
A guide hole was drilled from the outside perpendicular to the lower angled return. The two inch hole on the inside was then drilled at the location of the guide hole.
Here is the hanger installed. A one inch OD, 3/8” ID washer keep the spring centered. The top one is a 1 ½” fender washer.
The goal of this exercise was to capture the look of the original. Here are pictures of our version and the original version.
Last edited:
Chuck, are you using stainless steel in contact with the aluminum to avoid galvanic corrosion?
No. The only contact between the exhaust and the aluminum tub are the two connections plates, which are steel. I do not anticipate that galvanic corrosion will be an issue in this application.Chuck, are you using stainless steel in contact with the aluminum to avoid galvanic corrosion?
Chuck
Exhaust system, Side Pipe Final Installation
Once the pieces were fabricated, the system was test fitted. Additional adjustments were needed to connect the headers to the side pipes. More cutting and tack welding.
Note that the pipes were staggered so that the ninety degree connections are above and below each other. This will simplify the cover that goes over these angled pipes on the outside of the body. A minimum of ¾” separates the pipes from the chassis.
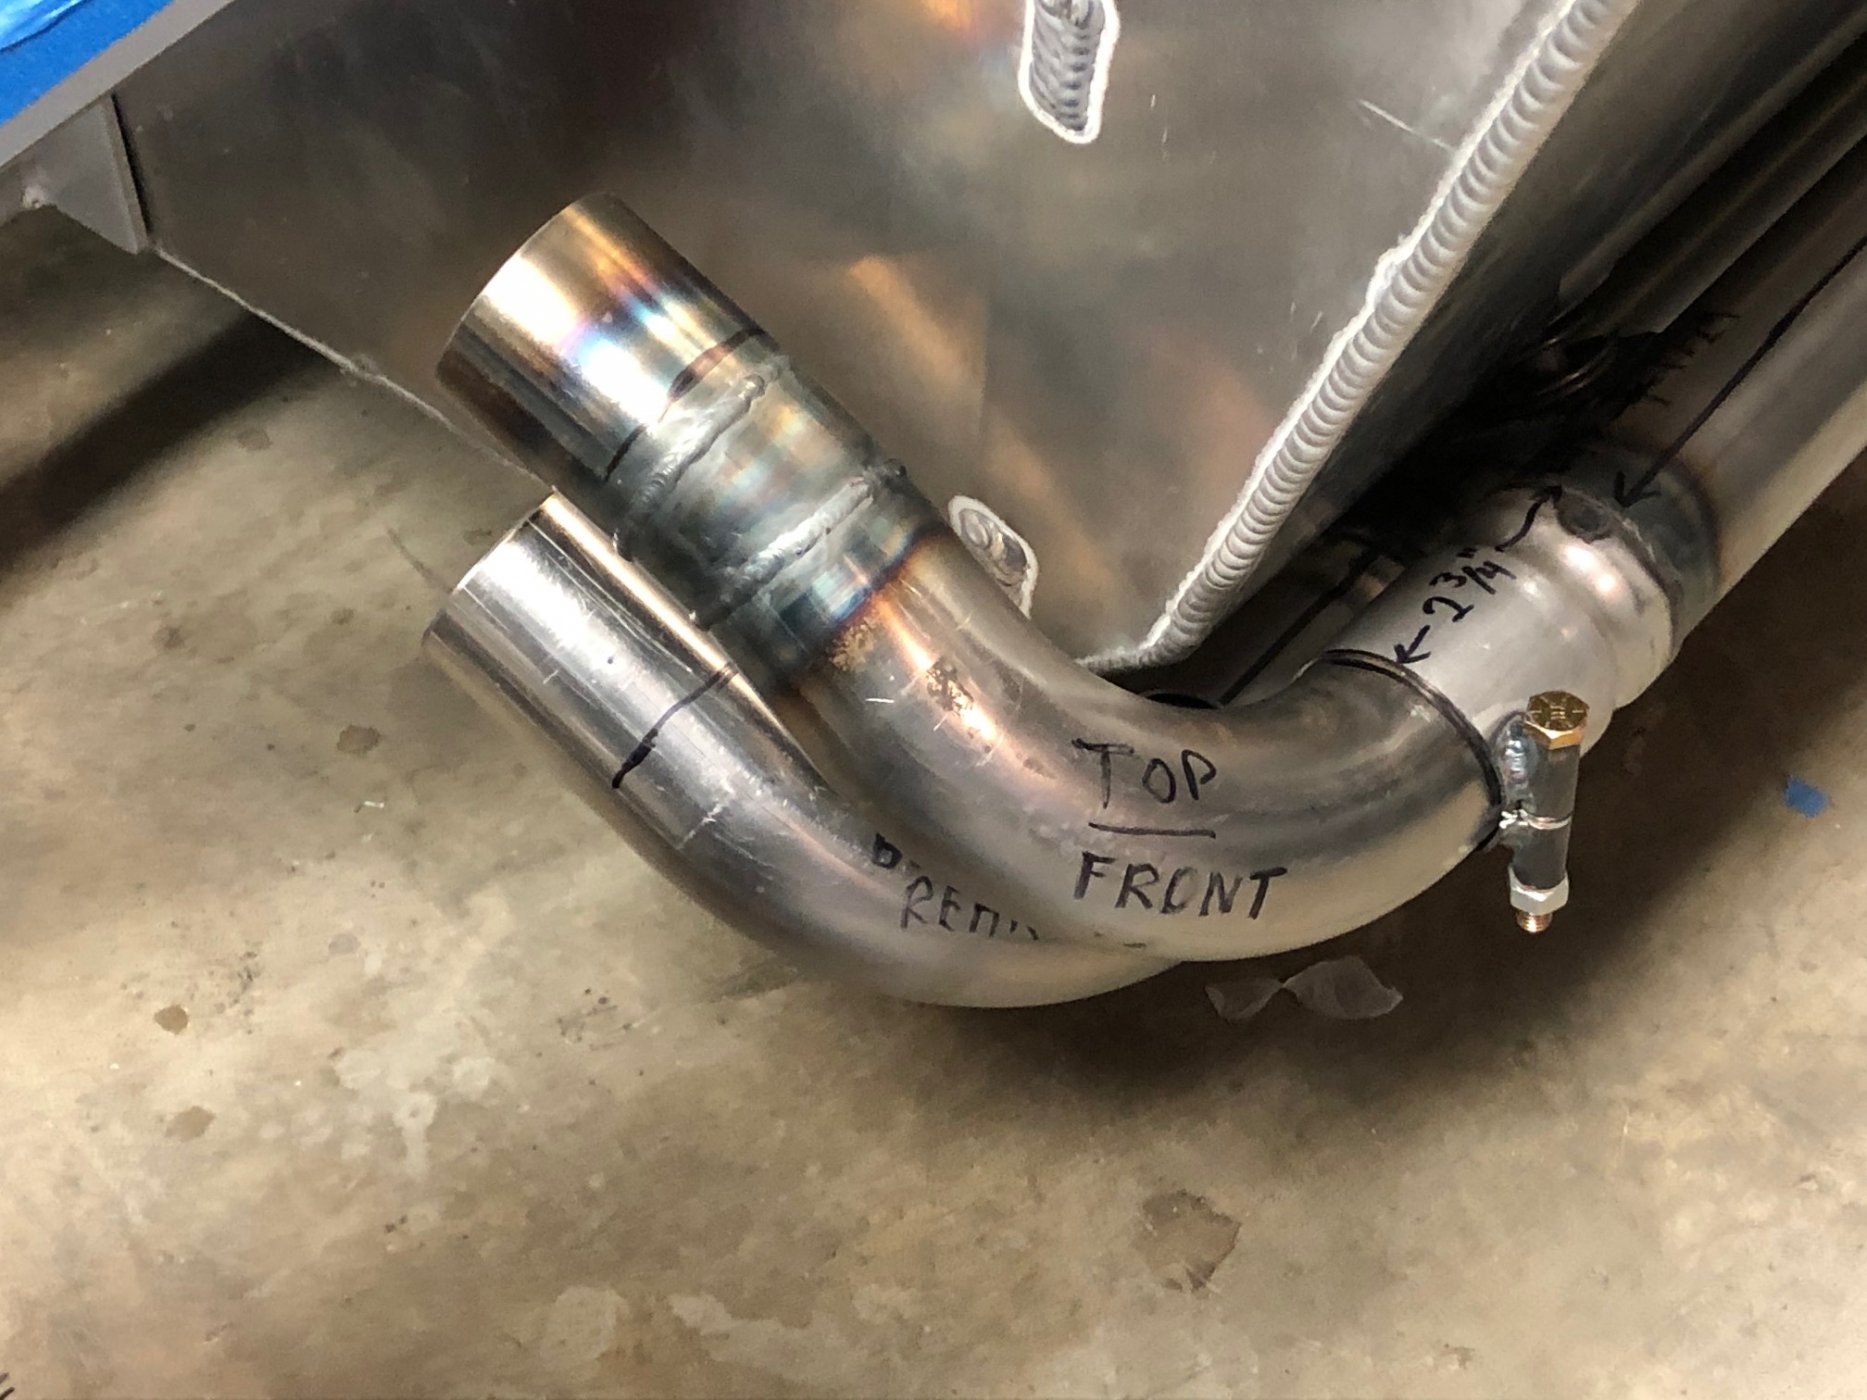
The angled pipes were cut to length so that the 18” flex pipes could be used without modification and with minimal bending. They fit nicely over the 2 1/8” pipes. Clamps will be used to seal the connection, as on the original.
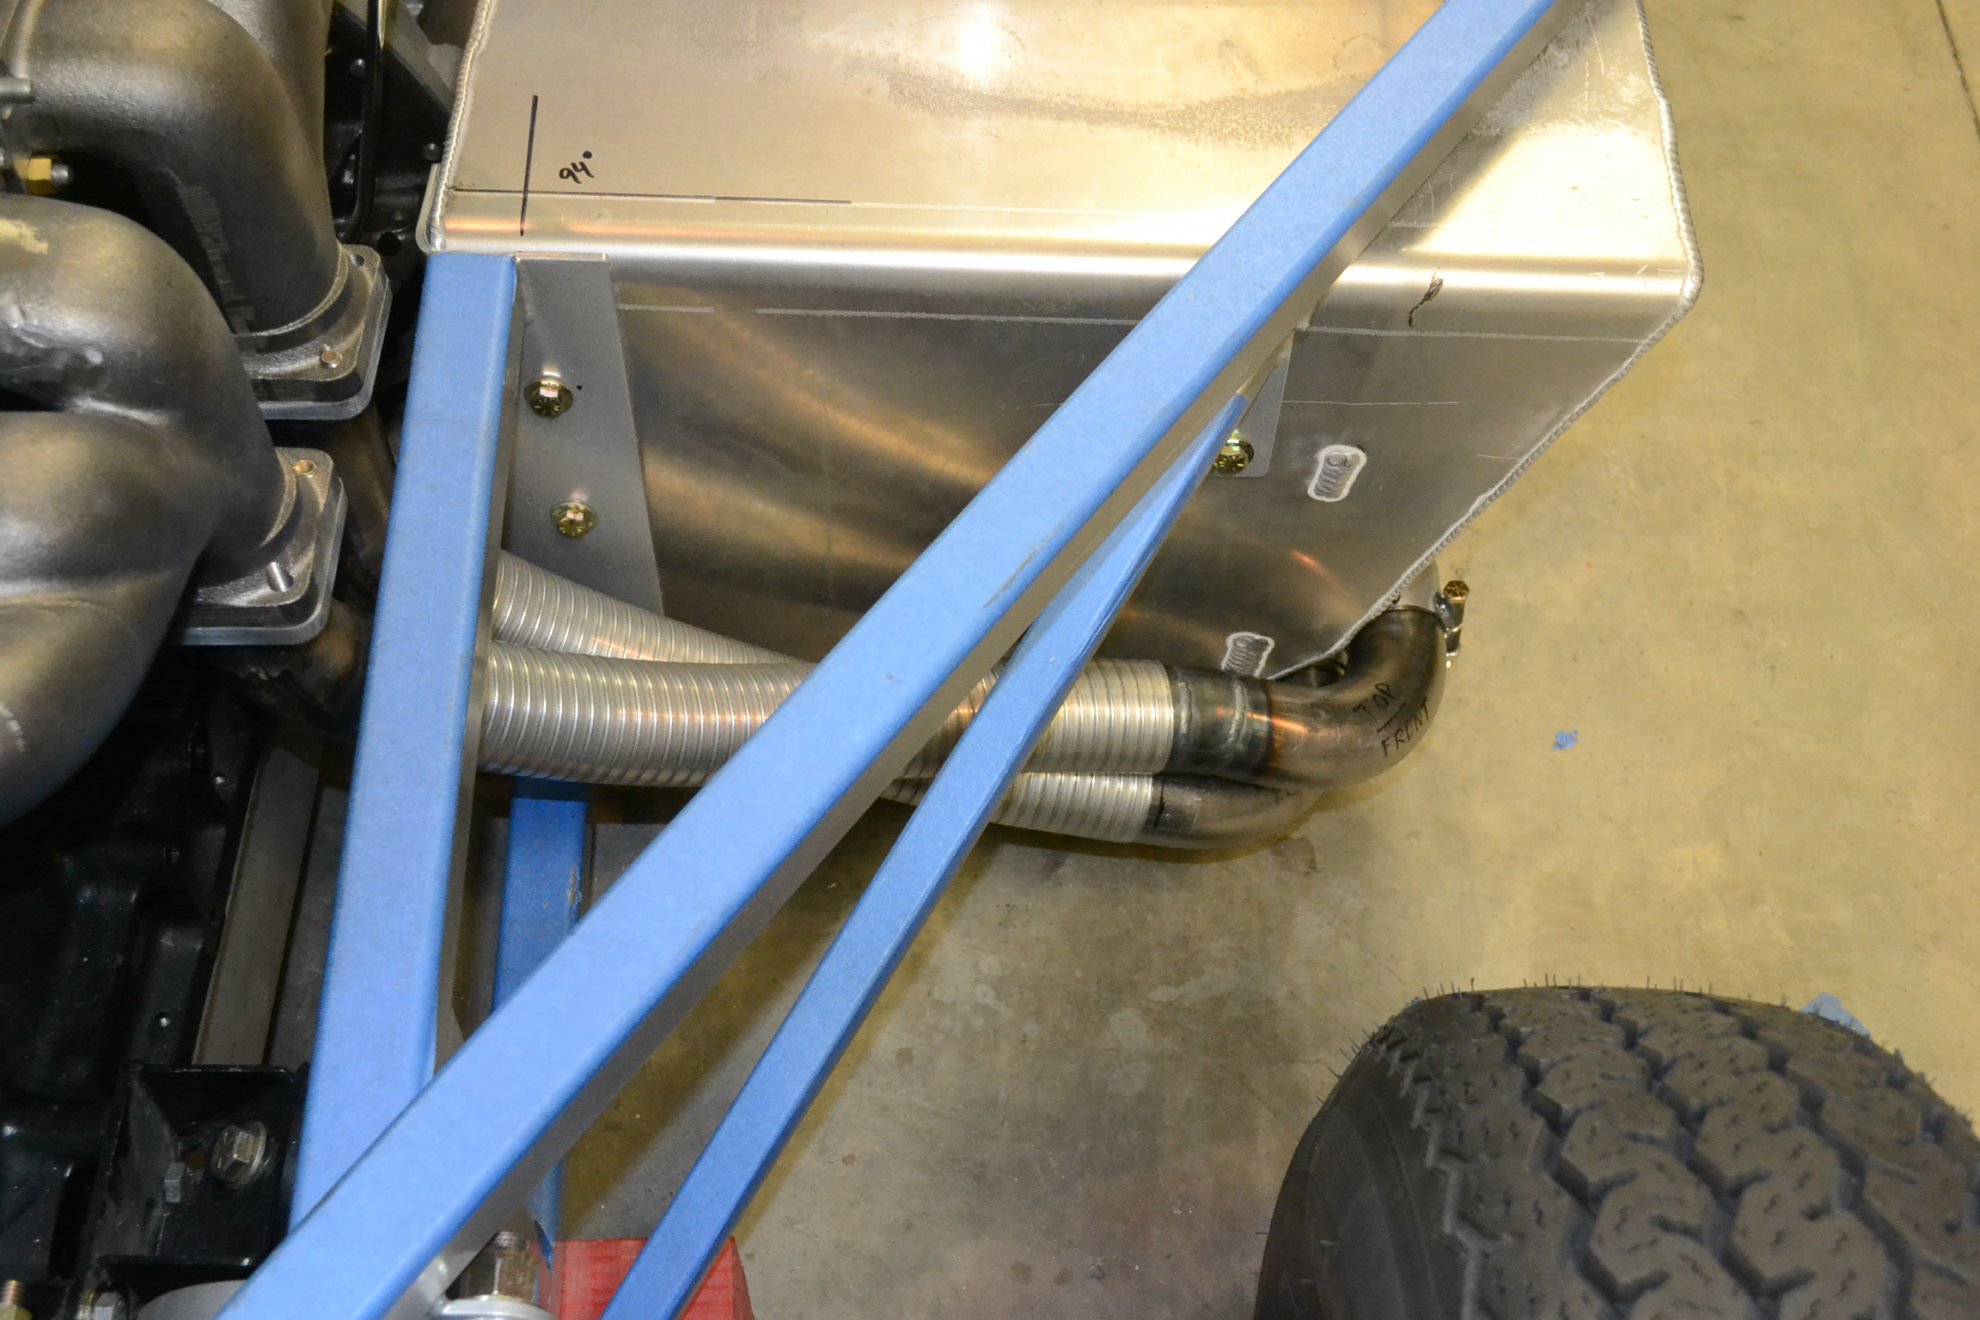
Before the side pipes were placed, weep holes were drilled near the ends at the low point. In addition the hanger holes drilled into the chassis were staggered so that the front is about a half inch higher. This should permit condensation to drain downhill to the weep holes rather than setting in the pipes.
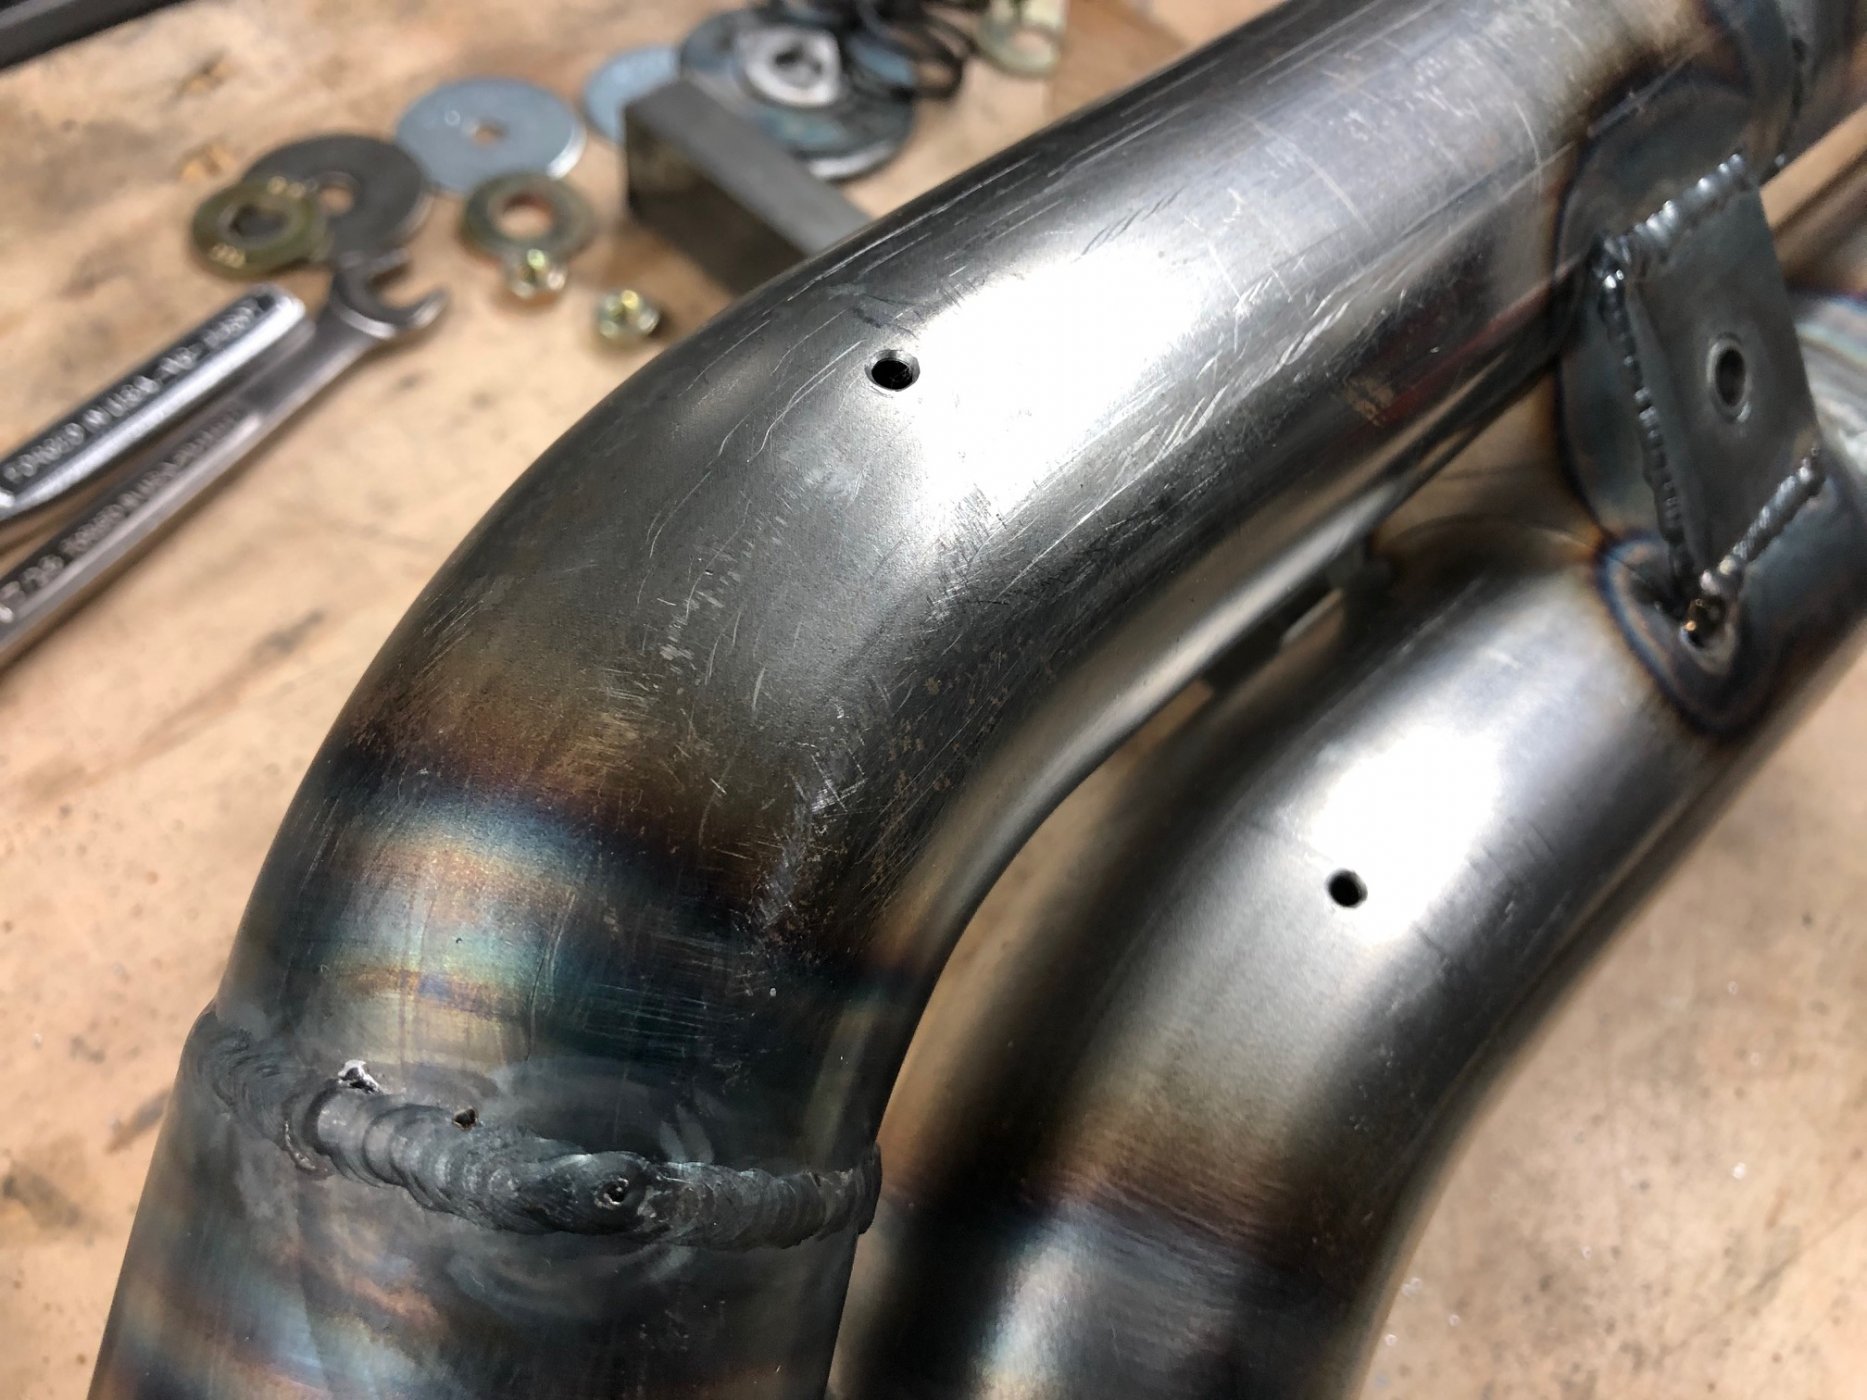
Once the body is in place there will be some final adjustments. The angle of the outlets can be easily turned more outward, depending on the fit of the body. Our plan is to paint the exhaust system with high temperature paint.
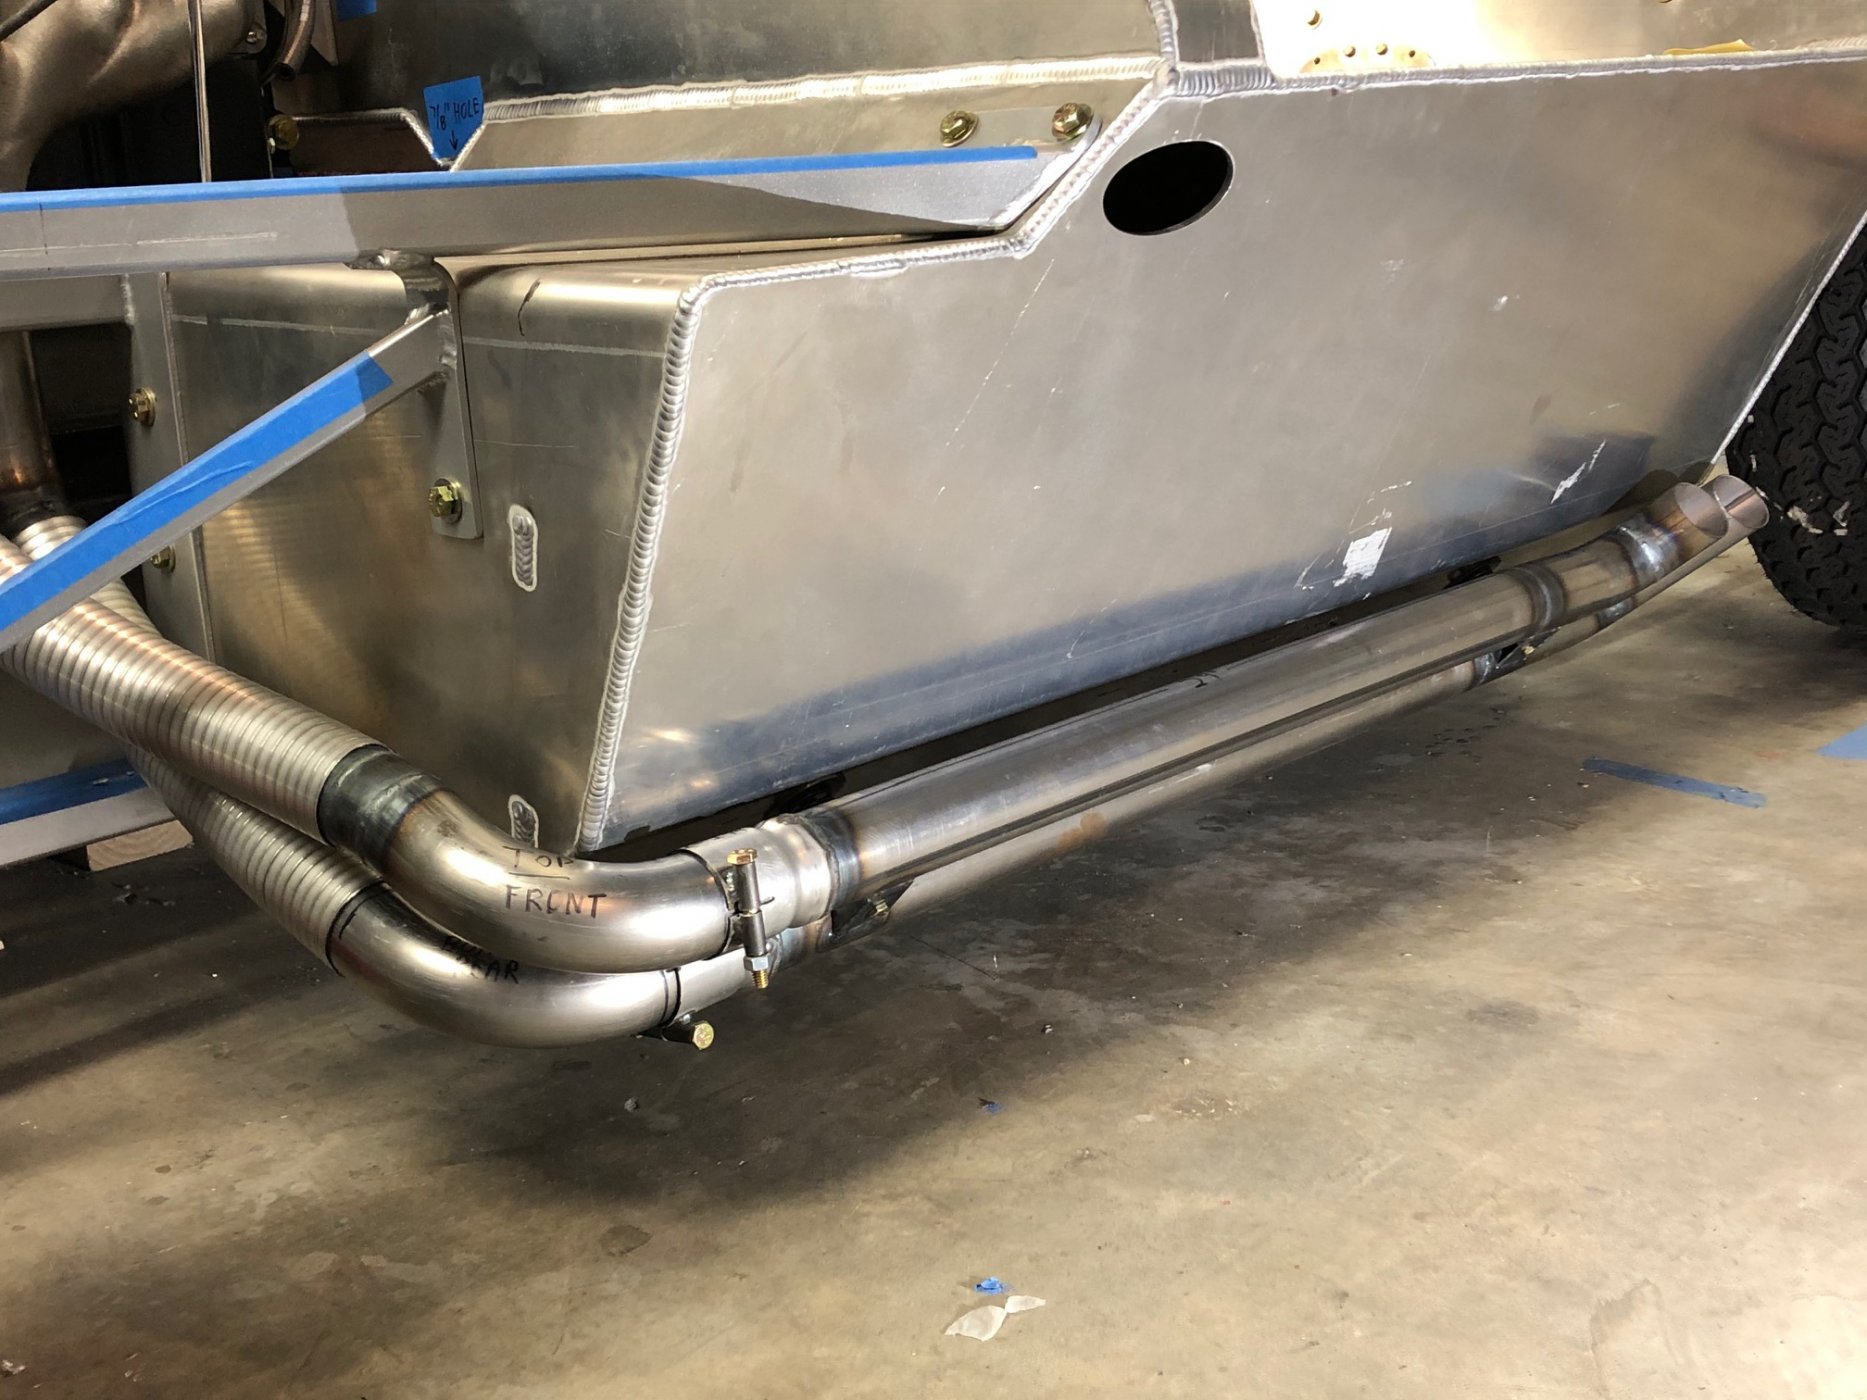
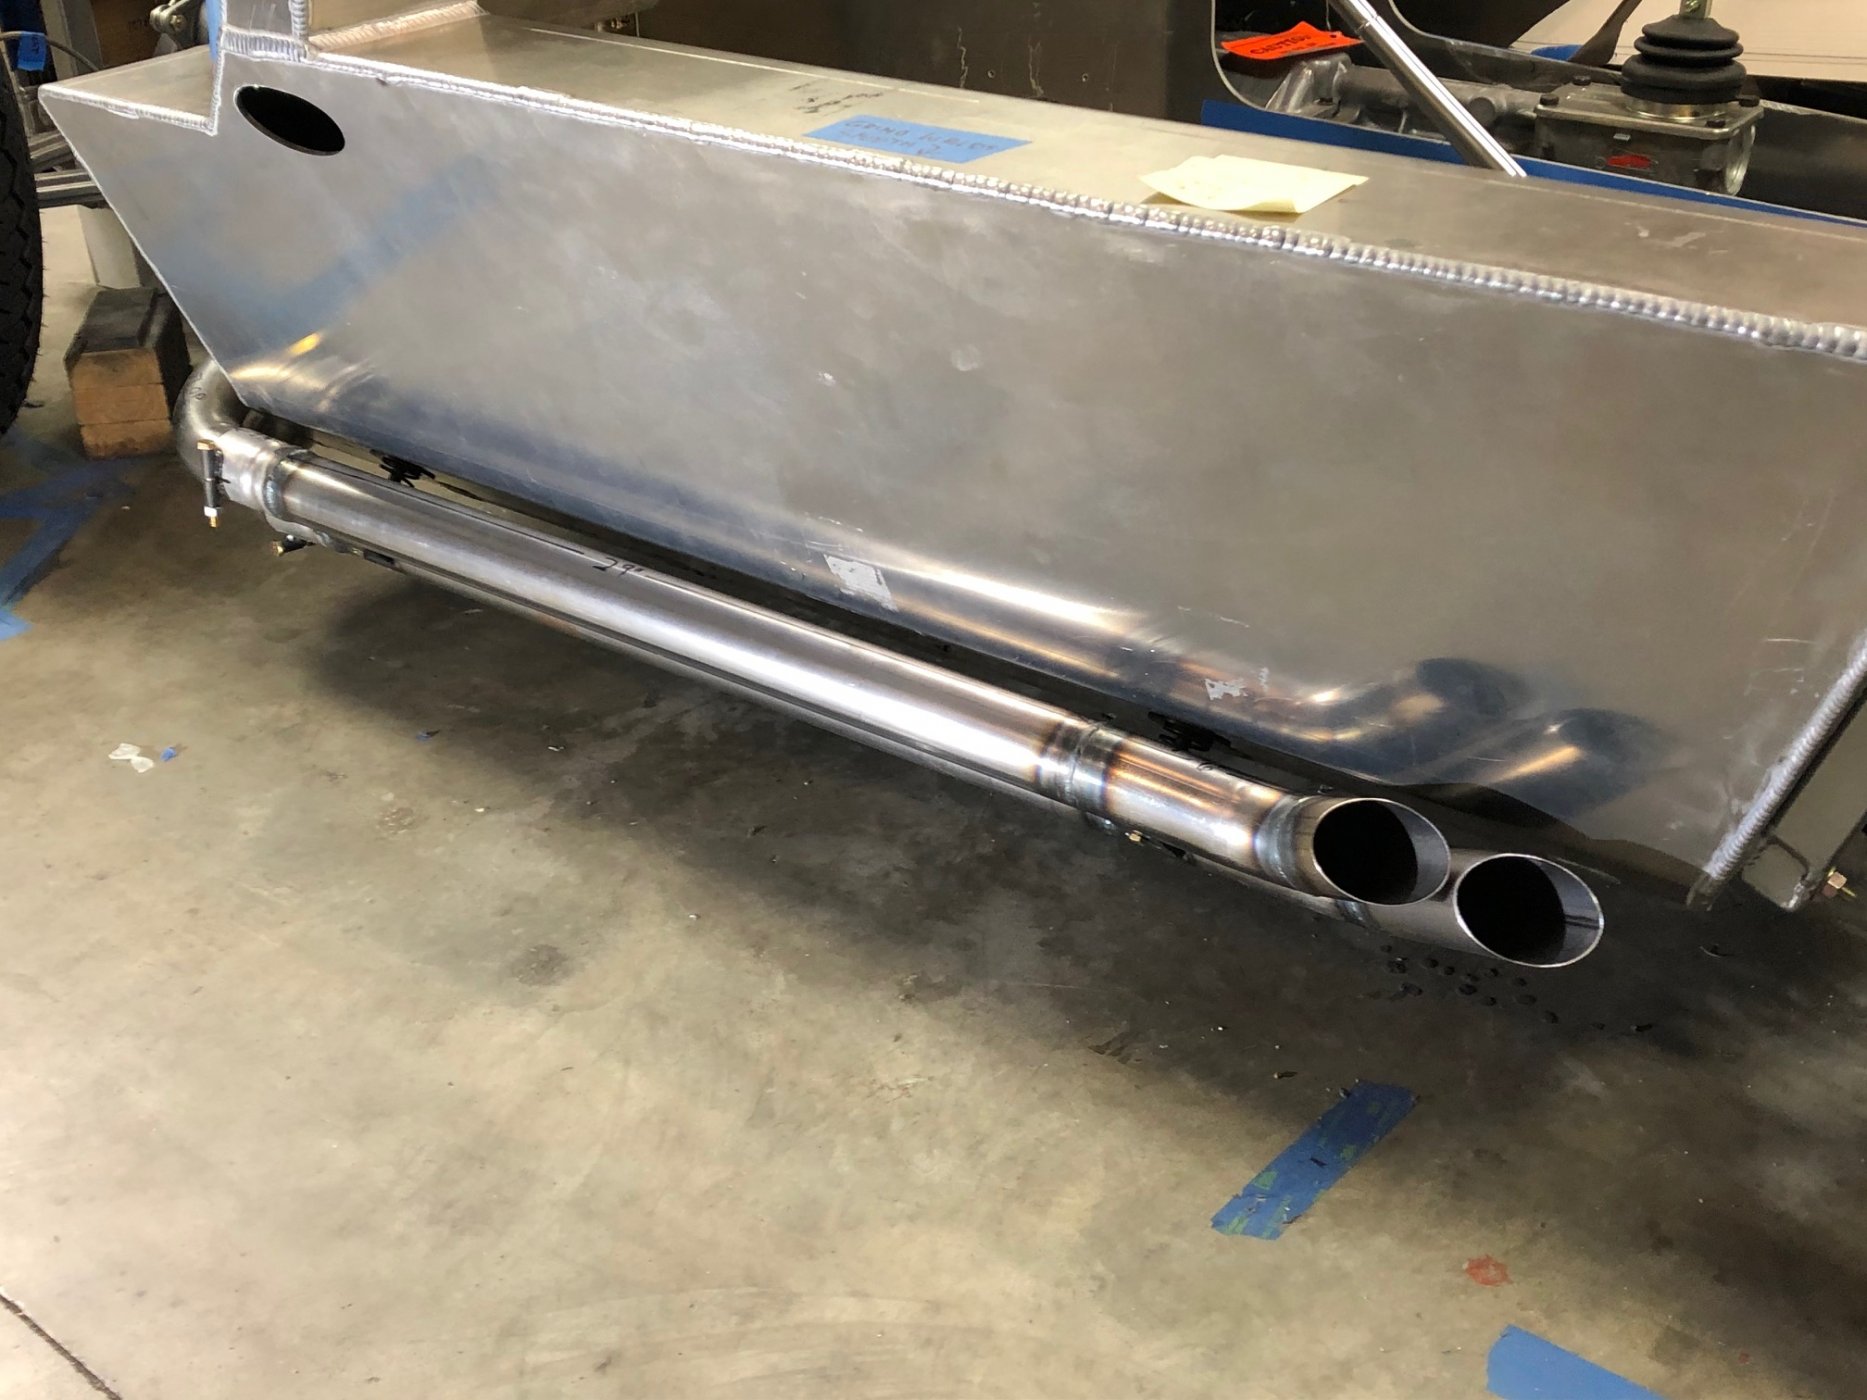
Once the pieces were fabricated, the system was test fitted. Additional adjustments were needed to connect the headers to the side pipes. More cutting and tack welding.
Note that the pipes were staggered so that the ninety degree connections are above and below each other. This will simplify the cover that goes over these angled pipes on the outside of the body. A minimum of ¾” separates the pipes from the chassis.
The angled pipes were cut to length so that the 18” flex pipes could be used without modification and with minimal bending. They fit nicely over the 2 1/8” pipes. Clamps will be used to seal the connection, as on the original.
Before the side pipes were placed, weep holes were drilled near the ends at the low point. In addition the hanger holes drilled into the chassis were staggered so that the front is about a half inch higher. This should permit condensation to drain downhill to the weep holes rather than setting in the pipes.
Once the body is in place there will be some final adjustments. The angle of the outlets can be easily turned more outward, depending on the fit of the body. Our plan is to paint the exhaust system with high temperature paint.
Last edited:
Beautiful!
After all your hard work - I would suggest you consider Jet-Hot Coatings or another Ceramic Coater that can put a nice protective coating on those pipes that won't erode away like VHT does.
 www.jet-hot.com
Our Coatings — Jet-Hot
Thanks for the tip. I will look into that. Extending the life of the exhaust would be nice - I don't want to rebuild it for a very very long time.After all your hard work - I would suggest you consider Jet-Hot Coatings or another Ceramic Coater that can put a nice protective coating on those pipes that won't erode away like VHT does.
Our Coatings — Jet-Hot
www.jet-hot.com
Front Suspension Update
Time to take a break from the exhaust to address another issue.
In previous posts revisions to the front suspension needed to provide clearance between the tires and the body were described. One of the revisions was shortening the upper and lower control arms which then required shortening the heim joints. The revisions worked but the camber was a bit more than we liked. The inward tip of the front tires stared me in the face while several front end projects were in the works. I finally took a break from other D Type projects to address the issue.
To correct the excess camber, the four upper heim joints were replaced but cut back only a quarter inch rather than a half inch as described in the post on July 5, 2020. Recall that because the control arms and heim joints were shortened, the heim joints are screwed in as far as possible to maximize the threaded contact and for that reason new heim joints were fitted rather than just turning out the exisiting ones a quarter inch.
When reassembled the longer heim joints reduced the camber noticeably. With the chassis set at a ride height of 5” there is now a half degree of camber and when set at a 6” ride height there is 1 ¼ degree of camber. (Different ride heights are being checked since the final height has yet to be determined.) This is a marked improvement. The camber readings were virtually identical left to right which was also good news.
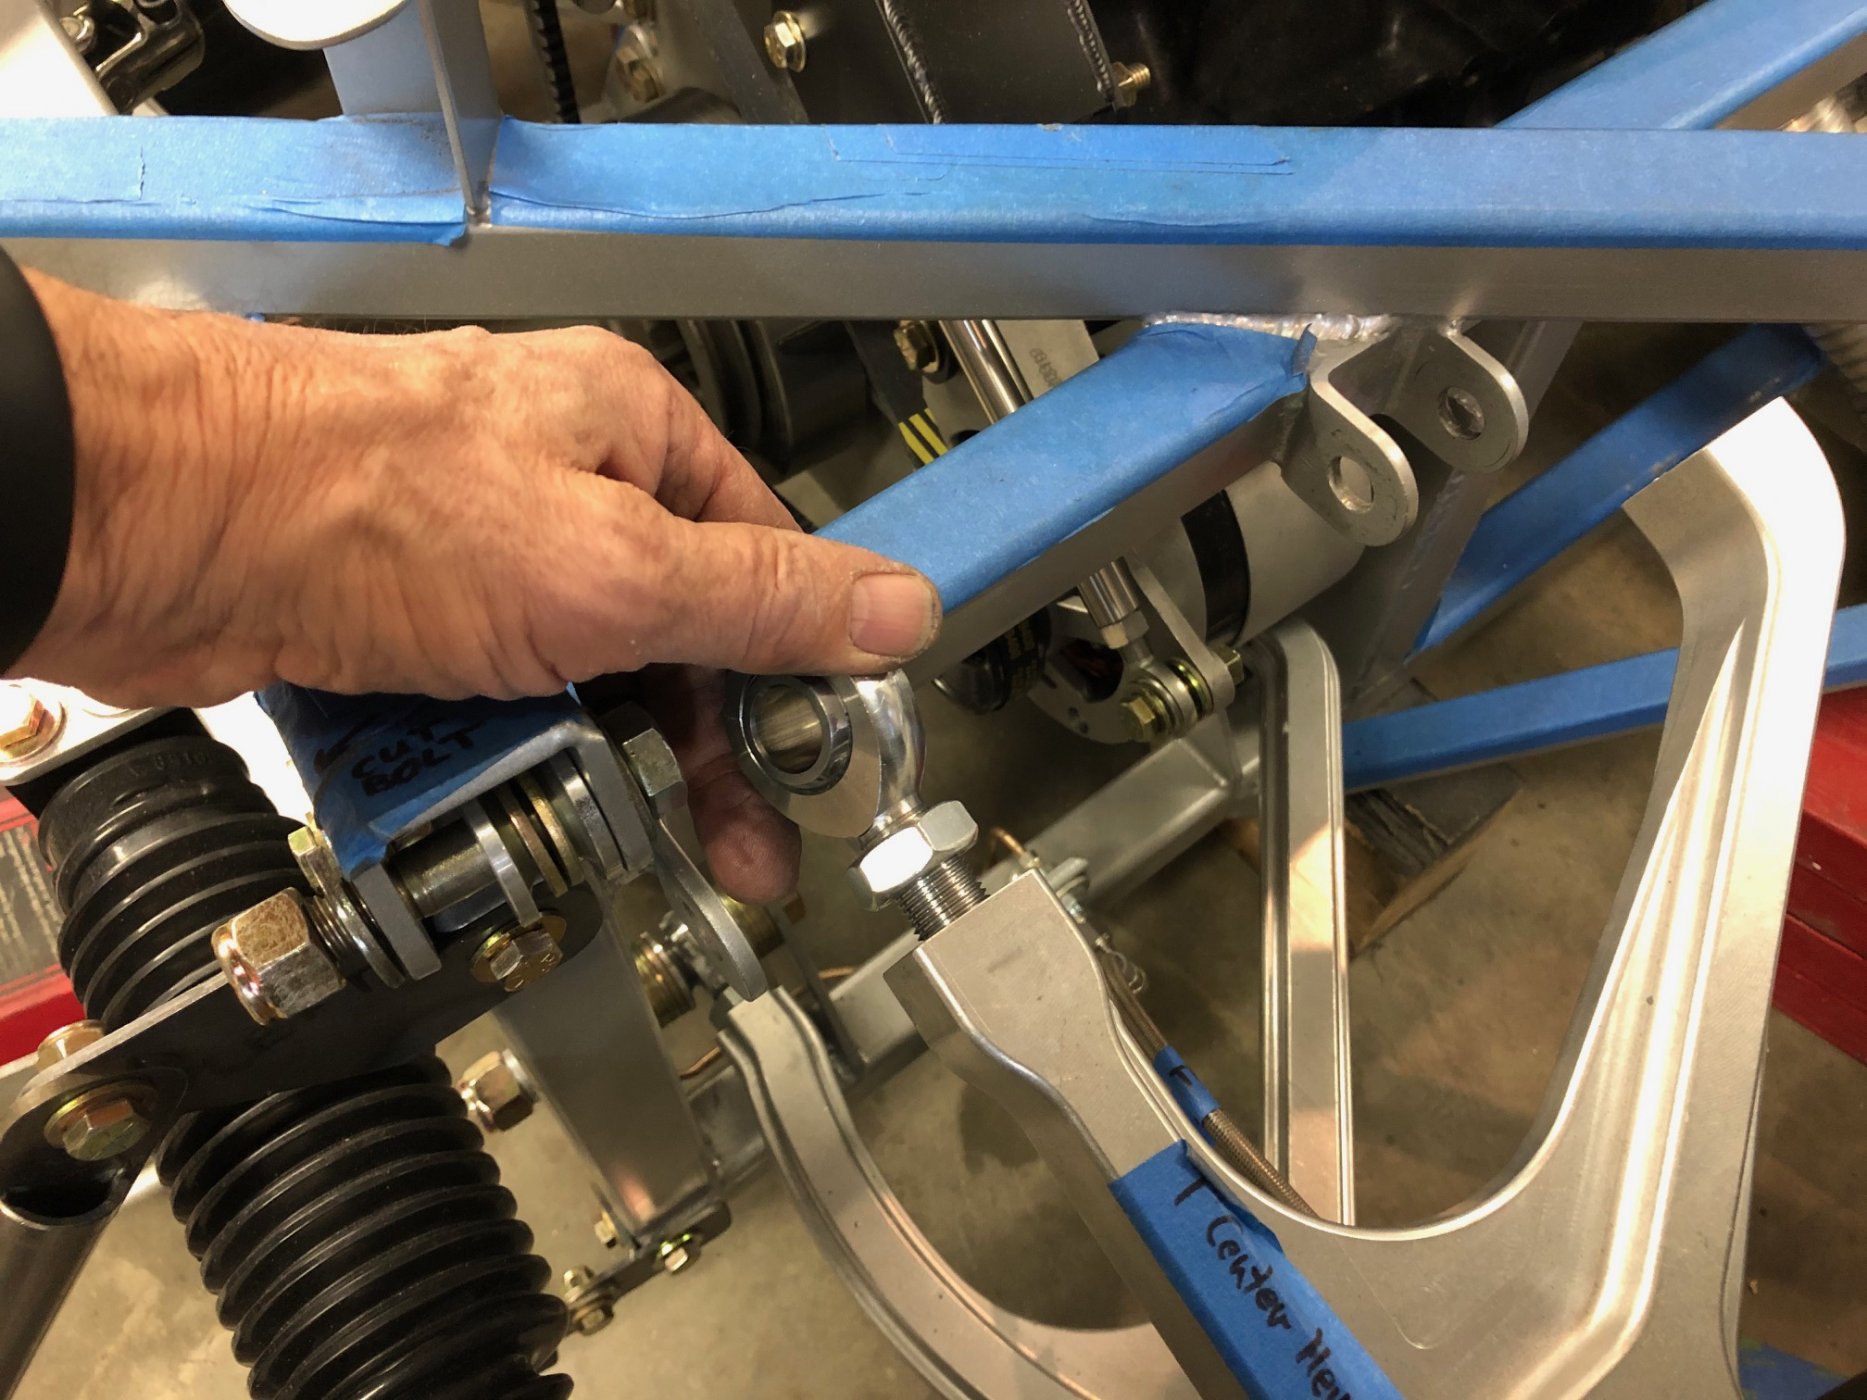
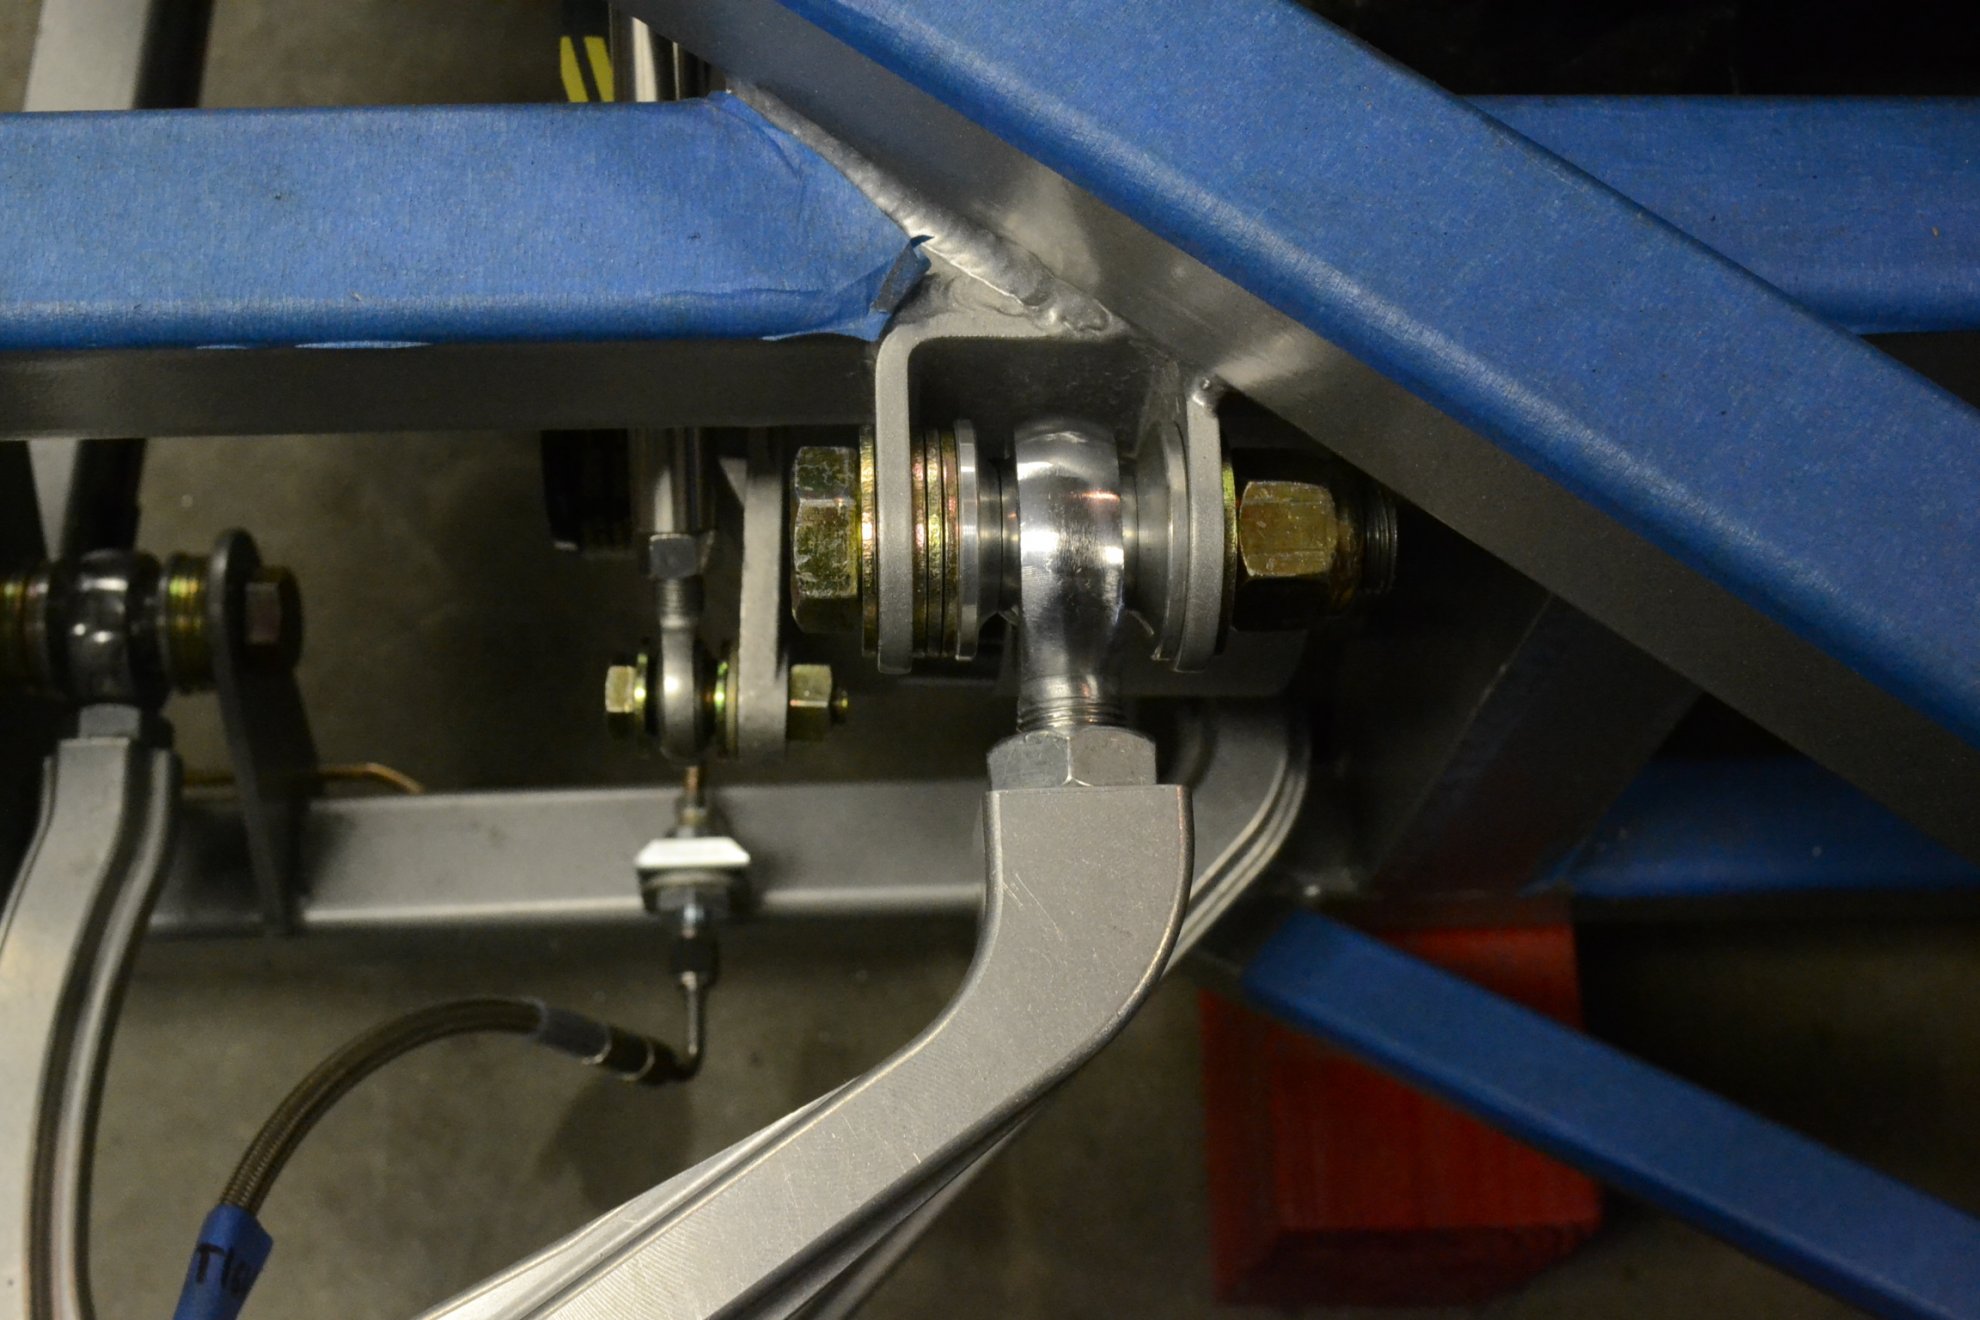
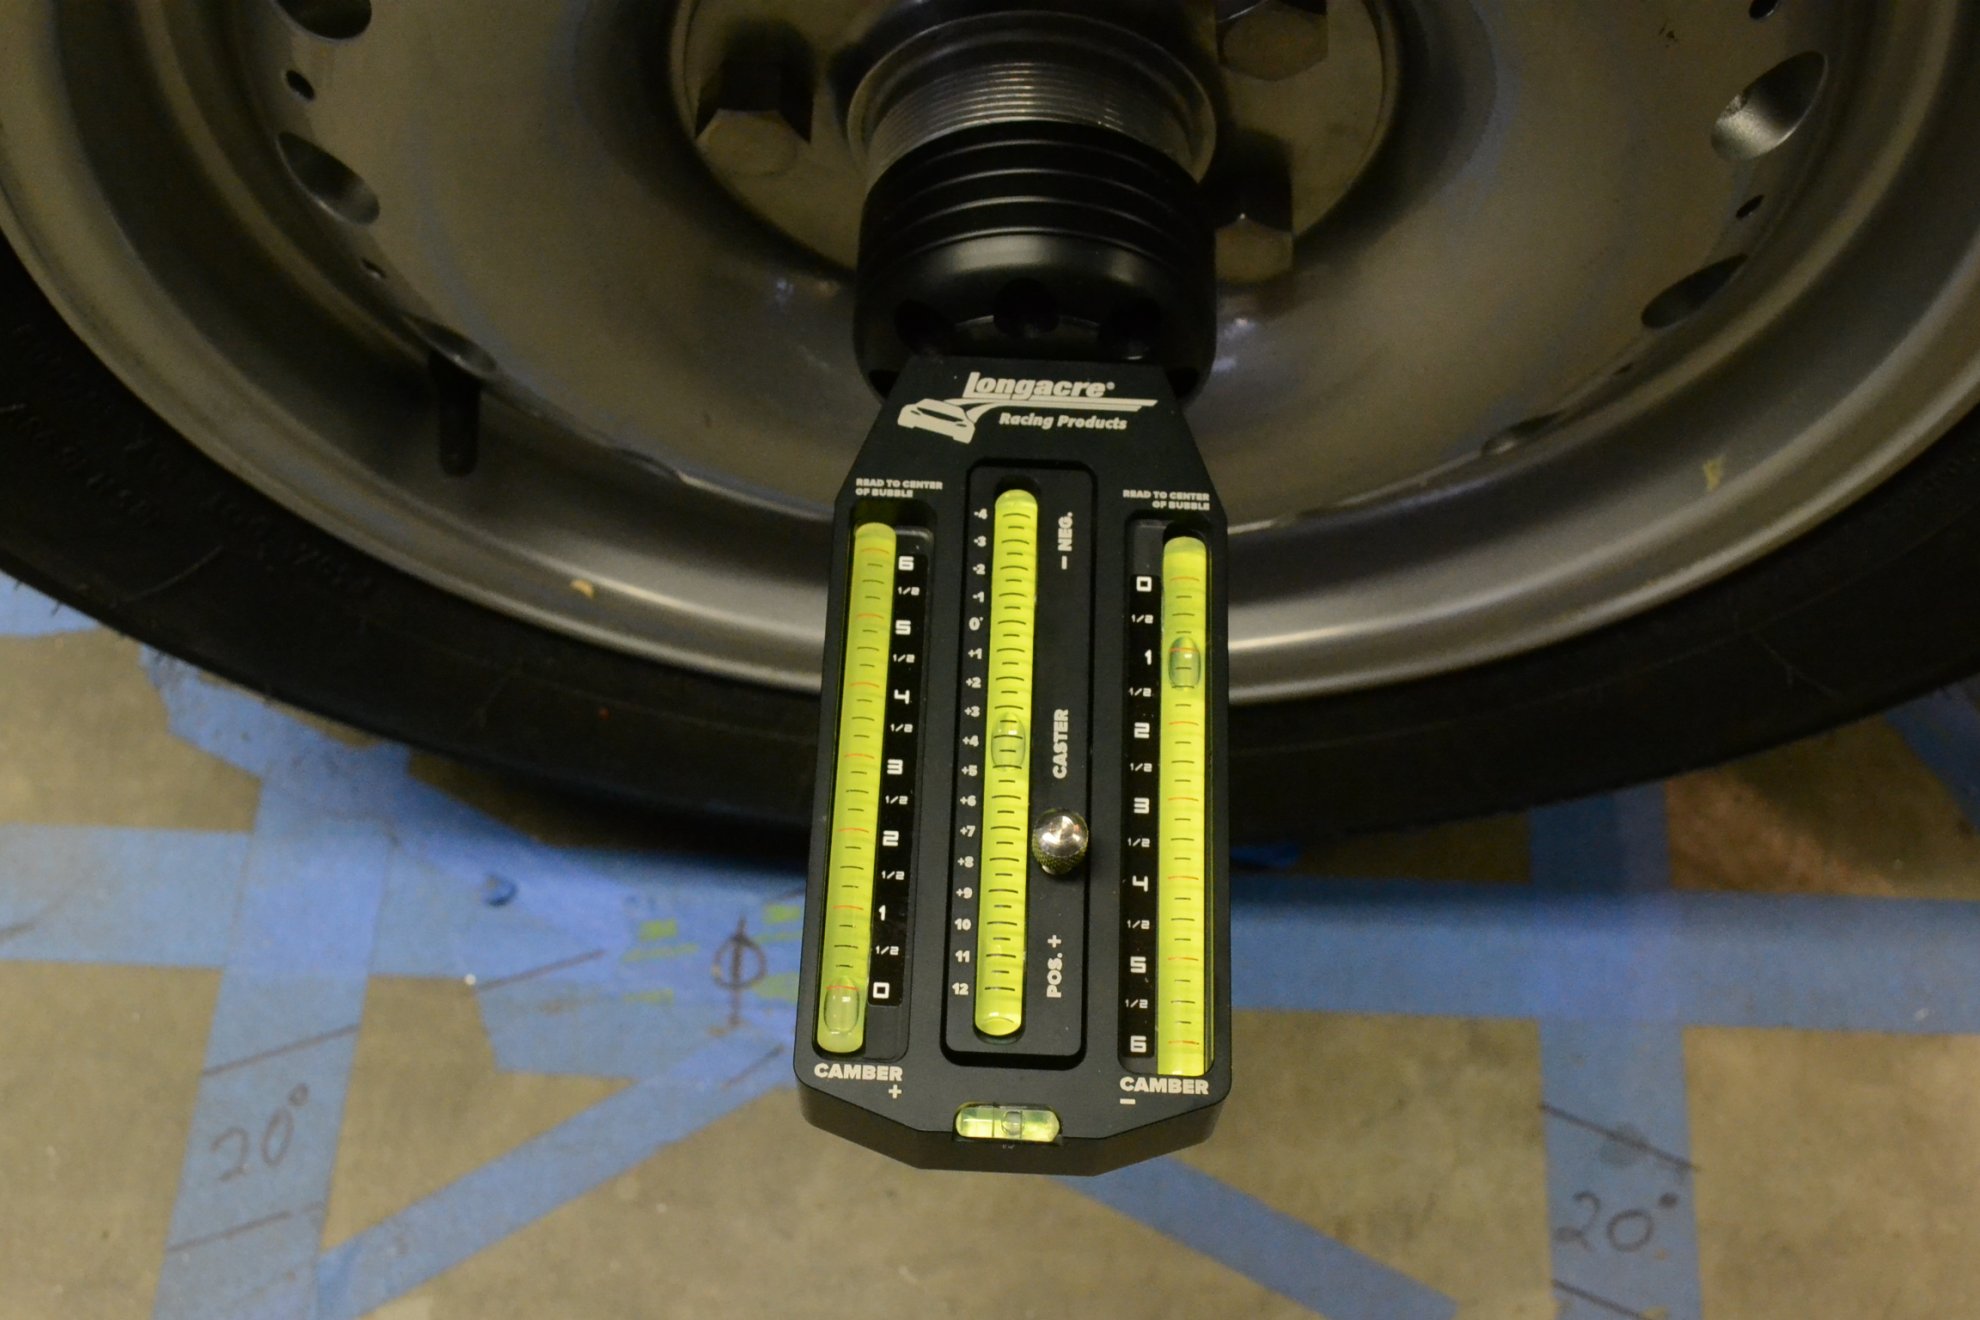
My expectation is that the decrease in camber will not causes an issue with the front tires interfering with the body, but that will not be known for certain until the body is set in place in a few weeks.
With this adjustment made additional steering options can be explored, since the camber setting affects the length of the inner tie rod.
Time to take a break from the exhaust to address another issue.
In previous posts revisions to the front suspension needed to provide clearance between the tires and the body were described. One of the revisions was shortening the upper and lower control arms which then required shortening the heim joints. The revisions worked but the camber was a bit more than we liked. The inward tip of the front tires stared me in the face while several front end projects were in the works. I finally took a break from other D Type projects to address the issue.
To correct the excess camber, the four upper heim joints were replaced but cut back only a quarter inch rather than a half inch as described in the post on July 5, 2020. Recall that because the control arms and heim joints were shortened, the heim joints are screwed in as far as possible to maximize the threaded contact and for that reason new heim joints were fitted rather than just turning out the exisiting ones a quarter inch.
When reassembled the longer heim joints reduced the camber noticeably. With the chassis set at a ride height of 5” there is now a half degree of camber and when set at a 6” ride height there is 1 ¼ degree of camber. (Different ride heights are being checked since the final height has yet to be determined.) This is a marked improvement. The camber readings were virtually identical left to right which was also good news.
My expectation is that the decrease in camber will not causes an issue with the front tires interfering with the body, but that will not be known for certain until the body is set in place in a few weeks.
With this adjustment made additional steering options can be explored, since the camber setting affects the length of the inner tie rod.
Last edited:
Steering, Part III
In pervious post it was noted that other options were being explored, but were delayed because critical parts were backordered. We were finally able to obtain the parts for one of the options.
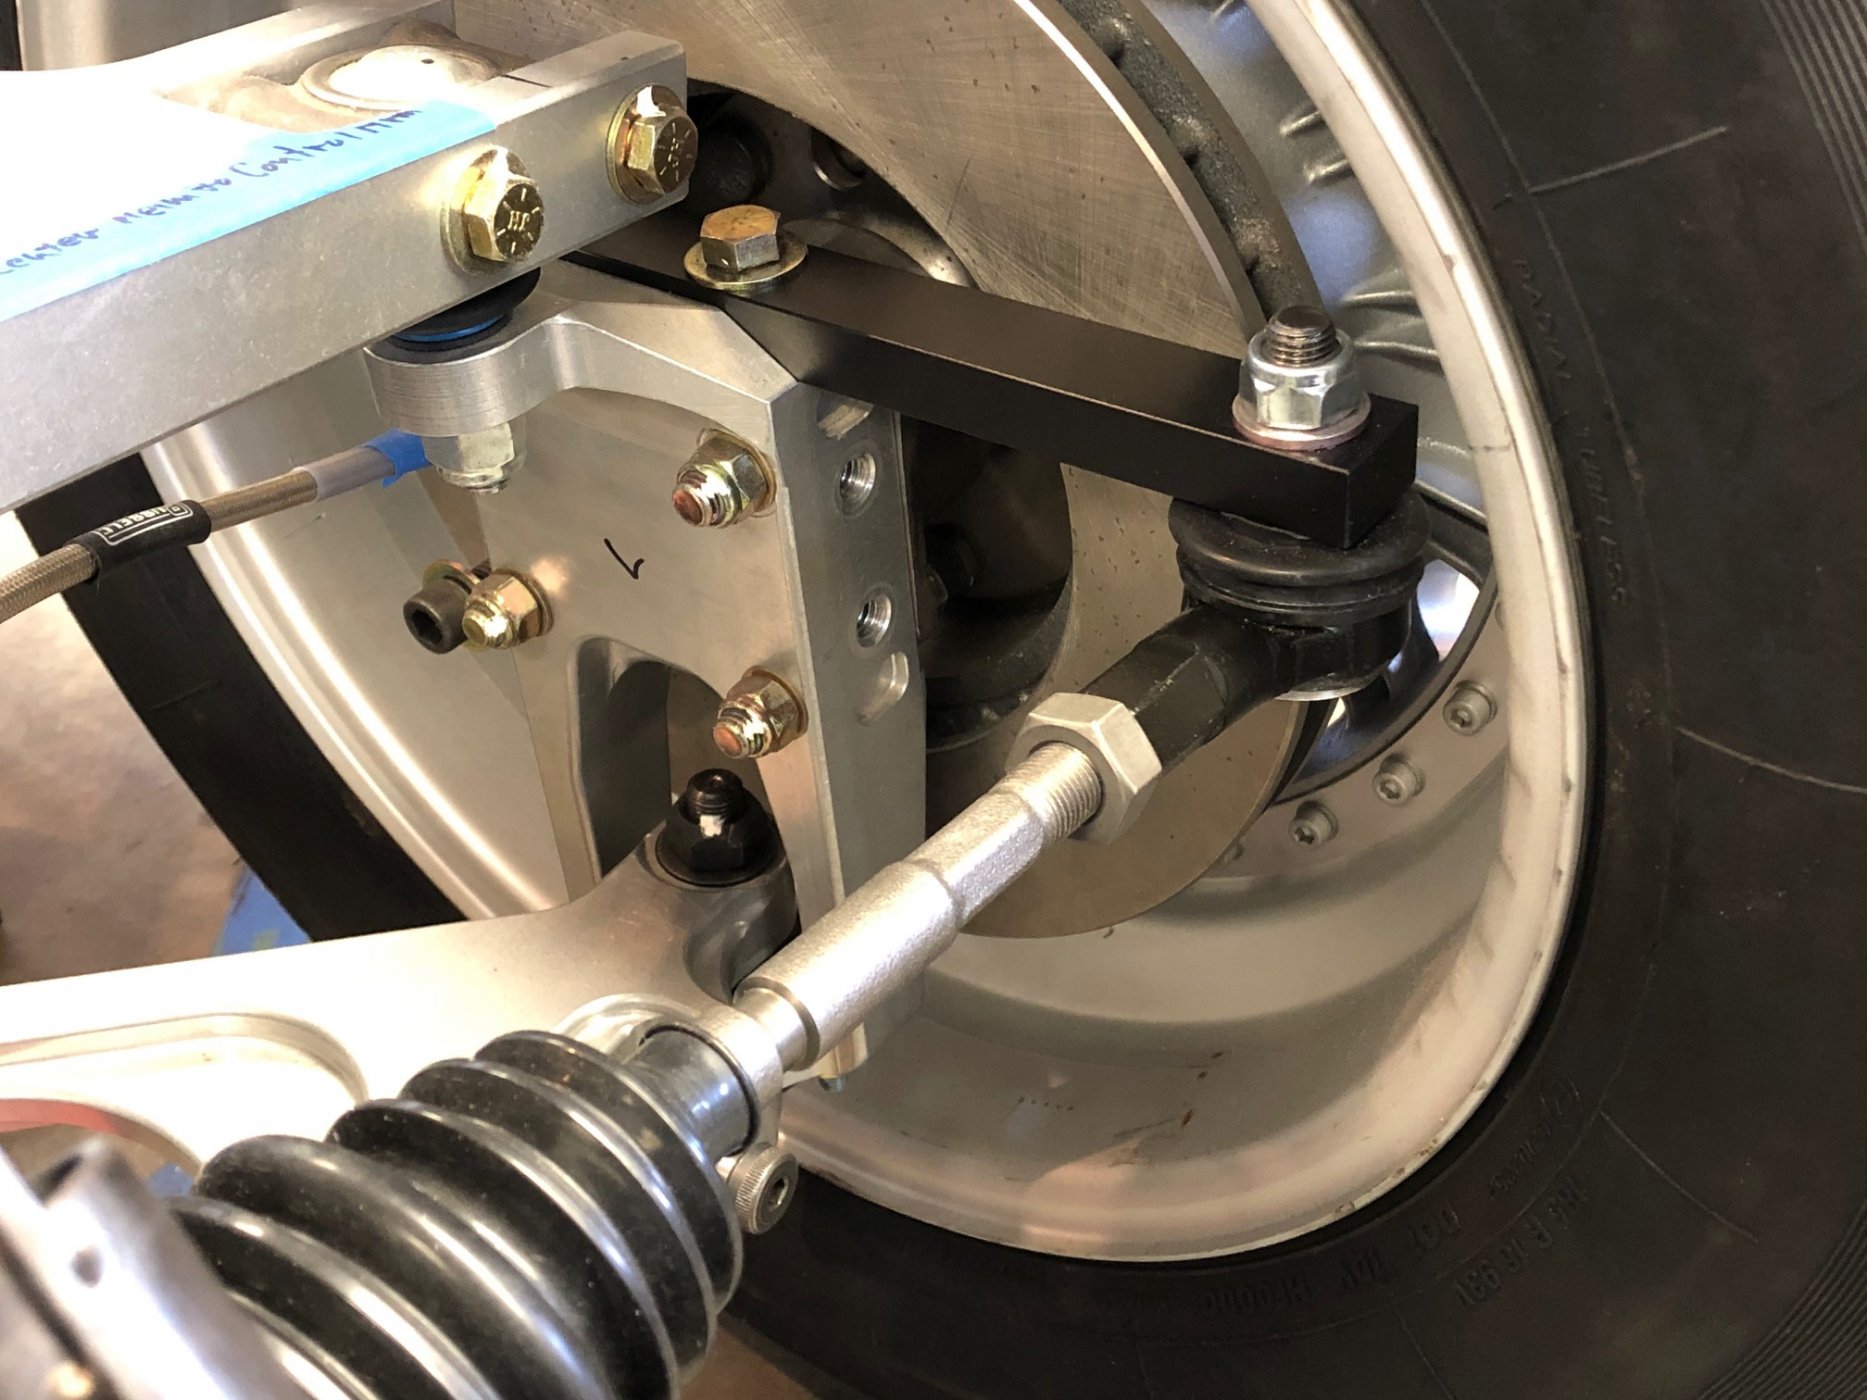
Option 2. The inner tie rod provided by RCR is threaded ½-20, which will not work with either a bump steer style or ball joint style outer tie rod. (Our research indicated they are typically 14-1.5 metric or 9/16”). Accordingly the second option required replacing the inner tie rod. We ordered a specific inner tie rod: Moog-EV179, available from Summit and Amazon for about $30 each, which is 8.85” long. It has metric threaded ends compatible with the ball joint.
The second component is the ball joint. Moog-ES3622, available from Summit or Amazon for about $20 each.
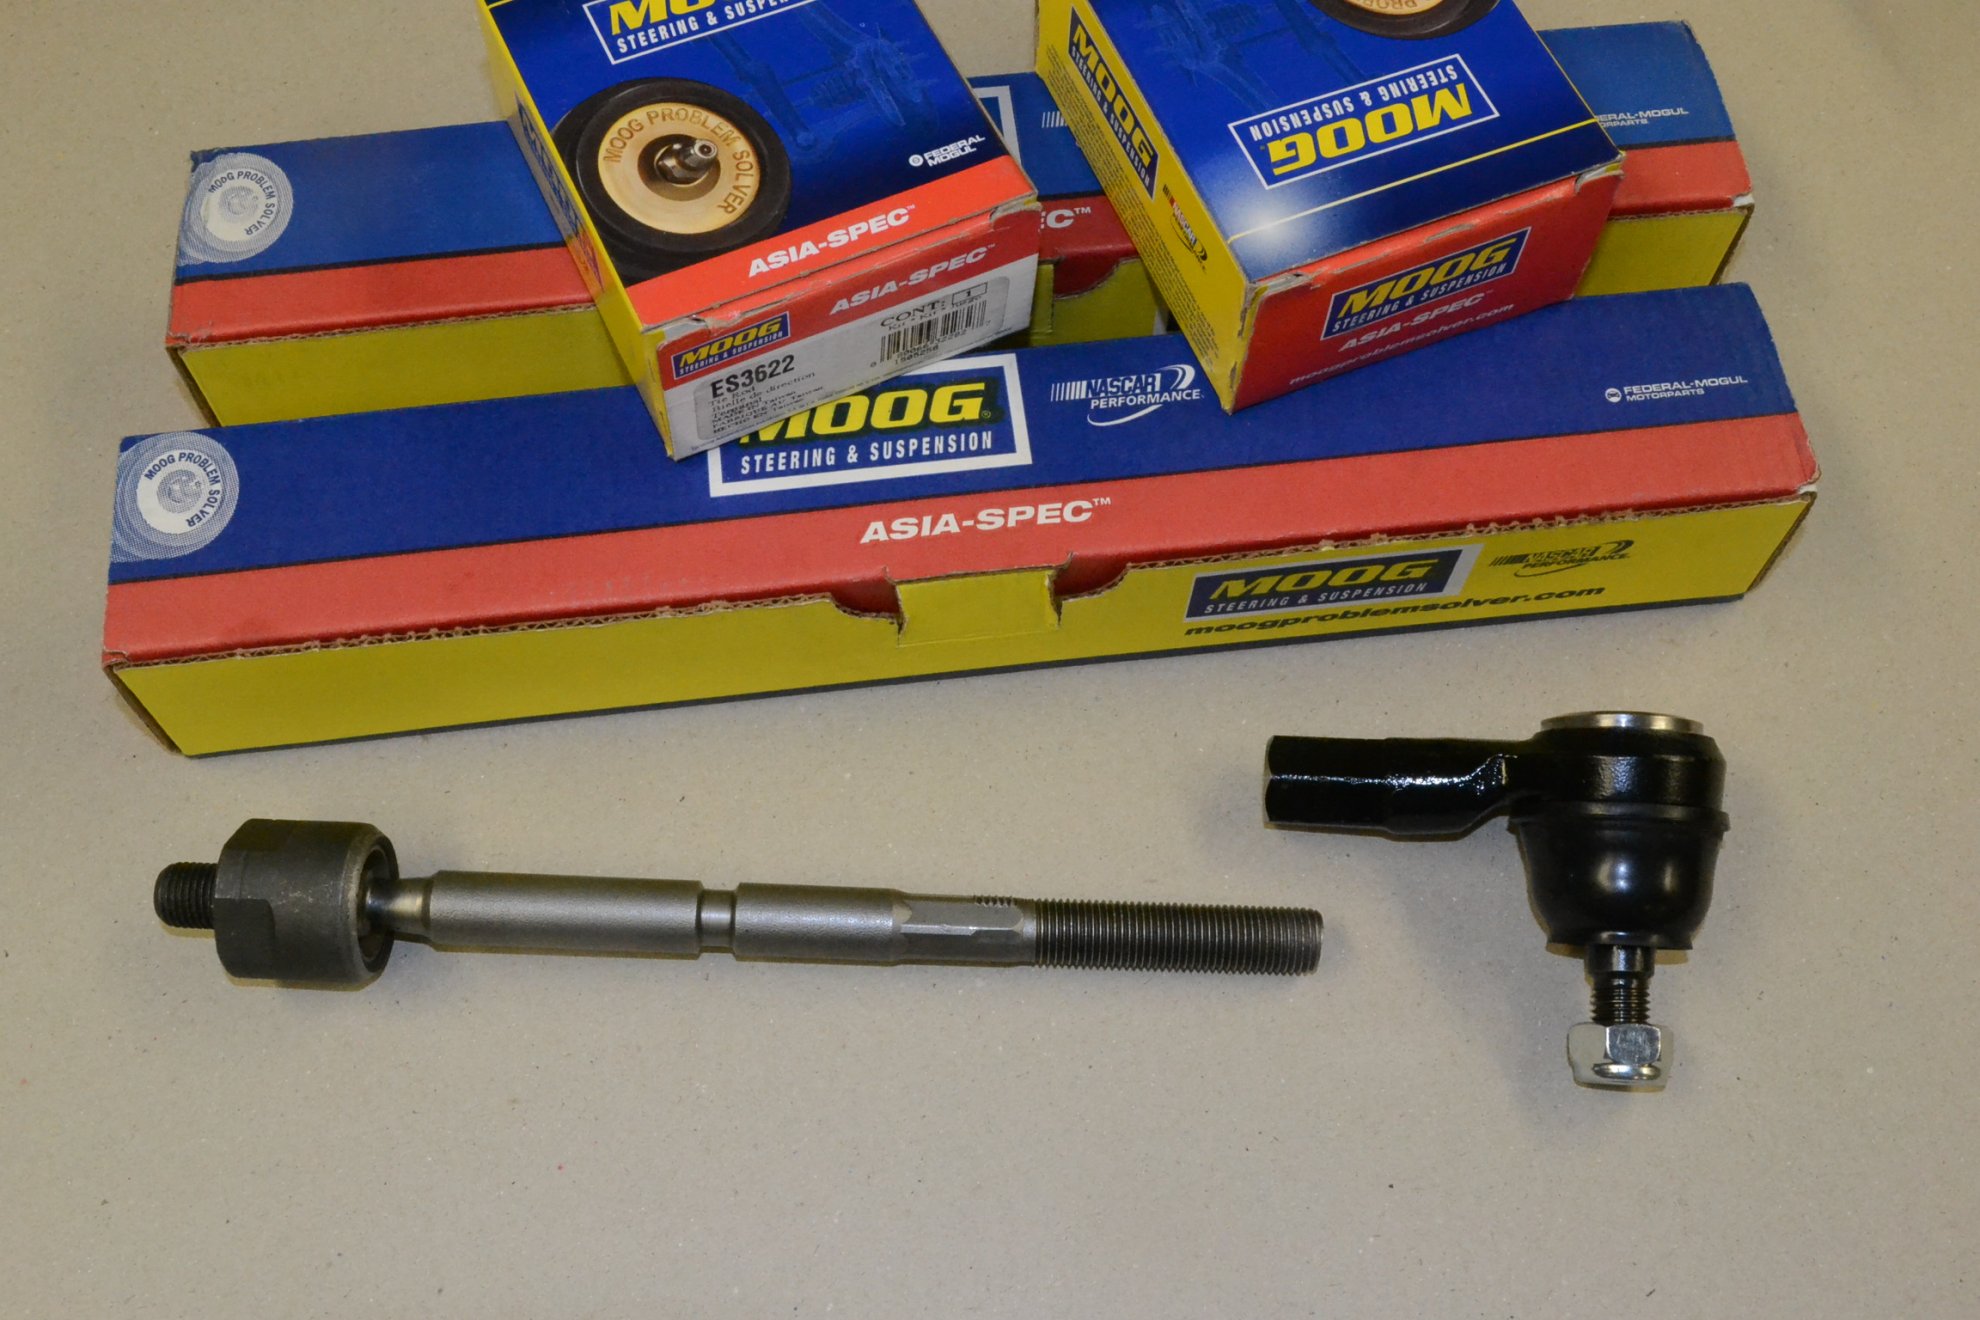
We decided to fabricate a new steering arm rather than modify the one used with the half inch bolts. The shank on the ball joint has a 7 degree tapered fitting which means that the half inch hole needs to be reamed out to 19/32” on the bottom side to achieve the depth needed for a one inch distance from the center line of the inner tie rod to the base of the steering arm. This is the distance we had determined to be best for minimizing bump steer in our initial testing.
We bought a proper taper reamer adding another $150 to the tab. (There are cheaper reamers, but they tend to fail quickly). Summit was the source for the AFCO Racing Tapered Reamer Drill Bit 80770. Reaming was a slow and careful job to prevent jamming. A bit of cutting oil was used during the process.
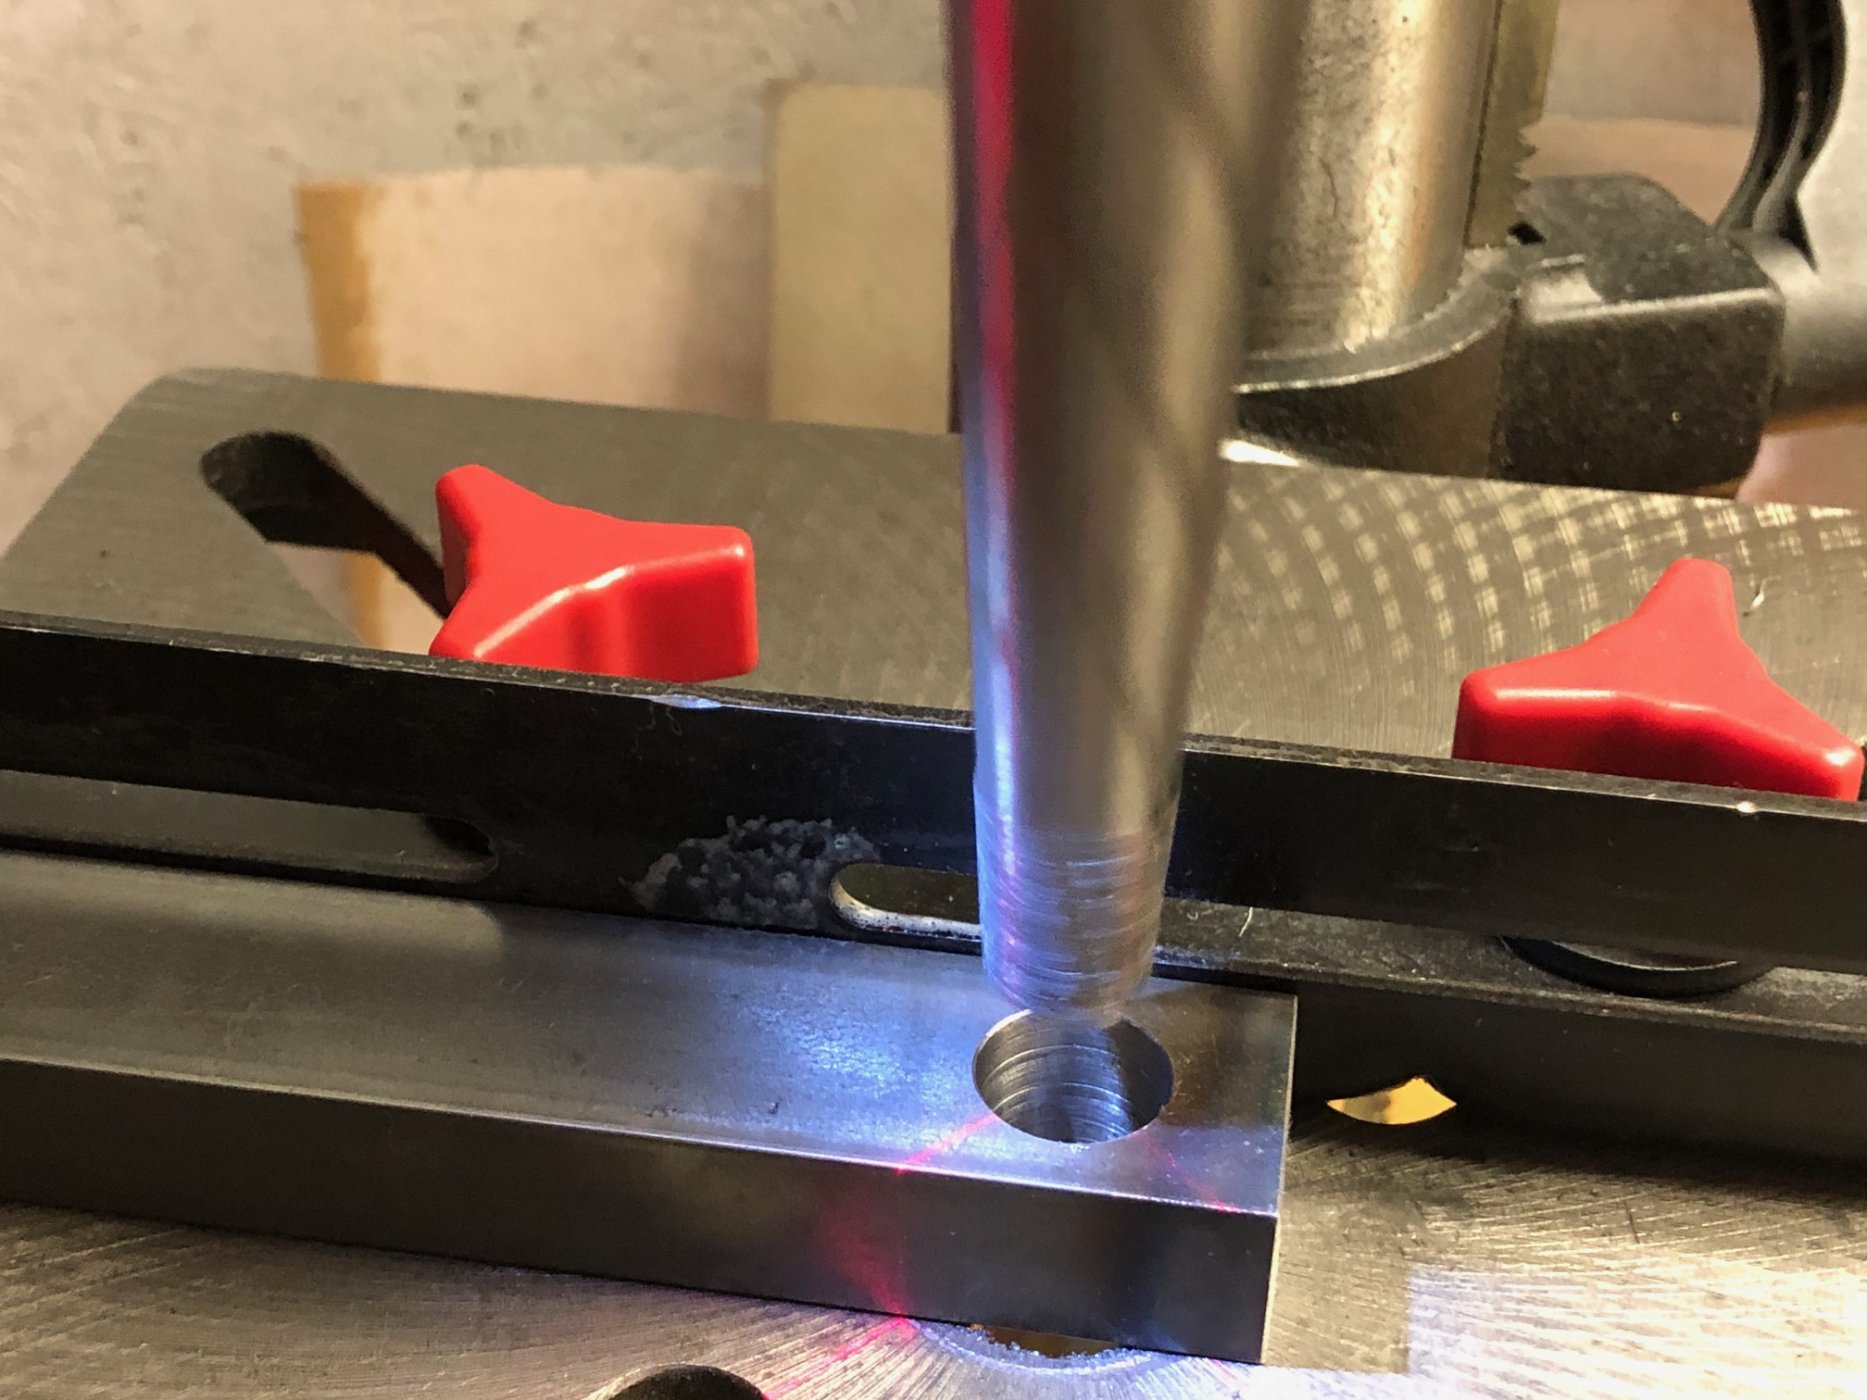
A lot of time was spent drilling the two 7/16” holes on the steering arm that connect to the upright. They were drilled out to 7/16” inch using several bits, starting with 3/32 and gradually going larger. The holes were finished with a step drill bit which gives a nice, precise, clean finish. It is critical that the holes be precisely centered since the upright has raised surfaces on either side that effectively center the arm in place. There is no movement to compensate for an off-center hole. If not centered precisely the hole will have to be enlarged. Our goal was as tight a fit with the bolt as possible with no slop.
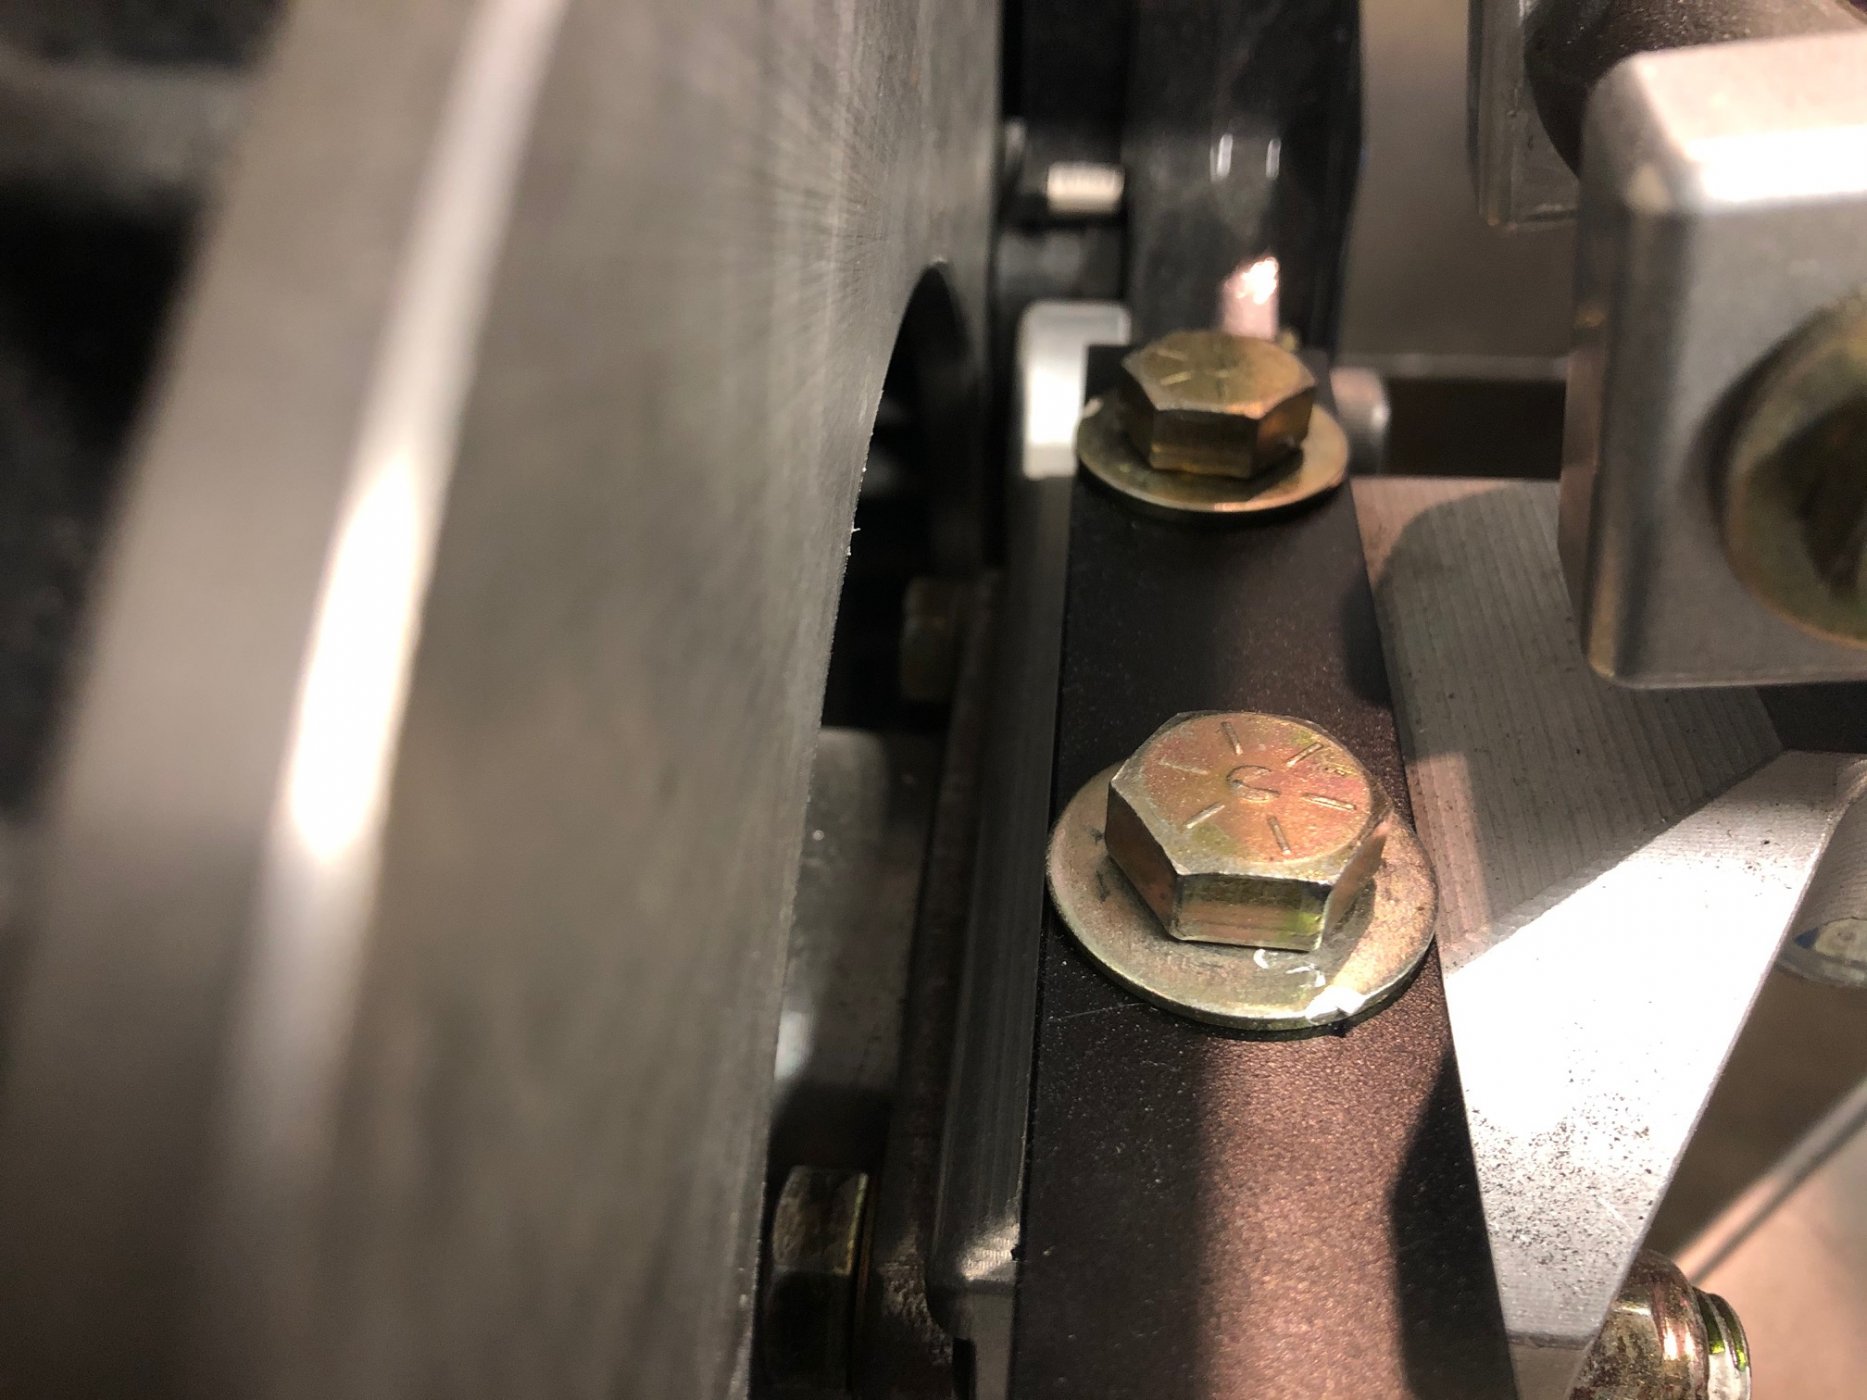
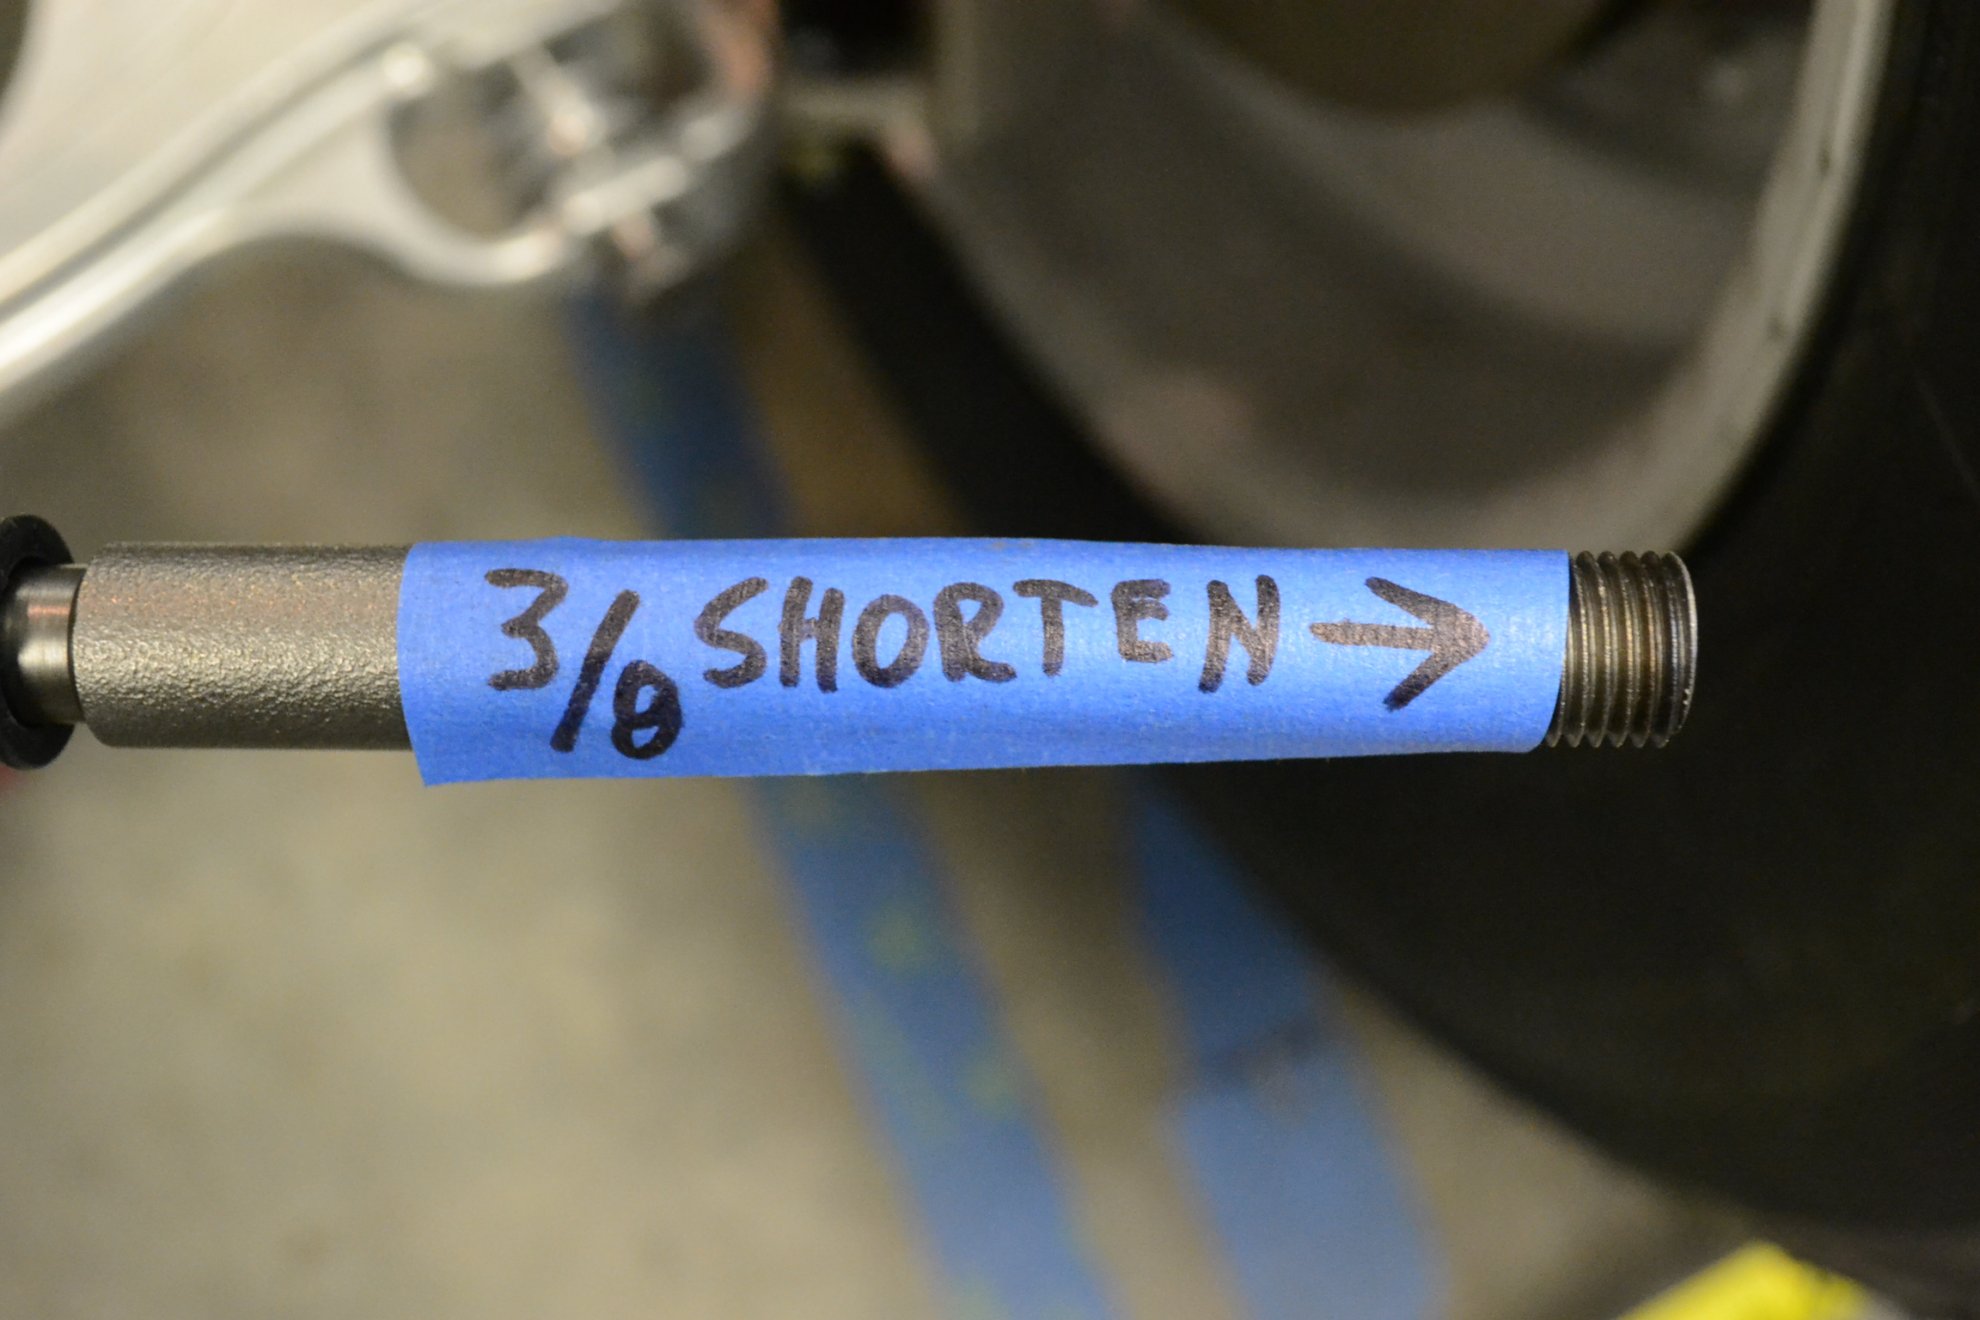
The inner tie rod was shortened 3/8” to permit a better range of adjustment, although it would have just barely worked without being trimmed. The steering arms were primed and painted Eastwood Chassis Black.
The geometry of this setup is virtually identical to the dimensions we determined in our original research, so this should work well with minimal, if any, bump steer. Of course until we road test it a final report will have to be deferred.
Excluding the cost of the reamer, this option came in at $100, which is only a bit more than Option 1, but a superior solution, in my judgment, which avoids the single shear issue and looks much more like the original. We have a third option to report, but a needed part remains to be delivered.
In pervious post it was noted that other options were being explored, but were delayed because critical parts were backordered. We were finally able to obtain the parts for one of the options.
Option 2. The inner tie rod provided by RCR is threaded ½-20, which will not work with either a bump steer style or ball joint style outer tie rod. (Our research indicated they are typically 14-1.5 metric or 9/16”). Accordingly the second option required replacing the inner tie rod. We ordered a specific inner tie rod: Moog-EV179, available from Summit and Amazon for about $30 each, which is 8.85” long. It has metric threaded ends compatible with the ball joint.
The second component is the ball joint. Moog-ES3622, available from Summit or Amazon for about $20 each.
We decided to fabricate a new steering arm rather than modify the one used with the half inch bolts. The shank on the ball joint has a 7 degree tapered fitting which means that the half inch hole needs to be reamed out to 19/32” on the bottom side to achieve the depth needed for a one inch distance from the center line of the inner tie rod to the base of the steering arm. This is the distance we had determined to be best for minimizing bump steer in our initial testing.
We bought a proper taper reamer adding another $150 to the tab. (There are cheaper reamers, but they tend to fail quickly). Summit was the source for the AFCO Racing Tapered Reamer Drill Bit 80770. Reaming was a slow and careful job to prevent jamming. A bit of cutting oil was used during the process.
A lot of time was spent drilling the two 7/16” holes on the steering arm that connect to the upright. They were drilled out to 7/16” inch using several bits, starting with 3/32 and gradually going larger. The holes were finished with a step drill bit which gives a nice, precise, clean finish. It is critical that the holes be precisely centered since the upright has raised surfaces on either side that effectively center the arm in place. There is no movement to compensate for an off-center hole. If not centered precisely the hole will have to be enlarged. Our goal was as tight a fit with the bolt as possible with no slop.
The inner tie rod was shortened 3/8” to permit a better range of adjustment, although it would have just barely worked without being trimmed. The steering arms were primed and painted Eastwood Chassis Black.
The geometry of this setup is virtually identical to the dimensions we determined in our original research, so this should work well with minimal, if any, bump steer. Of course until we road test it a final report will have to be deferred.
Excluding the cost of the reamer, this option came in at $100, which is only a bit more than Option 1, but a superior solution, in my judgment, which avoids the single shear issue and looks much more like the original. We have a third option to report, but a needed part remains to be delivered.
Last edited:
Front Sub Frame, Part I
The D Type came with a front sub frame made with three aluminum panels which support the radiator and provides the connection point for the front clip. Although it is functional, something that more closely resembles the original was sought.
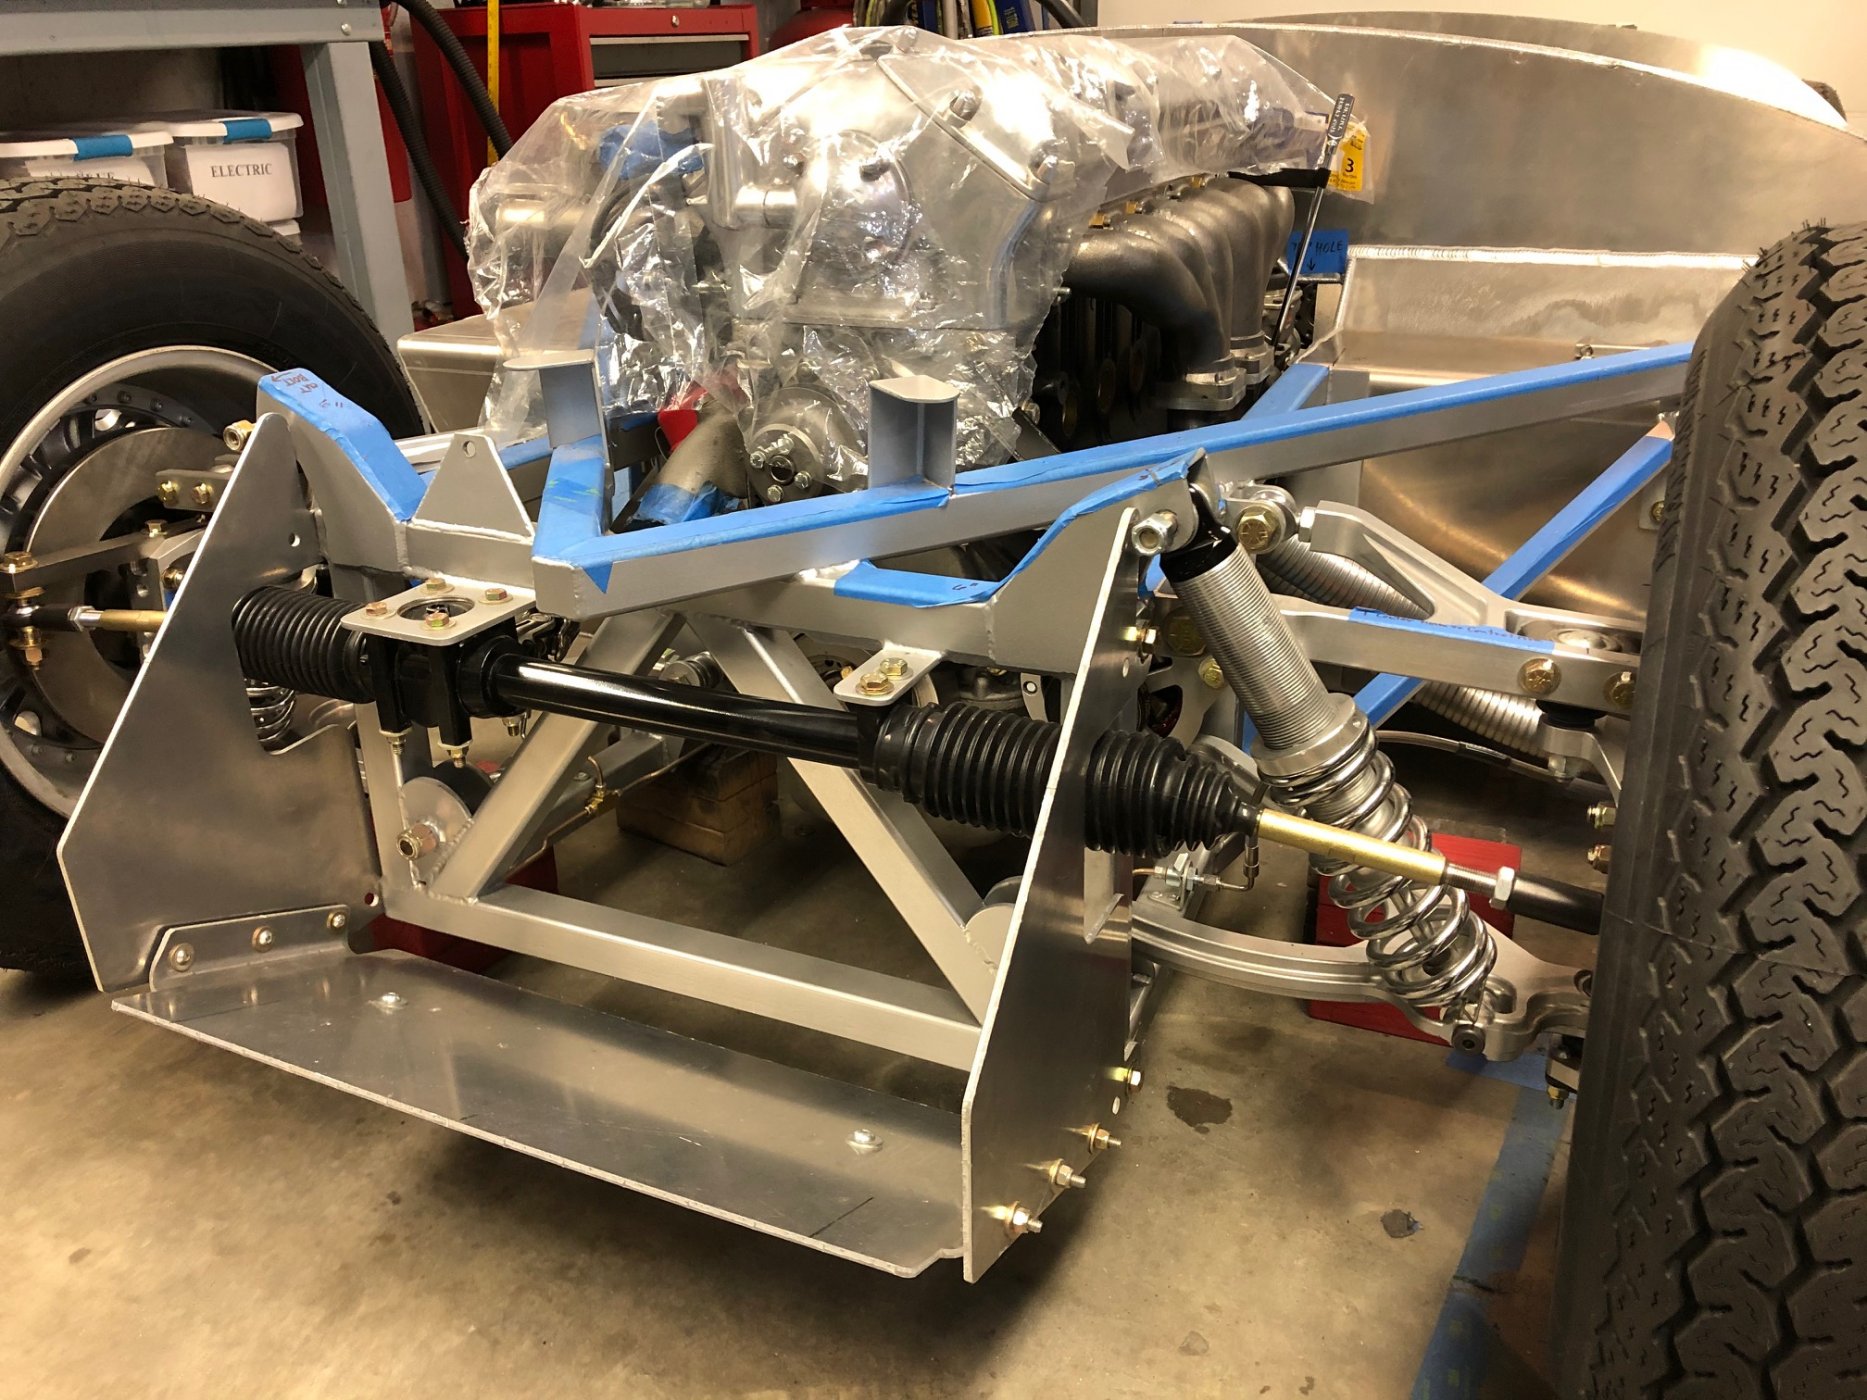
The original was made from steel tubing with tabs welded on the ends which is the same method used for construction of the rear clip under body supports which we previously built and discussed in prior posts.
The RCR subframe was dismantled and one of the side panels was used as a pattern to establish the dimensions and connection points. Plans were then drawn referencing photographs of the original which appear in the Haynes Jaguar D-TYPE Owner’s Workshop Manual. First, plans for the four brackets were prepared.
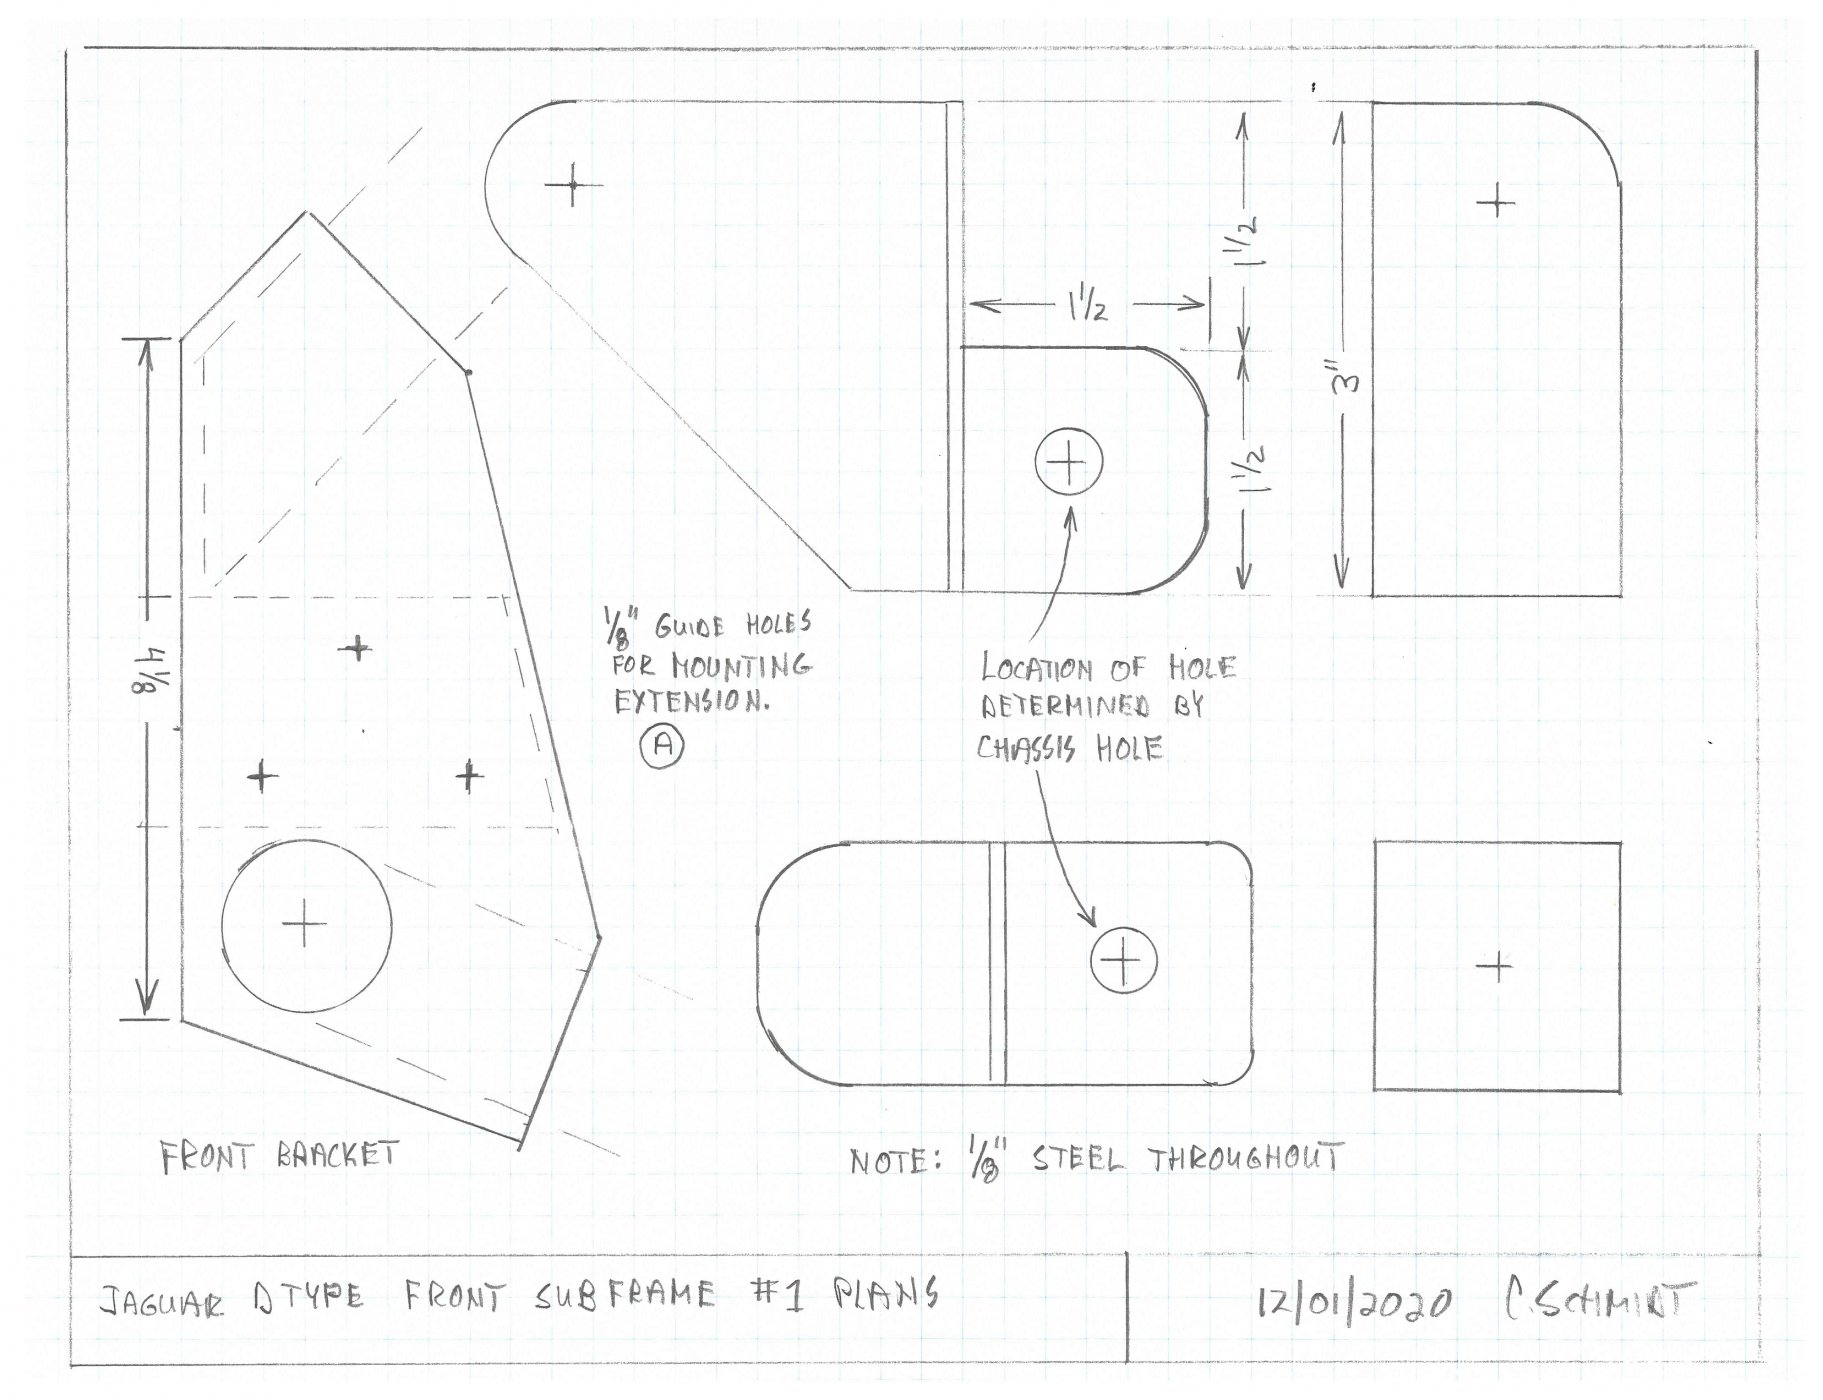
Patterns were cut from cardboard and tested for fit.
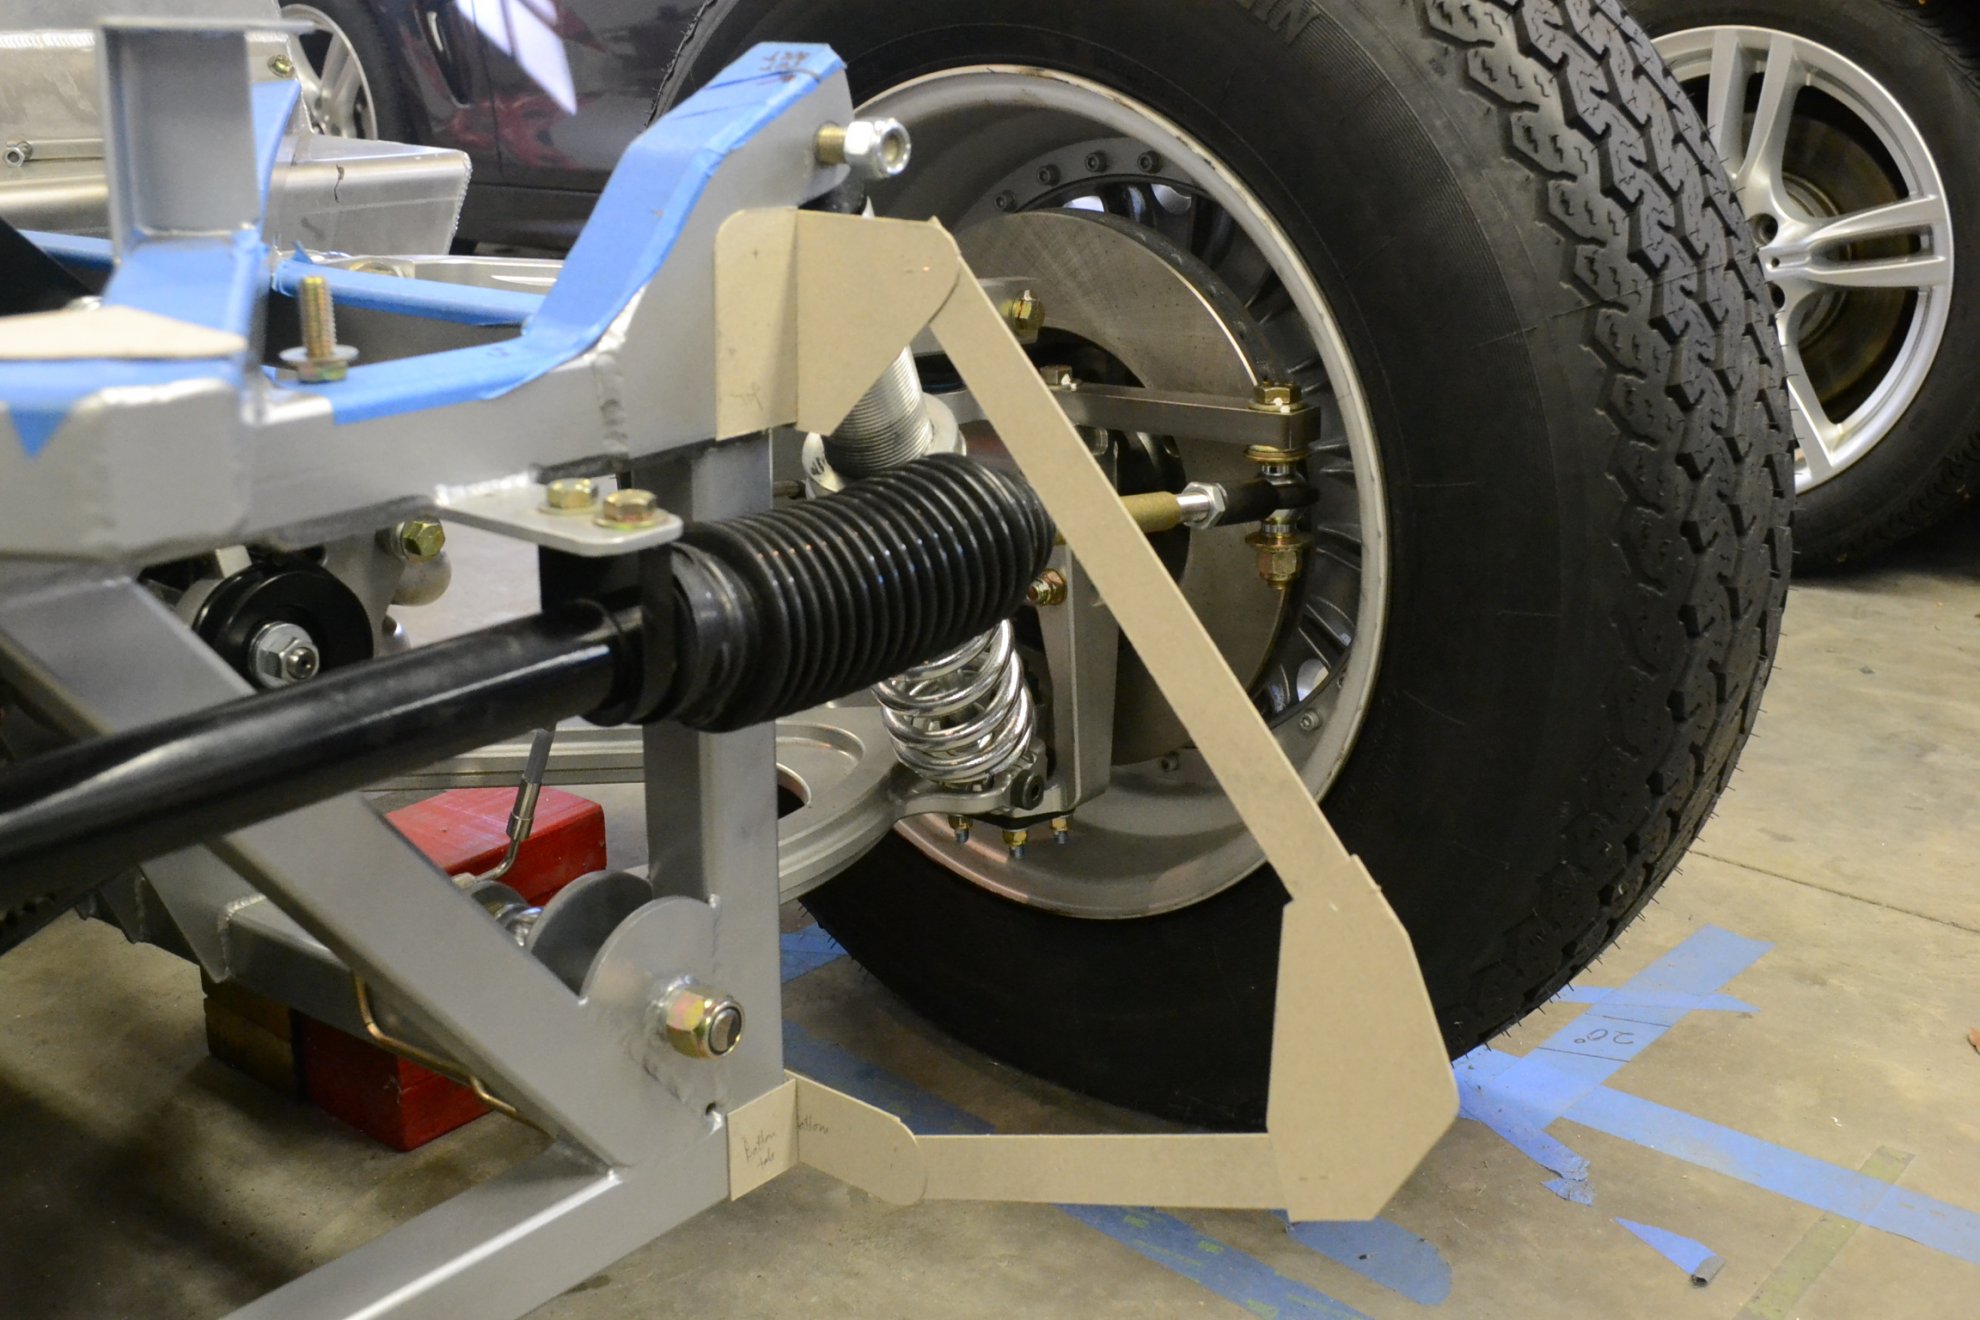
The pieces for the four brackets were cut from 1/8” steel with a jig saw and the edges smoothed with a rotary bench sander to assure reasonably precise dimensions. Holes were drilled with a drill press.
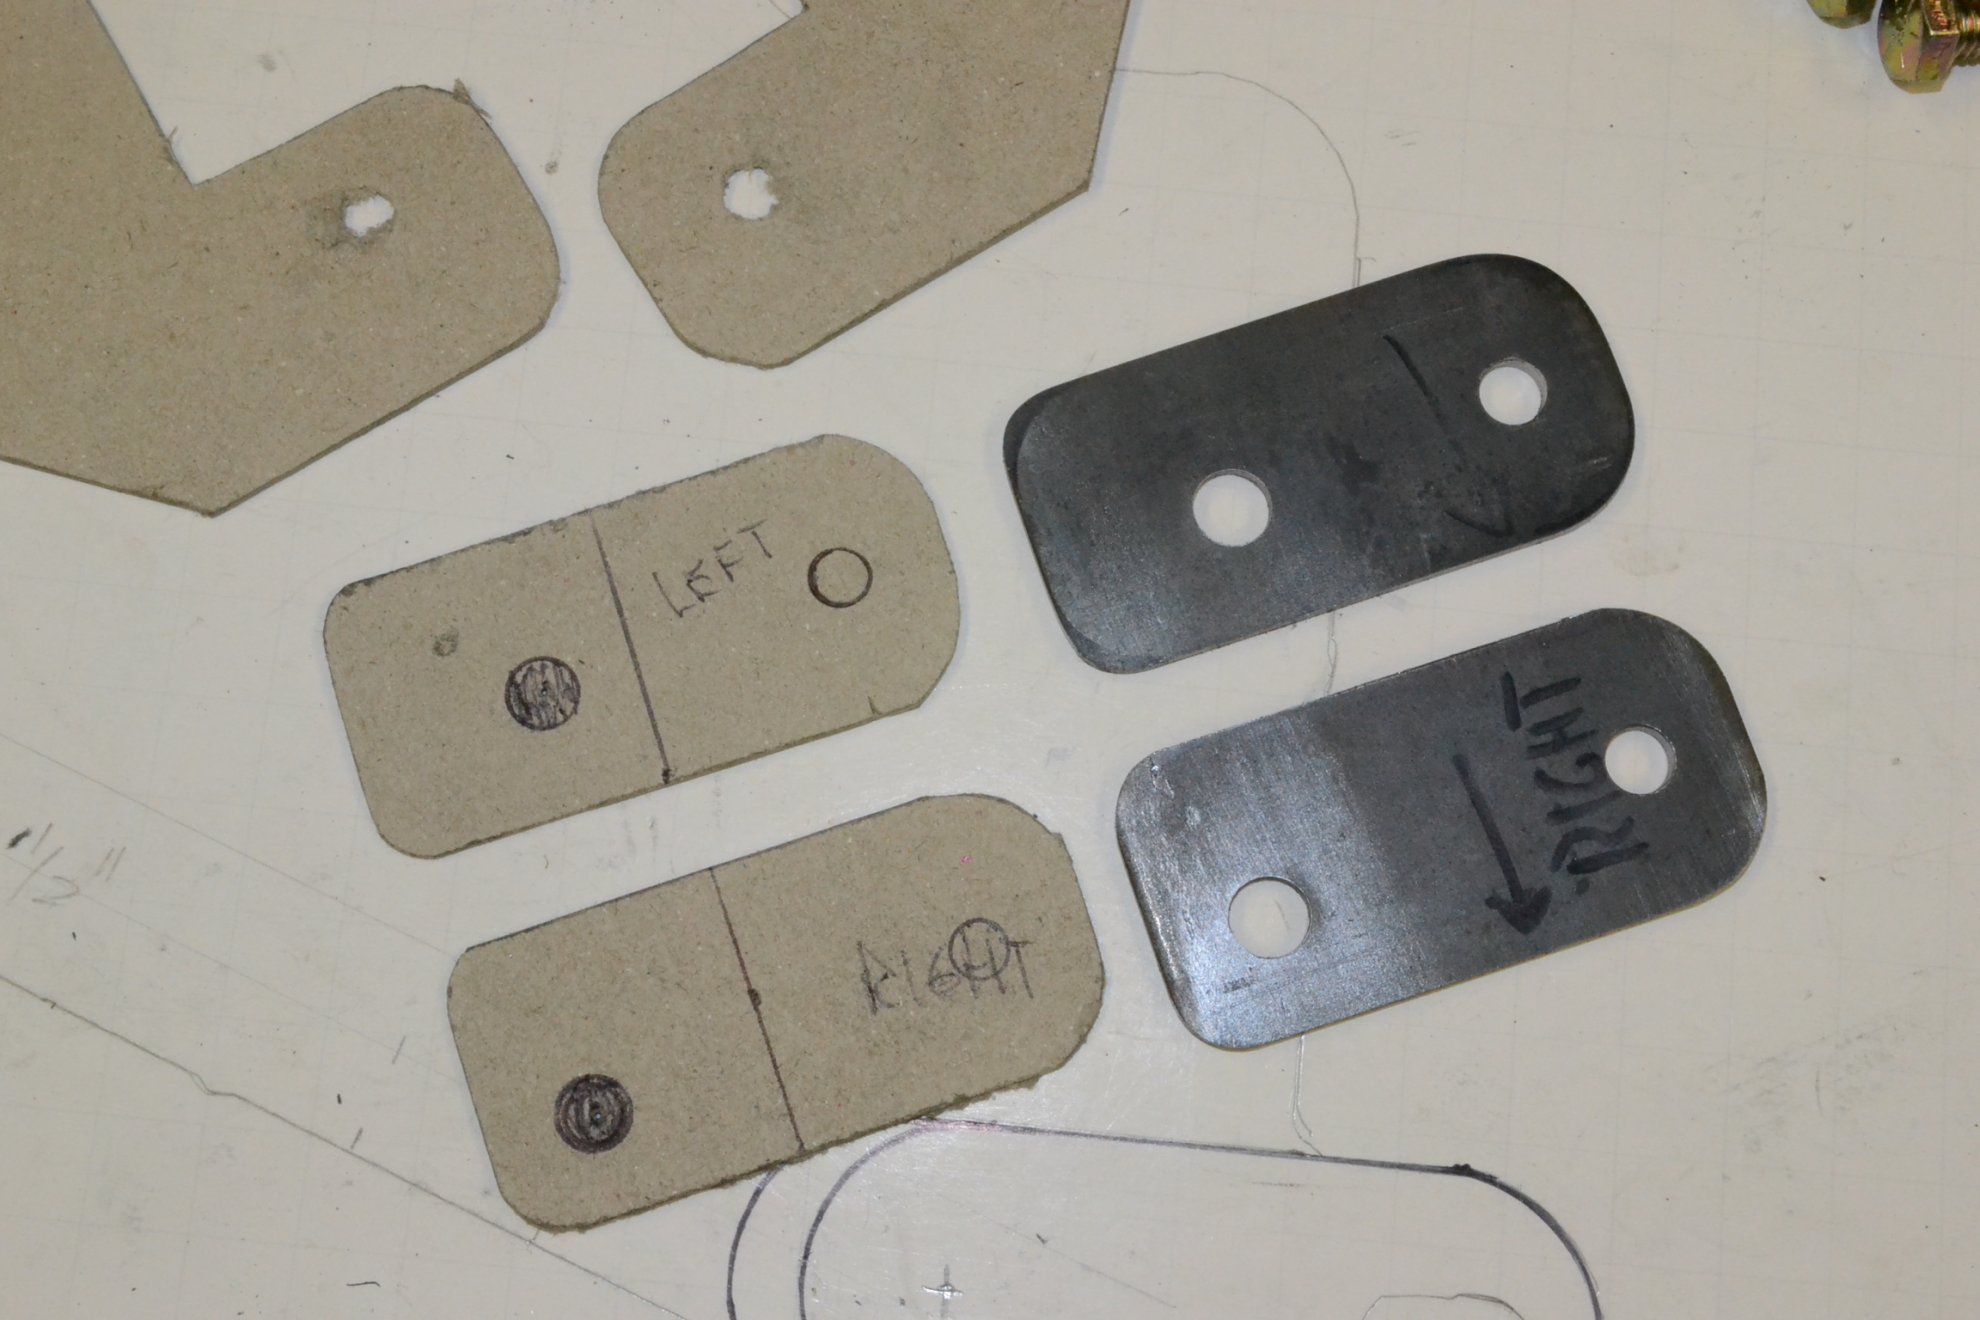
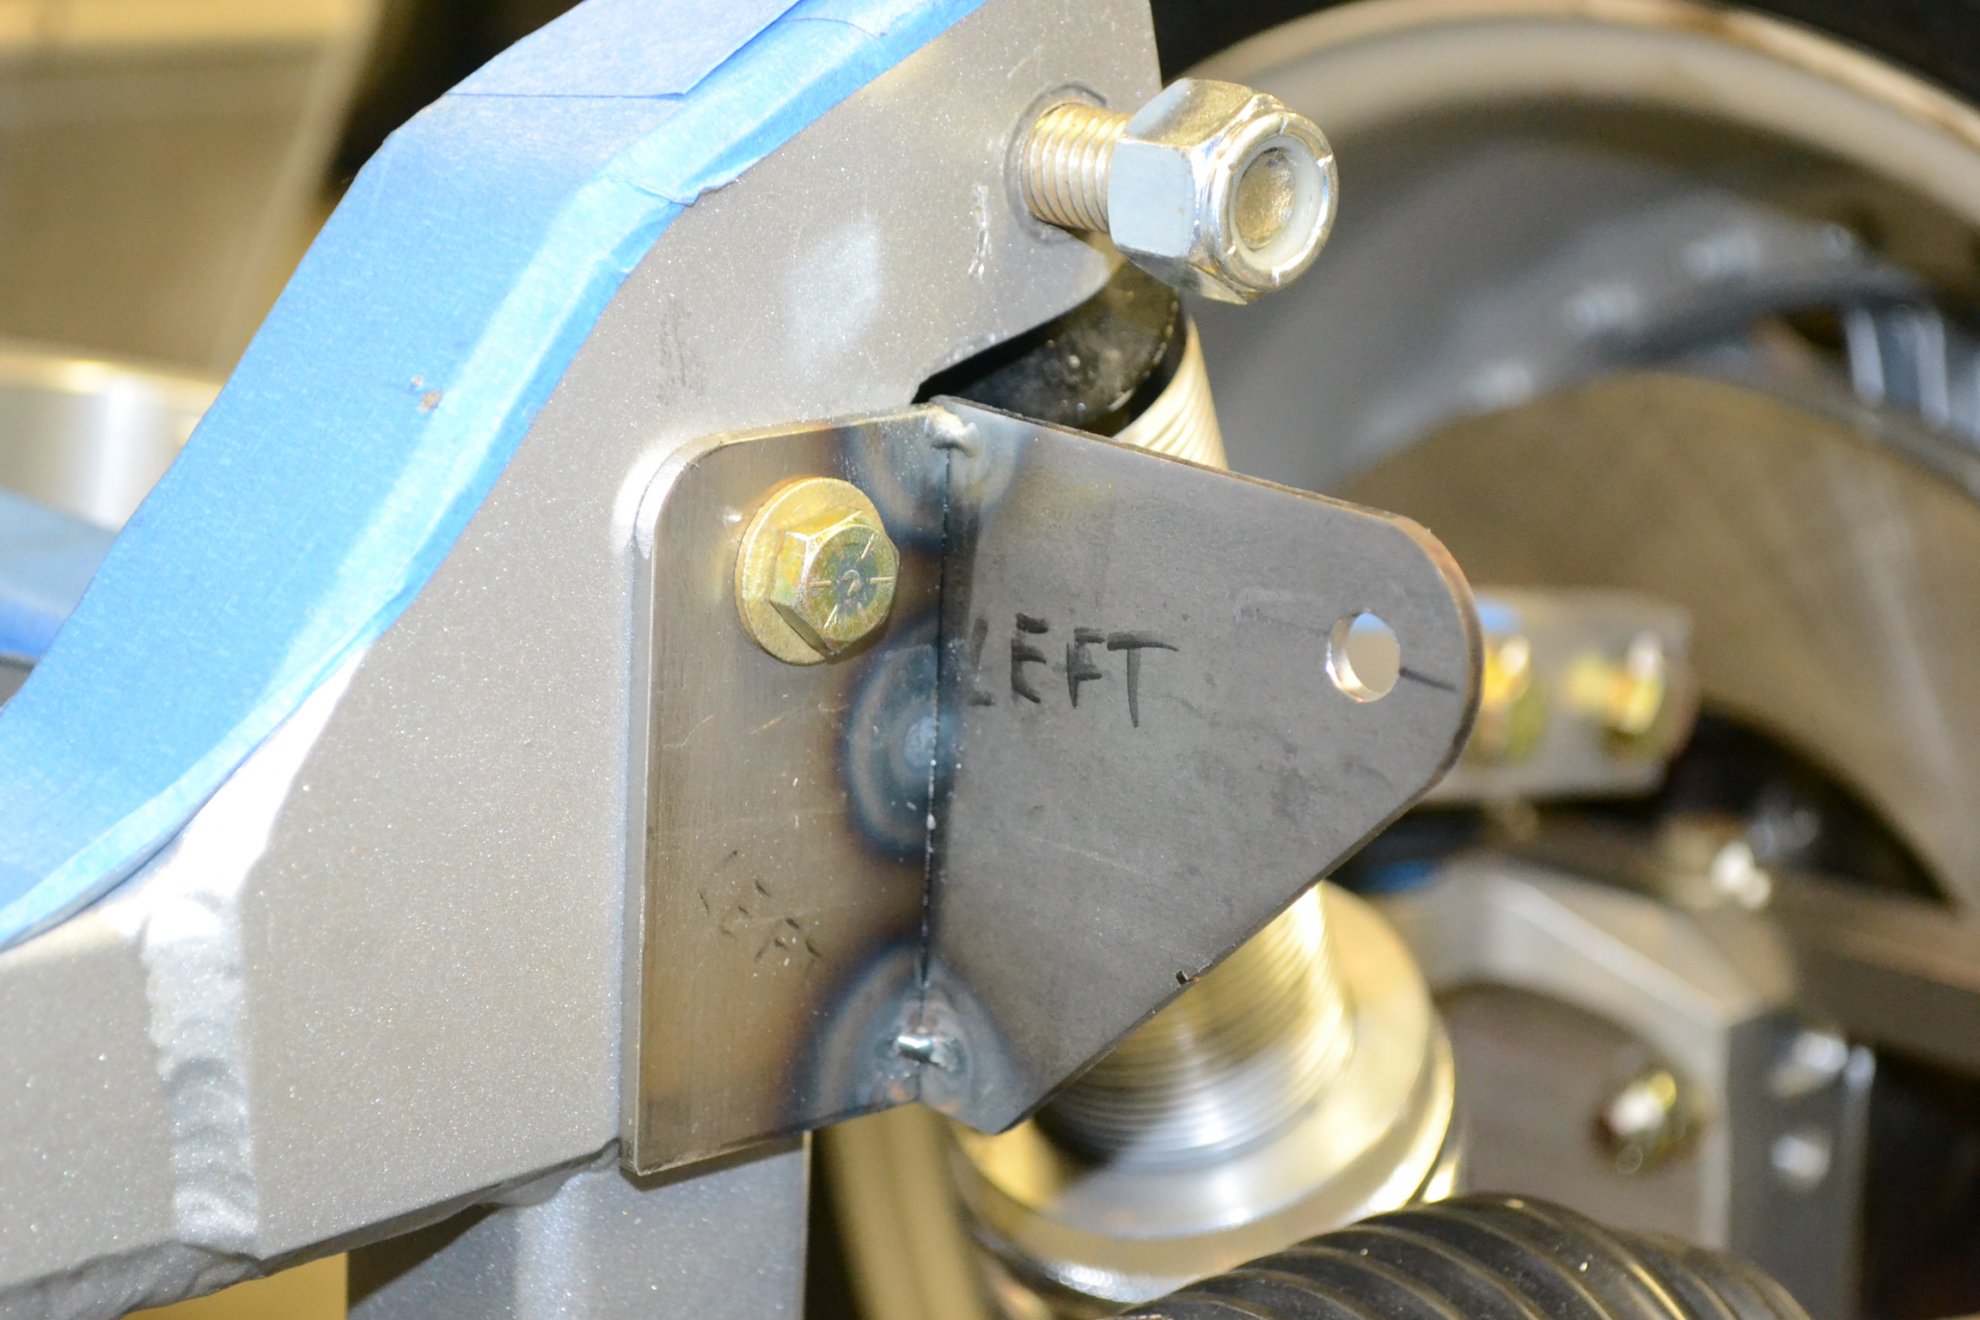
The upper and lower attachment brackets were assembled. These four brackets use the lateral 3/8” threaded mounting holes made by RCR for its subframe. Unfortunately the 3/8” holes were located randomly on the end sections requiring that the holes on the new brackets had to be located off center to match the locations of the RCR threaded holes. This required making four separate patterns. Once the location of these mounting holes was determined and drilled the side portion of the new brackets were temporarily bolted into place.
Next the front half of the brackets were set in place and matching hole drilled into the chassis. The chassis was then threaded for a 5/16” bolt. With the front and side brackets now in place the two pieces were tack welded together while on the car assuring a perfect fit that aligns with the two mounting holes. The same technique was used for each of the four brackets.
With the four mounting brackets in place the connecting tubes could now be fabricated.
The D Type came with a front sub frame made with three aluminum panels which support the radiator and provides the connection point for the front clip. Although it is functional, something that more closely resembles the original was sought.
The original was made from steel tubing with tabs welded on the ends which is the same method used for construction of the rear clip under body supports which we previously built and discussed in prior posts.
The RCR subframe was dismantled and one of the side panels was used as a pattern to establish the dimensions and connection points. Plans were then drawn referencing photographs of the original which appear in the Haynes Jaguar D-TYPE Owner’s Workshop Manual. First, plans for the four brackets were prepared.
Patterns were cut from cardboard and tested for fit.
The pieces for the four brackets were cut from 1/8” steel with a jig saw and the edges smoothed with a rotary bench sander to assure reasonably precise dimensions. Holes were drilled with a drill press.
The upper and lower attachment brackets were assembled. These four brackets use the lateral 3/8” threaded mounting holes made by RCR for its subframe. Unfortunately the 3/8” holes were located randomly on the end sections requiring that the holes on the new brackets had to be located off center to match the locations of the RCR threaded holes. This required making four separate patterns. Once the location of these mounting holes was determined and drilled the side portion of the new brackets were temporarily bolted into place.
Next the front half of the brackets were set in place and matching hole drilled into the chassis. The chassis was then threaded for a 5/16” bolt. With the front and side brackets now in place the two pieces were tack welded together while on the car assuring a perfect fit that aligns with the two mounting holes. The same technique was used for each of the four brackets.
With the four mounting brackets in place the connecting tubes could now be fabricated.
Last edited:
Thank you, appreciate the feed back.Work of art my friend, what are you using for a dizzy?
gtjoey1314
It is a Mallory Unilite distributor.
Similar threads
- Replies
- 1
- Views
- 658
- Replies
- 15
- Views
- 2K
- Replies
- 8
- Views
- 996
