Designing rear anti-roll bar brackets for my RF

Has anybody on this site checked out www.emachineshop.com? I've heard some very good things about the site from others. It's a great concept: you download their software, design the parts that you need, specify materials, and you can play around with different designs, materials and quantities and price the parts instantly. I'm told the products delivered were first rate.

So let me explain how I used emachineshop (EMS) software to come up with a design for rear anti-roll bar brackets for my Roaring Forties kit. Since I have increased the rear tire width from 255 to 315, the increased track width will probably cause the car to understeer. The fix will be a rear anti-roll bar. THe first order of businedd will be to locate a part of the suspension where I can attach the lower links from the anti-roll bar. I don't like the way CAV does it because it would require me to weld a tab onto my lower control arms, which would cause a bending moment about the heim joint. Let's take a look at my RF's rear suspension so I can show you what my plan is.

Single%20shear%20rear%20lower%20arm%20mount.jpg


The above picture is of the rear part of my lower rear upright. This is the only suspension link on the car that's in single shear and I don't like that. My fix will be to fabricate a bracket that will box in the heim joint, converting the single-shear mount to a double-shear mount. The bracket will attach to the upright at the two (unused) holes, as well as at the pivot bolt that goes through the upright. The upper surface of the bracket will be where the anti-roll bar end links attach. If I locate this attachment point immediately above the heim joint, there will be no bending moment put on the suspension by the anti-roll bar. So this bracket gives me a good ARB end link mounting location and it improves the single-shear pivot bolt by turning it into a double-shear mount. Note that, since the lower arm geometry will not change, I'll also need to fabricate a thinner inner bushing to accomodate the thickness of the metal bracket.

Bottom%20rear%20damper%20mount%20bracket.jpg


The picture above is the front part of the lower rear upright on my RF. Note the shiny plate that attaches to the upright. It serves to locate the lower drag link as well as the lower damper mount. Robert Logan at RF was kind enough to share a drawing of that plate with me, and it serves as the basis for my rear anti-roll bar bracket design.

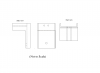
So the first thing I did was download the EMS software and draw RF's damper mount plate. Here it is modeled as a 3-mm plate (the part RF provides is 5 mm):

RF%20bracket%20model.jpg


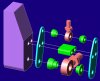
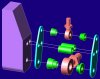
Next, I designed the reduced-height bushing which I'll need to accomodate the 3 mm thickness of the bracket. Here's a picture of the bushing, followed by the rendered model of the smaller bushing:

heim%20joint%20pivot%20bolt%20bushing.jpg


smaller%20bushing%20model.jpg


more to come...
 
Finally, here's my bracket design in 2D and again rendered in 3D:

2d%20bracket%20design.jpg


bracket%20model.jpg


I would finish the bracket by welding up the seams and having it plated to match the rest of my rear suspension stuff.

If I can round up another nine RF owners who want to purchase these brackets then the cost would probably be well under $50 for a set of two brackets and two bushings.

I'd be interested to hear any comments on my design, particularly since I'm not a mechanical engineer and I am unfamiliar with fabrication. The way I have this spec'd out right now calls for the bracket being made of 3mm-thick 1020 steel, laser cut. I'm thinking 4340 steel for the bushing. I'm a little worried about what appear to be loose tolerances on the bends, and I wonder if I should revise the design to make the bracket a little wider with the expectation that I'll have to shim up the pivot bolt to get the right fit. I set my .EMS drawing up with the two top fold lines 34.6 mm apart, which is the width of my existing heim joint with two bushings. Should this be increased or decreased to allow for the bend radius (which I set equal to plate thickness at 3 mm)? Finally, how best to attach the down links to the top of the bracket? I could weld a couple tabs that I could run a pivot bolt through. Is there any other hrdware I should consider for attaching the downlinks to the brackets?

Anyway, this was a fun exercise, and I learned a lot and had some fun. Looks like www.emachineshop offers a very good service, particularly since I haven't been able to find any responsive, reasonably priced machinists locally.
 
Hi Mark, that's a brilliant piece of work. I'm no engineer, but it looks right, and that is often the right way to go.
Good luck.

Mike
 
So if I understand correctly, your brackets would both eliminate the single shear connection and at the same time provide a location to mount the rear sway bar? If that's correct, I'd spring for $50 for a pair. I have no plans at this time for a rear sway bar, but I like the idea of making the single into a double.
 
You understand correctly, Pat. I don't know of too many RF owners/builders who are going with wide rear tires and Gulf flares; for those who are, I would think a rear anti-roll bar is a must. For everyone else, the primary benefit is converting a single-shear link to double shear.

I just need some input from someone who's familiar with machining as to what tolerances are appropriate and what materials should be used. I guess one way to eliminate the bend tolerance question would be to make the bracket out of three pieces - two side plates and the folded top-side plate. The assembly would then have to be welded up.
 
[ QUOTE ]
I guess one way to eliminate the bend tolerance question would be to make the bracket out of three pieces

[/ QUOTE ]

Why not just mill it out of a solid block of metal?
 
I agree with Steve on this one. If you want stress free components then go for a one piece unit. EN16 Mild steel shold suffice.
I tried to download the Freeware you mentioned Mark but I cannot open the file. I get an error message 'requires Win 32 format to install' I'm no computer expert, so what the hell does that mean!!!
 

Chris Duncan

Supporter
Re: Designing rear anti-roll bar brackets for my R

The first thing I would do would be to shorten the outer spacer and bolt in your first picture. This joint only pivots in one plane, you don't need the long radiused spacer all you need is a bushing for your difference in bolt/hiem size and a washer flat up against the outside of the hiem. You could then design your bracket shorter making the whole assembly lighter and stronger.

If you decide to go with your design in mild steel I would do a bent and welded assembly just like you've designed. This would be cheaper/easier. A finished tolerance would be about .005" clearance + or - .002". It should be a little loose so you don't have to force it together when aligning the bolt holes. Thickness of 3mm or .125" is about right.

4340 would be overkill for the spacer. Could you just cut down the existing spacer and re-plate?

Typical fabrication steps in order would be, cut, bend, tack weld, drill holes, bolt a jig spacer in place that is .010" thicker than actual assembled spacers/heims (big hole), and final weld. If your weld jig spacer is the same size as final assembly the weld will shrink the piece and cause a tight fit.

With your design I'm assuming that the rod end for the sway bar link will mount on one of the smaller bolt holes that go through to the upright, using a longer bolt. It's going to be a 5/16" bolt in single shear which is OK as that is similar to how the original cars were done.

The only problem I can see with your design is your going to need spacers for the two 5/16" through bolts otherwise the clamping force will bend your bracket and not allow sufficient bolt torque. Spacers could be aluminum tube or welded in mild tube which would be stronger but more complex/difficult to fabricate.

You could just have short bolts going through one side of the bracket on the upright side, then just use another short bolt on the outside to hold the swaybar link heim. The bolt heads might be hard to access this way though.

If I was given this design construction task I would use just a plate like your third picture made from 7075 aluminum, 3/16" thick. Then I would make a 7075 or 6061 rectangular spacer that utilized the two smaller 5/16" holes and was the thickness of the heim/heim spacers assembly, and just bolt this assembly together with the 3/16" plate on the outside and the rectangular spacer sandwiched alongside the hiem. If you wanted to be really trick you could machine all your heim spacers from 6061 or even better 7075, it's how most race cars do it including the original GT's. This method would be simpler, easier to build and probably lighter.

Too bad the two small threaded holes on the upright are so close together. If they were further apart you could incorporate the swaybar link mount heim sandwiched between the 3/16 plate and the upright with spacers on one of them and just put a tubing spacer (instead of the rectangular one) on the other.

Don't forget that the original RF design is adequate and to truly gain all you can from a redesign would require that you look at reducing the size of components. In other words if it's strong enough in single shear then it's overkill in double shear and components could be smaller/lighter.

I can see your design intent though in gaining strength from double shear while also incorporating a swaybar link mount. Reduction in size of components I.E. size of heim or through bolts is probably impractical as the next size down is too small.
 
Re: Designing rear anti-roll bar brackets for my R

Thank you for the kind words of encouragement, folks. Kalun, I hadn't yet figured out how to attache the end links to the bracket, but was thinking of welding two brackets on the top of the bracket through which I would install a pivot bolt and capture the end link in double shear. I was thinking of designing little slots on the top of the bracket along with corresponding tabs on the brackets. I was also wondering if I could just find the right piece of hardware that would allow me to cut a hole in the top of the bracket and mount the endlink attachment point to a bolt installed through the hole. Those two holes accept an 8 mm bolt; I did not intend to use long 8 mm bolts going through the entire bracket, rather, I was going install 8mm x 30 mm bolts to attche the bracket to the upright.

Thanks for the info on the clearances.
 

Chris Duncan

Supporter
Re: Designing rear anti-roll bar brackets for my R

Mark,

OK, got you now. You want to drill a hole in the top of your bracket and bolt straight onto there with your sway bar link.

There are two common ways I know of to attach a sway bar end link (I'm sure there are others). One is with rod ends (heim), the other with a through bolt and urethane bushings.

A rod end would require more bracketry if you wanted it double shear. You could just drill a hole in the top of your bracket and put a urethane bushing on either side of it with a through bolt.

Here's a pic of the urethane links

bmp149.jpg


You have to imagine these with longer "bolts" which would probably be a long piece of tubing threaded inside the ends with studs or bolts threaded into the ends, which would then go through the urethane on either side of your bracket.

I'm saying these "bolt" links need to be long assuming that your running the sway bar on top of the exhaust like the original design. If for some reason you had it mounted closer, you could use the links just like pictured, which use a full length through bolt with a tubing spacer between the washers on the urethane links.

I seem to remember these urethane bushings being about 1" in diameter, so with your 8 x 30 bolt you might not have room to narrow your bracket as I suggested.

IMHO a sway bar is almost a requirement especially on the rear of a GT40, and if your going to do a rear one you probably need a front one for balance. Passenger cars have had them as standard equipment for years. Most of them at least on the heavier end and all EX models front and rear.

There was a thread about a month ago discussing an add on sway bar from a firm in California.

My replies to your thread are all IMHO so please do whatever you think is right for your preference/situation.
 
Re: Designing rear anti-roll bar brackets for my R

So Kalun got me thinking... I'm not a mechanical engineer, but how about something like this (with appropriate additions for sway bar mounting). This would be easy to make with a CNC mill...
 

Attachments

  • 35730-bracket.png
    35730-bracket.png
    10.9 KB · Views: 395
Re: Designing rear anti-roll bar brackets for my R

Hmmm... Drawing's not showing up to well on my machine. Right-click & select "View image" (or equivalent in your browser) and it looks better...
 

Chris Kouba

Supporter
Re: Designing rear anti-roll bar brackets for my R

Reflecting upon Kalun's comments, I decided to share my own opinions...

Assuming the RF design criteria are healthy, the design should be sufficiently strong with a built-in factor of safety to ensure a single shear bolt will not fail under load. I liked Kalun's idea of eliminating the spacers on that side of the upright and getting your bolt as short as possible. Brilliantly simple!

In looking at the pictures and making a few assumptions, I'll bet the spacers can't be removed as the width from heim to heim on the control arm is already fixed by the physical size of it (ie: you'd need to construct a new A-arm to facilitate this change).

My inclination would be to bolt a heim joint end link right into the upright at one of the holes in the first picture. This would also be single shear, but I am confident in the strength of quality heim joints. It would certainly be simple and easy.

This doesn't solve the puzzle of putting the A-arm in double shear. I am not convinced that a stamped-steel bracket that bolts to the upright is going to significantly enhance the stability of the bolt. Perhaps someone with a bit of free time and FEA resources can answer that. It might be more work than it's worth.

I still am very impressed with the ingenuity and creativity of the people on this site. It's awesome to see and try to contribute. Keep up the good work!

Chris
 
Re: Designing rear anti-roll bar brackets for my R

I've settled on an end-link capture design, and I've made some revisions to my proposed brackets. I've also found that the EMS software allows you to model bends so I tweaked things a little bit until the modeled distance between the bracket sides came out right where I want it (existing bolt-bushing stack length plus 0.005").

I decided to attach my end links in double shear to mounting lugs on the brackets that will be welded to the bracket tops, with a 3/8" rod end, an AN-6 bolt and nut, and two small bushings which will sandwich the spherical bearing between the mounting lugs. The hardware (rod ends, bushings, botlts and AN nuts) is available from Aircraft Spruce for less than $25 per set (depending on what quality of the rod end).

Here's my revised bracket. Note the two notches in the top which will accept tabs on the botton of the mounting lugs. These tabs serve to properly locate the mounting lugs and to allow a stronger weld.

Revised%20bracket%20model.jpg


And here are the mounting lugs (two per bracket). I wanted to make them out of 5 mm thick 1020 steel, but I'd have to make the bracket wider to accomodate the increased thickness and that would require yet another bushing to allow for the wider bracket.

bracket%20tabs%20model.jpg


It's interesting to use the EMS software to see how the price changes depending on material, machining complexity, and especially quantity of parts. If I make one set it'll cost me $221. If I make five sets it'll cost $63 per set; 10 sets would be $43 each, and 20 sets would be $32 each. It really drives home the high cost of prototyping and the need to design it right the first time.

So I need to make some final measurements, double (triple) check my calculations, and get this stuff ordered. I want to have these pieces chrome plated at the same time I do my door jamb catches.

Some final questions for those of you who may be familiar with machining:

1) I'm afraid the rectangular holes for the tabs on my mounting lugs may be too close to the bend and that the metal may be distorted. Probably easily remedied with a file or a grinder, but I'm always looking for input.

2) I specified the nominal sized hole for each bolt. For example, the mounting lugs get a 3/8" hole, and I designed it to be laser cut to exactly 3/8". I know most bolts are a few thousandths undersized, but do I need to add a few thousandths to the hole diameters?

3) The smaller bushing is a significant cost (~40%) of the machine work. To keep these costs down I specified 7075 T6 aluminum. Should I use another material?

Thanks in advance for any additional input.
 

Chris Duncan

Supporter
Re: Designing rear anti-roll bar brackets for my R

[ QUOTE ]
In looking at the pictures and making a few assumptions, I'll bet the spacers can't be removed as the width from heim to heim on the control arm is already fixed by the physical size of it (ie: you'd need to construct a new A-arm to facilitate this change).

Chris

[/ QUOTE ]

That is correct, on the side facing the upright you couldn't change the spacer, BUT on the outer side you could shorten the overall bolt length and the spacer thickness.
 

Chris Duncan

Supporter
Re: Designing rear anti-roll bar brackets for my R

""Here's my revised bracket. Note the two notches in the top which will accept tabs on the bottom of the mounting lugs. These tabs serve to properly locate the mounting lugs and to allow a stronger weld.""

Simplicity is usually one of the primary goals of design. In order to realize the benefits of double shear, which is more strength with less weight, you have to reduce size and weight of material. In this double shear instance the tab wouldn't be necessary for weld strength. If you wanted to make it stronger you should make the outer face one continuous piece incorporating the outer face of the A-arm brkt with the sway link outer brkt piece.

""And here are the mounting lugs (two per bracket). I wanted to make them out of 5 mm thick 1020 steel""

Please don't take offense but your starting to sound like a tractor builder <grin>.

5mm is 3/16". There are no 3/16 steel brkts anywhere on the original cars. 1/8" to me is overkill for a sway bar mount it should be about 12 gauge (.110). The original car would have a 14 or 16ga.(.063) flanged mount with this load situation. Flanging is an exorbitant process but you get the picture.


""I want to have these pieces chrome plated at the same time I do my door jamb catches.""

Chrome is about the thickest of all the plating processes. I've only had one piece chromed years ago so I don't remember thickness. Make sure the chrome person knows what their doing, that it's going to be a structural piece. Sometimes the process starts off with sandblasting which can weaken the piece if not done properly. You might consider cadmium, cheaper and thinner.

""2) I specified the nominal sized hole for each bolt. For example, the mounting lugs get a 3/8" hole, and I designed it to be laser cut to exactly 3/8". I know most bolts are a few thousandths undersized, but do I need to add a few thousandths to the hole diameters?""

3/8 even may be right for cadmium, and just general clearance, more for chrome. Buy your bolts and measure. The true test is with the prototype. Also realize there are two things to consider here clearance and tolerance. How accurate is the laser cut? A drill bit usually makes a slightly larger hole.

""3) The smaller bushing is a significant cost (~40%) of the machine work. To keep these costs down I specified 7075 T6 aluminum. Should I use another material?""

Not sure of which spacer your talking about. You could just grind/machine down your existing spacer on the A-arm heim and replate.

I want to discuss these spacers. A rod end (heim) has a designed angular clearance. It obviously can pivot 360 degrees around the bolts axis but side to side it's limited to less than 10 degrees. A spacer like in your first spacer pic is designed to increase that 10 degree limit. It has a small diameter where it contacts the heim and a large one where it contacts the bolt head or whatever it's bolted too. In this instance though with the lower A-arm the heim doesn't pivot at all in the side to side direction thus making these type spacers unnecessary. You could get by with just a standard AN washer right up against the side of the heim if your brkts were spaced accordingly.


I'm also guessing that the sway link heim would be the same, I.E. within the 10 degree limit, but this should be checked before final production. Taking this into regard any spacers could be simplified from the original piece thus reducing machining operations. Even a longer spacer could be just a piece of tubing essentially.

Another thing that RF has done is to use a heim with a larger ball hole diameter than the size of the bolt necessary thus requiring a bushing. This was probably done in order to utilize the most cost effective rod end for the application. Quite understandable when you look at the cost of rod ends and the amount required. Typically rod ends aren't used with a bushing that goes through the ball hole bore. The size of the bore in the A-arm tubing also is a factor in deciding hiem size and this probably affected the heim size choice also.

As far as material 7075 is about twice the cost of 6061. I made a mistake when I recommended it as it's very hard to even obtain especially in tube or rod. You might look at hard anodizing 6061 if you want to use it.

""Thanks in advance for any additional input.""

I would construct a bracket out of thick posterboard and tape and set it in position and see what it looks like. An actual model of the piece often looks very different from a drawing. You could look at your loads, strength and clearance this way also. Take the spring off your shock absorber and push the suspension through it's entire range.


DISCLAIMER. Any and all information presented is all IMHO and should not be taken personally or with any thought that I'm trying to malign or discourage anybody. Accuracy can and has also been called into question due to the continual learning/forgetting process.

There's 50 ways to skin a cat, this is just one of them.
 

Robert Logan

Defunct Manufactuer - Old RF Company
Re: Designing rear anti-roll bar brackets for my R

Kauln,

The reason for the use of spacers in our heim joints is NOTHING to do with cost. Nothing could be further from the trueth.

The method of failure of the mounting is shear. The way of combatting shear is to increase the mating surface , thus increasing the frictional area. This has a drawback in that the size of the bolt is then reduced so a engineering decision must be reached after much calculation. This is what was done and NOT the bottom line.

Please remember that our cars have been fully engineered by Graduate engineers with decades of proffesional experience in the race industry, as members of professional race teams, and that our cars have covered many hundreds of thousands of miles in total to verify our design.

I hope this is now constrewed as being heavy handed by me , it was ment as an outline of the extent that our Roaring Forties are FULLY ENGINEERED.

Best wishes,

Robert
 

Chris Duncan

Supporter
Re: Designing rear anti-roll bar brackets for my R

Here's some stuff I drew in ACAD solids to show what I've been thinking.

The first is of an all aluminum version, no welding, only machining. The upright and heims are simplified for brevity.

Purple, cut away of existing rear upright.

Green, machined 6061-T6

Lt. Blue, 7075-T7 .124"(11ga.) plate

Red, rod ends (heims)
 

Attachments

  • 37082-brkt.jpg
    37082-brkt.jpg
    91.6 KB · Views: 329

Chris Duncan

Supporter
Re: Designing rear anti-roll bar brackets for my R

Here's the same all aluminum brkt, in exploded view.

For future reference this is brkt #1
 

Attachments

  • 37084-brkt2.jpg
    37084-brkt2.jpg
    97.6 KB · Views: 361

Chris Duncan

Supporter
Re: Designing rear anti-roll bar brackets for my R

Brkt #1 modification.

The rectangular spacer has been changed to 2 ct. 5/8" OD x 5/16"ID 6061-6 pieces of tubing for simplicity of fabrication and the spacer tapers have been further refined for weight reduction.

Note that the outer lower spacer is essentially just a bushing and a washer combined in one piece.
 

Attachments

  • 37085-brkt5.jpg
    37085-brkt5.jpg
    96.4 KB · Views: 337
Back
Top