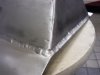
Frank's KVA Build

Hi Dave,
yes by the time i'm finished i'll be able to weld everything together you name it
finished the mount today unfortunatly didn't take a picture will try to do on sunday
frank
 
he're the pics of the mounts
 

Attachments

  • Foto0218 (Small).jpg
    Foto0218 (Small).jpg
    50.6 KB · Views: 413
  • Foto0219 (Small).jpg
    Foto0219 (Small).jpg
    33 KB · Views: 378
  • Foto0220 (Small).jpg
    Foto0220 (Small).jpg
    47.3 KB · Views: 403
finished the chassis mounts put the alu back and put the enginemounts into place
i´m realy pleased with the result it was a bit of work but the result shows
 

Attachments

  • Foto0221 (Small).jpg
    Foto0221 (Small).jpg
    60.5 KB · Views: 393
  • Foto0222 (Small).jpg
    Foto0222 (Small).jpg
    54.4 KB · Views: 363
  • Foto0223 (Small).jpg
    Foto0223 (Small).jpg
    48.1 KB · Views: 360
  • Foto0224 (Small).jpg
    Foto0224 (Small).jpg
    46.8 KB · Views: 419
  • Foto0225 (Small).jpg
    Foto0225 (Small).jpg
    31.4 KB · Views: 414
hey frank, I was looking at pic of your rear uprights on the first page on you build logs and noticed that your uprights look remarkably similar to the ones on a pantera. are they the same.
 
Frank:
Looking good on the welding job. Those mounts look plenty strong to me. Soon you will be able to weld everything but the crack of dawn....keep up the good work.
Cheers
Phil
 
Steph they are heavy but strong and they came with the car so i just worked with what i got and i think it´s not for racing so ... should be ok

Phil thanks i´m realy pleased also with the results and it´s getting better everytime
 
worked on the panneling of the back again thats an advantage that the pieces are resonable easy so quick results only needs welding and some holes (easier sad than done i know )
and a picture of the pile of alu witch came of the car
 

Attachments

  • Foto0226 (Small).jpg
    Foto0226 (Small).jpg
    47.8 KB · Views: 387
  • Foto0227 (Small).jpg
    Foto0227 (Small).jpg
    50.9 KB · Views: 363
  • Foto0228 (Small).jpg
    Foto0228 (Small).jpg
    56.1 KB · Views: 422
  • Foto0229 (Small).jpg
    Foto0229 (Small).jpg
    53.8 KB · Views: 463
  • Foto0230 (Small).jpg
    Foto0230 (Small).jpg
    41.1 KB · Views: 395
Frank:
What filler rod are you using, I am assuming probably 4043. Try some 5356, you might find the welds a bit nicer looking. Also I forgot to ask if your machine has square wave capability.
Cheers
Phil
 
I'll have a look next week on the fillerrod
and i don't know what you mean with square wave
here's a picture
frank
 

Attachments

  • tig207 (Small).jpg
    tig207 (Small).jpg
    42 KB · Views: 344
Frank:
5356 a good filler, 4043 reacts with anodizing, and the welds don't look as nice but I use it sometimes with castings as it seems to flow better.
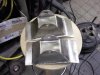
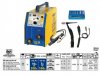
Square wave is generated by some machines, and the purpose is to be able to control the arc profile. I see you have a high frequency output, that is an arc stabilizer. Aluminum tends to buck about 40% of the current in the negative cycle of the ac wave almost like a diode, this means that at a fixed current you are getting 40% less current half of the time, the solution for this is to jack up the current, not good with thin materials. The High freq multiplies the number of cycles to about 600 to close those peaks and give a smoother arc. You hear it as a hiss coming from the machine.
With a square wave output the voltage polarity jumps almost instantaneously from positive to negative without sloping through zero volts as in an AC waveform, the power source has a balance control to increase the time the arc spends in the negative cycle and equalize the arc allowing you to weld very thin materials, and better control at lower arc currents like below 35 or 40 amps.
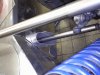
Its hard to see your machine in the photo, but it would be a control that was labeled "Balance".
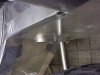
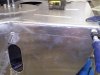
Otherwise your welding is "Lookin' Good"
Cheers
Phil
 
worked on the firewall
and made holes for entering the chassis
 

Attachments

  • Foto0236 (Small).jpg
    Foto0236 (Small).jpg
    57.1 KB · Views: 447
  • Foto0237 (Small).jpg
    Foto0237 (Small).jpg
    30.1 KB · Views: 344
  • Foto0238 (Small).jpg
    Foto0238 (Small).jpg
    41.1 KB · Views: 346
last progress
 

Attachments

  • Foto0241 (Small).jpg
    Foto0241 (Small).jpg
    41.4 KB · Views: 328
  • Foto0242 (Small).jpg
    Foto0242 (Small).jpg
    34.9 KB · Views: 340
  • Foto0243 (Small).jpg
    Foto0243 (Small).jpg
    49.1 KB · Views: 402
  • Foto0245 (Small).jpg
    Foto0245 (Small).jpg
    49.5 KB · Views: 375
  • Foto0251 (Small).jpg
    Foto0251 (Small).jpg
    38.3 KB · Views: 355
  • Foto0254 (Small).jpg
    Foto0254 (Small).jpg
    40.6 KB · Views: 355
Hi Frank, thanks for the build diary, it is very inspirational!
Don't know if you could help me but i have a question for you if you don't mind..
I'm just starting of building a space frame from drawings supplied by Mike Osborne, have you heard of these drawings??
The drawings have no exact measurements for the exact suspention mounting positions, my question is do i weld up all the suspention so it works correctly and then fit the body around the wheels or do i fit the body and then weld up the suspention mounting points so the wheels are located correctly iside the wheel arches, obivously making sure all geometry etc is correct.
If you could help me i would be very grateful!
Thanks
Tom
 
Hi Tom,
no i never heard of mike osborne's drawings
There are a lot of guys with more experience than me i hope they wil chip in for you
i think the best thing to do is first get al of youre measurement right (wheelbase tracking) then ask around about the measurement between the front or rear axle and say thefirewall then put the wheels into place make a mockup and try to fit the body
If this goes ok then you can make the parts for real or you can adjust them keeping in mind the wheelbase and tracking
hopes this helpes a bit
frank
 
It's been a while since I posted here.
've had some time to work on the garage
First some pic's before
then during finaly after
Made a workbench and storage above with a staircase which i can close
Bought some second hand metal cabelgutters (hope wrote that right) and attached a few allready.
I'll try to get in the electricity next week and a appointment to get the floor leveld .
don't know how long that will take.
Well at least i've made a sort of a start again
 

Attachments

  • Foto0328 [640x480].jpg
    Foto0328 [640x480].jpg
    61.5 KB · Views: 308
  • Foto0329 [640x480].jpg
    Foto0329 [640x480].jpg
    58.8 KB · Views: 288
  • Foto0330 [640x480].jpg
    Foto0330 [640x480].jpg
    66.7 KB · Views: 321
  • Foto0367 [640x480].jpg
    Foto0367 [640x480].jpg
    54 KB · Views: 307
  • Foto0368 [640x480].jpg
    Foto0368 [640x480].jpg
    72.2 KB · Views: 308
  • Foto0369 [640x480].jpg
    Foto0369 [640x480].jpg
    68.6 KB · Views: 300
  • Foto0370 [640x480].jpg
    Foto0370 [640x480].jpg
    63.7 KB · Views: 300
  • Foto0371 [640x480].jpg
    Foto0371 [640x480].jpg
    60.3 KB · Views: 287
  • Foto0373 [640x480].jpg
    Foto0373 [640x480].jpg
    60.1 KB · Views: 294
  • P101127_131501 [640x480].jpg
    P101127_131501 [640x480].jpg
    58.8 KB · Views: 289
  • P101127_131702 [640x480].jpg
    P101127_131702 [640x480].jpg
    58.4 KB · Views: 280
  • P101127_131740 [640x480].jpg
    P101127_131740 [640x480].jpg
    44.4 KB · Views: 277
  • P101127_131754 [640x480].jpg
    P101127_131754 [640x480].jpg
    45.3 KB · Views: 261
  • P101127_131846 [640x480].jpg
    P101127_131846 [640x480].jpg
    54.1 KB · Views: 280
Back
Top