
You are using an out of date browser. It may not display this or other websites correctly.
You should upgrade or use an alternative browser.
You should upgrade or use an alternative browser.
Frank's KVA Build
- Thread starter Frank Beuker
- Start date
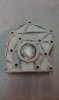
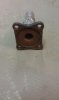
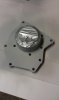
i took the engine and gearbox out and cleand up the side pieces of the gearbox afte that sprayed them with primer.
also started with the startermotor hope to finish that this week
also started with the startermotor hope to finish that this week
Attachments
-
 IMAG0164.jpg43.4 KB · Views: 407
 -
 IMAG0163.jpg125.4 KB · Views: 423
 -
 IMAG0166.jpg30.7 KB · Views: 406
 -
 IMAG0165.jpg35.5 KB · Views: 409
 -
 IMAG0169.jpg27.7 KB · Views: 418
 -
 IMAG0167.jpg27.9 KB · Views: 406
 -
 IMAG0168.jpg30.1 KB · Views: 412
 -
 IMAG0183.jpg31.6 KB · Views: 399
 -
 IMAG0184.jpg109.3 KB · Views: 415
 -
 IMAG0185.jpg66.7 KB · Views: 410
Hi phil,
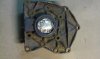
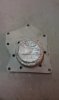
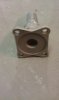
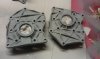
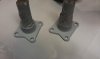
THE bracket on THE left is THE one i made and THE one on THE richt came with THE starter
But i can drill as many holes as i want and turn THE starter around in any position
With THE starter in this position i have no problems with clearence
THE bracket on THE left is THE one i made and THE one on THE richt came with THE starter
But i can drill as many holes as i want and turn THE starter around in any position
With THE starter in this position i have no problems with clearence
started working on the alternatorbracket and the aircopumpbracket
Attachments
-
![iphone foto s 024 [800x600].jpg](/data/attachments/46/46807-3715d084faf75353b87720c74cc03e86.jpg?hash=NxXQhPr3U1) iphone foto s 024 [800x600].jpg87.3 KB · Views: 497
iphone foto s 024 [800x600].jpg87.3 KB · Views: 497 -
![iphone foto s 026 [800x600].jpg](/data/attachments/46/46808-9e804a5b8ab7572cb411ab8ee736518a.jpg?hash=noBKW4q3Vy) iphone foto s 026 [800x600].jpg90.5 KB · Views: 441
iphone foto s 026 [800x600].jpg90.5 KB · Views: 441 -
![iphone foto s 028 [800x600].jpg](/data/attachments/46/46809-6c435ec917ad23a9b9957009695d3970.jpg?hash=bENeyRetI6) iphone foto s 028 [800x600].jpg96.3 KB · Views: 483
iphone foto s 028 [800x600].jpg96.3 KB · Views: 483 -
![iphone foto s 030 [800x600].jpg](/data/attachments/46/46810-434d68ad7ea57094549b76bcc9f201d1.jpg?hash=Q01orX6lcJ) iphone foto s 030 [800x600].jpg93.2 KB · Views: 474
iphone foto s 030 [800x600].jpg93.2 KB · Views: 474 -
![iphone foto s 032 [800x600].jpg](/data/attachments/46/46811-30127385a75a4988d79cef24cb22c9f3.jpg?hash=MBJzhadaSY) iphone foto s 032 [800x600].jpg88.8 KB · Views: 440
iphone foto s 032 [800x600].jpg88.8 KB · Views: 440 -
![iphone foto s 058 [800x600].jpg](/data/attachments/46/46812-710c5a05ecf8d019c4ed031b4ee7c66f.jpg?hash=cQxaBez40B) iphone foto s 058 [800x600].jpg83.9 KB · Views: 450
iphone foto s 058 [800x600].jpg83.9 KB · Views: 450 -
![iphone foto s 061 [800x600].jpg](/data/attachments/46/46813-41cd79a5dbac1e0c020b861555c4c47f.jpg?hash=Qc15pdusHg) iphone foto s 061 [800x600].jpg85.7 KB · Views: 448
iphone foto s 061 [800x600].jpg85.7 KB · Views: 448 -
![iphone foto s 164 [800x600].jpg](/data/attachments/46/46814-4769a4163e4d5c48c20fb5d8faaf786f.jpg?hash=R2mkFj5NXE) iphone foto s 164 [800x600].jpg112.2 KB · Views: 445
iphone foto s 164 [800x600].jpg112.2 KB · Views: 445 -
![iphone foto s 165 [800x600].jpg](/data/attachments/46/46815-9540856720bfea490206a79b161f6c87.jpg?hash=lUCFZyC_6k) iphone foto s 165 [800x600].jpg82.3 KB · Views: 431
iphone foto s 165 [800x600].jpg82.3 KB · Views: 431 -
![iphone foto s 169 [800x600].jpg](/data/attachments/46/46816-aebbbf6ca6657fd3bdc30c64109ca91c.jpg?hash=rru_bKZlf9) iphone foto s 169 [800x600].jpg104 KB · Views: 471
iphone foto s 169 [800x600].jpg104 KB · Views: 471 -
![iphone foto s 170 [800x600].jpg](/data/attachments/46/46817-2c72468720748c19d8c86d96cf718f0f.jpg?hash=LHJGhyB0jB) iphone foto s 170 [800x600].jpg97.1 KB · Views: 436
iphone foto s 170 [800x600].jpg97.1 KB · Views: 436 -
![iphone foto s 172 [800x600].jpg](/data/attachments/46/46818-0ac35c4e69e812d07e6631d07a570b29.jpg?hash=CsNcTmnoEt) iphone foto s 172 [800x600].jpg103.6 KB · Views: 430
iphone foto s 172 [800x600].jpg103.6 KB · Views: 430 -
![iphone foto s 177 [800x600].jpg](/data/attachments/46/46819-e279a326ef803fa2596be69cb34031e7.jpg?hash=4nmjJu-AP6) iphone foto s 177 [800x600].jpg75.8 KB · Views: 401
iphone foto s 177 [800x600].jpg75.8 KB · Views: 401 -
![iphone foto s 178 [800x600].jpg](/data/attachments/46/46820-79f4650c221b35f56c5ead20fd4630b7.jpg?hash=efRlDCIbNf) iphone foto s 178 [800x600].jpg97.9 KB · Views: 444
iphone foto s 178 [800x600].jpg97.9 KB · Views: 444 -
![iphone foto s 188 [800x600].jpg](/data/attachments/46/46821-1c2d2b91535cbe86780e0faec5ae32c3.jpg?hash=HC0rkVNcvo) iphone foto s 188 [800x600].jpg93.3 KB · Views: 435
iphone foto s 188 [800x600].jpg93.3 KB · Views: 435 -
![iphone foto s 194 [800x600].jpg](/data/attachments/46/46822-71ce0a499b4746f6010f41e1b2398400.jpg?hash=cc4KSZtHRv) iphone foto s 194 [800x600].jpg82.3 KB · Views: 459
iphone foto s 194 [800x600].jpg82.3 KB · Views: 459 -
![iphone foto s 201 [800x600].jpg](/data/attachments/46/46823-6e32ad104d9d9d75c14a88fe2a6de020.jpg?hash=bjKtEE2dnX) iphone foto s 201 [800x600].jpg91.3 KB · Views: 443
iphone foto s 201 [800x600].jpg91.3 KB · Views: 443 -
![iphone foto s 203 [800x600].jpg](/data/attachments/46/46824-66468fd024ee08bba37d3435376d7e15.jpg?hash=ZkaP0CTuCL) iphone foto s 203 [800x600].jpg77.1 KB · Views: 434
iphone foto s 203 [800x600].jpg77.1 KB · Views: 434 -
![iphone foto s 206 [800x600].jpg](/data/attachments/46/46825-f5191c3624f9ee16865e6a588cb6556a.jpg?hash=9RkcNiT57h) iphone foto s 206 [800x600].jpg95.5 KB · Views: 440
iphone foto s 206 [800x600].jpg95.5 KB · Views: 440
Frank,
I am going to ask a stupid question that you may have addressed earlier. With you starter mounted under the engine block, have you checked to see if it will spin in the right direction????? Your starter looks like a Hi torque unit, like mine. If it is, mine mounts from the opposite direction(trans side), spins clockwise from the back to front view of the starter, and thus the opposite action of yours, unless you are mounting it on the other side of the engine?? Straighten me out. Is yours wired differently because of your mounting position??
Bill
Hi Bill ,
There is'nt such à thing as à stupid question.
Specialy if it's for helping.
Bit ro answer you
I don't know !
I did Order THE starter by frank specialy for this bellhousing so i think
It must be ok
There is'nt such à thing as à stupid question.
Specialy if it's for helping.
Bit ro answer you
I don't know !
I did Order THE starter by frank specialy for this bellhousing so i think
It must be ok
Frank,
good to see you working on your car again.
When i will have some time left, i will visit you.
I reached the age of which nearly every body retired, but i get it more bussier then ever.
good to see you working on your car again.
When i will have some time left, i will visit you.
I reached the age of which nearly every body retired, but i get it more bussier then ever.
you're always welcome
And i know to little time in à day
And i know to little time in à day
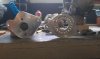
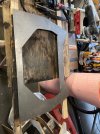
dismanteld my gearbox because i need to shorten the inputshaft and the splines,the reason is that my bellhousing is 13 mm shorter than the pantera bellhousing so as you can see on the picture i made inside the bellhousing that the shaft runs against the testring i made inside the crank
Attachments
![prise as in koppelhuis 1 [800x600].jpg](/data/attachments/46/46942-9f075c8b4c248e9f3bb5fe57b1b51a10.jpg?hash=nwdci0wkjp)
![foto 1 [800x600].jpg](/data/attachments/46/46943-fb52f44ec820799dee9b5b917b281a43.jpg?hash=-1L0TsggeZ)
![foto 3 [800x600].jpg](/data/attachments/46/46944-258cb463a7c9198af49a37772332474f.jpg?hash=JYy0Y6fJGY)
![prise as 1 [800x600].jpg](/data/attachments/46/46945-b52f74c8303dbcb1fae0760daf050dca.jpg?hash=tS90yDA9vL)
![schakelhuis 1 [800x600].jpg](/data/attachments/46/46947-fd74d35ba4c6d712d8ef91c02cf735e3.jpg?hash=_XTTW6TG1x)
Frank:
I can tell you that going inside a ZF there is nothing like the quality of the machining and finish on gears and shafts, have fun.
Also I think that alternator bracket you are constructing is the Cats nuts, maybe when you finish it you might be so kind as to share the pattern. I am planning on using a standard V-belt on my motor.
Great looking work
Cheers
Phil
hi phil,
yes the gearbox looks great inside i've shortend the shaft today on a lathe from a friend of mine.
next i'm going to make a hole for the drainige (or the cooling) at the back ,because the housing is empty so easy accessible.
And for the bracket i'll make a sketch for you.
frank
yes the gearbox looks great inside i've shortend the shaft today on a lathe from a friend of mine.
next i'm going to make a hole for the drainige (or the cooling) at the back ,because the housing is empty so easy accessible.
And for the bracket i'll make a sketch for you.
frank
here are some pics of the progress on the gearbox
Attachments
-
![bak uit elkaar [800x600].jpg](/data/attachments/47/47321-bf3ee113ab230ef3e4bdd0f57ceac5f0.jpg?hash=vz7hE6sjDv) bak uit elkaar [800x600].jpg98.1 KB · Views: 413
bak uit elkaar [800x600].jpg98.1 KB · Views: 413 -
![dif kroonwiel.2 [800x600].jpg](/data/attachments/47/47322-853744843c93a48578670c41c7681131.jpg?hash=hTdEhDyTpI) dif kroonwiel.2 [800x600].jpg79.5 KB · Views: 428
dif kroonwiel.2 [800x600].jpg79.5 KB · Views: 428 -
![dif kroonwiel [800x600].jpg](/data/attachments/47/47323-fc3e6d8e5cde8d659f1cce37a474c32a.jpg?hash=_D5tjlzejW) dif kroonwiel [800x600].jpg83.6 KB · Views: 415
dif kroonwiel [800x600].jpg83.6 KB · Views: 415 -
![lsd zf [800x600].jpg](/data/attachments/47/47324-f59b8f04f47d8b0299ad31c19bd488d5.jpg?hash=9ZuPBPR9iw) lsd zf [800x600].jpg72.5 KB · Views: 398
lsd zf [800x600].jpg72.5 KB · Views: 398 -
![spoelgaten bak [800x600].jpg](/data/attachments/47/47325-3ddcb798b73af83bae2c924b3a1d5e1d.jpg?hash=Pdy3mLc6-D) spoelgaten bak [800x600].jpg90 KB · Views: 367
spoelgaten bak [800x600].jpg90 KB · Views: 367 -
![tapgat versnellingshuis [800x600].jpg](/data/attachments/47/47326-c1131d970df6acac3aa9c08a9a2d2dc1.jpg?hash=wRMdlw32rK) tapgat versnellingshuis [800x600].jpg68 KB · Views: 387
tapgat versnellingshuis [800x600].jpg68 KB · Views: 387 -
![tapgat versnellingshuis met plug [800x600].jpg](/data/attachments/47/47327-f979d0c71f9bb47a2e6f412a8440b943.jpg?hash=-XnQxx-btH) tapgat versnellingshuis met plug [800x600].jpg102.9 KB · Views: 361
tapgat versnellingshuis met plug [800x600].jpg102.9 KB · Views: 361 -
![tapgat versnellingshuis met plug.2 [800x600].jpg](/data/attachments/47/47328-d532979860e5e3600f03f56b2967a5b2.jpg?hash=1TKXmGDl42) tapgat versnellingshuis met plug.2 [800x600].jpg97.7 KB · Views: 385
tapgat versnellingshuis met plug.2 [800x600].jpg97.7 KB · Views: 385 -
![versnellingshuis met deksel [800x600].jpg](/data/attachments/47/47329-68198c4b9a29f8f3c504c14f22d4125a.jpg?hash=aBmMS5op-P) versnellingshuis met deksel [800x600].jpg64.9 KB · Views: 377
versnellingshuis met deksel [800x600].jpg64.9 KB · Views: 377
work on gearbox
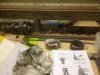
did some work on the gearbox
Securing the diff turned out nice ,i had the tools for about four years and used them for the first time .
closed the openings witch were going to be at the bottem with npt plugs
Made a pressing tool for the taperbearings
did some work on the gearbox
Securing the diff turned out nice ,i had the tools for about four years and used them for the first time .
closed the openings witch were going to be at the bottem with npt plugs
Made a pressing tool for the taperbearings
Attachments
-
![zekering diff1 [800x600].jpg](/data/attachments/47/47505-43c1945cd2deb3f034eb042c15892136.jpg?hash=Q8GUXNLes_) zekering diff1 [800x600].jpg80.9 KB · Views: 395
zekering diff1 [800x600].jpg80.9 KB · Views: 395 -
![zekering diff 2 [800x600].jpg](/data/attachments/47/47506-ddac23dee3b588787cd3ffef7c02b502.jpg?hash=3awj3uO1iH) zekering diff 2 [800x600].jpg77.9 KB · Views: 363
zekering diff 2 [800x600].jpg77.9 KB · Views: 363 -
![zekering diff 3 [800x600].jpg](/data/attachments/47/47507-67df2f69aab771286d6c0aaf4b784bfb.jpg?hash=Z98vaaq3cS) zekering diff 3 [800x600].jpg78.8 KB · Views: 341
zekering diff 3 [800x600].jpg78.8 KB · Views: 341 -
![zekering diff 4 [800x600].jpg](/data/attachments/47/47508-63f1acd2099085bbdb818cbcf760178f.jpg?hash=Y_Gs0gmQhb) zekering diff 4 [800x600].jpg81.8 KB · Views: 383
zekering diff 4 [800x600].jpg81.8 KB · Views: 383 -
![afdichting onderzijde zf 1 [800x600].jpg](/data/attachments/47/47509-c6bcebf71452c5925ab094c8bf5a2607.jpg?hash=xrzr9xRSxZ) afdichting onderzijde zf 1 [800x600].jpg86.2 KB · Views: 388
afdichting onderzijde zf 1 [800x600].jpg86.2 KB · Views: 388 -
![afdichting onderzijde zf 2 [800x600].jpg](/data/attachments/47/47510-0bb86f927982f06142524b78a8f3a6b0.jpg?hash=C7hvknmC8G) afdichting onderzijde zf 2 [800x600].jpg98.9 KB · Views: 378
afdichting onderzijde zf 2 [800x600].jpg98.9 KB · Views: 378 -
![perstool difflager 1 [800x600].jpg](/data/attachments/47/47511-3dac8c9b95768e28b313b99c8b7bb5d9.jpg?hash=PayMm5V2ji) perstool difflager 1 [800x600].jpg65.6 KB · Views: 340
perstool difflager 1 [800x600].jpg65.6 KB · Views: 340 -
![perstool difflager 2 [800x600].jpg](/data/attachments/47/47512-ff774deac654637796eb64a5c1fc0190.jpg?hash=_3dN6sZUY3) perstool difflager 2 [800x600].jpg65.6 KB · Views: 364
perstool difflager 2 [800x600].jpg65.6 KB · Views: 364 -
![perstool difflager 3 [800x600].jpg](/data/attachments/47/47513-090795a4445c231bb99d83f44f6d60c9.jpg?hash=CQeVpERcIx) perstool difflager 3 [800x600].jpg71.8 KB · Views: 412
perstool difflager 3 [800x600].jpg71.8 KB · Views: 412
Hé is still Alive !!
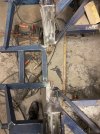
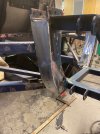
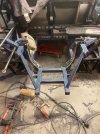
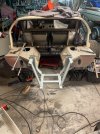
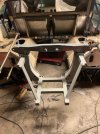
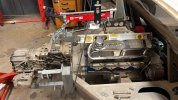
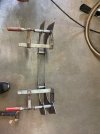
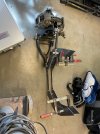
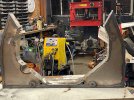
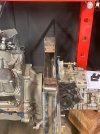
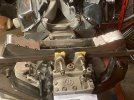
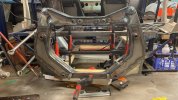
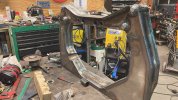
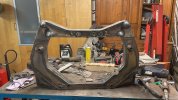
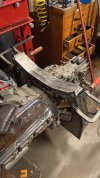
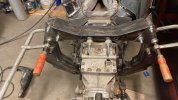
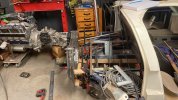
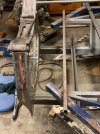
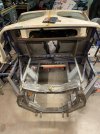
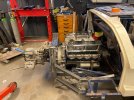
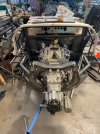
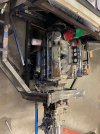
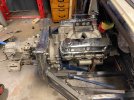
I ve been working on the car on and off now for some time now and thought that its time to post Some progress/satback here again
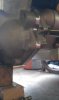
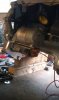
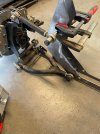
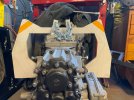
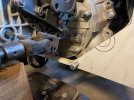
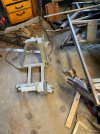
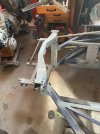
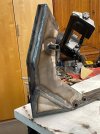
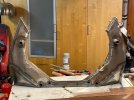
After all the work I have done in the past on the backend off the car I finally got to fit the engine and axles only to found out that my cluch lever got stuck in the horseshoe and the engine was 35 mm to much to the front which I could See directly on the axles
I tried to fix the clutch clearence but after Many hours and materials found out this didn’t work so ….. just cut everything off and start again !
I will post the progress in foto’s and explain them later
I ve been working on the car on and off now for some time now and thought that its time to post Some progress/satback here again
After all the work I have done in the past on the backend off the car I finally got to fit the engine and axles only to found out that my cluch lever got stuck in the horseshoe and the engine was 35 mm to much to the front which I could See directly on the axles
I tried to fix the clutch clearence but after Many hours and materials found out this didn’t work so ….. just cut everything off and start again !
I will post the progress in foto’s and explain them later
Attachments
-
 IMG_0967.jpeg669.5 KB · Views: 143
 -
 IMG_0965.jpeg476 KB · Views: 153
 -
 IMG_0964.jpeg637.4 KB · Views: 151
 -
 IMG_0969.jpeg668.9 KB · Views: 147
 -
 IMG_0971.jpeg597.4 KB · Views: 134
 -
 9BBB2B19-0375-43B5-BFDD-23BA0F75D5BD.jpeg681.4 KB · Views: 175
 -
 IMG_5762.jpeg630.3 KB · Views: 140
 -
 IMG_5763.jpeg919.8 KB · Views: 133
 -
 IMG_5764.jpeg623.3 KB · Views: 161
 -
 IMG_5765.jpeg573.9 KB · Views: 141
And more
Attachments
-
 IMG_2342.jpeg462.2 KB · Views: 142
 -
 IMG_2343.jpeg703.6 KB · Views: 148
 -
 IMG_2344.jpeg846.3 KB · Views: 131
 -
 IMG_2399.jpeg457.4 KB · Views: 153
 -
 IMG_2398.jpeg760.7 KB · Views: 141
 -
 7998EB08-2E19-4B61-9FF7-140FF258C8FC.jpeg693.1 KB · Views: 167
 -
 E53B83BA-4007-4268-A53C-1A9C655FFF50.jpeg719.4 KB · Views: 159
 -
 E129E7D6-36CB-4A1F-AE31-94FB9139ECB8.jpeg636.8 KB · Views: 166
 -
 4AC07C87-5985-4701-9AE9-1124E02945B5.jpeg408.8 KB · Views: 154
 -
 2271ABF5-D933-463F-BDF3-DD8C5E9A4349.jpeg636.9 KB · Views: 164
And the last
Attachments
-
 329FF997-3282-4B38-827D-A025BA536822.jpeg641.6 KB · Views: 157
 -
 IMG_3111.jpeg876.3 KB · Views: 153
 -
 IMG_3112.jpeg567 KB · Views: 152
 -
 IMG_3168.jpeg434.8 KB · Views: 142
 -
 IMG_3170.jpeg575.7 KB · Views: 152
 -
 IMG_3192.jpeg906.1 KB · Views: 154
 -
 IMG_3194.jpeg648 KB · Views: 155
 -
 IMG_3195.jpeg593 KB · Views: 148
 -
 IMG_3196.jpeg574.3 KB · Views: 156
 -
 IMG_3197.jpeg953.1 KB · Views: 154