
- Forums
- GT40 Replica Manufacturers' Corner
- RCR Forum - RCR40/SLC/917/Superlite Aero
- The SLC Clubhouse
You are using an out of date browser. It may not display this or other websites correctly.
You should upgrade or use an alternative browser.
You should upgrade or use an alternative browser.
Grant's SL-C Build tread
- Thread starter deadshot
- Start date
Jim I think it would be nicer without the hyphen if you want I can have them put it in yours
but I am leaving mine as is but I do like Jacks bead Idea that would make them pop : )
I will a try sample piece see what they would look like.
Grant, I incorporated the hyphenated SL-C throughout the rest of my car, so to remain uniform I would require the hyphen on mine.
Thanks,
Jim
A side note somewhat related to sill plates in these cars. I have the optional interior package door trim panels, unless the design has changed these panels take up every MM of gap space between the door sill and the door itself. So be aware and test for needed space in this area before painting, I plan to shave the sill down a bit to make sure the trim panels do not wear on the door sills. Or in this case the door sill trim panels.
Neat option Grant, Carry on.
Neat option Grant, Carry on.
Jim have a look let me know if its looks good to you.
Cheers,
Grant, the one with the hyphen looks great to me!
Are you still doing the beading?
Jim
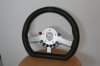
Getting back on the car after taking the summer off. Now that it was mostly mocked up with everything in place I Stripped it all down again and have sent everything out for powder coating then I will be doing the final reassembly. Remounted the radiator with vibration isolators, machined the gas shock lower door mounts and installed where I hope they should go. Finished installing the buttons and upholstery on the Steering wheel they will be wired to start, horn,digidash controls and lift and lower front end.
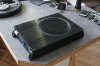
I have found a 8" Sub with amp and cross over that I will mount on the rear bulkhead between the seats and will mould into the interior making it disappear.
I have found a 8" Sub with amp and cross over that I will mount on the rear bulkhead between the seats and will mould into the interior making it disappear.
Attachments
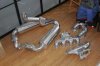
Picked up my exhaust system from the powder coaters had it Cerma-Chromed turn out nice.
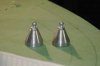
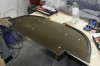
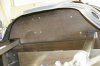
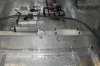
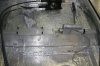
and had the rest of the metal parts done in black powder. Made some mounting brackets to hold the nose down I was going to hinge the front clip but after thinking about it for a few days decided having the whole front end removable was the way to go allows easier access to anything that may need to be worked on. After fab-ing the brackets I welded two small brackets to front clips to mount the horns at a slight angle outwards on the nose I bonded the nylon spools into the nose with SMC it is great stuff when you are looking to bond anything to fiberglass. Started to put the lava mat on the rear bulk head and finished the edges with a rubber bulb seal gives it a nice finished look. installed insert a nuts to hold all my electronics. I will pull the gas tank next wrap it with lava mat on the side facing the engine and weld a drain bung to the bottom of the tank in the event I may have to drain the tank some day.
and had the rest of the metal parts done in black powder. Made some mounting brackets to hold the nose down I was going to hinge the front clip but after thinking about it for a few days decided having the whole front end removable was the way to go allows easier access to anything that may need to be worked on. After fab-ing the brackets I welded two small brackets to front clips to mount the horns at a slight angle outwards on the nose I bonded the nylon spools into the nose with SMC it is great stuff when you are looking to bond anything to fiberglass. Started to put the lava mat on the rear bulk head and finished the edges with a rubber bulb seal gives it a nice finished look. installed insert a nuts to hold all my electronics. I will pull the gas tank next wrap it with lava mat on the side facing the engine and weld a drain bung to the bottom of the tank in the event I may have to drain the tank some day.
Attachments
Last edited:
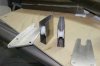
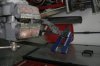
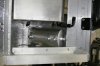
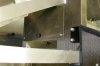
Made some mods to the plastic bracket that holds one of the motors on the steering column it needed to be rotated 90 deg clockwise then bent 25 deg right and up 2 " so I took a heat gun heat the crap out of it and did just that its work perfect but It took a while to do but looks factory.
Attachments
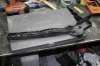
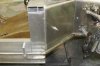
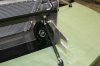
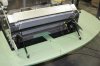
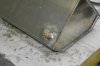
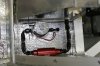
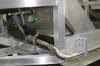
started putting the fuel system back in. welded a drain plug to the bottom of tank in case It ever needs to be drained easily. stuffed two fuel filters two fuel pumps and one surge tank into the space next to the tank with room to spare this took a fair bit of time and money for all the fittings I used but it comes out nice and easy and fast.
Attachments
Last edited:
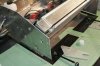
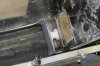
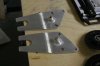
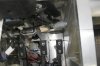
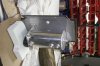
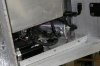
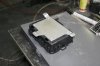
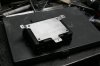
made a bracket for the back side of the fuse box riveted on to the back with a bit of clearance it will mount to the bulk head. getting the fuse box open was a bit of a challenge now with the new bracket it gives you a good way to mount it.
Attachments
Similar threads
- Replies
- 2
- Views
- 1K