
You are using an out of date browser. It may not display this or other websites correctly.
You should upgrade or use an alternative browser.
You should upgrade or use an alternative browser.
GT40 Aluminium Mononcoque Chassis
- Thread starter mickky3
- Start date
Hi John,
Sorry I missed your post, I'v been away for a few days
When I looked into adhesives, I rang a few different companies, and the Technical guy at Permabond, was familiar with my type of chassis construction, and recomended the ES 550. Their single part epoxy adhesives are available with a range of different viscosities and with and without metal filler
Because of the rivets and construction that Im useing. The main concern was getting the adhesive thin enough ( The thinner the adhesive the stiffer the joint ). And he recomended, that although Im useing Blind rivets, I should pull them down in stages to allow the adhesive to settle and become as thin as possible. So I can only assume that there is not enough pressure to squeeze all of the adhesive out from the joint. Im not an expert on adhesives, so I will go with his recomendations
Thanks for the intrest
Mick
PS.... Ron. It woud be great to see a video of you Tandem Freefall Skydiving on your next birthday..Yes it was great fun, you should try it, it is an amazing experiance
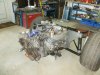
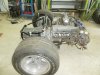
Here is my engine /gearbox/suspension
My design was greatly influenced by the Lotus 49....
Ive inverted the Renault Gearbox, which means the engine now sits 4" lower in the chassis. the rocker covers are 32mm lower than the top of the tyres, which means I can have the drive shafts at a good angle.
There are still some bits that need finishing.....,all of the single shear points will be made into double shear..
The discs are from a Vauxhal Omega, they are 296 x 28 mm, and Im useing Hispec Billet 4 calipers, with 4 x 35mm pistons..These will be a good match for my Willwood superlite calipers with 4 x 35mm pistons, on 323 X 32mm discs, at the front
The uprights were probably the hardest bit to design, it took about 3 months to design , and build them
Attachments
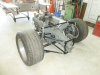
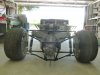
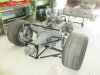
A few more pics


.
.
Thanks Dave
It was agood Idea of yours to flip the gearbox, where it bolts onto the bell housing.....
.
It was agood Idea of yours to flip the gearbox, where it bolts onto the bell housing.....
.
Hi Phil
Yes I think with this set-up, I have eliminated bump steer...
I dont have any castor in the rear, but by adjusting the links it would be possible to put some in, if it was needed.....

How is your car progressing ? I studied your uprights alot, when I was designing and building mine.
Mick
Yes I think with this set-up, I have eliminated bump steer...
I dont have any castor in the rear, but by adjusting the links it would be possible to put some in, if it was needed.....
How is your car progressing ? I studied your uprights alot, when I was designing and building mine.
Mick
Mick:
Car is coming along, I have not posted in a while as I am busy with other jobs and with the good weather I need to make it happen when the work is there.
I will post real soon as I am really close to starting the exhaust and then want to start the motor when thats all done ....that will be a big jump forward.
I watch your build with great interest, I think my next chassis will be a mono, just need to finish this project.
Cheers
Phil
Hi Mick, just caught up with your build and as always beautiful work. I have some questions about the suspension and how you are going to mount the engine to the rear bulkhead. The McLarens attached the bulkhead plate to the front of the engine then bolted the plate to the bulkhead thought the trailing arm bolts, how wil you do yours, Im not familiar with how the water pump and front of the Rover is. The rear suspension? Are you not having trailing arms to control the rear uprights, it would appear to me that it is now controlled by the A arm configuration. Will you have a Tri Pod set up from the bulkhead back to the bell housing ?? It is an interesting set up and nicely built. Looking forward to more up dates. Cheers Leon.
Hi Leon,
Thanks for the comments on my chassis.
The engine gearbox will be mounted in a similar way to your chassis.The triangulated tube structure will be mounted to the bulkhead in four fixings each side to spread the loadings as much as possible, and taper down to the alloy plate that is welded to the bell housing, and be bolted onto the plate. I will use the original front engine mount positions and these will attatch to the trianguled structure, with an additionall tube going from the engine to the bulkhead to stop sidways movement


There will be no need for trailing arms,as the suspension is controlled by the A arms. By mounting the suspension directly to the engine gearbox, I have saved some weight and the A arm set-up will eliminate the problems of bump steer etc, that you get with the trailing arm configuration. I inverted the Renault gearbox, so I coud get the engine as low as possible in the chassis, without having large angles on the drive shafts. The engine now sits 4" lower in the chassis. the rocker covers are 32mm lower than the top of the tyres. It was a lot of work, but Im very pleased with the result
Thanks for the comments on my chassis.
The engine gearbox will be mounted in a similar way to your chassis.The triangulated tube structure will be mounted to the bulkhead in four fixings each side to spread the loadings as much as possible, and taper down to the alloy plate that is welded to the bell housing, and be bolted onto the plate. I will use the original front engine mount positions and these will attatch to the trianguled structure, with an additionall tube going from the engine to the bulkhead to stop sidways movement
There will be no need for trailing arms,as the suspension is controlled by the A arms. By mounting the suspension directly to the engine gearbox, I have saved some weight and the A arm set-up will eliminate the problems of bump steer etc, that you get with the trailing arm configuration. I inverted the Renault gearbox, so I coud get the engine as low as possible in the chassis, without having large angles on the drive shafts. The engine now sits 4" lower in the chassis. the rocker covers are 32mm lower than the top of the tyres. It was a lot of work, but Im very pleased with the result
Yes I can see where you are going now. I also see your chassis has the side sponsons coming back past the engine so you could brace from them as they look to be a substantial structure where as the side sponson on the M20 are purely to hold the radiators and duct air, so have no real structural integrity. That looks like a heap of work on the gearbox and bell housing, but as you say, worth the effort. I remember Russell Ks M8b with the Audi box (you can't flip them) having quite steep drive shaft angles in order to get the engine lower. I'll keep watching with interest and you may find some interesting things coming up with regards my Transaxle in the ( I hope) not too distant future. Keep up the good work, cheers Leon.
I introduced myself on here a few weeks ago and promised to reveal the part built car we had acquired. After a few delays with the collection and a few work commitments, I am finally in a position to annonce that this is the car we have obtained and will be completing over the course of the next 12 months.
First of all I want to commend Mick for his excellent work so far. The quality of work really is fantastic. I am sorry to hear about your reasons for not being able to complete what is clearly a very well executed project. I wish you all the best.
The jig/frame to mount the chassis to during its build has just been finished and work will be starting next week. At which point, I will be making weekly progress reports with accompanying photos.
The car is in the very capable hands of IQC Sheffield for the rest of the build. We have a few changes in mind from Mick's original plans, but for the better we hope.
First off, we have got a 427 block to replace the Rover engine, the plan is to mate this to a Ferrari 360 gearbox.
The suspension will be reworked, inline with the original GT40 designs.
The aim of the project is not only to continue the build to the highest quality, as the construction so far deserves, but to keep the car as light as possible. Any existing steel that can be replaced with aluminium, will be. We have also sourced the same epoxy resin used by supercar manufacturers to add increased strength to the chassis framework.
I only spent a short time with the car this morning, so not really much more to report until the build gets underway.
Now to go and decide on a colour...
John
Similar threads
- Replies
- 15
- Views
- 4K
- Replies
- 11
- Views
- 3K