I haven't had this much fun since the pigs ate my brother.

Pat

Supporter
Time for a pair of Ian's uprights...
 

Attachments

  • The 40 gets new uprights.JPG
    The 40 gets new uprights.JPG
    182.7 KB · Views: 519

Rick Muck- Mark IV

GT40s Sponsor
Supporter
First time I heard that one was from a guy in Rochester, Mn. who said "I ain't had this much fun since my sister fell into the hog pen, and they ate her"
 

Pat

Supporter
It's almost done; now to the alignment shop. Ian really has a quality product with his uprights.
 

Attachments

  • CAV REPL UPRIGHT.JPG
    CAV REPL UPRIGHT.JPG
    166.7 KB · Views: 372

Ian Clark

Supporter
Hi Veek,

Thanks for the compliment, these are deceptively simple looking parts that are not only substantially stronger than the (pre Autofutura - Series 100 cars) original equipment, you'll notice an immediate improvement in steering response, corner entry turn-in along with less kick back in the wheel (bump steer).

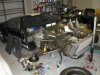
Chuck, the install is pretty straight forward, of course without the custom wrench supplied (shown in picture below) you'd have a devil of a time tightening the ball joint nuts. The tie rods have be shortened since we optimised the Ackerman angles and after assembly there's realignment, nothing too scary.

If your car has three bolt upper ball joint mounting bolts (instead of two) you'll need shims under the inboard upper a-arm mounts to dial in the camber. We're making these shims available in stainless steel to match the chassis.

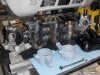
All the uprights in the picture are spoken for however more are in the works. Black appears to be the most popular colour choice, aluminum and charcoal metallic still available.

The two stock uprights on the far left of the bench are examples of what can happen with over or under torqued bolts, incorrectly machined tapers or the heads of cap screws sinking into the aluminum and loosing clamping force. Sorry, no core credit for these bad boys...

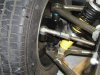
Since you mentioned the rear uprights, I'll say that apart from taking all the rubber bushing bind out of the back end, the improved upright geometry increases anti squat, increases roll resistance and dramatically reduces camber climb on bump. All good stuff, and with more control of the contact patch, braking improves and driver confidence.

Ooops, almost forgot, the radial pattern of lightening holes also reduces heat soak to the axle bearings, seals and CV Joints

Thanks again Veek and all the other CAV owners who've purchased the upright kit. It does what it's supposed to do.

Cheers
 

Attachments

  • UHPIM1013.jpg
    UHPIM1013.jpg
    391.3 KB · Views: 377
Last edited:

Pat

Supporter
what all in entailed in the change? do you have the rears also? Thanks
________________________________________________________

Chuck, I'm taking it a project at a time so I only did the fronts this go around. The old uprights were fine but I like to continually improve things and work a fresh upgrade someplace on the car every couple of months. Assembly was actually very straight forward and the fit was perfect. Ian provided the detailed instructions that actually impressed my wife. She is a CPA and really likes details. Apparently she is also desperate for entertainment. The worst part of the whole thing for me was getting the old assembly apart. CAV must hire Conan the Barbarian to tighten the stub axle nuts. I solved it by having the old nuts milled off and replaced them with new BMW ones.
Assembly was actually pretty easy and the new uprights add a little "FAV-panache" to the front end. Besides, the older stock pre-100 CAV alloy upright blocks always looked a little too “kit car” to me. I can't wait to get some track day time and check the feel.
Next project though is the seats. The current ones are recipes for a chiropractor visit.
I’ll go for the rear uprights down the road when I can score a ZF and redo the engine mounts, tranny, and axles all at the same time.
 
Last edited:

Pat

Supporter
The 350ft/lb gun at the shop didn't even annoy it. They had a 1000ft/lb gun but I was a little concerned about tearing something up with it. That may have been over concern but I really didn't want to take any chance of dinging up the stub axle.
So I figured that the line of least resistance was to just cut the things off. I prefer to use all new fasterners anyway. Mine may have been unusually tight as others have been able to coax theirs off with a breaker bar.
Interestingly there was no corrosion whatsoever so that little beast was just that tight.
 
Last edited:
Back
Top