
You are using an out of date browser. It may not display this or other websites correctly.
You should upgrade or use an alternative browser.
You should upgrade or use an alternative browser.
IMSA Fiero Race car
- Thread starter Dave Deerson
- Start date
Thank You for the compliments. It makes the seemingly endless hours and late nights worth it to know that others just "get it" (since my wife doesn't totally understand why I put myself through this madness)!
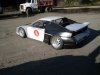
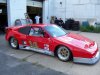
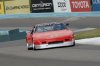
The car weighs in with my weight and 5 gals fuel at 2150lbs.The motor puts down a conservative 395hp to the wheels(stock LS6). I run (for now) Goodyear slicks sized at 23.5 x 10⁻¹⁶ front and 25.5 x 12-16. And yes I have had it to the Glen,although I have not been comfortable letting it rip yet as I am still learning the ins and out of driving a full "race car" and not a production based machine on R-compounds. This car is like a big overpowered go-cart!! I had a few issues and big offs last season as I struggled to run with someone else's setup that was just too darty and hair trigger-like. For me, this has been a big jump, so I am happy taking baby steps. I would say I have probably run The Glen at times in the 2:05-2:10 range,based on the cars I lap with. This year I spent the winter revising the wheel rates, bump steer curves and Ackerman to settings more like the car was designed with and so far I must say I have been very pleased with how much more confident I am in the car. I am amazed at how softening the wheel rates makes the car feel like it has more grip.
Well on to the body:
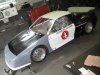
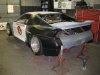
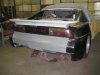
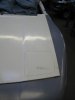
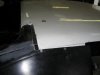
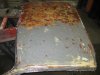
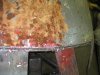
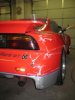
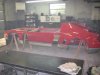
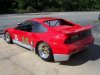
It's remarkable in how the puzzle fit together. The body panels in white are original, black come from Jack's molds in Canada, and the gray bits come from the other Huffaker molds in California. The initial fit for race panels was very good. Then I stumbled upon a neat find.......... brand new GM Pontiac Motorsports Doors and hood unused and sitting in storage in Wash. state for over 25 years! The difference is in the glass, the original Pont. Motor Sport panels were all very light weight, tissue paper thin glass cloth whereas the later parts are made with thicker chopped strand mat. I intended to use this car as much as possible, so the increased thickness/weight is not so much of a negative to me. The trial fitment of the "new" GM hood is in the pic with the hood in white. You can see some of the gaps I would have to contend with. In prepping the original roof, I stripped off what looks to have been 15 coats of paint!! I wish I had weighed it before and after because there was a noticeable weight reduction in the end. I was able to get it back to the original white gel coat. There are also 2 pics of rolling the car outside for the first time on 4 wheels and a body in 2 years!! That felt great, there may have been some light at the end of the tunnel,but there was still a long (and expensive) road ahead!! I realize that since some of the pics are 2-3 years old and that I may be leaving out some details as I go, so if there are any questions, please ask away!! Next up, primer and paint....................
The car weighs in with my weight and 5 gals fuel at 2150lbs.The motor puts down a conservative 395hp to the wheels(stock LS6). I run (for now) Goodyear slicks sized at 23.5 x 10⁻¹⁶ front and 25.5 x 12-16. And yes I have had it to the Glen,although I have not been comfortable letting it rip yet as I am still learning the ins and out of driving a full "race car" and not a production based machine on R-compounds. This car is like a big overpowered go-cart!! I had a few issues and big offs last season as I struggled to run with someone else's setup that was just too darty and hair trigger-like. For me, this has been a big jump, so I am happy taking baby steps. I would say I have probably run The Glen at times in the 2:05-2:10 range,based on the cars I lap with. This year I spent the winter revising the wheel rates, bump steer curves and Ackerman to settings more like the car was designed with and so far I must say I have been very pleased with how much more confident I am in the car. I am amazed at how softening the wheel rates makes the car feel like it has more grip.
Well on to the body:
It's remarkable in how the puzzle fit together. The body panels in white are original, black come from Jack's molds in Canada, and the gray bits come from the other Huffaker molds in California. The initial fit for race panels was very good. Then I stumbled upon a neat find.......... brand new GM Pontiac Motorsports Doors and hood unused and sitting in storage in Wash. state for over 25 years! The difference is in the glass, the original Pont. Motor Sport panels were all very light weight, tissue paper thin glass cloth whereas the later parts are made with thicker chopped strand mat. I intended to use this car as much as possible, so the increased thickness/weight is not so much of a negative to me. The trial fitment of the "new" GM hood is in the pic with the hood in white. You can see some of the gaps I would have to contend with. In prepping the original roof, I stripped off what looks to have been 15 coats of paint!! I wish I had weighed it before and after because there was a noticeable weight reduction in the end. I was able to get it back to the original white gel coat. There are also 2 pics of rolling the car outside for the first time on 4 wheels and a body in 2 years!! That felt great, there may have been some light at the end of the tunnel,but there was still a long (and expensive) road ahead!! I realize that since some of the pics are 2-3 years old and that I may be leaving out some details as I go, so if there are any questions, please ask away!! Next up, primer and paint....................
Attachments
-
 Picture 583.jpg45.7 KB · Views: 1,635
 -
 Picture 584.jpg43.6 KB · Views: 2,004
 -
 Picture 605.jpg37.7 KB · Views: 1,296
 -
 Picture 586.jpg35.5 KB · Views: 1,396
 -
 Picture 559.jpg11.6 KB · Views: 1,164
 -
 Picture 593.jpg48.9 KB · Views: 1,496
 -
 Picture590.jpg127.2 KB · Views: 1,343
 -
 Picture 589.jpg22 KB · Views: 1,127
 -
 Picture 623.jpg40 KB · Views: 1,167
 -
 15 coats of paint.jpg132.2 KB · Views: 1,163
I run a Shelby Can Am in HSR, and Watkins Glen is my favorite track.
Our cars weights and tire sizes are almost identical, but my 3.3L. V6 is not as powerful as your LS6(maybe 260 hp to rear wheels).
2:05s-2:10s are very respectable times at Watkins Glen: your car must be handling pretty well already. But I definitely understand your wanting everything perfect in your car before taking the esses flat out!
You have a seriously fast and capable race car there, and you should be very proud of your work. I hope to see you run it sometime in person.
Jack
But I definitely understand your wanting everything perfect in your car before taking the esses flat out!
Jack
Funny you should mention that...........
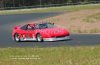
There was a reason I reworked the suspension over the winter. Last season was my second with the car on track (although the first full season) and was stupidly trying to really hammer the car wherever I went as I thought "it's gotta stick,this is so and so's setup!". Well with wheel rates that would be home on an Indy car( for reasons I will get to in later posts) the car was extremely stiff and darty. So as I hammered up the esses in 3rd cresting the hill by the last flag station (just as you would start to open up onto the back straight)I was just topping out and ready to shift( 6200rpm/3rd=around 130mph). There is a bump about a car width from the apex and I was not tight enough to it an went over the it and the back end broke loose...........
Let me tell you, I have MANY,Many laps there,although they are in my Spec Miata where I am maybe going 90 up though there,so a dip in the road that feels insignificant at that speed feels very different at 130!! I was very,very lucky I didn't pinball off the armco up there. Since the car has such a small wheelbase it snap spins just like a gocart(spins in it's own wheelbase) and luckily contained the spin to the center of the track mostly until hitting the grass on driver's left (too bad there wasn't a few more feet to the armco!) and finally hit at only 35-40 mph. This last incident started the headscratching and soul searching as to: A. What did I do to the car to cause this instability? and B. Maybe I'm not ready for a tube chassis race car with this power to weight ratio?
This season,people have come up to me after a session to ask if everything is alright, why am I not going faster? So I tell them I am going as fast as I need to right now. I need to learn the car with it's quirks,likes,dislikes and the multitude of settings/adjustments to play with.
Attachments
I know that exact spot on the track: during qualifying last year, a Riley and Scott WSC ground effects car shot into that apex as I was going through there flat out(120+mph). I never saw him, and we came within millimeters of colliding and a BAD accident. I was forced out over the bump you mentioned, but my back end stayed put: I'm sure the splitter up front and the wing on the back helped.
My car runs with the GTP/WSC cars at many HSR events, and it is nerve-wracking trying to go fast while keeping your eyes on your mirrors for GTP cars closing on you at 60-70mph on every straight.
I spoke to a 700hp GT-1 Camaro driver who lost it in the esses at Watkins Glen. He said it is amazing how quickly everything happens, and how comprehensively his car got demolished against the armco when you are travelling at those speeds. You are very lucky boy!
As I was building/restoring the car I did take lots of pics. Unfortunately ther were a few steps that wish I did take more of and did not realize this until times like now......Oh Well!!
Moving along, I mocked up everything for test fit. This included brake, oil,trans cooler lines,electric wiring,etc.. so I can then blow everything apart to paint.I had a looming deadline in that I was attempting to finish the car for the 25th Anniversary of the Fiero in Detroit. I ended up not making it by 2 weeks, but i felt I had a good chance as I would be a bachlor for the summer!! My wife was awarded a Fullbright Scholarship to go to India for 6 weeks( I'm not sure why she would want to go in the middle of the summer, but she said that living in New Jersey was good prep for the hazy,hot and humid weather!!). So let's just say that while she was gone that the lights did not go off much at the shop!! There were many all-nighters!!
So after complete mock up off to paint!! I used Corvette Torch red( one of the brightest reds!!!), GM code 13S silver, and a blue foe the strip that I found to match the blue in my vinyl numbers that turned out to be called "Pepsi Blue"as it came from Dupont's commercial colors line. I'm sure I spent too much time on panel fit, prep and paint that most would for a "race car", but I knew as I intended to only use the car for fun track days that I could be allowed some concessions to appearances.
Attachments
-
 Fiero Pictures 363.jpg58.8 KB · Views: 2,319
 -
 Fiero Pictures 358.jpg46.5 KB · Views: 1,218
 -
 Fiero Pictures 376.jpg37.6 KB · Views: 2,253
 -
 Fiero Pictures 373.jpg35.8 KB · Views: 1,444
 -
 Fiero Pictures 374.jpg37.7 KB · Views: 1,478
 -
 paint 1.jpg33.8 KB · Views: 1,100
 -
 paint 7.jpg36.4 KB · Views: 1,063
 -
 paint 2.jpg24.2 KB · Views: 1,101
 -
 paint 4.jpg33 KB · Views: 997
 -
 paint 3.jpg31.5 KB · Views: 1,124
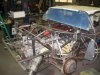
So down the home stretch as I was now bolting parts up for real this time! As everything was test fitted, building up the freshly painted/plated parts was like putting together a big model kit! It went from a bare frame with suspension hung to engine startup in 1 week!! Like I said , I was spending way too much time at the shop with very little sleep( sometimes even I have to admit that extended periods of this can be unhealthy).
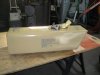
One of the items to blow the budget was the fuel cell. I had estimated a figure for it while building,and when I finally went to ATLl to have it built, I was shocked. I just needed a cell made exactly like the original,only a few inches shorter as the V8 ate up some room. By the time the Digitizing/design charges(everything is CAD up there),the material(the Gulf War had shortened the supply of ballistic material hence increased price) and the hardware was added up, the price was over double what I had set aside! At least they put my name on it!!!
In the brake dept., I was fortunate that Jack O. was upgrading hid Fiero chassis to Indy-Car style uprights and brakes. I purchased his whole set up including: Front and rear Alcon B-type calipers and floating rotors,spare uprights and bearings, and 2 sets of Jongbloed wheels.
Attachments
-
 Picture 621.jpg30.3 KB · Views: 1,013
 -
 Picture 622.jpg36.5 KB · Views: 1,046
 -
 Picture 700.jpg52 KB · Views: 1,109
 -
 Picture 698.jpg60.8 KB · Views: 2,431
 -
 Picture 699.jpg58.8 KB · Views: 1,911
 -
 Picture 704.jpg57.3 KB · Views: 1,379
 -
 Picture 707.jpg48.9 KB · Views: 1,729
 -
 Picture 805.jpg37.1 KB · Views: 1,132
Neat build! Had me pulling out my old issue of Sports Car Graphic and re-reading their 1983 article on the Fiero SD4. I prefer the 1st generation front end, it may not be as aerodynamic as as the "roundnose" but has a bit more character.
The article touted it as a "Corvette threat"..... a bit of a stretch, at least in street guise (and how can you compare a full blown tube-frame race car with a street car???).
Envisioned a street version with V8 swap and the SD4 bodywork, still think it would make a cool car!
The article touted it as a "Corvette threat"..... a bit of a stretch, at least in street guise (and how can you compare a full blown tube-frame race car with a street car???).
Envisioned a street version with V8 swap and the SD4 bodywork, still think it would make a cool car!
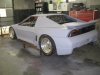
So the time came for the first rollout into sunlight as a complete car!! Seeing the car outside made all the late nights (very late nights),cost over runs( we all know about that), and assorted agony that goes with a project of this nature worth the trouble. I didn't make my deadline for the Detroit show, but that's OK.
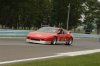
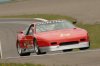
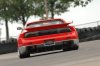
I took the car to New Jersey Motorsports park for the shakedown. The next event was Watkins Glen where the most pics were taken, as my friend is a photog that takes track photos of the people participating with our club, and makes them available for them to by as posters or just 8x10s.
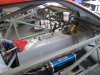
The first issues I addressed were cooling temp (too low!!), C/V joint meltdown, and that dreaded 930 gearbox shifting feel.For cooling, I used the stock LS style pump from the later LS2 as the pulley is narrow keeping a low profile to the front engine face. Then since I am not running a heater core which is really the thermostat bypass, I made a few mods based on advise from the ASA racing guys using this engine. They take out the T-stat altogether,plug the heater outlet and put a -10 fitting on the heater return. This fitting is now run to the bottom of the expansion tank. Since the 'stat is gone, seal the two cooling circuits ( supply and return) by driving a freeze plug in the hole where the stat had sealed them and drill a 5/16 bleed hole for air in the center. Then taking inspiration from Kateck and their very expensive modified pumps, I placed the cooling restriction on the outlet side of the system as opposed to the inlet, as creating pressure in the block helps avoid hot spots. The restrictor is a machined slug that fits inside of the water pump steel outlet, restrained by using a circlip inserted into the "bump" formed in the steel outlet used to limit how much the rad hose pushes on. I made a few of them with inner holes of varying sizes( 9/16,5/8, 3/4,and 13/16) to adjust my running Temps. I still find that even in 80deg heat I must run a restrictor strip in the rad opening to keep the temp up to 180 to 200deg. I guess I could/should have sized the rad smaller!!
The C/V problem was caused by a combination of the operating angle and the grease used. In order to fit the drivetrain, I had to make the concession that I could not get the axles straight out of the gearbox and not have the engine push me so far forward that driver comfort would be compromised. Since the angle would be only 12deg, I felt this would be alright since Porsche runs them at 16to 18deg in some years and offroad racers run them over 22deg. with no problems.The reason for the issue was the grease! I was told to use Redline synth.grease,(although this was by sports racers that have much less torque). Well this stuff lasted for a day at Watkins Glen before the grease in the inners turned to black clay and got the C/V body and balls so hot that they turned blue and melted the boot!! I replaced both inner joints and switched to NEO grease(expensive,but totally worth it!!) and haven't had an issue since with C/V temps down remarkably.
The trans was addressed later by doing the Albins dog gear conversion that gets covered on other threads. As I get the car out at least 2-3 days a month, I have many opportunities to shake more bugs out of the car. The issues that have been come up so far I accept as nothing more than natural teething pains in the progression to a "real" tube chassis race car from a production based one. I will continue next time.........
I took the car to New Jersey Motorsports park for the shakedown. The next event was Watkins Glen where the most pics were taken, as my friend is a photog that takes track photos of the people participating with our club, and makes them available for them to by as posters or just 8x10s.
The first issues I addressed were cooling temp (too low!!), C/V joint meltdown, and that dreaded 930 gearbox shifting feel.For cooling, I used the stock LS style pump from the later LS2 as the pulley is narrow keeping a low profile to the front engine face. Then since I am not running a heater core which is really the thermostat bypass, I made a few mods based on advise from the ASA racing guys using this engine. They take out the T-stat altogether,plug the heater outlet and put a -10 fitting on the heater return. This fitting is now run to the bottom of the expansion tank. Since the 'stat is gone, seal the two cooling circuits ( supply and return) by driving a freeze plug in the hole where the stat had sealed them and drill a 5/16 bleed hole for air in the center. Then taking inspiration from Kateck and their very expensive modified pumps, I placed the cooling restriction on the outlet side of the system as opposed to the inlet, as creating pressure in the block helps avoid hot spots. The restrictor is a machined slug that fits inside of the water pump steel outlet, restrained by using a circlip inserted into the "bump" formed in the steel outlet used to limit how much the rad hose pushes on. I made a few of them with inner holes of varying sizes( 9/16,5/8, 3/4,and 13/16) to adjust my running Temps. I still find that even in 80deg heat I must run a restrictor strip in the rad opening to keep the temp up to 180 to 200deg. I guess I could/should have sized the rad smaller!!
The C/V problem was caused by a combination of the operating angle and the grease used. In order to fit the drivetrain, I had to make the concession that I could not get the axles straight out of the gearbox and not have the engine push me so far forward that driver comfort would be compromised. Since the angle would be only 12deg, I felt this would be alright since Porsche runs them at 16to 18deg in some years and offroad racers run them over 22deg. with no problems.The reason for the issue was the grease! I was told to use Redline synth.grease,(although this was by sports racers that have much less torque). Well this stuff lasted for a day at Watkins Glen before the grease in the inners turned to black clay and got the C/V body and balls so hot that they turned blue and melted the boot!! I replaced both inner joints and switched to NEO grease(expensive,but totally worth it!!) and haven't had an issue since with C/V temps down remarkably.
The trans was addressed later by doing the Albins dog gear conversion that gets covered on other threads. As I get the car out at least 2-3 days a month, I have many opportunities to shake more bugs out of the car. The issues that have been come up so far I accept as nothing more than natural teething pains in the progression to a "real" tube chassis race car from a production based one. I will continue next time.........
Attachments
-
 Picture 021.jpg53.3 KB · Views: 1,616
 -
 Picture 015.jpg53.7 KB · Views: 1,143
 -
 Picture 014.jpg54.1 KB · Views: 1,084
 -
 Picture 525.jpg36.4 KB · Views: 1,243
 -
 Picture 637.jpg30.5 KB · Views: 1,392
 -
 Picture 667.jpg37.4 KB · Views: 1,064
 -
 Picture 683.jpg28.1 KB · Views: 1,191
 -
 Picture 684.jpg31.4 KB · Views: 1,351
Brian Hamilton
I'm on the verge of touching myself inappropriatel
Dude, that car looks gooooood!!!
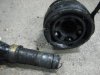
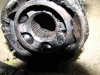
We've been having the same CV Joint issues with out 2010 Camaro SS Racecar.
In these pics you can see that even the center of the CV split and the axle was then spinning inside the CV..
We're running a total of 3200# with full fuel and driver and HP to the wheels varies (restrictor plate or not) from 355 to 380 (which is not outrageous)...
I'll be looking into the NEO grease. Where did you source yours from? Thanks for the tip!
Attachments


I got the NEO from Hoerr Racing.
HRPWorld.com Race Car Parts and Supplies
I hope it works for you too!!
HRPWorld.com Race Car Parts and Supplies
I hope it works for you too!!
UPDATE TIME !!!!!!!!!
I know it's been a long while since the last post, but the shop has been busy, there are many projects at home to do and with the Fiero, well, it's easier for me to work on it than type out a post( I hate typing!!)
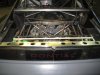
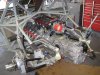
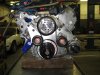
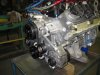
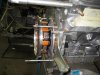
So, my goals for the off season were to freshen the LS6, as it has been 4 trouble free seasons and I felt that it was time for it to come out and just have a look inside. I replaced the valvesprings( with new GM LS6), oil pump( with the now popular high volume unit from the 2011 Camaro), and installed the ASA camshaft( I just wanted that "rumpity-rump" idle !!). Then I turned my attention to the front of the engine. I wanted to clean up the serpentine belt/reverse rotation water pump as I planned on installing a smaller 3 disc clutch, as wanted to make sure that there was no chance of belt slippage or jumping off due to the much quicker revving. I went with the Stewart/Wegner Racing water pump as it is normal rotation and would simplify belt routing. I would definitely recommend this pump as it makes the belt routing MUCH simpler without the need for weird idler pullies and extended belt length. It also simplifies the coolant routing for race/track cars without heaters as it has a thermostat-type of flange at the top. Now, the only caveat is that for those that need the front of the engine to be "low profile" with as short a belt drive/waterpump length as possible, then this setup may not work for you as the pump and drive extends out 1.25in more than the LS2 pump I had before, but the advantage of the better pump, modular, stackable crack pulley( I can just add a drysump drive at a later date if I wish) and the better full race-type ATI balencer, I felt that it was a fair trade off. I then moved the alternator to the lower driver's side and mounted a tensioner and idler to it's bracket that I milled out of 1/2 alum. plate. To test everything and rough in the fuel map with the new camshaft, I ran the engine on a friend's dyno with output now at a nice solid 450 hp and a great flat torque curve( I don't have the figures in front of me right now) with no leaks or belt issues.
Then I turned my attention to the clutch. I ended up using a 7 1/4in Quartermaster Optimum V (new 8 lug design) 3 disc unit( I will tell the tale of the bargain purchase later), but had to fabricate an adapter ring for the starter ring gear so I could reuse the high torque Porsche 930 starter I already had. I drew up some rough plans, then took the clutch cover and new ring gear to a friend who digitized it and CNCed it out of 3/4 plate. This put the ring gear at the same distance off the back of the block as the original clutch supplied by Kennedy. A Tilton hydaulic release bearing mounted to a custom bracket where the original Porsche release bearing nose went completes the package.
So, after 2 trouble free events( 2 days at new Jersey Motorsports park, and then 2 at Watkins Glen), I can attest to the increase in power( around 35-40hp increase)due to the cam change with a more aggressive engine note,along with the much improved throttle response due to the reduced moment of inertia of the smaller/lighter race clutch make the car more fun to drive. The quicker revving with the race clutch really helps shifting with the dog ring gears as the rev-matching is smoother.
I'm sure I have glossed over a few details along the way, so bring on the questions and comments....................
I know it's been a long while since the last post, but the shop has been busy, there are many projects at home to do and with the Fiero, well, it's easier for me to work on it than type out a post( I hate typing!!)
So, my goals for the off season were to freshen the LS6, as it has been 4 trouble free seasons and I felt that it was time for it to come out and just have a look inside. I replaced the valvesprings( with new GM LS6), oil pump( with the now popular high volume unit from the 2011 Camaro), and installed the ASA camshaft( I just wanted that "rumpity-rump" idle !!). Then I turned my attention to the front of the engine. I wanted to clean up the serpentine belt/reverse rotation water pump as I planned on installing a smaller 3 disc clutch, as wanted to make sure that there was no chance of belt slippage or jumping off due to the much quicker revving. I went with the Stewart/Wegner Racing water pump as it is normal rotation and would simplify belt routing. I would definitely recommend this pump as it makes the belt routing MUCH simpler without the need for weird idler pullies and extended belt length. It also simplifies the coolant routing for race/track cars without heaters as it has a thermostat-type of flange at the top. Now, the only caveat is that for those that need the front of the engine to be "low profile" with as short a belt drive/waterpump length as possible, then this setup may not work for you as the pump and drive extends out 1.25in more than the LS2 pump I had before, but the advantage of the better pump, modular, stackable crack pulley( I can just add a drysump drive at a later date if I wish) and the better full race-type ATI balencer, I felt that it was a fair trade off. I then moved the alternator to the lower driver's side and mounted a tensioner and idler to it's bracket that I milled out of 1/2 alum. plate. To test everything and rough in the fuel map with the new camshaft, I ran the engine on a friend's dyno with output now at a nice solid 450 hp and a great flat torque curve( I don't have the figures in front of me right now) with no leaks or belt issues.
Then I turned my attention to the clutch. I ended up using a 7 1/4in Quartermaster Optimum V (new 8 lug design) 3 disc unit( I will tell the tale of the bargain purchase later), but had to fabricate an adapter ring for the starter ring gear so I could reuse the high torque Porsche 930 starter I already had. I drew up some rough plans, then took the clutch cover and new ring gear to a friend who digitized it and CNCed it out of 3/4 plate. This put the ring gear at the same distance off the back of the block as the original clutch supplied by Kennedy. A Tilton hydaulic release bearing mounted to a custom bracket where the original Porsche release bearing nose went completes the package.
So, after 2 trouble free events( 2 days at new Jersey Motorsports park, and then 2 at Watkins Glen), I can attest to the increase in power( around 35-40hp increase)due to the cam change with a more aggressive engine note,along with the much improved throttle response due to the reduced moment of inertia of the smaller/lighter race clutch make the car more fun to drive. The quicker revving with the race clutch really helps shifting with the dog ring gears as the rev-matching is smoother.
I'm sure I have glossed over a few details along the way, so bring on the questions and comments....................
Attachments
Terry Oxandale
Skinny Man
Love the work you've done. How can I get the details of your clutch set-up to duplicate the same with my 930? Seems you've done all the hard work now ")
Here's the deal on the clutch............and a few more parts that I used this winter..........
As much as I don't care for NASCAR, I gotta love them!! In their display of excess and waste, we benefit. On Ebay, there are many ex-NASCAR parts for pennies on the dollar,you just have to know exactly what you need( as far as part numbers) and what the items are worth new and on the used market. I picked up a pre-made -20AN upper coolant hose in a length that I could work with, new those large fittings are $120 each and the hose is $180 for a 6ft length(the minimum order). I paid $60 including!! The clutch is a current design 8 lug Quartermaster Optimum V 7 1/4in dia. The current price is around $700-800 and the button for the LS is $285. The ex-NASCAR clutch had plates that mic out with plenty of life left, but the wrong driven plates for the Porsche (different spline) and was asking $300. Now that's a good deal as is, but some sellers have a "make offer", so I made a low ball offer for $200 and he took it ( these guys are buying those parts at scrap value, so they are still making a profit), then he credited me back $65 as I didn't need the drive plates!!, so total with him was $135!!. Then I called Summit racing with the part numbers for the clutch packs that I needed and they were somewhere less then $200( I think $180). So in total I paid less than $600 for a $1100 clutch!! The bargains are out there, you just have to be careful and patient.
So with the clutch, I had to make the spacer fit the 7.25 Optimum V cover, so unless you plan on running the same clutch, the CAD file will not help.It was not cheap to have it made as I had to buy 2 pieces of 3/4 alum. plate as one was used a a jig plate. The total with materials, CAD time, and CNC time, came out at $700. To me this was worth it, as I knew I was not confident enough in my machining skills to make something that needs to be very accurate so as not to have a vibration issue at high RPMs, or to have some one-off starter set up( starters are not cheap either). The release bearing is a Tilton 800 series #61-8002. I took the stock release bearing nose off the trans and made a new 2 piece one with a steel nose turned in the lathe to center the release bearing in the relief in the trans case, and a plate of .100 to give the correct freeplay between the release fingers and the bearing face.
Attachments
Last edited:
Similar threads
- Replies
- 1
- Views
- 481
- Replies
- 3
- Views
- 355