JaseH's GTForte

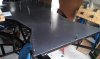
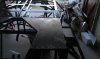
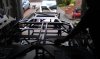
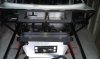
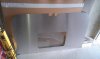
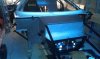
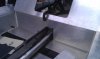
I'm all ready to rivet the floor panels this weekend. All holes are drilled and cleaned up and Keith Baker has kindly sent me a brand new air riveter to borrow! Thanks so much Keith, really appreciated! Will really help with the 270 stainless rivets Ive got to do!
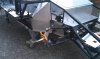
Cant wait to get this done as I'll be able to turn the car back over and get on with the other panels again. In other news Ive got hold of a set of Front uprights/hubs and bearings from Darren at GTForte and after a quest which has lasted many weeks I have finally found a set of Mk3 Granada/Scorpio rear hubs and bearing carriers for reasonable money! These things seem to be getting as rare as rocking horse doo doo!
 
The floor panels are now all rivetted and the car has been turned back over. The air riveter that Keith lent me was brilliant, it took no time to rivet the stainless rivets into the chassis, the most time consuming thing was running the sealant on the chassis. Thanks alot for lending me it Keith, I'll PM you.

Heres a couple of (poor quality pics :(
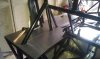
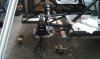
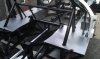
) of the job. Still awaiting my uprights ect but I'm now cracking on with finishing off the other panel templates, I reckon I should have all the correct shapes done by the end of the weekend!
 

Attachments

  • IMAG0342.jpg
    IMAG0342.jpg
    176.2 KB · Views: 507
  • IMAG0343.jpg
    IMAG0343.jpg
    169.2 KB · Views: 484
  • IMAG0346.jpg
    IMAG0346.jpg
    114.7 KB · Views: 484
  • IMAG0347.jpg
    IMAG0347.jpg
    151.2 KB · Views: 486
Looking very good Jayson!

What kind of chalk are you using? Is it clear silicon maybe? I don't see it oozing out in the photos anywhere. I take it that you are sealing in between the panels and the chassis?
 
Have you decided to order the panel set from Darren?

I have it on order with the cut outs already made but I am wondering if that (or something) is holding things up. May just have him ship with the sheets and get it done here so I can get it sooner as it's already much later than I hoped.
 
Last edited:
Hi Jayson,

I have read your build log and want to first offer you the best of luck in your quest! I also wanted to get your opinion on the overall quality of the GT Forte kit and what your first impressions are about it. I have spoken with Darrin and he has spoken highly of Darren and GT Forte so far. I am starting my research on my car and would be interested in your opinions.

Thanks
Robert
 
Have you given much thought to latches to hold the upper/lower bodywork together?

Darren has a VERY nice option for this (original Hartwell uppers...yes, the real deal) from a third party but they are a good bit more than I wanted to part with for latches unless it cannot be avoided so I've been looking at several options:

One that would work without alterations and be reasonably esthetic (but far from beautiful) can be found here: Camloc Over Centre Catch with Lock from Merlin Motorsport

Another one that I like is the one that another GTForte member used (David). That one though will need what I think to be fairly extensive body work modifications. Those can be found here: http://www.gt40s.com/forum/gt40-build-logs/35077-gt-forte-gts40-build-7.html

Lastly one that deviates greatly from the originals but I personally like just as well are reasonably priced but will require cutting the lower sections to fit the body and then we may have curves to worry about. Those can be seen here: AeroCatch 3 Shear & Tension Latch Fastener from Merlin Motorsport

If you would, can you tell us what the size of the slot in the bodywork is? Need to know the height, width, and depth of the thing please.
 
Last edited:
The ones I have are these, this shows how much difference/work is required
DSC07757.JPG


Genuinie Hartwell, just not the same ones as the GT40 used and at £25/set delivered I'm prepared to do a bit of hard work on getting them to fit.
 
Hi David,

Same question to you if you have time...

Can you tell us the dimensions of the slot? Looks to be about 30mm wide and 60mm tall based on the dimensions of that latch (I looked it up).
 
Quick update.

Havent done much over the last week (apart from sitting in the car and pondering!)as Ive sent my aluminium sheet off to the cutters to get my panels cut out. Theyre being cut at Precision Profiles Ltd who are based in Brislington Bristol, I hopefully should have 32 nicely cut panels with me very soon! In the meantime Ive bought myself a rivet gun with a moveable head and rotary tool so I can clean up a few small weld splashes on the chassis.

Hi Robert

Sorry for the delay in replying to your post and thanks for the encouragement. I'm happy with what Ive got from GTForte, I'm a complete noob to car building so I dont have much experience of anything else but it was ready in 6 weeks and it all seems very good for the price. A couple of things that were missing from the kit were quickly depatched and Darren has been helpful to me.
 
Picked up my panels yesterday and 2 lengths of ali pipe for my cooling. The quality of the cutting is fantastic but I need to do some fettling to make them fit, I think I was trying to be a bit to accurate with cardboard panels, even though the thickness is the same Ive rediscovered that ali is a bit of a different material than cardboard :( Also I'm p****d off with myself, for some reason which I havent worked out yet an old drawing of the footwell top panel was on the cut out drawing that was sent to the cutter so that panel is totally wrong and will have to be redone :(. Its a mystery, the correct drawing has the access date when the cut sheet was created and the incorrect drawing hasnt been accessed since may? Sodding annoying as most laser cutters wont do a single sheet if they do theres a minimum order charge :(.

Here's a few pics anyways
 

Attachments

  • IMAG0418.jpg
    IMAG0418.jpg
    133.2 KB · Views: 548
  • IMAG0421.jpg
    IMAG0421.jpg
    160.3 KB · Views: 538
  • IMAG0424.jpg
    IMAG0424.jpg
    163.2 KB · Views: 508
Looking good Jase! Shame about that panel but it's not the end of the world to make one panel by hand. Is it too large or too small? ie Can you trim/fettle it a bit or is it a total write-off?
 
It's too small mate & the wrong shape. It could be used but I wouldn't be happy with it. Shame because it looks real nice, laser cutting rules! Been trying to get price to have that one cut but the cheapest I can get it done for is £55 for one panel :(. I spoke to darren and he said he may be able to get it cut for me when he sends a new batch to be cut for himself.
 
Hi Jayson

Are you planning on powder coating any of your panels or keeping them as they are? If you decide to have them coated I found that I had to skim off a bit on most panels to allow for the extra thickness added by the coating. So if you are just give yourself a little bit of space between panels
 
Hi Trev

I was originally going to have them all coated but I'm now going to leave them as they are (Been going through my costs and had a bit of a purge, coating was one casualty).

Just marking out the fold lines on the panels, did you guys use various radius's or just bend them all the same?
 
Hi all.

Just realised its been a long time since Ive posted on my build log!
Just been lazy on the posting pics front to be honest! Been working as much as I can on the car but the crap British climate and the fact that I am so busy at work means that I havent done as much as Ive wanted to.

Got alot of my panels fettled and drilled now. Test fitted the suspension back in October and fitted the driver side wheel arch panels but then discovered I had an issue with one of the passenger side suspension brackets which meant I couldnt progress with the wheel arch panels on that side. My friend came round over Xmas and we fixed that and now the wheel arch panels that side are nearly done! All the main interior cockpit panels are done and I am now doing the templates for the interior footwell panels. My steering column is at Darrens for modification and I will be buying my brakes soon. I will most likely go for Wilwood 4 pots on 288mm discs.

Anyway here are some pics!
 

Attachments

  • IMAG0478.jpg
    IMAG0478.jpg
    219.4 KB · Views: 538
  • IMAG0483.jpg
    IMAG0483.jpg
    210.8 KB · Views: 506
  • IMAG0480.jpg
    IMAG0480.jpg
    211.5 KB · Views: 447
  • IMAG0519.jpg
    IMAG0519.jpg
    136.5 KB · Views: 471
  • IMAG0539.jpg
    IMAG0539.jpg
    113.6 KB · Views: 478

Renato

Lifetime Supporter
Hi Jayson,

Good to see you back on the project. Keep on it, every day something, doesn't matter how small.
I'm doing all my bends the same radius.
Good luck with your build, don't forget the pictures...

Renato
 
Hi all

Managed to spend a day in the garage today after a few busy weekends away on stag do's and holidays etc. Still working on the front panelling drilled and cleaned up 3 panels for the front bulkhead, I've discovered one job I really dislike on this project...Drilling! Takes bloody ages and I'm getting through the drill bits!

Quick question for you guys. How would you go about panelling the two panels labelled A & B in the picture? Its going to be really difficult to fix against the diaganol bar as its at an awkward angle and inset (C).
I was thinking the easiest thing to do would be to just rivet the 2 panels together and not fixing to the diagonal?
Ive been studying yours Renato but I cant make out how you joined there.
Also as you can see Ive done a template for the panel covering the steering rack. Ive left a big enough space so I can pull out the rack if it needs replacing. How would you make this water tight? Should I go for a square or round opening?

My front brake kit also arrived last week, Wilwood Midilite 4 pot on 288mm discs. I'm also due a brake line kit and my modified Corsa B steering column but this hasnt been sent yet. Hopefully within the next week or so, then I can get the steering finished,

Thanks again

Jase
 

Attachments

  • Front panel Query.jpg
    Front panel Query.jpg
    171 KB · Views: 461
I've discovered one job I really dislike on this project...Drilling! Takes bloody ages and I'm getting through the drill bits!
Hi Jayson, just wondered if you've tried using some quality cobalt drill bits? These stay sharp for ages! Use a slow speed and put lots of pressure on - should cut through in no time....!!
 
Back
Top