Kurt H (hoffkm) SL-C build thread

Big congrats!! Especially getting all the tape glue off, definitely a right of passage. One of the few things I got to do on mine, lol. Allan told me a tip I wish I knew and even more so relayed to you, send RCR a couple rolls of easy to remove tape prior to shipping.

Man, what are the wheel and tire sizes? That tread pattern on the rear just looks sick!

Del,

Thanks

The wheels are the standard 19" wheels from RCR and the tires are Nitto NT05s. I run them on my 69 Camaro (much narrower) and they are quite sticky. Not so good in the rain as can be expected. The sizes are 275-30R19 in the front and 335-30R19 in the rear. It is a shame that the street tail will hide the rear tires, guess I should have gone race tail, oh well, I prefer the street tail.
 
Today was the first trip of what I am certain will be many more to the hardware store for grade 8 fasteners...

Don't forget you have LOTs of extra bolts already. Like those bolts through the rear suspension rockers that are 1/2-3/4" too long!

I ended up ordering a slew from Aircraft Spruce as 1) you can order basically any length, 2) you have the option of getting drilled either end, 3) no worries about them being crap bolts marked as grade 8. There website does a good job of describing how the AN bolts are sized so no surprises on the size of the shoulder or thread length.

You can also get castle nuts and different thickness washers.
 
It is a shame that the street tail will hide the rear tires, guess I should have gone race tail, oh well, I prefer the street tail.

And the solution....

TMS 4-14-19 (105 of 216) (3).jpg
 
Wanted to share an experience I had working on the SL-C last night. I put the chassis up on jack stands to work underneath the car. I placed two jacks stands at the outer front corners of the tub and two under the frame just forward of the rear axle centerline where numerous tubes join together. While under the car I bumped one of the rear jack stands and it slid out of place! The entire chassis, with the engine and transaxle installed mind you, was only resting on three corners! Now that is what you call a RIGID and STIFF chassis! I guess one of my jack stands is a little shorter than the others.

Excellent chassis design! This car continues to impress me and I find that I stand and admire it almost as much as I work on it. That may effect my timeline but oh well.
 
Yes, my SLC. Not my Hot Rod. The photographer taking pics sent me a copy as payment.

If that Hot Rod does not float your boat, maybe one of these does...
 

Attachments

  • TMS 4-14-19 (104 of 216).jpg
    TMS 4-14-19 (104 of 216).jpg
    133.6 KB · Views: 465
  • TMS 4-14-19 (107 of 216).jpg
    TMS 4-14-19 (107 of 216).jpg
    397.9 KB · Views: 472
Progress update:

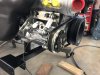
Engine has been in and out of the chassis a couple of times, it is in for good now (I hope).

I have my coolant plumbing all planned out, materials procured, and some of the lines run.

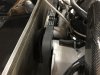
I am not using the RCR wiring harness and have designed my own (schematic attached for reference, I am a mechanical engineer so it is not a true schematic but works for me). I am utilizing 4 fuse boxes for main power. Two under the dash, one under the front clam, and one under the rear clam. Two are constant power and two are switched via a Flaming River battery disconnect. Control signals, etc. and routed to terminals strips under the front clam, dash, and rear clam via a 12 conductor cable (two terminal strips under the dash that are connected to the strips under the front and rear). I have most of the main power feeds ran including the battery connections and ground. Most of the fuse boxes and terminal strips are mounted (still need to mount the ones under the dash). The engine ECU is mounted as well and all wires under the rear clam near the engine are double insulated for heat.

I designed an aluminum fan shroud (drawing attached in case anyone is interested) and had one of our sheetmetal suppliers at work make it for me. It turned out well and is installed and tested. With a single fan running a small piece of paper sucked against the outside of the radiator everywhere across it, even in the corners. Success!

I cut the spider to fit down into the tub but my tub is sitting high on the chassis for some reason. Need to figure that out. It may be because I have yet to cutout the floors of the tub for the seats. I also cut out the windshield plug so I could sit in the car and get a feel for it. Even up on jack stands this thing sits low. Looking out the front you cannot see any of the hood or the front of the car (as Scott S. warned me). This will definitely take some getting used to.

Next step is to pull the spider off to work on the tub and to widen the front roll bar hoop. I will then finish the coolant lines, plumb the fuel system, finish the engine wiring, finish the exhaust, and then be ready for first start!!

So far I consider myself on schedule even though I am kind of bouncing around from task to task and varying from my build order.

So far we have not shut down at work and even if we do I will be working from home, no coronacation for me to work on the car. My wife is a teacher so she is at home which actually means I have been in my shop less than normal. I usually try to only work out in the shop when she is not at home.

Pictures coming in my next post.
 

Attachments

  • wiring.pdf
    82.8 KB · Views: 378
  • D020357.pdf
    138.4 KB · Views: 335
2020-03-21 12.34.57.jpg
2020-03-21 13.23.51.jpg


2020-03-21 17.09.24.jpg

Yes I know, the horns are not going to work there. I realized that after I mounted them. I will move them somewhere?? Quickly running out of space for things.
2020-03-21 17.09.41.jpg
2020-02-29 15.42.57.jpg

Forgot to mention in my previous post that before installing the engine I polished all the aluminum framework with Sharkhyde aluminum polish and applied Sharkhyde protectant to everything.
 

Joel K

Supporter
I used self tapping screws thru the top and button flange into the top and bottom crossbar of the radiator. There are no tubes or fins in that area to pierce.

Kurt, was thinking a bit more about attaching the shroud to the radiator. Did you think about using J-clips to get a tighter/more secure mounting of the shroud to the radiator? I was thinking of mounting it the way you did, but in the holes on the radiators use steel j-clips so the screws can be tightened with more torque. Just an idea and wondering what you think?
 
Joel,

Yes, I think J clips would work or you could use rivnuts. Fitting J clips onto the top of the radiator may lead to space constraints, all depends on how you mount things. There is ample room along the bottom to fit just about any mounting style.

If my "plan A" does not hold up rivnuts will probably be my "plan B".
 
Kurt - I highly recommend taking a second look at the Dirty Dingo AC mount; it makes changing the belt a 5-minute job.

Details here on my blog:
 
Back
Top