RCR Seats Mounting Seat Belts

Mitch Krause

Supporter
Hello,

I have read a few written descriptions, have not yet found any good images, so thought I would ask. For an RCR GT, in particular on the passenger seat, how have you run the seat belts.

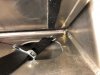
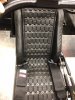
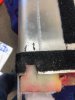
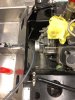
The issue that I am seeing is that the holes that a seat belt bolt goes into are like 15.5 inches apart (the seat is 17 inches wide) and the adjusting end of the seat belt (with the metal buckle) is usually close to where the seat belt mounts to those bolts. So the issue is that there is then not room to run the seat belt around the side of the seat. If you mount without something else, adjusting would be very difficult. You will have to cut holes in your seat back (unless you put the seat a couple of inches forward. Etc.

Anyone have pics of what they did, or good descriptions to help the thought process?

Mitch
 
Hi Mitch, I’ve got full harness belts in my RCR GT. The top mount belts go through holes cut in the seat back to mounts on the rear bulkhead at shoulder top height. The mounts are into a beam behind the bulkhead which is bolted into the chassis and roll cage. The side belts mounts go into the chassis floor which is reinforced in the area.
I reckoned that I could not get the correct mount location without going through the seat back.
Cheers
Roger Allen
 

Mitch Krause

Supporter
Roger,

Thanks. In my case, the side belts mount into the slanted part of the chassis (just above the floor and behind the seat (but outwards towards the center tunnel and gas tank), where there is the re-reinforcement and tapped seat belt mounting block. The issue that I am struggling with is how to get the belts around the side of the seat (or maybe through the seat). Not sure if that is exactly what you meant by saying that yours were mounted in the floor, maybe the mounts changed. I will try and maybe post a picture tonight, that might help.

Mitch
 
Hi Mitch,
The lap strap on my full harnesses go to the outside of the seat in the ‘hinge’ area. Having said that I’ve had to narrow the driver’s seat to accommodate a right hand cable shift.
Cheers
Roger
 

Mitch Krause

Supporter
Picture attached, tried to get everything in one. Note how close the seat is to the tank, not enough to fit the belt around without lots of seat cutting. The distance from mount to adjust on the belt is fairly short. Note how the seat belt mounting eye bolt will hit the seat without cutting or moving the seat a couple of inches forward. I could cot the eye off the mounting bolt, but want to preserve that a little while longer while I consider how I could get the belt so the adjust is more easily available. I am intrigued by one writing of a marine shackle, but don’t quite see how that would work without cutting into the seat and running the belt through the seat frame. This the reasons for the questions.
 

Attachments

  • 177CD230-C035-4FBC-AB0E-1064D62978E4.jpeg
    177CD230-C035-4FBC-AB0E-1064D62978E4.jpeg
    85.7 KB · Views: 474
Mitch,
From your last pic, it looks to me like you mounted your seat too far back. You need a little more working room for the belts to clip to that eyelet. Although you can route the lap belt around the outside top-bottom seat hinge area (yes, it's tight), you should also be able to route on the inside of the hinge area. There should be no need to cut or hack into the seating/belt mounting system. On the rare occasion where I have a new passenger, I adjust the belts for them before they get in. I know my wife's settings so it's easier to go back.

Also, my seats are off the floor a bit and mounted to ~1/4" x 1" aluminum bar stock so they can be easily removed out on the road for quick access to the firewall plate if I ever have to deal with a road-side repair. I mount the threaded adapter bar from the bottom using aircraft counter-sunk screws to retain a flat bottom, and the bar has separate countersunk screws pointing up to serve as mounting studs for the seats using aircraft AN 10-32 low-profile nylon lock-nuts.

The shoulder belts can criss-cross behind the seat, then drape over the cross bar of the roll cage which is at shoulder height for most. FWIW, I'm using the Willans belt system.

FWIW, there's a lot of things you have to think about several steps ahead before committing and drilling holes in the aluminum. Good luck!
 

Mitch Krause

Supporter
Tom,

Thanks, I was afraid someone was going to say the seats were too far back, I was starting to think along those lines, but hesitant to move them.

I was not in favor of cutting into things, so looking for ideas to avoid that.

Mitch
 
Mitch,
Sorry to hear that....mounting seats was one of last things I did in the cabin area so I could find that sweet spot while I worked on the car.
 

Mitch Krause

Supporter
Tom,

So the passenger seat is in and all is well. A couple of things went into play, I put the rollbar back in temporarily as I thought of that. That serves to keep the seat back out a couple of inches, which helped with the angle. Then I did make one very slight modification to the back of the seats and that let me retain the original hole locations that I had, whew I avoided having to drill new holes in the floor.

Thanks for all the help.

Mitch
 

Attachments

  • Pass_Seat.jpg
    Pass_Seat.jpg
    115.3 KB · Views: 475
  • Pass_Seat_Mod.jpg
    Pass_Seat_Mod.jpg
    136.5 KB · Views: 497
Mitch,
Glad to hear you were able to push through the issue to your satisfaction.

What engine/transaxle combo are you running? For the firewall access plate you will most likely have to cutout an opening and fab up a cover plate to hide the engine water pump pulley. You'll see this on many GT-40s. I have a dual purpose solution that covers that and also serves as pad for the seat back. Probably easier to take a picture than explain what I'm talking about, however, it might take a couple of days before I can get back in the garage and take a pic for you...
 

Mitch Krause

Supporter
Tom,

Small block Ford and Porsche G50. I dropped the engine in last night just for kicks and too look at things. My clearance looks OK and is supposed to be good, Randy did all the fitting and work on that. Picture attached. Now I can start to do some fitting and securing of the shifter cables. Electric water pump located in the front. (powered by relay).

Mitch
 

Attachments

  • Engine_Front.jpg
    Engine_Front.jpg
    116 KB · Views: 439
  • Bare_Engine_Back.jpg
    Bare_Engine_Back.jpg
    132.2 KB · Views: 543
Back
Top