Restarting my SLC project in West Texas

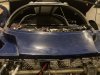
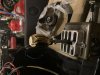
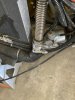
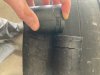
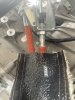
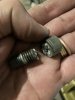
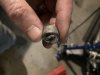
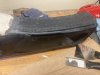
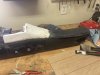
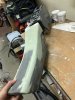
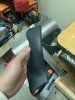
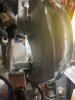
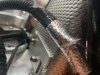
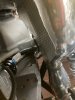
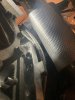
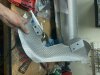
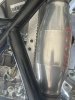
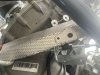
Well if you want the short answer the hot cat was created by an exhaust leak caused by a broken bolt and absence of donut gaskets between the exhaust manifold and the mid pipe , excess Oxygen , I guess .

I created another thread with the full story and the mystery solved by Howard .
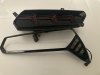
 

Attachments

  • IMG_9683.jpeg
    IMG_9683.jpeg
    153.6 KB · Views: 90
  • IMG_9682.jpeg
    IMG_9682.jpeg
    264.1 KB · Views: 101
  • IMG_9142.jpeg
    IMG_9142.jpeg
    200.6 KB · Views: 92

Neil

Supporter
"...the hot cat was created by an exhaust leak caused by a broken bolt and ..." I'll bet that broken bolt was not made by SPS or Allen. There are a lot of junk fasteners out there, counterfeited to look like high-quality stuff. If your application is critical, depend on high grade industrial or aerospace fasteners!
 
Well, in the mean time, while working out frustrating engine or mechanical problems, I was also working on less stressful stuff, how about leather wrapping my freshly made center console components. I decided to add a little foam for my right elbow , since I am getting sensitive in my old age. LOL . I have enjoyed learning about upholstery . Leather stretches A LOT , and it makes it easy for beginners like me. Super happy with the end product
 

Attachments

  • IMG_0280.jpeg
    IMG_0280.jpeg
    256.5 KB · Views: 100
  • IMG_9329.jpeg
    IMG_9329.jpeg
    447.5 KB · Views: 99
  • IMG_9327.jpeg
    IMG_9327.jpeg
    361.7 KB · Views: 96
  • IMG_9348.jpeg
    IMG_9348.jpeg
    235.6 KB · Views: 90
  • IMG_0271.jpeg
    IMG_0271.jpeg
    316.6 KB · Views: 103
  • IMG_9213.jpeg
    IMG_9213.jpeg
    234.1 KB · Views: 101
  • IMG_9208.jpeg
    IMG_9208.jpeg
    292.3 KB · Views: 93
  • IMG_0281.jpeg
    IMG_0281.jpeg
    306.9 KB · Views: 118
Well, I heard horror stories about melted cables , so I decided that anywhere a wire or cable approximates any exhaust components I made a micro louver shield. Thanks to Aaron Hamilton to help me secure the last sheet available anywhere , in Perth Australia. I don't know why they quit making it, the stuff is awesome , very effective , and easy to work with
 

Attachments

  • IMG_8798.jpeg
    IMG_8798.jpeg
    246.8 KB · Views: 105
  • IMG_8795.jpeg
    IMG_8795.jpeg
    335.2 KB · Views: 102
  • IMG_8799.jpeg
    IMG_8799.jpeg
    202.2 KB · Views: 98
  • IMG_8800.jpeg
    IMG_8800.jpeg
    202 KB · Views: 102
  • IMG_8793.jpeg
    IMG_8793.jpeg
    254.3 KB · Views: 91
  • IMG_8663.jpeg
    IMG_8663.jpeg
    544.3 KB · Views: 97
  • IMG_9689.jpeg
    IMG_9689.jpeg
    232.1 KB · Views: 90
  • IMG_9690.jpeg
    IMG_9690.jpeg
    457.2 KB · Views: 92
Before I knew there was an oil temperature and level plug that the factory harness does not use . Why ??? (yes the one I plugged the crank sensor into ) . I came up across a connector that fits into the AIMS Strada unit . probably overkill, but Oh Well , can't never have too much information.
 

Attachments

  • IMG_8437.jpeg
    IMG_8437.jpeg
    188.8 KB · Views: 91
  • IMG_8438.jpeg
    IMG_8438.jpeg
    148.5 KB · Views: 100
I decided to upgrade to stronger springs in the front and stronger longer springs in the rear, and might as well upgrade to metal bushings along the way . Also added the bearing that makes it much easier to adjust suspension height and spring tension. Thanks to Cam for the tips .
 

Attachments

  • IMG_9226.jpeg
    IMG_9226.jpeg
    239.2 KB · Views: 90
  • IMG_8638.jpeg
    IMG_8638.jpeg
    415.4 KB · Views: 93
  • IMG_9223.jpeg
    IMG_9223.jpeg
    447.3 KB · Views: 97
  • IMG_9225.jpeg
    IMG_9225.jpeg
    582.7 KB · Views: 109

Neil

Supporter
Your experience reminds me of a book I ran across in the library back in college. "Human Factors Engineering", it covered how to make as fool-proof systems as possible by covering a very wide range of subjects. One part that I was reminded of was to never use identical connectors where a cable could be plugged into the wrong one. Their rule was to use different connectors for each connection. Sometimes the connectors may look similar but internally they have an index key in a different position so a wrong cable connector cannot be plugged in.
 

Neil

Supporter
I decided to upgrade to stronger springs in the front and stronger longer springs in the rear, and might as well upgrade to metal bushings along the way . Also added the bearing that makes it much easier to adjust suspension height and spring tension. Thanks to Cam for the tips .
You will love those radial needle bearings!
 
So time to kick the interior into high gear. Start with the tub . I keep reading about fuel sending units going bad and the need for an access panel. both on the tub and the fuel cover. , so now is the time !! kilmat everywhere how about foam for noise and insulation purposes and carpeting for a nice finish . How hard can it be , right?

And don't forget the speakers, I found super thin small ones that will fit and still pack a punch . Morel virtue nano 603. https://www.crutchfield.com/S-nUDxp7FlLtJ/p_210VIRN603/Morel-Virtus-Nano-603.html
 

Attachments

  • IMG_9748.jpeg
    IMG_9748.jpeg
    203.3 KB · Views: 97
  • IMG_9752.jpeg
    IMG_9752.jpeg
    216.4 KB · Views: 107
  • IMG_9898.jpeg
    IMG_9898.jpeg
    314.3 KB · Views: 100
  • IMG_9744.jpeg
    IMG_9744.jpeg
    285.4 KB · Views: 88
  • IMG_9815.jpeg
    IMG_9815.jpeg
    438 KB · Views: 91
  • IMG_9816.jpeg
    IMG_9816.jpeg
    344.6 KB · Views: 100
  • IMG_9822.jpeg
    IMG_9822.jpeg
    200 KB · Views: 95
  • IMG_9887.jpeg
    IMG_9887.jpeg
    246.8 KB · Views: 106
  • IMG_9836.jpeg
    IMG_9836.jpeg
    320.9 KB · Views: 98
  • IMG_9883.jpeg
    IMG_9883.jpeg
    302.5 KB · Views: 104
I've only ever blownout the rear shock mount eyelets, then I replaced them with the steel ones. I suspect it was because the springs were coil binding or the shock was bottoming. Never investigated to the level of confirmation. Your longer springs will help the coil bind question and the steel will prevent eyelet failure. Still its a good idea to wrap a zip tie around the shock shaft to see how much travel you are consuming under compression once on the road in earnest. Once the ideal shock/bellcrank angle has been established, my preference is to adjust the ride height with the pushrods.

Those needle bearings are the "dizzle" :)
 
Well since the tub was out , it was time to tackle one of my pet peeves about the SLC interior, those super wide butt ugly A Pillars. I had bought a hydraulic kit a year ago. Time to use it . Scott had paved the way on this project, but I was way over my head on the amount of force that takes to gently bend the front part of the cage , and of course it needed to be lengthened and new flanges welded, It took forever and a lot of creativity including a tree stump.

When you are bending the front hoop, there is no way to make sure both sides get bent evenly, so to fine tune things a good ol tree stump on my backyard saved the day . Super happy with the end result . Much harder than I anticipated though .

I have not taken a final picture , the gap is a bit smaller on the passenger side .

Happy my shoes have thick soles. I stepped on a wedge I cut out of a steel rod. Close call to a major burn .
 

Attachments

  • IMG_9963.jpeg
    IMG_9963.jpeg
    274.4 KB · Views: 98
  • IMG_9943.jpeg
    IMG_9943.jpeg
    278.1 KB · Views: 91
  • IMG_9951.jpeg
    IMG_9951.jpeg
    196.9 KB · Views: 92
  • IMG_9954.jpeg
    IMG_9954.jpeg
    159.3 KB · Views: 85
  • IMG_9944.jpeg
    IMG_9944.jpeg
    377.1 KB · Views: 93
  • IMG_0100.jpeg
    IMG_0100.jpeg
    353 KB · Views: 92
  • IMG_0116.jpeg
    IMG_0116.jpeg
    186.9 KB · Views: 84
  • IMG_9940.jpeg
    IMG_9940.jpeg
    441.3 KB · Views: 81
  • IMG_9957.jpeg
    IMG_9957.jpeg
    157.7 KB · Views: 92
Last edited:
I've only ever blownout the rear shock mount eyelets, then I replaced them with the steel ones. I suspect it was because the springs were coil binding or the shock was bottoming. Never investigated to the level of confirmation. Your longer springs will help the coil bind question and the steel will prevent eyelet failure. Still its a good idea to wrap a zip tie around the shock shaft to see how much travel you are consuming under compression once on the road in earnest. Once the ideal shock/bellcrank angle has been established, my preference is to adjust the ride height with the pushrods.

Those needle bearings are the "dizzle" :)
Thank you so much, that is a question I had about adjusting ride height, I was aiming to keep the adjustment thread half way on the coilovers and then use the pushrods for final adjustment, Thank you very much for the tip .
 
well I noticed that the carpeting was getting worn out around sharp edges, so decided to extend the floor mats all the way to the seats . originally I only had a small floor mat next to the pedals. The openings are for the side cage mounting . The eagle claws will hold the mats in place nicely since I have full thickness insulation under the carpeting inside the footbox
 

Attachments

  • IMG_0292.jpeg
    IMG_0292.jpeg
    381 KB · Views: 79
  • IMG_0300.jpeg
    IMG_0300.jpeg
    416.7 KB · Views: 86
  • IMG_0299.jpeg
    IMG_0299.jpeg
    232.2 KB · Views: 74
  • IMG_0305.jpeg
    IMG_0305.jpeg
    289.6 KB · Views: 74
  • IMG_0302.jpeg
    IMG_0302.jpeg
    167.7 KB · Views: 75
The fuel sender calibration was a major PIA, adding fuel 1/2 gallon at a time, to create the calibration table . I used a converter to change the signal from 0-100 Ohms to volts so that the AIMS Strada unit can read it.

According to my calculations at about 14 1/2 gallons the fuel starts flowing into the filler hose elbow, which makes me nervous , considering all the moving pulleys and belts near the rubber elbow . I went up to 17 1/2 gallons . Curious to know how much you all fill your tank and what is your experience with the stock fuel sending unit that came with the kit .

So far, the fuel splashing when the tank is low makes the unit a bit crazy . Either way , happy to have fuel sensor working.
 

Attachments

  • IMG_0238.jpeg
    IMG_0238.jpeg
    210.5 KB · Views: 83
so after much going back and forth, and considering I have gold wheels, I settled with the John Player Special black with gold accents look, which also matches my interior carpeting and seat colors .

I will have to paint the gate for the shifter and shifter rod black . The center console center face will be gold color instead of black , probably leather, the wrap I had used did not hold up at all.

Blingy golden shift knob, hopefully I won't forget where reverse is LOL
 

Attachments

  • IMG_9889.PNG
    IMG_9889.PNG
    2.1 MB · Views: 93
  • IMG_0290.jpeg
    IMG_0290.jpeg
    340.7 KB · Views: 97
  • IMG_0298.jpeg
    IMG_0298.jpeg
    260.9 KB · Views: 95
So I drove over my neighbors house and dumped a bunch of coolant on his driveway . The rubber hoses that came with the flexible radiator hoses that I used failed miserably , replaced them all with silicone hoses . Had to re do all of them, , was a mess and a royal PIA , better on my neighborhood than on the road. Cant catch a break.
 

Attachments

  • IMG_0206.jpeg
    IMG_0206.jpeg
    319.9 KB · Views: 79
  • IMG_0205.jpeg
    IMG_0205.jpeg
    322.5 KB · Views: 87
I ordered the morimoto lambo style sequential corvette tail lights, trying to decide what to do with the reverse light
 

Attachments

  • IMG_0110.jpeg
    IMG_0110.jpeg
    219.5 KB · Views: 98
I forgot to mention that I did melt a shifter cable, but not because of poor insulation, I failed to secure it properly and it touched the bottom of the mid pipe . FYI the heat melted the triple insulation . Bottom line don't let the cables touch hot surfaces, even if insulated properly. Shifter cables now properly secured , the area where they are right next to the catalytic converter is holding up well . I did have to replace one shifter cable though. Not happy about that .
 

Attachments

  • IMG_9694.jpeg
    IMG_9694.jpeg
    303.1 KB · Views: 113
Well, I love my comfy seats, but my son Miguel , now 17 , has grown a lot and he has a long neck, will have to dust up the original fiber glass seats or get some Tilton ones, so he can fit . I figure ai can swap them occasionally, not a big deal.
 

Attachments

  • IMG_2396.jpeg
    IMG_2396.jpeg
    700 KB · Views: 108
Last edited:
Back
Top