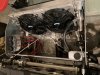
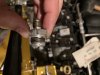
Radiator and a/c condenser fully installed, all hoses crimped and routed on the passenger side, finishing the routing inside the footbox , getting ready to expand the holes and permanently install the unit, need to relocate the surge and catch tank higher and the a/c and heater will be done . that took a ton longer than I anticipated . Thanks for all the feedback and help

You are using an out of date browser. It may not display this or other websites correctly.
You should upgrade or use an alternative browser.
You should upgrade or use an alternative browser.
Restarting my SLC project in West Texas
- Thread starter felizguy
- Start date
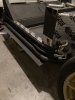
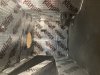
One reason for delays was that i decided to go crazy with kilmat everywhere , the thick stuff. prior to installing the a.c heater unit in the footbox. Easy to work with the the rubber is runny and messy when cut or drilled , hopefully it will be worth it, the lizard skin plus the mat should help a lot with heat and noise. Not sure what carpeting I will use eventually
Attachments
Thanks Joel . Not as nice as yours but I am just happy to make progress .Awesome news Hector, also nice progress on the SLC front.
Awesome progress Hector, looking good.
Slowly but surely . Thanks for your help KurtAwesome progress Hector, looking good.
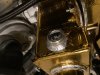
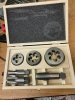
Now this was truly annoying, I bought the surge tank from some outfit in California because was a bit cheaper than summit, big mistake, the threads were not fully done and were different than stated . after I messed up the 1/8 fitting I thought it was me, then I had to change the 3/8 fitting and i noticed that the threads were also messed up. Harbor freight to the rescue,NPT set $15 with a nice wooden case. Sometimes (not often) Chinese crap does the job. rethreaded with the right NPT size and fitting threaded like butter. Only one out of 3 threads was good, glad to find out before I had a leak. More often than not you get what you pay for.
Attachments

Johan:
The steering rod mounting came like that from the factory, I have not made any changes just tightened everything to the right torque settings. I have not made any brackets that interfere or change the mounting of the steering rod. Let me know if you need a more detailed picture.
Thanks for looking and providing feedback, I really appreciate it.
Hector
Johan
Supporter
Ok. Maybe you have an upgraded upright, mine is 3 years old now. But I checked mine today and it’s mounted below the bracket.Johan:
The steering rod mounting came like that from the factory, I have not made any changes just tightened everything to the right torque settings. I have not made any brackets that interfere or change the mounting of the steering rod. Let me know if you need a more detailed picture.
Thanks for looking and providing feedback, I really appreciate it.
Hector
Can you show me a picture?Ok. Maybe you have an upgraded upright, mine is 3 years old now. But I checked mine today and it’s mounted below the bracket.
Johan
Supporter
So all the plumbing is 100% done, thank you all for your feedback and catching my mistakes with the tank and heater control valve placement . Thanks to Cam for the late night consultations and encouragement . It took much much longer than anticipated , but looking forward to moving on to the next thing. Electrical maybe?
Similar threads
- Replies
- 18
- Views
- 2K