Scotts build thread

Thanks for Pete posting up about that front panel express place. This may be my new heater plate! CCan't believe you can have this made for $81! Took awhile to do, but well worth it.


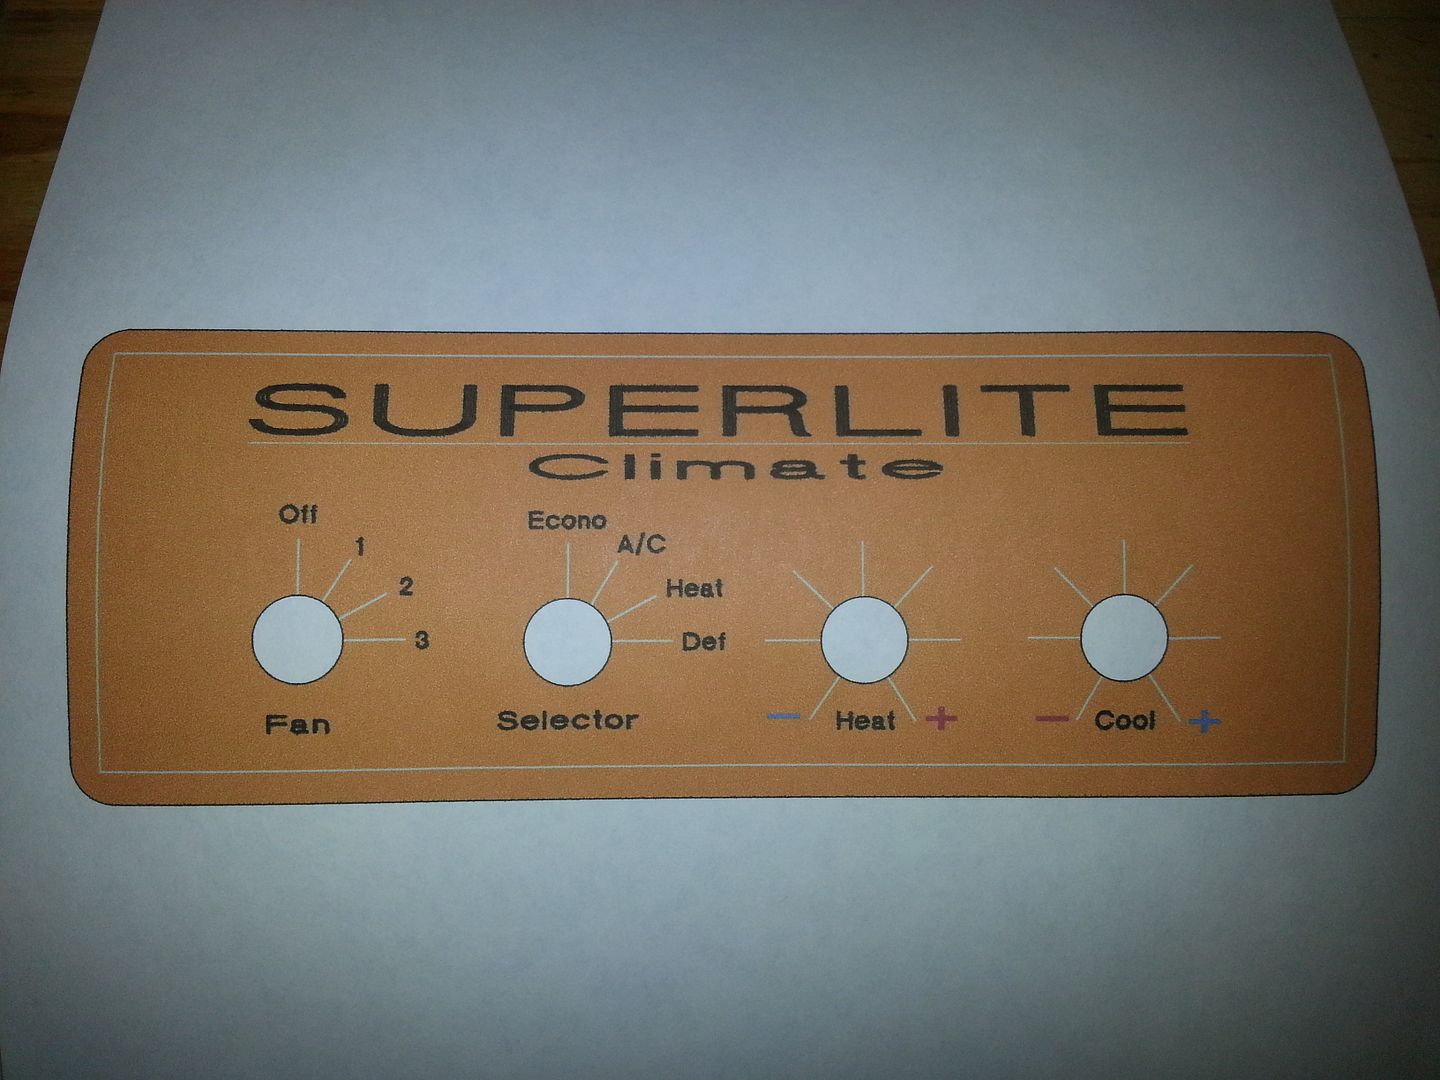
This is just a print out of it. Scale is 7.5"wX2.5"h. Background is gold anodized ( I will have quite a bit of gold anodized throughout car) and everything white is raw alum details. It is parts like this that really finish a car off well. Glad Pete posted it, it may have created a monster here! Everything getting labeled!
Need to call Vintage and make sure I really need 4 rotary switches and that my layout and functions are correct.
 

PeteB

GT40s Supporter
Need to call Vintage and make sure I really need 4 rotary switches and that my layout and functions are correct.

You don't need 4 rotary switches. You really only need the fan speed rotary, and on/off switch for the A/C, a heat control, and if you used a door for the defroster, then the control for that. The rotary switch you have labeled "selector" doesn't really do anything in any position except "A/C". The "cool" knob you really don't want to ever adjust unless your condenser is freezing up.
 
Ok, I will have to adjust it abit then. Their software was a little tough at first, but really it only takes about an hour to be pretty quick with it.
You can choose many different background colors, so if anyone likes the style, it is pretty easy for me to change and order more. With all the detail I have in it, It is only $81! Cheaper once I take a few things out.

On a side note, I have made cf emblems before and finished them with a couple coats of table top resin. It finishes as a very professional part. This piece and others I will be making will get a coat over the top to protect and round out all the edges. Makes it appear more like a high end production part, rather than some dude making stuff in his garage. Lol.
 
Very nice! So no more turbos?

Keeping the turbo's. I will be enclosing the itb's and putting a 1" thick clear acrylic top on it. :thumbsup: Plan is to make the water to air intercoolers part of the enclosure hanging off the sides. So I will need to cut one side off of the w/a intercoolers, and weld to the main enclosure. So it will all be enclosed.
In this arrangement, I will get way better efficiency on the intercoolers and keeping heat soak out of the whole manifold, it will only be about 28" from turbo outlet to the valve itself, and get rid of the side air to air intercoolers and basically have the outter portion of the sides to do whatever I want to. So, just over all, reducing footprint of the system as a whole, and increasing efficiency. Oh, and it should look cool. Lol.


The plans for my go kart chassis (will be painting entire bare chassis satin black) with everything installed is to have nothing but black, anodized gold (brass for the fittings), and polished s.s. and alum as far as colors. Same with interior. Maybe a red warning thing here and there to pop, but thats it.
So I will be anodizing all of the horns gold. exterior paint is going to be the PPG Harlequin blue to red color. Gold works with every color it changes and one color in it's spectrum is gold. It should work out pretty wild.
 
Last edited:
For the body, a little inspiration from the Toyota One on the front end.
For the rear, some inspiration from the Ligier J3 Nissan. Mostly side profile similarities in the rear.

Ligier-JSP31.jpg


Autolifers-Toyota-GT-One-2-of-42.jpg


And all done by spring 2016! Ya.........right.
 
Had some time today to do the radiator lines. Decided to do full s.s. down the sides. Welded up bends, ground smooth and will brush them when I do all the rest of my finishes. Ran out of just a bend or two, so not "complete", but close enough.
I also got rid of my sweated copper tubing and fittings for the heater. Decided that vibration may create a leak over time, so will be making new lines out of 5/8 alum that can be bent up. they will be continuous down the sides. Figured that the body will be soooooo hard to pull off to do any repairs in that area, I better make everything in there zero maintenance or chance of failure.
Will be wrapping engine coolant tubes with header wrap, and undecided about heater lines yet, whether foam insul or header wrap.


Just to add, the full pipe will have 4 silicone couplers with t-bolt clamps from engine to radiator to soak up chassis flex and general vibration. Should be bullet proof.
 
Little bit of repositioning turbos this weekend. Wanted to move them a few inches inboard, and a few inches higher. They were abit low for my taste, with the oil outlets being just right at engine oil level. Moving inboard also gained abit more room back.
Wastegates were all the way forward also, so I needed to move to have room for the coolant lines. Still unsure of intercooler placement, will need to figure with body on. Still need to grind off old bracket mounts and make new turbo bracing.


For those not familiar with Calyx manifold coating, this is what a simple tooth brush and Calyx can do for rusted cast iron. Lasts for a long time also.


And since I never get tired of seeing this......................................


Abit more work on the coolant and heater lines. Main radiator lines are nearly complete. I will have to redo the front s.s. sections though that go to the radiator. Previous ones built are not really up to show quality.
Chucked the copper lines and decided to do 5/8 alum fuel line with flare connections. Did not want to have any chance of leaks through the side section at all, so everything is solid. Rad lines will get wrapped in black header wrap, and heater lines will get wrapped in header wrap also. May be going electric ac unit in front, so this about wraps up the fab on the sides of the car under the body.


added little vent holes through side rockers. Should help keeping temps down by circulating air there.


Bundle of crap! Once all placements are done and extra wiring run, all wires will be in one complete "car" harness. Not this mess!
 
I should be able to do the compressor outlet to intercooler plumbing with mandrel bends, but compressor inlet I may have to weld on a cast 90. Need to plan air inlet in body to decide.
 
Got the final plan for the intercoolers. They tuck nice and neatly between frame and body. Just didn't have room to make them part of the intake manifold.
Will have to weld a 90 onto compressor outlet, but it should work. Will need to add filler caps to the highest points in the i/c as they are now the highest part of the system. For ease of plumbing, I am going to keep each side as a separate system with it's own pump and heat exchanger. As water exits the i/c, it will split off to the wastegate and the turbo cartridge, then come together for pump.
I still have room to run 14"X12" heat exchangers right under the i/c's. Will be making side body duct much larger.

 
Today has been a fun day of fab! Started working on the manifold finally. Also got the rear belly pans made and one installed.
Only a few hours into the manifold and this far already. I set aside a few weeks to build it, looks like I can have the bulk of it done by the weekend is over. Only one piece that I need to have machined for it, the mounting plate for the 1" thick acrylic top. Probably will have to get it decked also once welded on.
More pics as it progresses.


Need to go get longer bolts right now to bolt horns back on to continue the cut outs for the throats. Base should be done today.
 
Back
Top