
You are using an out of date browser. It may not display this or other websites correctly.
You should upgrade or use an alternative browser.
You should upgrade or use an alternative browser.
Scotts build thread
- Thread starter Scott R.
- Start date
Ken Roberts
Supporter
Those were the stock mirrors that came with the kit if not using the hippo mirrors. Lots of builders used different mirrors so I'll bet a used set could be had easily if you put out a request.
Here is the manufacturer. https://www.visionhotrod.com/vf4-mirror
Here is the manufacturer. https://www.visionhotrod.com/vf4-mirror
Last edited:
Howard Jones
Supporter
I really like those Indy's. I might just replace the ones I have now with them. I like the way they are adjusted. The mount is stationary and the mirror is moved inside the mount ……………….right?
Ken Roberts
Supporter
Yup.....the mirror pivots inside the housing.I really like those Indy's. I might just replace the ones I have now with them. I like the way they are adjusted. The mount is stationary and the mirror is moved inside the mount ……………….right?
Scott, how's work on this beast? I know you're busy with work etc,; but you mentioned selling bodies and having molds made, just curious if that's still in the plan. The body is the sexiest thing in existence by far.
Freedom!!!
After a long hiatus of not being able to post in my own build thread (or the rest of the site) that was originally in the SLC Clubhouse, I finally mentioned something to one of the general GT40 mods, and they were able to move it to this section and get away from the censorship by the person moderating the RCR section. Thanks to everyone that was previously following my build thread for the messages and yes, I am still kicking over here.
The car is abit further along since my last post and have been working on the more complex sub-assemblies of the car and final planning of parts placement to finalize fab. Will do a few big dumps of pics and info this week as I have time.
Attachments
Scott, how's work on this beast? I know you're busy with work etc,; but you mentioned selling bodies and having molds made, just curious if that's still in the plan. The body is the sexiest thing in existence by far.
At this point in my life, I really just plan to keep auto stuff as my relax hobby for myself. I started a new business 5 years ago, and have been doubling sales every year since with a pretty unlimited ceiling for growth. Cars for me are best as a hobby at this point.
Howard Jones
Supporter
Come on Scott, let's see the stuff under that bat suit!
Hey Howard! How are you doing? Ok, here is some recent pics.
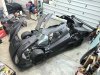
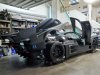
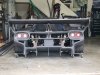
Had to ditch the beautiful headers that came on the car. Clearance was at about 1/16" off frame in many spots w/o the exhaust gaskets even in yet. Coatings or wrap will do almost nothing with zero clearance and no room for shields too. Since this is a street car, there will be scenarios when coming off the freeway, at greatest heat soak, and then hit city traffic at stop lights in possible 90+ ambient temps. Not chancing it, so made some thick stainless log style manifolds. Gained so much room back and was able to really shorten all of my hose/tubing lengths and position turbos exactly where they fit the best while saving weight doing it. I was also able to tuck a small resonator each side right at the back of the motor!! You can see the exhaust exits at this point, and will be building an X pipe directly at the merge. I am keeping the tips and body exit location a secret until car is near completion though. Lol. From the air horns intaking fresh air and then going through turbo, then water/air intercoolers, then to the air horns in the intake is 36"! From the exhaust valve, through the manifold and turbo, then the resonator, X pipe, and finally out the tip, is also 36". Very compact for the complexity and should be a great set up.
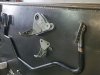
Had to make a small vacuum block out of stainless to sum all of the ITB signals into a solid vacuum signal for sensors etc, and mounted it on the heavily modded rear coolant crossover pipe. I will also be running the coolant through the Tial wastegates, but plumbing is super clean. All vacuum and water lines are ss tube and what you see in the pics here is nearly completed with all needed plumbing. Put the oil cooler on the rear subframe. Come to find out R8 coils fit the 1UZ perfectly and seal completely, so using those for my COP ignition and ditch the from distributors cleaning the motor up.
Got the heat exchangers/resevoirs for the intercoolers mounted now. Had to build custom fiberglass shrouds for the fans. These fans move a surprisingly huge amount of air for the size, so they will actually help cool and keep air circulating around engine (the fans point at motor for their exits) if stuck in traffic. I will have vent openings in the rear clam over the motor, so the hot air can exit simply by rising up, helped by the IC fans.
Did an adjustable rear sway bar. Funny story actually. I was looking at a 7/8" universal hollow bar kit and right before I pulled the $800 trigger, I remembered I had a 67 Camaro rear one that I bought 30 years ago sitting in the garage. It only saw a couple thousand miles of use, 30 years ago. Hanging on to this dam thing for 30 years, tried to sell it a couple times also and never sold it. Well, I find this thing in the garage and low and behold, it is 7/8". Hmmm, surely there is zero chance of it fitting, right? The more measurements I took, the more I was in disbelief! It got to the point that it atleast had to be tried in car. Snaked it in, and low and behold, you simply could not of designed a better bar to fit the chassis even if you were custom bending one yourself!!! The links are in a near perfect arc and linear with the coilovers, I was able to make it adjustable from 250#-650#, the mounts land right on the rear frame with simple custom made mounts, the direction of deflection is linear with the mount, it curves perfectly under the trans and still allows use of belly pan, and my total cost was about $80 in new mounts and some rod ends. Hahhaaa. I believe it is made by Addco still. Rear 7/8" 67 Camaro sway bar. If it has the bent ends like mine, it will work.
.jpg")


Had to ditch the beautiful headers that came on the car. Clearance was at about 1/16" off frame in many spots w/o the exhaust gaskets even in yet. Coatings or wrap will do almost nothing with zero clearance and no room for shields too. Since this is a street car, there will be scenarios when coming off the freeway, at greatest heat soak, and then hit city traffic at stop lights in possible 90+ ambient temps. Not chancing it, so made some thick stainless log style manifolds. Gained so much room back and was able to really shorten all of my hose/tubing lengths and position turbos exactly where they fit the best while saving weight doing it. I was also able to tuck a small resonator each side right at the back of the motor!! You can see the exhaust exits at this point, and will be building an X pipe directly at the merge. I am keeping the tips and body exit location a secret until car is near completion though. Lol. From the air horns intaking fresh air and then going through turbo, then water/air intercoolers, then to the air horns in the intake is 36"! From the exhaust valve, through the manifold and turbo, then the resonator, X pipe, and finally out the tip, is also 36". Very compact for the complexity and should be a great set up.
Had to make a small vacuum block out of stainless to sum all of the ITB signals into a solid vacuum signal for sensors etc, and mounted it on the heavily modded rear coolant crossover pipe. I will also be running the coolant through the Tial wastegates, but plumbing is super clean. All vacuum and water lines are ss tube and what you see in the pics here is nearly completed with all needed plumbing. Put the oil cooler on the rear subframe. Come to find out R8 coils fit the 1UZ perfectly and seal completely, so using those for my COP ignition and ditch the from distributors cleaning the motor up.
Got the heat exchangers/resevoirs for the intercoolers mounted now. Had to build custom fiberglass shrouds for the fans. These fans move a surprisingly huge amount of air for the size, so they will actually help cool and keep air circulating around engine (the fans point at motor for their exits) if stuck in traffic. I will have vent openings in the rear clam over the motor, so the hot air can exit simply by rising up, helped by the IC fans.
Did an adjustable rear sway bar. Funny story actually. I was looking at a 7/8" universal hollow bar kit and right before I pulled the $800 trigger, I remembered I had a 67 Camaro rear one that I bought 30 years ago sitting in the garage. It only saw a couple thousand miles of use, 30 years ago. Hanging on to this dam thing for 30 years, tried to sell it a couple times also and never sold it. Well, I find this thing in the garage and low and behold, it is 7/8". Hmmm, surely there is zero chance of it fitting, right? The more measurements I took, the more I was in disbelief! It got to the point that it atleast had to be tried in car. Snaked it in, and low and behold, you simply could not of designed a better bar to fit the chassis even if you were custom bending one yourself!!! The links are in a near perfect arc and linear with the coilovers, I was able to make it adjustable from 250#-650#, the mounts land right on the rear frame with simple custom made mounts, the direction of deflection is linear with the mount, it curves perfectly under the trans and still allows use of belly pan, and my total cost was about $80 in new mounts and some rod ends. Hahhaaa. I believe it is made by Addco still. Rear 7/8" 67 Camaro sway bar. If it has the bent ends like mine, it will work.
Few more pics. Sorry for the sideways ones, not sure why they are getting flipped.
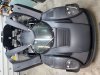
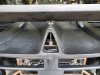
Some pics of the air box and how the rear clam closes to seal it. I will just run some sand socks over the horns for driving around town. Since the air intakes are a touch lower than the roof line, most all solid debris will shoot right over the intake anyways. The openings on each side of the intake will even out any other low/high pressure that may be happening in that area.


.jpg")
A few more of the rear sway bar


Added a Gurney flap to the wing. Since my wing was pretty old, it had sagged nearly 3/4" over time. I made multiple cuts in the bottom to straighten it and added a rod end adjuster to support the middle of the wing that goes down to the rear clam alum structure I made, similar to the front. The alum structure carries the wing load from sides of body and it lands on stops on the rear subframe I added. So yes, the entire wing load is fully transferred to the frame and no load on body itself. Door strikes have a thick ss brace to the frame and I added about 6 layers of cf to the front hinge area. I can slam these doors repeatedly and get no body contact or knocked out of alignment. Can also walk from one side of the wing to the other. Trying to get as close as possible to an oem type operation and reliability as possible without sacrificing much weight to do it.
Some pics of the air box and how the rear clam closes to seal it. I will just run some sand socks over the horns for driving around town. Since the air intakes are a touch lower than the roof line, most all solid debris will shoot right over the intake anyways. The openings on each side of the intake will even out any other low/high pressure that may be happening in that area.
A few more of the rear sway bar
Added a Gurney flap to the wing. Since my wing was pretty old, it had sagged nearly 3/4" over time. I made multiple cuts in the bottom to straighten it and added a rod end adjuster to support the middle of the wing that goes down to the rear clam alum structure I made, similar to the front. The alum structure carries the wing load from sides of body and it lands on stops on the rear subframe I added. So yes, the entire wing load is fully transferred to the frame and no load on body itself. Door strikes have a thick ss brace to the frame and I added about 6 layers of cf to the front hinge area. I can slam these doors repeatedly and get no body contact or knocked out of alignment. Can also walk from one side of the wing to the other. Trying to get as close as possible to an oem type operation and reliability as possible without sacrificing much weight to do it.
Attachments
Thanks Mesa. Ya, one day I could no longer post. It sure isn't going to take Elon Musk to find out who the censorship warden was. Hahaha. I chatted with one of the mods on the FB group and told them the situation and they had no problem reinstating my account outside of the RCR section.Looking good Scott, nice to see you out of forum limbo and posting again!
I heard from "Dr. David" that you two met at a show? Great guy! Post a few pics of your car here. I saw a pic online and posted to the fb group to see whos it was and was told it was yours. Looks awesome man!!
")
Very cool! So you made a front hood? Love the wheels, where did you find those?
Few more pics. Sorry for the sideways ones, not sure why they are getting flipped.
Some pics of the air box and how the rear clam closes to seal it. I will just run some sand socks over the horns for driving around town. Since the air intakes are a touch lower than the roof line, most all solid debris will shoot right over the intake anyways. The openings on each side of the intake will even out any other low/high pressure that may be happening in that area. View attachment 126984
View attachment 126981
View attachment 126983
A few more of the rear sway bar
View attachment 126985View attachment 126986View attachment 126987
Added a Gurney flap to the wing. Since my wing was pretty old, it had sagged nearly 3/4" over time. I made multiple cuts in the bottom to straighten it and added a rod end adjuster to support the middle of the wing that goes down to the rear clam alum structure I made, similar to the front. The alum structure carries the wing load from sides of body and it lands on stops on the rear subframe I added. So yes, the entire wing load is fully transferred to the frame and no load on body itself. Door strikes have a thick ss brace to the frame and I added about 6 layers of cf to the front hinge area. I can slam these doors repeatedly and get no body contact or knocked out of alignment. Can also walk from one side of the wing to the other. Trying to get as close as possible to an oem type operation and reliability as possible without sacrificing much weight to do it.
What is a "sand sock"?
Similar threads
- Replies
- 3
- Views
- 355
- Replies
- 14
- Views
- 1K