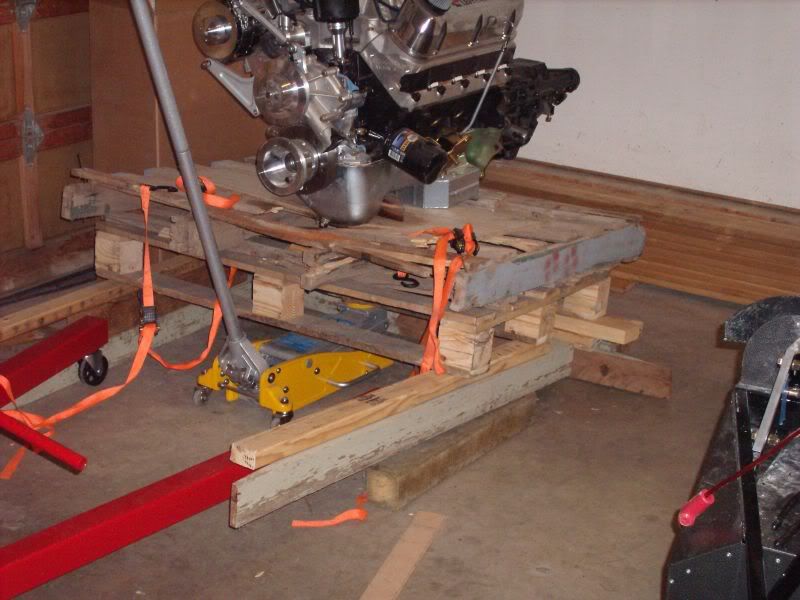
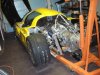
Whoops forthe recor, i was off on the 10x40mm allen head bolts to fasten the adapter plate. they took 100+ ft/lbs of tourque to bury the heads. seemed like too much torque for a 10mm bolt. the 35mm bolts fit in there better. Oh and the fancy engine stand, that's the pallet the crate motor came on. Who says you can't do this on a budget?

- Forums
- GT40 Replica Manufacturers' Corner
- RCR Forum - RCR40/SLC/917/Superlite Aero
- The SLC Clubhouse
You are using an out of date browser. It may not display this or other websites correctly.
You should upgrade or use an alternative browser.
You should upgrade or use an alternative browser.
SLC 36 Cam's Build
- Thread starter Cam MacIsaac
- Start date
Whoops forthe recor, i was off on the 10x40mm allen head bolts to fasten the adapter plate. they took 100+ ft/lbs of tourque to bury the heads. seemed like too much torque for a 10mm bolt. the 35mm bolts fit in there better. Oh and the fancy engine stand, that's the pallet the crate motor came on. Who says you can't do this on a budget?
Comment in pic
Last edited:
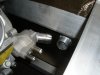
Befroe mounting the engine I tapped a 1/8 npt thread for a plug to relocate the oil pressure sensor. other wise you can't flip the induction. I tied a piece small piece of cloth to a 2 inch string and shoved it into the block then tapped. this stopped any Al shavings from getting into the block. after tapping you can vacuum up the string and voila, a clean tap. OK it is sort of like an engine tampon. I think this is better than taping a the cap into the valley cover. thataway you don't need to worry about that gasket leaking. I'll probably epoxy that shut for double insurance.
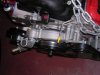
I alos cut of the water pump outlet at the 1st bead to make room at the firewall. this will end up being insufficent to mount a 1.5" hose. more on that later
I alos cut of the water pump outlet at the 1st bead to make room at the firewall. this will end up being insufficent to mount a 1.5" hose. more on that later
Ok, 100 was a guess. It took too much force so i threw out those bolts and got shorter. Sure would be nice if this were doucment somewhere, ehh?Comment in pic
I am not concerned about the bolts, more about that alloy block & its threads ability to not be stressed beyond limits in your attempt to tighten the longer bolts which I assume were bottoming out in the holes, reminds me of a guy who rang asking for some 302w ford head bolts one afternoon because he had snapped several while torqueing the heads down , seemed strange to me as I had never encountered the problem..... but this clever fellow was using specs from a 302 cleveland, 110 ft lbs vs the 65/70 the 302w reqd. That was not the end of the story either, shortly after it was discovered that the block had a couple of cracked head stud boss's..... something that Im concerned could cause you problems in the future. Im sure the GM factory shop manual would have torque specs for bell housing bolts, which are essentially what you are/were tightening.
Whoops forthe recor, i was off on the 10x40mm allen head bolts to fasten the adapter plate. they took 100+ ft/lbs of tourque to bury the heads. seemed like too much torque for a 10mm bolt. the 35mm bolts fit in there better. Oh and the fancy engine stand, that's the pallet the crate motor came on. Who says you can't do this on a budget?
uhhhhh, isn't max. recommended torque for 10mm ~40-45ft-lbs? 100ft-lbs and you'd have many problems I'd imagine :stunned:
Btw, I bet I've got everybody beat for jury-rigged engine stands/crate motors

Nice, the triple pallet stack, i shoulda thought of that. keeps you from hunching over all the time.
A 10.9 10mm bolts are spec-ed at 50 ft/lbs with the blue stuff. When my torque wrench clicked and the heads were'nt buried i knew somehting was wrong. I just estimated 100+ lbs, then went to Denton bolt for some new ones. I just wanted to document it for the next guy, so he doesn't have to take muultiple trips to the fastener shop. That adapter plate is going nowhere. The 16mm dowel pins are capturing the brunt of the torque.
Oh i did forget a photo of the heat reflective lava mat. Pretty cool stuff. Has that carbon fiber look.
Attachments
EFN, it worked best if it was pre cut and 2 people stretch it and hope you drop it right on. The 36" x 48 will do the fire wall and fuel tank plus arounf 10" x48" left over
HSP770003 - Lava Mat Lava Mat Heavy duty; 36" x 48" Uncoated With Adhesive - Withstands 1200 Degree Heat Direct - HSP770003
HSP770003 - Lava Mat Lava Mat Heavy duty; 36" x 48" Uncoated With Adhesive - Withstands 1200 Degree Heat Direct - HSP770003
Looked like a smooth landing but the Al motor mounts welded to the frame were around 1/4" too wide. I took a die grinder and cut in 1/4" rather than just wallering out the hole with a larger drill bit. Also my thermostat housing met up nicely with my fuel filler. If i swap my thermostat 180 deg, i beleive it will collide with my belts. Anyone have an LS that's had success with that? Summit carries several 360 swivels, or I'm considering having it re-welded stright down.
CSR Performance 912R - CSR Swivel Thermostat Housings - Overview - SummitRacing.com
CSR Performance 912R - CSR Swivel Thermostat Housings - Overview - SummitRacing.com
Attachments
Also, i cut 1.25" off the water pump inlet so it wouldn't hit the firewall. Waste of time. there was only 1 1/4" to turn a 1 1/4" hose, not gonna happen. Thanks to Jack M for the idea of welding the inlet straight up. This is actually his pic but mine was welded the same. On to the fuel supply....
Attachments
Trying to plan my coolant system and don't have the luxury/cash to solid weld. It seems you've got to be ordering parts 3 weeks ahead of time or you end up sitting and staring at the car. Which is not so bad, but i'd rather be building. it's very addicitve. Fran, how's my A/C bracket coming?
I've ordered seven 90 and five 45 deg. red silicone coulpings. Thanks for the recommendations guys, i found the best 3 ply at:
Results for 45 Degree Silicone Elbows:Red:3 Ply
I need 7 lengths of beaded 1.5" Al/SS tubing in addition to the 6 that fran sent and having a hard time finding it off the shelf. Has anyone used this Earls bead roller? pic attached
Earl's Performance 014ERL - Earl's Performance EZ Tubing Beaders - Overview - SummitRacing.com
It says it will roll up to 1/16" Al, is this wall thick enough? Help!
Attachments
I don't use all the convoluted stuff you have, but I cut up one of my long 1.5 inch cooling tubes and used it to make several short sections. I had my local aluminum welder lay a bead down on the end of the tubes to make a seat for the hoses. It's not been tested in battle yet though.
J., good point I had a bead welded on the water pump. On 7 tubes, that's 14 tig welds. I might get that done for around the cost of the tool. But then again, it is nice to have some cool tools!
I had to add a pic of Frying the turkey with the SLC in the background. And i didn't even burn down the house!
I had to add a pic of Frying the turkey with the SLC in the background. And i didn't even burn down the house!
Attachments

Fran, I thought this was supposed to be a transverse mount. Guess i better torch off the motor mounts?:laugh:
What's that hose dangling on the left side of the transaxle for?
Cam, you could use the swing arm float style and simply bend the wire arm to suit placing the unit in the tank passenger side.
Jack, I like that idea of putting it under the passeger, then i set them on fire first! Kidding. Would something like this VDO work?
VDO Gauges 226008 - VDO Fuel Tank Senders - Overview - SummitRacing.com
Is there enough room? It reads out 0-90 Ohms resistance. I guess i calibrate the Digidash?