Steve’s Active Power GEN II Coyote GT40

Hi Everyone,

Let me start at the beginning.

This all got started when I decided to build a car.

I’ve restored a bunch of cars over my life and I didn’t want to get into a rustbucket, I wanted start another project from scratch. So I started researching the internet and I found “kit cars”.

I started looking at Kelmark Ferraris and I started to like the Fiberfabs, but they didn’t look right. I have loved GT 40s since I was a kid but I knew the prices and I knew that I would never own one. But researching kit cars I stumbled upon the GT40 replicas but again, I thought I could never afford to build one.

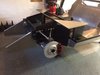
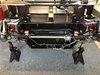
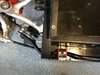
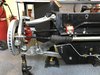
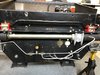
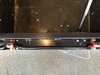
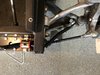
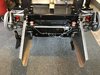
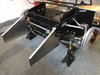
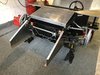
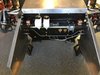
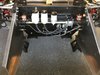
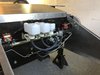
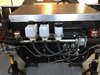
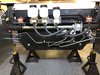
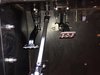
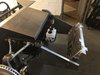
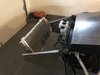
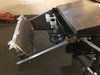
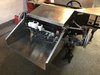
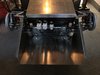
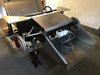
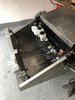
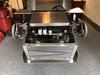
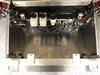
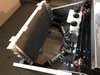
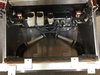
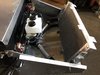
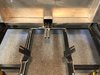
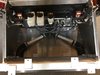
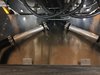
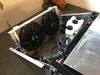
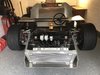
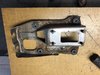
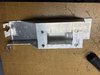
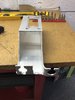
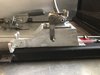
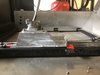
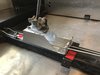
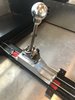
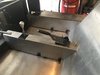
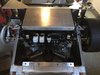
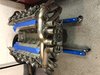
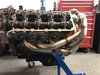
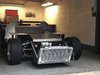
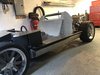
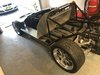
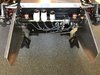
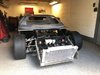
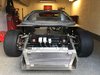
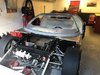
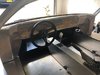
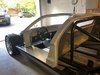
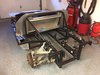
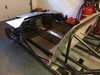
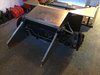
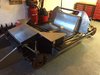
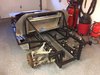
I was searching eBay and craigslist and low and behold, I found a used Active Power Cars GT 40 chassis. It was a bare chassis with just the gas tanks, it was great price was only about 220 miles away so I bought it!

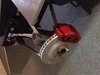
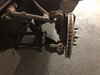
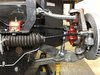
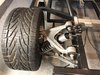
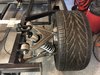
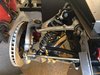
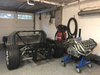
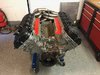
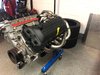
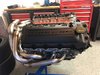
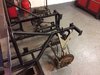
This chassis was designed for a Ford Coyote engine and a C-5 Corvette suspension. Not too far from the chassis I found a used C-5 Corvette suspension.

So I rented a truck headed down south and I picked up the chassis and the C5 suspension.

This is my FIRST complete car build so I’m a beginner. Please be patient with me.

Here are the pictures from that day.
 

Attachments

  • 9144A748-8459-4EAC-B732-96B999728009.jpeg
    9144A748-8459-4EAC-B732-96B999728009.jpeg
    396.2 KB · Views: 669
  • 82430699-8D32-49C1-9581-6924FF1E1A77.jpeg
    82430699-8D32-49C1-9581-6924FF1E1A77.jpeg
    456.8 KB · Views: 662
  • B3EDAC17-FADF-4F50-9B63-E76617F7FD7E.jpeg
    B3EDAC17-FADF-4F50-9B63-E76617F7FD7E.jpeg
    430.4 KB · Views: 572
  • C9C3E4DC-F57E-49A5-BFAA-0FBC0AE0847F.jpeg
    C9C3E4DC-F57E-49A5-BFAA-0FBC0AE0847F.jpeg
    395.4 KB · Views: 581
  • EABD3C5B-F538-4E37-B473-F937722E8815.jpeg
    EABD3C5B-F538-4E37-B473-F937722E8815.jpeg
    426.3 KB · Views: 527
  • A0B9B4DF-399D-45F8-9A8E-130040D92572.jpeg
    A0B9B4DF-399D-45F8-9A8E-130040D92572.jpeg
    115.2 KB · Views: 583
  • 7969AC8B-35D2-458C-B222-70AE8D0F0C4E.jpeg
    7969AC8B-35D2-458C-B222-70AE8D0F0C4E.jpeg
    133 KB · Views: 538
  • 0D0EBE95-407B-4148-B28C-8C8C9AC9EAB4.jpeg
    0D0EBE95-407B-4148-B28C-8C8C9AC9EAB4.jpeg
    129.8 KB · Views: 587
  • D13CAB9A-7248-463B-9730-158E6960351D.jpeg
    D13CAB9A-7248-463B-9730-158E6960351D.jpeg
    121.3 KB · Views: 547
Last edited:
The first job was to clean up the suspension, paint the calipers and add new disks.
 

Attachments

  • C18047A4-E9AB-45B9-AADF-318950EBDDF6.jpeg
    C18047A4-E9AB-45B9-AADF-318950EBDDF6.jpeg
    196 KB · Views: 495
  • 667A1E9E-DD0A-4F46-B941-CB92336471AE.jpeg
    667A1E9E-DD0A-4F46-B941-CB92336471AE.jpeg
    385.1 KB · Views: 560
  • FA335125-ED02-4842-A0D3-F2BEC0FD8576.jpeg
    FA335125-ED02-4842-A0D3-F2BEC0FD8576.jpeg
    460.4 KB · Views: 545
  • 05FB1E79-F2BB-40C6-86F7-C44A64205FF5.jpeg
    05FB1E79-F2BB-40C6-86F7-C44A64205FF5.jpeg
    441 KB · Views: 530
  • ECB60A2C-EA64-4CDD-86B8-779516432C5B.jpeg
    ECB60A2C-EA64-4CDD-86B8-779516432C5B.jpeg
    352.2 KB · Views: 549
Next was adding the steering rack and the front sway bar.

The sway bar was trial and error. I thought I could mount it horizontally but it needed to be mounted vertically because it wouldn’t have worked properly (what this means is the hump on the bar couldn’t be mounted to the firewall, it had to be mounted to the flat part where the rack is mounted. You’ll see the original holes where it was mounted).

Below is the final installation with the steering rack. Unfortunately the steering rack that I bought was wrong and after I got the entire suspension mounted (rack, sway bar, steering links and brake master cylinders) I had to rip it all apart and do it all over.

You can see that it’s really tight in there. Was a pain in the ass.

But that’s what I signed up for!
 

Attachments

  • 5969D7D8-4C41-42AA-8267-92D6BCB3A3F8.jpeg
    5969D7D8-4C41-42AA-8267-92D6BCB3A3F8.jpeg
    557 KB · Views: 523
  • B6641153-C622-4F54-A4B6-534997CB6B60.jpeg
    B6641153-C622-4F54-A4B6-534997CB6B60.jpeg
    432.9 KB · Views: 502
  • 719137DD-8940-4B0F-8C16-DC60EC9323EA.jpeg
    719137DD-8940-4B0F-8C16-DC60EC9323EA.jpeg
    469.8 KB · Views: 519
  • CBB7537A-EBF0-4A48-9C99-0706926D01FE.jpeg
    CBB7537A-EBF0-4A48-9C99-0706926D01FE.jpeg
    452.8 KB · Views: 506
  • 99256DEE-5FE7-47C6-9E03-E157FF93012C.jpeg
    99256DEE-5FE7-47C6-9E03-E157FF93012C.jpeg
    441.9 KB · Views: 508
  • 135653C9-0F91-4048-A401-0CED1F3B789A.jpeg
    135653C9-0F91-4048-A401-0CED1F3B789A.jpeg
    467.1 KB · Views: 468
  • CA3A1387-0F7F-46C9-B87B-ED883D077EE9.jpeg
    CA3A1387-0F7F-46C9-B87B-ED883D077EE9.jpeg
    406.8 KB · Views: 507
  • 10D81855-B620-4583-A59E-5ACB895A32C0.jpeg
    10D81855-B620-4583-A59E-5ACB895A32C0.jpeg
    613.6 KB · Views: 496
  • 3C41EB38-5CAA-45D1-A9A7-7167AB5CB162.jpeg
    3C41EB38-5CAA-45D1-A9A7-7167AB5CB162.jpeg
    535.8 KB · Views: 431
  • 38A9AEEA-CDFA-4B89-92CE-D2E8B33E0302.jpeg
    38A9AEEA-CDFA-4B89-92CE-D2E8B33E0302.jpeg
    605.9 KB · Views: 427
Last edited:
Next was making a bracket for the fluid reservoir’s and installing the master cylinders and clutch master cylinder.

I bought all new Wilwood master cylinders and pedals, the chassis was designed for these so they’re pretty much plug-and-play.
 

Attachments

  • D15E0621-847C-407B-8838-6EB4DF80009B.jpeg
    D15E0621-847C-407B-8838-6EB4DF80009B.jpeg
    455.3 KB · Views: 470
  • 89D92D42-3EEB-4AEA-9A59-537B989EFBFA.jpeg
    89D92D42-3EEB-4AEA-9A59-537B989EFBFA.jpeg
    470.3 KB · Views: 476
  • 6228BB33-9C57-4214-84D7-3F3799C9FAA6.jpeg
    6228BB33-9C57-4214-84D7-3F3799C9FAA6.jpeg
    360.4 KB · Views: 479
  • A348CAF1-6589-4AFD-BB93-734D4D29B88F.jpeg
    A348CAF1-6589-4AFD-BB93-734D4D29B88F.jpeg
    394.9 KB · Views: 463
  • A5571F49-C5AC-435E-B32E-B0E3B7BDCA0A.jpeg
    A5571F49-C5AC-435E-B32E-B0E3B7BDCA0A.jpeg
    438.5 KB · Views: 465
  • D3825E2A-85C7-4AB4-B556-BB3C042D7B45.jpeg
    D3825E2A-85C7-4AB4-B556-BB3C042D7B45.jpeg
    294.5 KB · Views: 476
Last edited:
Next was to move onto the cooling system. I did a lot of research and a lot of measuring and I found a radiator from OPL that was the right size had the right connections and I bought it.

After installing the radiator I thought that it might make sense to add a bottom plate to the cooling area.

The chassis wasn’t designed for this plate, but I believe it made the whole front section stronger.
 

Attachments

  • 68CED000-D244-4324-8DBA-9A935CCD8E0C.jpeg
    68CED000-D244-4324-8DBA-9A935CCD8E0C.jpeg
    363.6 KB · Views: 419
  • C5FD8D3F-9820-4933-BFB1-34A2E94272A1.jpeg
    C5FD8D3F-9820-4933-BFB1-34A2E94272A1.jpeg
    327.7 KB · Views: 411
  • 4CE2B6C1-C53D-4A9C-AEAC-2B0652CC9F99.jpeg
    4CE2B6C1-C53D-4A9C-AEAC-2B0652CC9F99.jpeg
    365.9 KB · Views: 399
  • 8042BAB9-AAD1-41E1-9180-DF2CBA31D889.jpeg
    8042BAB9-AAD1-41E1-9180-DF2CBA31D889.jpeg
    413.4 KB · Views: 404
  • AE844FA0-0F80-408F-A219-E4BCEFDB8C5B.jpeg
    AE844FA0-0F80-408F-A219-E4BCEFDB8C5B.jpeg
    370.4 KB · Views: 396
  • 2CF7EA6E-9E4C-499A-ACD2-C7FDF6FE1179.jpeg
    2CF7EA6E-9E4C-499A-ACD2-C7FDF6FE1179.jpeg
    440.8 KB · Views: 408
  • 28FC7A54-F8BD-4139-A4FB-8D810AFA739A.jpeg
    28FC7A54-F8BD-4139-A4FB-8D810AFA739A.jpeg
    284.5 KB · Views: 426
  • 819EB268-C9DF-4005-AAD6-F347FE19BCE8.jpeg
    819EB268-C9DF-4005-AAD6-F347FE19BCE8.jpeg
    572.6 KB · Views: 415
  • A59F599A-6BBC-41D4-802E-9E02167C687E.jpeg
    A59F599A-6BBC-41D4-802E-9E02167C687E.jpeg
    352.9 KB · Views: 402
The next part of the cooling system was to buy some aluminum tubes and rubber elbows to complete the front cooling section. I also added some radiator fans. I made the bracket for the fans from aluminum angle stock.
 

Attachments

  • FB1E9B8B-CED4-4BBC-9DAB-49FFD312FCEC.jpeg
    FB1E9B8B-CED4-4BBC-9DAB-49FFD312FCEC.jpeg
    432.4 KB · Views: 445
  • 561C1471-5839-4F70-A747-2B3F3CA88DCB.jpeg
    561C1471-5839-4F70-A747-2B3F3CA88DCB.jpeg
    352.9 KB · Views: 436
  • 008AECB2-308D-4ABA-B382-BEB0636413A3.jpeg
    008AECB2-308D-4ABA-B382-BEB0636413A3.jpeg
    403.5 KB · Views: 429
  • ADBA081B-A742-47EC-BC80-D6EF384E5002.jpeg
    ADBA081B-A742-47EC-BC80-D6EF384E5002.jpeg
    406.1 KB · Views: 413
  • 8AAD6314-5BB8-4ADD-8655-FC958E3A8AAD.jpeg
    8AAD6314-5BB8-4ADD-8655-FC958E3A8AAD.jpeg
    447.3 KB · Views: 383
  • 7C41D32D-B214-4F95-9521-A047D6C26C5B.jpeg
    7C41D32D-B214-4F95-9521-A047D6C26C5B.jpeg
    85.1 KB · Views: 437
  • AB7AFB61-5C88-437C-A990-33A4621B9484.jpeg
    AB7AFB61-5C88-437C-A990-33A4621B9484.jpeg
    85.9 KB · Views: 366
  • C770CCB9-F2C6-41F5-A3F1-ECCA04512A4E.jpeg
    C770CCB9-F2C6-41F5-A3F1-ECCA04512A4E.jpeg
    364.1 KB · Views: 412
  • E4A78C68-A9CC-467E-A2AA-D2C50870C3D8.jpeg
    E4A78C68-A9CC-467E-A2AA-D2C50870C3D8.jpeg
    232.9 KB · Views: 364
  • 379A0D4D-8D18-4054-A7C7-21798732AC58.jpeg
    379A0D4D-8D18-4054-A7C7-21798732AC58.jpeg
    435.3 KB · Views: 463
Last edited:
With the front end complete minus the shocks (I had to save my money for those), I moved on to the shift mechanism.

Researching on this site, I bought a Toyota shifter and made the mount to raise it off of the deck with a piece of extruded square aluminum.

It’s not fancy, but I made it myself!
 

Attachments

  • 37633937-0BF7-4285-BEBA-17FDCCE5FBA6.jpeg
    37633937-0BF7-4285-BEBA-17FDCCE5FBA6.jpeg
    562.2 KB · Views: 454
  • D0F14EE0-CFF0-4FC1-93E0-CEC8286FAA84.jpeg
    D0F14EE0-CFF0-4FC1-93E0-CEC8286FAA84.jpeg
    467.4 KB · Views: 428
  • 404B4B60-46E4-451A-94CE-32A0C6324019.jpeg
    404B4B60-46E4-451A-94CE-32A0C6324019.jpeg
    220.7 KB · Views: 434
  • 9867E6CC-E296-460D-8DA2-8E41F2AE49C8.jpeg
    9867E6CC-E296-460D-8DA2-8E41F2AE49C8.jpeg
    263.8 KB · Views: 445
  • 52AEECA1-5EF0-45CE-8462-5DEA4928D88D.jpeg
    52AEECA1-5EF0-45CE-8462-5DEA4928D88D.jpeg
    305.6 KB · Views: 443
  • BB2AD295-758F-4582-B75E-F57EF179575D.jpeg
    BB2AD295-758F-4582-B75E-F57EF179575D.jpeg
    337.4 KB · Views: 434
  • 38E37250-B667-411B-B59F-1CE11D5E6018.jpeg
    38E37250-B667-411B-B59F-1CE11D5E6018.jpeg
    323.1 KB · Views: 464
  • 4A469CA1-CB49-4B0F-8FB8-7F72C3FA8366.jpeg
    4A469CA1-CB49-4B0F-8FB8-7F72C3FA8366.jpeg
    195.8 KB · Views: 460
  • 1671A1F3-C925-46F7-B81F-6B730C658DE0.jpeg
    1671A1F3-C925-46F7-B81F-6B730C658DE0.jpeg
    285.2 KB · Views: 442
The shocks came and I installed them this morning. I’m going to take it off of the jack stands as soon as I get the motor on an engine stand because it’s in the way.

But I have a rolling chassis!

9 months and I’m actually further along than I thought I’d be at this point!
 

Attachments

  • C3CC183A-63AC-4E86-A0B2-7ED0DC477495.jpeg
    C3CC183A-63AC-4E86-A0B2-7ED0DC477495.jpeg
    344.1 KB · Views: 444
  • 097EF3E3-6FE7-4186-B22D-A142076BE967.jpeg
    097EF3E3-6FE7-4186-B22D-A142076BE967.jpeg
    383.8 KB · Views: 464
  • B0015110-901E-4A05-A077-67FB7F7F09CE.jpeg
    B0015110-901E-4A05-A077-67FB7F7F09CE.jpeg
    510.5 KB · Views: 466
  • E5B2E35E-D1AB-4368-86CF-F2A629450F76.jpeg
    E5B2E35E-D1AB-4368-86CF-F2A629450F76.jpeg
    485.9 KB · Views: 485
  • 25F486A5-9EBC-495F-9E2B-B499F2097D6F.jpeg
    25F486A5-9EBC-495F-9E2B-B499F2097D6F.jpeg
    423.8 KB · Views: 511
This is real now!!!
 

Attachments

  • F13EF9A3-7CC8-4991-89A3-F8B4F8F56B11.jpeg
    F13EF9A3-7CC8-4991-89A3-F8B4F8F56B11.jpeg
    472.7 KB · Views: 500
  • C111E903-FAC0-46C3-952C-499E1C621CA3.jpeg
    C111E903-FAC0-46C3-952C-499E1C621CA3.jpeg
    491.4 KB · Views: 535
  • 81FCA518-2C4C-43D3-A0B9-174AA27C3DDD.jpeg
    81FCA518-2C4C-43D3-A0B9-174AA27C3DDD.jpeg
    408.5 KB · Views: 534
Got her off the jack stands for the first time ever. I now have a working rolling chassis.
 

Attachments

  • A3636F1E-0443-4B5E-AA8A-815BA8D7899E.jpeg
    A3636F1E-0443-4B5E-AA8A-815BA8D7899E.jpeg
    331.5 KB · Views: 477
  • 21BF72EA-0CDB-4511-9CDC-A8CD10E5EA87.jpeg
    21BF72EA-0CDB-4511-9CDC-A8CD10E5EA87.jpeg
    422.1 KB · Views: 534
  • BBDBAACE-1233-4161-8504-B1D24B8A8097.jpeg
    BBDBAACE-1233-4161-8504-B1D24B8A8097.jpeg
    487 KB · Views: 544
  • F8619018-6547-47D7-8951-8F13B1E3D880.jpeg
    F8619018-6547-47D7-8951-8F13B1E3D880.jpeg
    484.6 KB · Views: 527
Steve, I like what you did adding the front bottom plate giving it better support and strength. How did you attach it to the existing two supports. Thanks
 
Steve, I like what you did adding the front bottom plate giving it better support and strength. How did you attach it to the existing two supports. Thanks

Thanks George. The original side plates had about a half inch bend at the bottom. I just got a piece of stock aluminum and riveted it.

You can see the bend in the picture below.
 

Attachments

  • 64CDA433-A182-493F-B1FE-3D81723217DB.jpeg
    64CDA433-A182-493F-B1FE-3D81723217DB.jpeg
    542.3 KB · Views: 541
I thought it was real when I got my engine and I put the chassis on the ground for the first time.

But I was mistaken...

Nothing makes it real until to add your first body section!!!
 

Attachments

  • D7F96668-F04D-4D9C-88E1-CBF31956D58F.jpeg
    D7F96668-F04D-4D9C-88E1-CBF31956D58F.jpeg
    105.1 KB · Views: 515
  • A91E029E-EC12-41C0-B777-4819CC783BA0.jpeg
    A91E029E-EC12-41C0-B777-4819CC783BA0.jpeg
    103.9 KB · Views: 484
  • E87B9D3F-6685-45AF-8466-81018C1749C1.jpeg
    E87B9D3F-6685-45AF-8466-81018C1749C1.jpeg
    107.1 KB · Views: 480
  • 15856B7B-E50F-4139-88AC-95273C541E1E.jpeg
    15856B7B-E50F-4139-88AC-95273C541E1E.jpeg
    71.4 KB · Views: 506
  • 9F8DBDB0-A1CC-4ECE-A9A2-D8A67FAD23A0.jpeg
    9F8DBDB0-A1CC-4ECE-A9A2-D8A67FAD23A0.jpeg
    97.3 KB · Views: 475
  • 60ADBB58-57B7-407F-94D7-CE65F8EC0C76.jpeg
    60ADBB58-57B7-407F-94D7-CE65F8EC0C76.jpeg
    115 KB · Views: 492
  • B0A89EDA-5779-4707-808F-87CF002FDE1B.jpeg
    B0A89EDA-5779-4707-808F-87CF002FDE1B.jpeg
    141.4 KB · Views: 534
  • BB24FAA0-A3B0-4068-8DDC-7FE2F7D9B223.jpeg
    BB24FAA0-A3B0-4068-8DDC-7FE2F7D9B223.jpeg
    106.4 KB · Views: 513
  • 54254293-43C7-4A91-8CAD-938526402C96.jpeg
    54254293-43C7-4A91-8CAD-938526402C96.jpeg
    103.3 KB · Views: 484
Hi guys, I’m also working on an Active Power. It was delivered on the 5th and just finished installing all new bushings and ball joints. The New brakes and rotors should be arriving this week and installed on the weekend. Steve you are doing a great job and thanks for your pictures. I use them as a guide for my build.
 
Hi guys, I’m also working on an Active Power. It was delivered on the 5th and just finished installing all new bushings and ball joints. The New brakes and rotors should be arriving this week and installed on the weekend. Steve you are doing a great job and thanks for your pictures. I use them as a guide for my build.
Haha, thanks George, but this is my first build from scratch. Not sure anyone should use my pictures as a guide!
 
Back
Top