
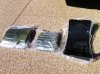
Just received my shields (Thank you Fran) and looking for some pictures (installed) and advice. The picture below shows (left to right), the front forward shield (covers back of headlights), the convoluted shield (that goes in front of the rear tire), and the larger shield that goes exactly where. It appears to have a molded area for a cut-out and I assume that's for the rear tail lamps. I have the pieces at the office and not here with the car, but I'm not visualizing exactly the mount location - specifically looking at the angled end tabs.
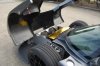
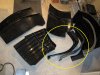
The convoluted splash gets cut on the ridges to allow air flow? Is that correct.
Lastly -- looking for bonding suggestions. Allan quickly shot me a note about 3M 08115 - pretty pricey, and the application gun that is sold separately (two rod plunger) appears to cost more than the bonding material. And if this is stuff to use - then it is what it is.
Open to all advice and suggestions --- I only want to do this once and correctly.
Thanks - Mike


![001[1].jpg](/data/attachments/51/51572-240a38bd8d1882e93529f59d03b49b5c.jpg?hash=JAo4vY0Ygu)
![DSC_7752 [1600x1200].jpg](/data/attachments/51/51573-7e7e95dbedbde5fa91833fdc82eb90c8.jpg?hash=fn6V2-295f)
![IMG_2537 [800x600].jpg](/data/attachments/51/51574-716b76bfb57ebbadde7b5c6416a6eaad.jpg?hash=cWt2v7V-u6)


![DSC_7752 [1600x1200].jpg](/data/attachments/51/51588-831f47df8bb03b8dc0d7672540ffe2ea.jpg?hash=gx9H34uwO4)