Ken's SLC build thread

Ken Roberts

Supporter
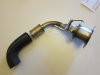
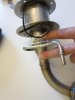
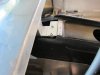
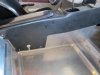
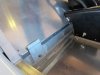
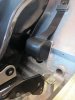
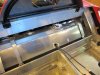
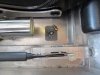
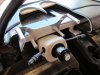
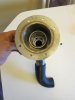
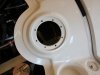
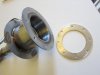
Two of the 4 3/4" discs with 3" holes Need to have the 8 small holes cut in them around their circumference to match the pattern of the Sparco fuel filler. I already drilled the holes in my bodywork for the Sparco so I had to reproduce this pattern on my Corvette style of fuel filler.
 

Attachments

  • 003_zps42433dc6.jpg
    003_zps42433dc6.jpg
    22.2 KB · Views: 231
  • 005_zps69199d78.jpg
    005_zps69199d78.jpg
    22.5 KB · Views: 248
  • 005_zps974cd49f.jpg
    005_zps974cd49f.jpg
    24.8 KB · Views: 203
Last edited:

Ken Roberts

Supporter
The Gates #24717 fuel fill hose (90 degree) gets cut to fit. It fits between the 2" intercooler pipe and the 2" outlet on the tank.
 

Ken Roberts

Supporter
The C6 Corvette fuel filler is the actual part I'm touching with my two fingers. The rest of the assembly is what needs to be made.
 

Attachments

  • 009_zps94225564.jpg
    009_zps94225564.jpg
    23.9 KB · Views: 214
Last edited:

Ken Roberts

Supporter
Mounted the Safecraft Halon fire extinguisher and billet mount. These are popular with the Ford GT owners.
 

Attachments

  • 001_zps25cc3707.jpg
    001_zps25cc3707.jpg
    39.7 KB · Views: 253
Last edited:

Ken Roberts

Supporter
I don't really have them all posted in one place. This build log is the best place to find them Bob.

Welcome to the club by the way!
 
Bob, It's been my experience that there are some web sites that do not have any pictures show up when I view the site with the internet explorer browser, but when I view with the Google Chrome browser the pictures magically show up. You could try using a different browser....
 

Ken Roberts

Supporter
Worked on mounting the seat belts and center console the last couple of days. Here are a few pictures of the center console.

First two pictures show the "close off" panels I made to complete the sides of the console. The middle picture shows the 12v power outlet and the Corvette fob slot in case the batteries are depleted. Don't make close off panels till you determine if the seat sides will clear. The third picture shows how I secured the console at the front top.
 

Attachments

  • 003_zpsad626b05.jpg
    003_zpsad626b05.jpg
    31 KB · Views: 232
  • 012_zpsa113353a.jpg
    012_zpsa113353a.jpg
    32 KB · Views: 242
  • 009_zps47adf88a.jpg
    009_zps47adf88a.jpg
    24.6 KB · Views: 257
Last edited:

Ken Roberts

Supporter
The seat belt receivers turned out great. I welded a 1 1/4" round bar 6" long (with a hole in the middle for a 6" long 7/16" grade 8 bolt) to the center tunnel beam. The seat belts are a three point standard automotive type. They were purchased from Wesco Performance.

The retractor gets bolted to a plate I had welded to the beam behind the seats. A hardened steel insert (Gardsert) was installed for longevity.
 

Attachments

  • 003_zpsad626b05.jpg
    003_zpsad626b05.jpg
    31 KB · Views: 218
  • 005_zps2fb51e70.jpg
    005_zps2fb51e70.jpg
    33 KB · Views: 214
  • 006_zps72b82653.jpg
    006_zps72b82653.jpg
    28.1 KB · Views: 209
  • 010_zps33c0e72a.jpg
    010_zps33c0e72a.jpg
    45.9 KB · Views: 231
Last edited:

Ken Roberts

Supporter
This picture shows the floor mounting anchor for the seat belt at the side of the seat. The plate with a grade 8 nut welded on gets mounted to the bottom of the floor. I still need to sit in the seat and replicate the ideal positioning of the seat belt across my hips before I decide where to drill the hole through the floor for this anchor.
 

Attachments

  • 010_zps9ccacd0b.jpg
    010_zps9ccacd0b.jpg
    35.4 KB · Views: 228
Last edited:

Ken Roberts

Supporter
The final anchor points for the seat belts will be to the roll cage behind the occupants head. I won't be getting to it till I remove the spider. The passenger seat mount will need careful consideration due to the fact the seat location is offset to the right and available space at the roll cage hoop behind the passengers head is minimal.
 
Ken, did you try the seat belts when in the car a bunch as speed and jumping in and out? The reason I ask is that sometimes I found that if the angle on them is not just right they want to catch and not release very easy, which can be an annoyance really quickly when it is all done, trust me on that. I do like your setup and will probably be copying it myself as mine is a street car so the 3 point is a real need and I will have the 5 point locations just in case I decide to track her.
 

Ken Roberts

Supporter
Ken, did you try the seat belts when in the car a bunch as speed and jumping in and out? The reason I ask is that sometimes I found that if the angle on them is not just right they want to catch and not release very easy, which can be an annoyance really quickly when it is all done, trust me on that. I do like your setup and will probably be copying it myself as mine is a street car so the 3 point is a real need and I will have the 5 point locations just in case I decide to track her.

Thanks for the tip Troy. I'll watch out for the latching of the belt.
 

Ken Roberts

Supporter
Starting to work on converting the dash to house a C6 Corvette cluster. I'll start cutting up the stock dash tomorrow. I ended up switching to a 350mm wheel to get a slightly better sweep of all the gauges. The picture shows the smaller 330mm wheel. The 350mm wheel will also give you an easier time when turning at slow speeds.
 

Attachments

  • 006_zpsc7f5aeef.jpg
    006_zpsc7f5aeef.jpg
    40.7 KB · Views: 253
  • 004_zps30a0b275.jpg
    004_zps30a0b275.jpg
    40.7 KB · Views: 262
  • 003_zps669f7ac8.jpg
    003_zps669f7ac8.jpg
    39 KB · Views: 243
  • 004_zps6c85092c.jpg
    004_zps6c85092c.jpg
    46.9 KB · Views: 244
Last edited:
Starting to work on converting the dash to house a C6 Corvette cluster. I'll start cutting up the stock dash tomorrow.

I'm watching this. I really enjoy your build thread. Thanks Ken for posting up and for providing details with part numbers to boot. Very nice.
 
Back
Top