KVA Project

Since getting the floor completed a couple of months ago, I have been busy collecting parts and making tweaks to the chassis to accommodate accordingly.

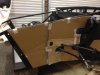
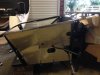
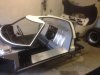
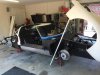
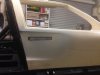
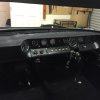
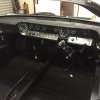
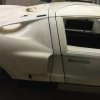
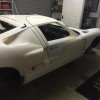
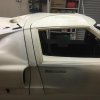
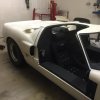
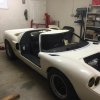
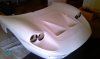
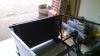
All the body work has been given a through clean with warm soapy water and 1500 wet & dry to get rid of the many years of grime and given a polish - amazed and please by how it came out.

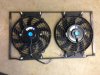
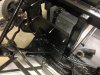
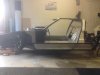
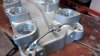
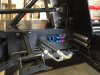
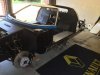
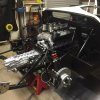
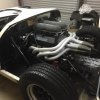
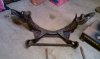
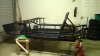
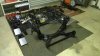
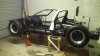
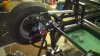
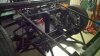
The front sub frame has been modified and strengthened to take coil overs, the original spring support arms were removed, the top mounting point for the coil overs has had additional metal welded in and the rest of the area have been seam welded, with all the front suspension parts blasted and painted and new polly bushes/ball joints etc.

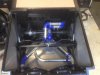
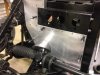
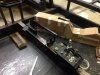
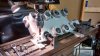
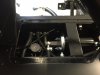
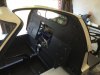
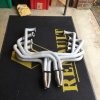
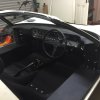
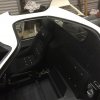
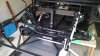
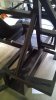
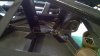
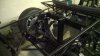
With the sub frame fitted and the steering rack in place, attention then turned to fitting a steering column, power steering was an absolute, so a Corsa unit was the obvious chose and went for the adjustable version. Three brackets have been fabricated with the main central one welded into the frame work with vertical and lateral bracing, the forward and aft brackets then bolt into the central bracket and lateral bracing.

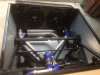
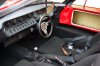
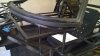
Having decided to stick with the original roll hoop rather than a full cage, I made a pair of support braces to tie into the rear of the chassis.

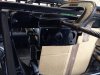
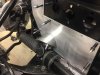
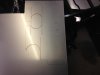
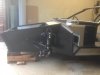
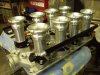
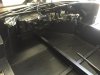
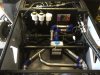
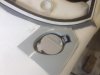
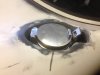
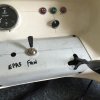
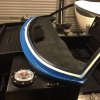
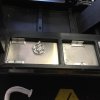
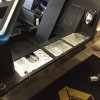
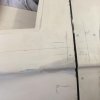
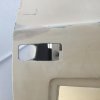
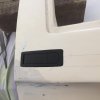
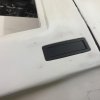
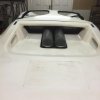
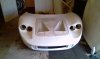
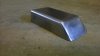
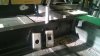
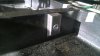
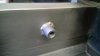
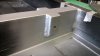
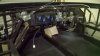
I have squared off the chassis frame in front of the windscreen in preparation for mounting fuel fillers, although visually it looks completely level from one side to the other it does raise up slightly at the outer ends, so took a while to get the fit correct so that the mounting surface for the fuel fillers is completely level.

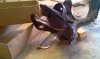
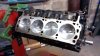
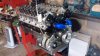
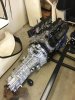
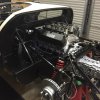
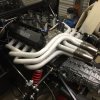
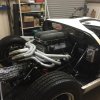
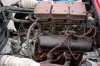
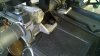
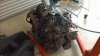
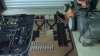
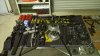
Picked up a 302 engine this weekend from an early 80’s Lincoln Town car, will be fully stripped and re-built – but for £200 a perfect starting point.

Tony
 

Attachments

  • IMAG6239.jpg
    IMAG6239.jpg
    134.5 KB · Views: 770
  • IMAG6243.jpg
    IMAG6243.jpg
    101.4 KB · Views: 744
  • IMAG6228.jpg
    IMAG6228.jpg
    174.5 KB · Views: 792
  • WP_20140720_029.jpg
    WP_20140720_029.jpg
    222.7 KB · Views: 992
  • WP_20140720_020.jpg
    WP_20140720_020.jpg
    61.3 KB · Views: 728
  • WP_20140720_004.jpg
    WP_20140720_004.jpg
    173.9 KB · Views: 765
  • WP_20140720_009.jpg
    WP_20140720_009.jpg
    200.4 KB · Views: 1,031
  • WP_20140720_015.jpg
    WP_20140720_015.jpg
    180.4 KB · Views: 858
  • WP_20140720_033.jpg
    WP_20140720_033.jpg
    223.6 KB · Views: 791
  • WP_20140720_025.jpg
    WP_20140720_025.jpg
    198.3 KB · Views: 925
This is coming along very nicely. It's amazing how similar your chassis is to our KCC. We've also done similar chassis changes (adding the front frame, squaring off in front of the windscreen and mounting EPS). Nice work. You've inspired me to get back into the garage :)
 
Here is some of the documentation that I received from Ken Atwell when I purchased mine in 1984 and had it converted to a GTD frame before it shipped to the US.

Don't know if it helps you or not, but here you go.

As part of my leaving the GT40 world (I've sold my car and it ships to Europe in a couple of days), I've scanned and uploaded several documents to my company web site. The KVA documentation is in pdf file at the following website url http://www.sierra-networks.com/KVA-Documentation.pdf I'll leave them up for a while. I tried uploading them here, but had issues. If someone else wants to upload them, you have my permission. I'm also posting the KVA instructions that I received, the JW Automotive GT40 Parts Manual, GTD build manual, a JW Automotive Electrical Wiring Diagram, a Clutch diagram, and possibly other information.


Hope everyone finds something useful.
 
Hi Paul

I have downloaded it and printed it out, will have a read through later, but it really is appreciated and will be extremely helpful.

What is really amazing is the fact that it is 77 pages all hand written with hand drawn diagrams.

Thank you very much.

Tony

Here is some of the documentation that I received from Ken Atwell when I purchased mine in 1984 and had it converted to a GTD frame before it shipped to the US.

Don't know if it helps you or not, but here you go.

As part of my leaving the GT40 world (I've sold my car and it ships to Europe in a couple of days), I've scanned and uploaded several documents to my company web site. The KVA documentation is in pdf file at the following website url http://www.sierra-networks.com/KVA-Documentation.pdf I'll leave them up for a while. I tried uploading them here, but had issues. If someone else wants to upload them, you have my permission. I'm also posting the KVA instructions that I received, the JW Automotive GT40 Parts Manual, GTD build manual, a JW Automotive Electrical Wiring Diagram, a Clutch diagram, and possibly other information.


Hope everyone finds something useful.

Corrected url (sorry Tony, you downloaded the GTD doc from the incorrect url- hopefully it will be useful as well).
Here is the correct url for the KVA instructions. http://www.sierra-networks.com/KVA-Documentation.pdf Sorry for the confusion.

Paul G.
 
Almost there with welding fabrication work to the chassis – just need to weld in some 7/16 threaded tube for mounting the seat belt harness fixings.

With a couple of weeks holiday coming up, I should be able to get in some serious time on the car, although the distraction of my 25th wedding anniversary will have to come first (It pays when you want to keep buying parts to put the wife first), once the final bit of chassis welding is completed I will start to fit the front and rear suspension parts.

As previously posted the front suspension will eventually be coilovers, for now I will fit an adjustable metal tube so that I can determine the length of coilover that is required, most of the front suspension parts came with the car, but due to sitting about for so long all needed new bearing/bushes/track rods etc.

With the rear suspension it was a case of starting from scratch as a new Southern GT rear end was fitted so none of the parts that came with the car would be suitable, all the tie rods, fittings, roll bar and lower radius arms were also purchased from Southern GT, with eBay for the hubs, drive shafts, SKF bearings etc.

Question:
Has anyone had any issues with the IVA test where they were using VR rated tyres that were not E or e marked, I know the IVA inspection manual says that VR tyres do not need to be marked (As below), but I saw on a posting on another kit car forum where someone failed due to tyres not being E/e marked. I have 4 brand new BF Goodrich VR tyres that are not E/e marked.

Each tyre must bear an ‘E‘ or ‘e’, DOT or JIS approval mark (see notes 1 and 2)
· Note 1: It is acceptable that tyres displaying a ‘VR’ or ‘ZR’ rating do not display an ‘E’ or ‘e’ marking.
· Note 2: Where the level of performance or safety provided is in question, the vehicle presenter must provide documentary evidence to demonstrate that the tyre would meet requirements equivalent to those of an ‘E’ or ‘e’ marked tyre.


Tony


Attachments

  • WP_20140809_001.jpg
    WP_20140809_001.jpg
    235.4 KB · Views: 992
  • WP_20140809_002.jpg
    WP_20140809_002.jpg
    197.7 KB · Views: 666
  • WP_20140809_004.jpg
    WP_20140809_004.jpg
    189.2 KB · Views: 755
  • WP_20140809_005.jpg
    WP_20140809_005.jpg
    181 KB · Views: 793
  • WP_20140809_006.jpg
    WP_20140809_006.jpg
    229.4 KB · Views: 842
  • WP_20140809_007.jpg
    WP_20140809_007.jpg
    198.6 KB · Views: 829

Ian Anderson

Lifetime Supporter
Hi
I had mine thru SVA and "Mini Hitler" would not turn the page and read the notes re the VR numbers.

He basically said change the tyres or it will never pass. Really strange as Paul had borrowed my wheels and tyres and his car passed no problems.

So it would appear to be down to how the examiner feels or who he is on the day.

Anyway if you are thinking of using the BF Goodrich in the pictures I would think seriously about it
1) they must be about 20 years old and will be hard as he'll and offer little to no grip and are probably perishing anyway
2) you can get other tyres that will meet IVA and be good for any speed you may do. Sure Avons will cost £300 per corner on average, but you can go Kumho or Maxis which will be around £300 for the set, all3 brands mentioned have the correct e marks

Ian
 

Ian Anderson

Lifetime Supporter
Oh I did get my car through on the Goodrich tyres

I contacted Goodrich UK technical department and had him on speed dial on my mobile

He said sure tyres are good and meet all requirements

On retest the examiner said oh no new tyres fail, and I passed him my phone and said you are now talking to head of technical department at Goodrich

They would not argue with that especially when he faxed through a "F off" and read the regs letter to the inspector, but really do you need the Agro?

Ian
 
Last edited:
Hi Tony,
If the rules state that VR or ZR markings on the tyre are OK, then you're OK
However the biggest issue I had during my build is that they keep changing the rules, specifically tightening them up. When I started a BS Kitemark on the screen was OK, but when I was ready to test, the exemption period had passed and I had to change for an E-marked one
Leave them for now, but be prepared to change them later
Rgds,
Andy
 
Had a full week on the car and have been able to get through a good few jobs.

1. Drilled 20mm holes through the box sections to fit the 8 threaded inserts for the seat belt mountings, as the centre insert will service both driver and passenger a longer insert was fitted and this was then boxed in.

2. The front cross member has been notched on one side so that the stainless radiator pipes from front to rear can come out above the steering rack and then follow line on the chassis, this was done so that the pipes do not need to run inside the cabin.

3. A heating/Air con unit has been fitted under the dash above the passengers feet, once that was positioned I was able to position the wiper motor so that that the drive wire followed an almost straight line.

4. The telescopic part of the Corsa power steering that goes to the rack needed modification so that it would join up with the Cortina rack. The Corsa UJ was cut off and a new one welded on that fits the Cortina rack.

With these jobs completed the front steering and suspension (Minus coilovers) was all fitted, the rear is almost fitted, just waiting on a couple of parts to arrive to finish the job. With the rear at present I am fitting the Spax adjustable coilovers that came with the car and will assess how the car sits later on and decide if they need to be changed.

Attention is now going to be on getting the engine parts required for the re-build and fitting a 6:1 pedal box – space is at a premium to the left of the steering column for the clutch and brake pedals so investigation is required to see what is available off the shelf – or may make my own as it needs to be a top mounted unit to maximise leg room.

Tony
 

Attachments

  • WP_20140819_005.jpg
    WP_20140819_005.jpg
    191.2 KB · Views: 678
  • WP_20140819_008.jpg
    WP_20140819_008.jpg
    235.2 KB · Views: 776
  • WP_20140819_007.jpg
    WP_20140819_007.jpg
    187.7 KB · Views: 659
  • WP_20140821_007.jpg
    WP_20140821_007.jpg
    171.5 KB · Views: 658
  • WP_20140821_012.jpg
    WP_20140821_012.jpg
    204 KB · Views: 678
  • WP_20140831_001.jpg
    WP_20140831_001.jpg
    188.2 KB · Views: 793
  • WP_20140831_002.jpg
    WP_20140831_002.jpg
    205.5 KB · Views: 770
  • WP_20140831_003.jpg
    WP_20140831_003.jpg
    196.3 KB · Views: 723
  • WP_20140831_004.jpg
    WP_20140831_004.jpg
    203.5 KB · Views: 795
  • WP_20140831_005.jpg
    WP_20140831_005.jpg
    205.9 KB · Views: 1,005
  • WP_20140831_006.jpg
    WP_20140831_006.jpg
    207 KB · Views: 956
9 months since the last posting………. time seems to fly by.

<?xml:namespace prefix = o ns = "urn:schemas-microsoft-com<img src=" /><o:p></o:p>
Steady progress has been made with the 40, most jobs seem to take longer to complete than initially anticipated, but I guess that’s understandable as solutions need to be designed and fabricated to fit (Particularly when working with a KVA Type A chassis and MK3 body) as there are very few parts ready-made.<o:p></o:p>
<o:p></o:p>
Main things done are:<o:p></o:p>
· Frame made to mount the cooling fans<o:p></o:p>
· Radiator has been re-cored<o:p></o:p>
· Stainless steel cooling pipework installed with remote Davis Craig water pump upfront, BMW remote thermostat and bypass pipework<o:p></o:p>
· Front bulkhead made that sits forward of the front cross member<o:p></o:p>
· Top mounted pedal box modified to fit in the front bulkhead<o:p></o:p>
· Modified lower swing arm to take new GAZ gold front coilovers<o:p></o:p>
· Central gear shift (Based on MR2) which will be a mix of cable and rod operated to the UN1 gearbox<o:p></o:p>
· Aluminium panelling in progress of being made (Not fitted until wiring/brake lines etc are installed)<o:p></o:p>
· Battery box made and installed on OS to sit inside the sill, so that it’s on the same side as the starter motor
<o:p></o:p>
<o:p></o:p>
Andy Green (Saxoncross on here) who has recently finished the build of his fantastic GT40 offered to build the engine for me, I will add another posting with details and pictures of the engine build/specification.<o:p></o:p>

Tony
 

Attachments

  • IMG_0079.jpg
    IMG_0079.jpg
    154.4 KB · Views: 898
  • PA0035.jpg
    PA0035.jpg
    126.9 KB · Views: 683
  • PA0040.jpg
    PA0040.jpg
    123.9 KB · Views: 655
  • PA0001.jpg
    PA0001.jpg
    157.7 KB · Views: 634
  • PA0003.jpg
    PA0003.jpg
    152 KB · Views: 639
  • PA0006.jpg
    PA0006.jpg
    149.5 KB · Views: 649
  • PA0009.jpg
    PA0009.jpg
    166.6 KB · Views: 651
  • IMAG6236.jpg
    IMAG6236.jpg
    173 KB · Views: 627
  • PA0010.jpg
    PA0010.jpg
    146.3 KB · Views: 599
  • PA0014.jpg
    PA0014.jpg
    88.3 KB · Views: 586
  • PA0015.jpg
    PA0015.jpg
    100.6 KB · Views: 633
  • PA0018.jpg
    PA0018.jpg
    126.9 KB · Views: 616
  • PA0021.jpg
    PA0021.jpg
    162.3 KB · Views: 740
  • PA0031.jpg
    PA0031.jpg
    111.4 KB · Views: 771
  • PA0037.jpg
    PA0037.jpg
    99.1 KB · Views: 630
  • PA0039.jpg
    PA0039.jpg
    90.1 KB · Views: 861
Been a long time since last posting, would take a while to detail all the work that has taken place over the last year, so will let the pictures tell the story.

The main big things are:<?xml:namespace prefix = "o" ns = "urn:schemas-microsoft-com<img src=" /><o:p></o:p>
· Southern GT rear end chassis adapted to take the MK3 body with jack points<o:p></o:p>
· Engine rebuild (Edelbrock heads, Inglese manifold, roller rockers, AT power throttle bodies, Specialist Components management system)<o:p></o:p>
· All new electronic gauges<o:p></o:p>
· Air con<o:p></o:p>
· Cooling, brakes, fuel system, electrics<o:p></o:p>
· Custom made fuel tanks with VDO dip tube senders<o:p></o:p>
· All aluminium panel handmade (2000+ rivets) – interior panels all carbon fibre vinyl wrapped<o:p></o:p>
<o:p></o:p>
A big thank you has to go to Andy Green (Saxon Cross on here) for building the engine, electrics (loom) and numerous other jobs and invaluable knowledge and advise.<o:p></o:p>
<o:p></o:p>
Tony<o:p></o:p>
 

Attachments

  • P9132421a.jpg
    P9132421a.jpg
    201 KB · Views: 546
  • P9132425a.jpg
    P9132425a.jpg
    195.8 KB · Views: 582
  • P9132428a.jpg
    P9132428a.jpg
    296.8 KB · Views: 541
  • Build 7.jpg
    Build 7.jpg
    157.2 KB · Views: 588
  • Build 14.jpg
    Build 14.jpg
    199 KB · Views: 580
  • Build 18.jpg
    Build 18.jpg
    178.9 KB · Views: 581
  • Build 19.jpg
    Build 19.jpg
    155.7 KB · Views: 575
  • Build 25.jpg
    Build 25.jpg
    216.7 KB · Views: 619
  • IMG_0076.jpg
    IMG_0076.jpg
    105.8 KB · Views: 621
Last edited:
More pictures
 

Attachments

  • IMG_0058.jpg
    IMG_0058.jpg
    146.8 KB · Views: 588
  • IMG_0067.jpg
    IMG_0067.jpg
    102.9 KB · Views: 557
  • IMG_0064.jpg
    IMG_0064.jpg
    129.3 KB · Views: 584
  • IMG_0061.jpg
    IMG_0061.jpg
    157.9 KB · Views: 548
more pictures
 

Attachments

  • IMG_0111.jpg
    IMG_0111.jpg
    153.4 KB · Views: 552
  • IMG_0118.jpg
    IMG_0118.jpg
    128.5 KB · Views: 537
  • IMG_0123.jpg
    IMG_0123.jpg
    127.1 KB · Views: 550
  • BO0033.jpg
    BO0033.jpg
    73.9 KB · Views: 510
  • BO0038.jpg
    BO0038.jpg
    83.5 KB · Views: 579
  • BO0056.jpg
    BO0056.jpg
    107.7 KB · Views: 566
  • BO0049.jpg
    BO0049.jpg
    97.5 KB · Views: 538
  • BO0051.jpg
    BO0051.jpg
    110.9 KB · Views: 569
and more pictures
 

Attachments

  • IMG_0158.jpg
    IMG_0158.jpg
    129.4 KB · Views: 577
  • IMG_0159.jpg
    IMG_0159.jpg
    84.7 KB · Views: 538
  • IMG_0160.jpg
    IMG_0160.jpg
    128.9 KB · Views: 540
  • IMG_0161.jpg
    IMG_0161.jpg
    96.3 KB · Views: 500
  • IMG_0174.jpg
    IMG_0174.jpg
    102.4 KB · Views: 521
  • IMG_0175.jpg
    IMG_0175.jpg
    93.8 KB · Views: 500
  • IMG_0176.jpg
    IMG_0176.jpg
    114.8 KB · Views: 521
  • IMG_0177.jpg
    IMG_0177.jpg
    105.3 KB · Views: 496
  • IMG_0179.jpg
    IMG_0179.jpg
    90.2 KB · Views: 529
  • IMG_0181.jpg
    IMG_0181.jpg
    77.5 KB · Views: 515
  • IMG_0182.jpg
    IMG_0182.jpg
    74 KB · Views: 530
  • IMG_0183.jpg
    IMG_0183.jpg
    78.8 KB · Views: 507
  • IMG_0187.jpg
    IMG_0187.jpg
    86 KB · Views: 508
  • IMG_0189.jpg
    IMG_0189.jpg
    80.3 KB · Views: 487
  • IMG_0191.jpg
    IMG_0191.jpg
    103.6 KB · Views: 528
  • IMG_0192.jpg
    IMG_0192.jpg
    90.7 KB · Views: 550
and yet more pictures
 

Attachments

  • IMG_0200.jpg
    IMG_0200.jpg
    74.2 KB · Views: 516
  • IMG_0205.jpg
    IMG_0205.jpg
    112.9 KB · Views: 521
  • IMG_0221.jpg
    IMG_0221.jpg
    140.3 KB · Views: 576
  • IMG_0224.jpg
    IMG_0224.jpg
    127.4 KB · Views: 539
  • IMG_0227.jpg
    IMG_0227.jpg
    53 KB · Views: 495
  • IMG_0228.jpg
    IMG_0228.jpg
    43.7 KB · Views: 514
  • IMG_0230.jpg
    IMG_0230.jpg
    55.8 KB · Views: 503
  • IMG_0233.jpg
    IMG_0233.jpg
    45 KB · Views: 510
  • IMG_0234.jpg
    IMG_0234.jpg
    56.1 KB · Views: 520
  • IMG_0256.jpg
    IMG_0256.jpg
    72.2 KB · Views: 495
  • IMG_0258.jpg
    IMG_0258.jpg
    68.8 KB · Views: 497
  • IMG_0271.jpg
    IMG_0271.jpg
    57.4 KB · Views: 501
  • IMG_0282.jpg
    IMG_0282.jpg
    81.3 KB · Views: 528
  • IMG_0283.jpg
    IMG_0283.jpg
    71.7 KB · Views: 499
  • IMG_0284.jpg
    IMG_0284.jpg
    80.9 KB · Views: 502
  • IMG_0285.jpg
    IMG_0285.jpg
    110.7 KB · Views: 545
  • IMG_0286.jpg
    IMG_0286.jpg
    116.8 KB · Views: 558
  • IMG_0289.jpg
    IMG_0289.jpg
    83 KB · Views: 516
Tony,
Congratulations
It seems you going to give me a big challenge to rebuild my car up to your standards....
Also we have, I believe sister cars build around same period, same Corbeau seats, layout etc. etc.
Also I have no openings in the front clip for fuel access, (where did you get them from?) also I have Morris Marina door handles.
I have the Citroen gearbox without the brakes, a v6 Essex. A set of triple Weber’s on it, all to throw rebuild because standing still since 1985.
Please continue to post pictures and explanations, it’s my training program!
I hope to start the rebuild of my car in beginning 2018,
Paul
 

Attachments

  • IMGP3822.JPG
    IMGP3822.JPG
    426.9 KB · Views: 603
Back
Top