
You are using an out of date browser. It may not display this or other websites correctly.
You should upgrade or use an alternative browser.
You should upgrade or use an alternative browser.
Ryans Group Ten GT40 build - Body 5.
- Thread starter Ryan Love
- Start date


Neil
Supporter
I'm trying to count the cylinders in the photograph but they are confusing. How many cylinders does this engine have?I don't understand the question Neil.
8I'm trying to count the cylinders in the photograph but they are confusing. How many cylinders does this engine have?
Neil
Supporter
Thank you, I thought this might be a "W" configuration block.
Neil
Supporter
That explains it; I only know Ferrari & Chevrolet engines well.It’s a 302 Windsor block
A little more done, moved forwards a little bit, moved backwards a little bit, as I now have to go and work out which of the bits i have wrong or where my error is. It should all line up, but it does not for some reason.


At least I did not get too far into the left hand side one. Hopefully I can get that side right first go.
At least I did not get too far into the left hand side one. Hopefully I can get that side right first go.
Another month gone, still working on the engine mounts.
I think I can remember what and why I had done what i did. When I was drafting up the green upper mount, (which would be GT40P-1-2058 on the LHS) I had adjusted where the edges mount to the rest of the engine bay as this is where the reinforcements underneath line up. So my assumption was that in order to make the stiffest chassis, it would make sense to have the engine mount reach across to this part. I had also adjusted the folds on the vertical section to try and get a nice smooth transition, as that is what the photos seemed to show.
This was obviously all the wrong thing to do, when you start trying to add in the rest of the engine mount closing plates.
So, have spent the last week redoing it all again. I have based some of my decisions on photos from the restoration of chassis P1040. Particularly the folded nosed of the mount. This is in contradiction to the assembly drawing GT40P-1-2147 that shows this as a square 90° bend.

Have now got the lower mounting bracket tucked inside the purple closing plate and have also completed the folds that form the lower flange where the mounting bush fits.

View from the top looking down. Happy with how that has ended up.

Part GT40P-1-2077. overall geometry largely based on the plans from GT40 Uncovered. Bolt holes for the engine mounts are moved and it doesn't have the depression in it. I have also added the flange for the lower part, based on GT40P-1-2757 and photos of P1040 restoration.

Link to thread for engine mounting bush, for when I need it again later.
I think I can remember what and why I had done what i did. When I was drafting up the green upper mount, (which would be GT40P-1-2058 on the LHS) I had adjusted where the edges mount to the rest of the engine bay as this is where the reinforcements underneath line up. So my assumption was that in order to make the stiffest chassis, it would make sense to have the engine mount reach across to this part. I had also adjusted the folds on the vertical section to try and get a nice smooth transition, as that is what the photos seemed to show.
This was obviously all the wrong thing to do, when you start trying to add in the rest of the engine mount closing plates.
So, have spent the last week redoing it all again. I have based some of my decisions on photos from the restoration of chassis P1040. Particularly the folded nosed of the mount. This is in contradiction to the assembly drawing GT40P-1-2147 that shows this as a square 90° bend.
Have now got the lower mounting bracket tucked inside the purple closing plate and have also completed the folds that form the lower flange where the mounting bush fits.
View from the top looking down. Happy with how that has ended up.
Part GT40P-1-2077. overall geometry largely based on the plans from GT40 Uncovered. Bolt holes for the engine mounts are moved and it doesn't have the depression in it. I have also added the flange for the lower part, based on GT40P-1-2757 and photos of P1040 restoration.
Link to thread for engine mounting bush, for when I need it again later.
Original Engine Mounting Bush
Hi Team. Just checking in, has anyone got any details/dimensions or sources for the rubber engine mounting bush used on the original cars? part, "3/3505 - Bush, Engine MTG", 2 number required out of the parts book. The outside diameter would be 1.497 to 1.498" based on GT40P-1-2562 as...
www.gt40s.com
Last edited:
A bit late for a reply but come to think of it, these vents look very similar to those used in my Mk3 Saracen, might just need to repurpose some!!More bits arrived. Someone must have been feeding the rocking horses.
I had a set of the later vents with the knob in the centre, but got lucky and found some original early MK IV ball vents. The rubber rings from the later ones have a foam liner which feels a bit tight on the early vent. I need to check if they are different sizes.
would be good to see what the early rubber rings are like.
View attachment 113390View attachment 113391View attachment 113392View attachment 113393
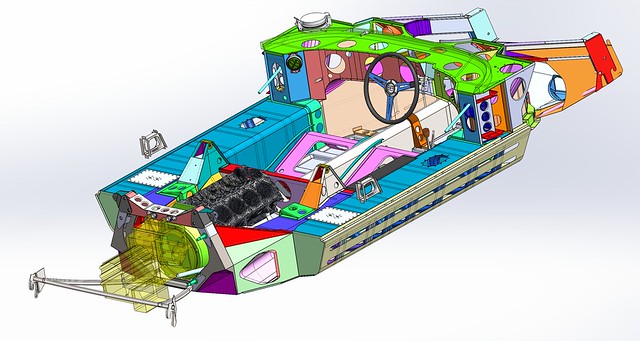
Time for another update, if only to remind myself of where I am up to as its been a few weeks since I have been able to touch the project. As mentioned elsewhere I think I have decided on a prototype to focus on. I was continually finding that I was looking at photos of different cars and getting conflicting details as they are all slightly different. I have decided to focus on GT103 as it was specked for Sebring in 1965. Since making this decision I have done a fair bit more research on the car, some of which many here have helped with.


I have created a number of albums of online images relating to some of the early GT40 chassis on pinterest if anyone else is interested.
After that I have been modifying my CAD model to capture some of the unique elements of GT103 that don't appear in latter chassis. Hopefully they are apparent in the screen grabs.
I still need to work out the floor details.

Details of the ductwork around the spare wheel area either side of the radiator. Changes to the dash and side sill tops. Lots more work to be done around the radiator yet.

Looks like I might have been working on the orange panel on the side of the radiator last. This is likely the latter production panel as its too long for the prototype nose length.
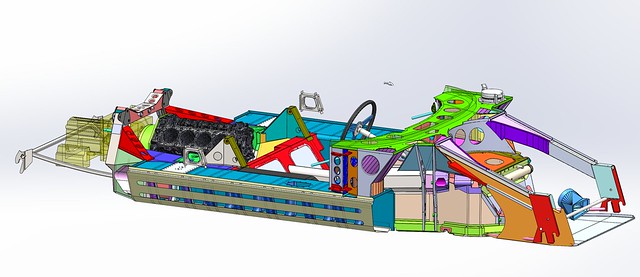
Oval shaped holes in the A pillar/door pillars. extra holes around the rear support hoop area as well as a two piece part to support the rear horse shoe shaped part.
Changes to the steering wheel, I like the one that's in GT108 for some reason.
Still need to amend the rear upper trailing link towers as they are different on 103
Cheers Ryan
I have created a number of albums of online images relating to some of the early GT40 chassis on pinterest if anyone else is interested.
After that I have been modifying my CAD model to capture some of the unique elements of GT103 that don't appear in latter chassis. Hopefully they are apparent in the screen grabs.
I still need to work out the floor details.
Details of the ductwork around the spare wheel area either side of the radiator. Changes to the dash and side sill tops. Lots more work to be done around the radiator yet.
Looks like I might have been working on the orange panel on the side of the radiator last. This is likely the latter production panel as its too long for the prototype nose length.
Oval shaped holes in the A pillar/door pillars. extra holes around the rear support hoop area as well as a two piece part to support the rear horse shoe shaped part.
Changes to the steering wheel, I like the one that's in GT108 for some reason.
Still need to amend the rear upper trailing link towers as they are different on 103
Cheers Ryan
These arrived last night in the post/dhl.

They are noticeably heavy, this is an unmodified one, straight of a donor car, still has a couple of the mounting nuts, gaskets, globes and wires on it.

This may have been the reason why they moved away from the Ford/Mercury lights. For comparison, below is a NOS/Reproduction Fiat 750 light, with globes and globe holders and wire tales. same as the Mercury one but this is a combined brake and indicator, not just a single brake light. So it probably saves 1kg or 2 LBS of the car weight.

Time to hunt down some of the other parts. still trying to work out what some of the other bits are.
Ryan
They are noticeably heavy, this is an unmodified one, straight of a donor car, still has a couple of the mounting nuts, gaskets, globes and wires on it.
This may have been the reason why they moved away from the Ford/Mercury lights. For comparison, below is a NOS/Reproduction Fiat 750 light, with globes and globe holders and wire tales. same as the Mercury one but this is a combined brake and indicator, not just a single brake light. So it probably saves 1kg or 2 LBS of the car weight.
Time to hunt down some of the other parts. still trying to work out what some of the other bits are.
Ryan
What Ford/Mercury are those tail lights from?.These arrived last night in the post/dhl.
They are noticeably heavy, this is an unmodified one, straight of a donor car, still has a couple of the mounting nuts, gaskets, globes and wires on it.
This may have been the reason why they moved away from the Ford/Mercury lights. For comparison, below is a NOS/Reproduction Fiat 750 light, with globes and globe holders and wire tales. same as the Mercury one but this is a combined brake and indicator, not just a single brake light. So it probably saves 1kg or 2 LBS of the car weight.
Time to hunt down some of the other parts. still trying to work out what some of the other bits are.
Ryan
63 breezeway

 en.m.wikipedia.org
Mercury Monterey - Wikipedia
Cant be many of those around anymore.63 breezeway
Mercury Monterey - Wikipedia
It’s taken me 6 months to find this lot. There is a few of the clear reverse lights listed but not a lot of the brake tail lights.
I would be interested to know how heavy a set of the Simca 1100 rear lights are to determine if weight was a factor in the change away from the Ford parts bin.
The Mercury lights have a much nicer feel and depth in colour to them in comparison to the set of 750 Fiat ones I have.
I have been told the back side of the metal housing was machined flat to fit up to the bodywork recess on the GT40. The original Mercury mount is curved/barrel shaped.
Some more photos of the early prototype X member in the floor. Drawing number X40-06.
the drawing shows some holes in the vertical faces front and read, but I cant see these on either GT103 or 104 or any of the latter prototypes. May have only been on 101 or 102 which I have no photos of. Either way, not needed for a 103 recreation.
I am still trying to work out the floor details. So I still have the later production floor shown. It shows how the two parts can not co exists in the one construction. So the prototype floor must have been different.

Base piece of the part. shown projected over the top of the drawing.

My attempt at understanding how the central reinforcement sits/looks. there is a curved bit that would go over the top as well as a rear plate that is not shown in this views. Undecided if they made it as a single piece and then used a shrinker stretcher to pull it around in a curve or if its multipipe pieces welded together.

Looks like I still need to add an internal flange to flank/sit flush with the radiator pipe cover. (GT104 picture)
the drawing shows some holes in the vertical faces front and read, but I cant see these on either GT103 or 104 or any of the latter prototypes. May have only been on 101 or 102 which I have no photos of. Either way, not needed for a 103 recreation.
I am still trying to work out the floor details. So I still have the later production floor shown. It shows how the two parts can not co exists in the one construction. So the prototype floor must have been different.
Base piece of the part. shown projected over the top of the drawing.
My attempt at understanding how the central reinforcement sits/looks. there is a curved bit that would go over the top as well as a rear plate that is not shown in this views. Undecided if they made it as a single piece and then used a shrinker stretcher to pull it around in a curve or if its multipipe pieces welded together.
Looks like I still need to add an internal flange to flank/sit flush with the radiator pipe cover. (GT104 picture)
So went to add in the flange on the part that goes over and around the tunnel and have run into a discrepancy in my cad model.
The question is, do I make the central tunnel 2.75” internal width or external width. I’d previously had it as an internal dimension, but now I can’t remember why I decided that. It’s been so long since I drew that part of it.
The question is, do I make the central tunnel 2.75” internal width or external width. I’d previously had it as an internal dimension, but now I can’t remember why I decided that. It’s been so long since I drew that part of it.