Paul Thompson 'Hooligan'
Admin
I've been sent an email - many of you may have received it as well, but it details the model making of a certain gentleman that I think you should all see. It's simply amazing!!:shocked:
A number of the photos were credited within the included text, so I have credited them also here and the text, content etc all remains as received.
I hope you enjoy them, I did...
Firstly, the text:
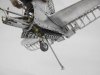
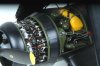
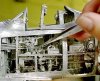
Using tweezers, the controls can be moved.
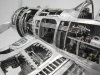
All cables and linkages are in place to work the wing control surfaces as well. <?xml:namespace prefix = st1 ns = "urn:schemas-microsoft-com ffice:smarttags" /><ST1
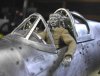
 LACE u1:st="on"><ST1LACENAME u1:st="on"><st1lace w:st="on"><st1laceName w:st="on">Young</st1laceName></st1lace></ST1LACE> <ST1LACETYPE u1:st="on"><st1laceType w:st="on">Park</st1laceType></ST1LACETYPE> has since carved a pilot's face and hands from solid aluminum and built an articulated pilot to sit in the cockpit. (Photo: George F. Lee, <ST1:CITY u1:st="on"><ST1LACE u1:st="on"><st1:City w:st="on"><st1lace w:st="on">Honolulu</st1lace></st1:City></ST1LACE></ST1:CITY> Star-Bulletin)</ST1LACENAME>
<ST1LACENAME u1:st="on"><?xml:namespace prefix = o ns = "urn:schemas-microsoft-comfficeffice" /><o></o>
Here's pic of fingers and tweezers to give scale......... Sooooo small!!!
<o></o>
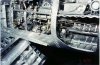
Remember this as you look at the pics........... All the controls work as designed, by cables, chains, linkages and levers.
<o></o>
<?xml:namespace prefix = v ns = "urn:schemas-microsoft-com:vml" /><v:shapetype id=_x0000_t75 stroked="f" filled="f" path="m@4@5l@4@11@9@11@9@5xe" oreferrelative="t" o:spt="75" coordsize="21600,21600"><v:stroke joinstyle="miter"></v:stroke><v:formulas><v:f eqn="if lineDrawn pixelLineWidth 0"></v:f><v:f eqn="sum @0 1 0"></v:f><v:f eqn="sum 0 0 @1"></v:f><v:f eqn="prod @2 1 2"></v:f><v:f eqn="prod @3 21600 pixelWidth"></v:f><v:f eqn="prod @3 21600 pixelHeight"></v:f><v:f eqn="sum @0 0 1"></v:f><v:f eqn="prod @6 1 2"></v:f><v:f eqn="prod @7 21600 pixelWidth"></v:f><v:f eqn="sum @8 21600 0"></v:f><v:f eqn="prod @7 21600 pixelHeight"></v:f><v:f eqn="sum @10 21600 0"></v:f></v:formulas><vath o:connecttype="rect" gradientshapeok="t" o:extrusionok="f"></vath><o:lock aspectratio="t" v:ext="edit"></o:lock></v:shapetype><o></o>
<o></o>
<o></o>
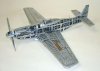
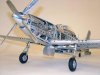
All these controls WORK!!!!!........ And that means they work the parts of the aircraft via rods and chains as in the original aircraft!!!!<o></o>
Every single part hand made and fitted.<o></o>
It blows you away, doesn't it???<o></o>
<o></o>
<o></o>
<o></o>
Don't forget the tiny scale......... go up again and look at the pic of the fingers and tweezers!<o></o>
<o></o>
<o></o>
<o></o>
<o></o>
<o></o>
<o></o>
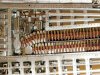
Machine guns and bullets.........<o></o>
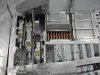
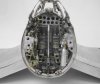
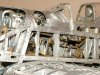
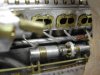
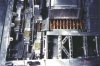
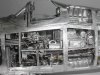
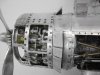
Detail of three .50 <ST1:STATE u1:st="on"><ST1LACE u1:st="on"><st1:State w:st="on"><st1lace w:st="on">Cal.</st1lace></st1:State></ST1LACE></ST1:STATE> machine guns and ammo cans. Ammo cans are loaded outside the aircraft and then simply set into place in the wing. Their doors become the top surface of the wing. This allowed for rapid reloading by the ground crew.<o></o>
<o></o>
<o></o>
<o></o>
<o></o>
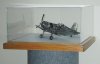
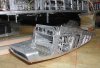
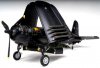
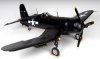
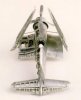
Mr. Park generously donated the first (cutaway) Corsair model to the Joe Martin Foundation. It can be seen in person in its display at the Foundation's museum in the Sherline building in <st1lace w:st="on"><st1:City w:st="on">Vista</st1:City></st1lace>, <st1:State w:st="on">California</st1:State>. A collection of photos showing how the model was built and all the historical data on the Corsair Mr. Park collected to build it has also been donated and is available for viewing. In 2005, Mr. Park also donated the second corsair and it is also now on display in the Foundation's museum.<o></o>
<ST1LACE u1:st="on"><ST1:CITY u1:st="on"></ST1:CITY><ST1:STATE u1:st="on"></ST1:STATE></ST1LACE><o></o>
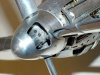
Showing the extent of his carving skills, Mr. Park sculpted a pilot's head and hands out of solid aluminum. The articulated figure is dressed in a custom made uniform and can be placed in any position to give a good sense of scale to the model.
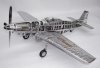
P51 MUSTANG<o></o>
<o></o>
<o></o>
<o></o>
<o></o>
<o></o>
<o></o>
Inside the left wing you can see the 50 cal ammunition threaded into the three wing guns.
Each round is machined in 3 parts—brass cartridge with copper bullet and primer and is held together with a small copper feed jacket.<o></o>
<o></o>
<o></o>
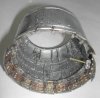
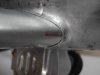
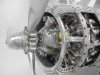
engine exhaust ports....... pic taken during assembly.<o></o>
<o></o>
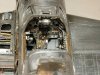
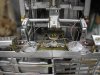
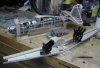
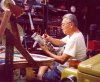
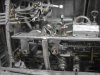
Control wires are being threaded around their pulleys underneath the cockpit during construction. (Y. Park photo)<o></o>
<o></o>
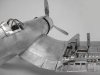
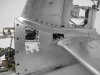
The radiator air intake sits under the fuselage ready for installation. Much of the detail of some of the parts is hidden once it is assembled. (Y. Park photo)<o></o>
<o></o>
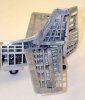
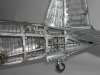
The wing being made.............. LOOKIT how SMALL it is
<o></o>
<o></o>
Each panel is hand formed over a wooden shape. The metal is annealed to the proper softness and then pounded and bent into shape. The plane is made up of many individual panels, and the fits between panels are just about perfect. (Y. Park photo)<o></o>
<o></o>
Here we see the panel above in it's final position. Looks easy now, doesn't it? (Y. Park photo)<o></o>
<o></o>
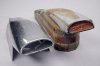
The form for the air intake and the final part. As is often the case in machining and model making, fixtures, moulds, formers and jigs to make the final parts can take a long time to make and are never seen by the public viewing the finished model. (Y. Park photo)<o></o>
END...
And now the pics - which will be across 3 posts...
</ST1LACENAME>
A number of the photos were credited within the included text, so I have credited them also here and the text, content etc all remains as received.
I hope you enjoy them, I did...
Firstly, the text:
Using tweezers, the controls can be moved.
All cables and linkages are in place to work the wing control surfaces as well. <?xml:namespace prefix = st1 ns = "urn:schemas-microsoft-com
ffice:smarttags" /><ST1LACE u1:st="on"><ST1LACENAME u1:st="on"><st1lace w:st="on"><st1laceName w:st="on">Young</st1laceName></st1lace></ST1LACE> <ST1LACETYPE u1:st="on"><st1laceType w:st="on">Park</st1laceType></ST1LACETYPE> has since carved a pilot's face and hands from solid aluminum and built an articulated pilot to sit in the cockpit. (Photo: George F. Lee, <ST1:CITY u1:st="on"><ST1LACE u1:st="on"><st1:City w:st="on"><st1lace w:st="on">Honolulu</st1lace></st1:City></ST1LACE></ST1:CITY> Star-Bulletin)</ST1LACENAME><ST1
LACENAME u1:st="on"><?xml:namespace prefix = o ns = "urn:schemas-microsoft-comfficeffice" /><o></o> Here's pic of fingers and tweezers to give scale......... Sooooo small!!!
<o
></o> Remember this as you look at the pics........... All the controls work as designed, by cables, chains, linkages and levers.
<o
></o> <?xml:namespace prefix = v ns = "urn:schemas-microsoft-com:vml" /><v:shapetype id=_x0000_t75 stroked="f" filled="f" path="m@4@5l@4@11@9@11@9@5xe" o
referrelative="t" o:spt="75" coordsize="21600,21600"><v:stroke joinstyle="miter"></v:stroke><v:formulas><v:f eqn="if lineDrawn pixelLineWidth 0"></v:f><v:f eqn="sum @0 1 0"></v:f><v:f eqn="sum 0 0 @1"></v:f><v:f eqn="prod @2 1 2"></v:f><v:f eqn="prod @3 21600 pixelWidth"></v:f><v:f eqn="prod @3 21600 pixelHeight"></v:f><v:f eqn="sum @0 0 1"></v:f><v:f eqn="prod @6 1 2"></v:f><v:f eqn="prod @7 21600 pixelWidth"></v:f><v:f eqn="sum @8 21600 0"></v:f><v:f eqn="prod @7 21600 pixelHeight"></v:f><v:f eqn="sum @10 21600 0"></v:f></v:formulas><vath o:connecttype="rect" gradientshapeok="t" o:extrusionok="f"></vath><o:lock aspectratio="t" v:ext="edit"></o:lock></v:shapetype><o></o><o
></o><o
></o>All these controls WORK!!!!!........ And that means they work the parts of the aircraft via rods and chains as in the original aircraft!!!!<o
></o>Every single part hand made and fitted.<o
></o>It blows you away, doesn't it???<o
></o><o
></o><o
></o><o
></o>Don't forget the tiny scale......... go up again and look at the pic of the fingers and tweezers!<o
></o><o
></o><o
></o><o
></o><o
></o><o
></o><o
></o>Machine guns and bullets.........<o
></o>Detail of three .50 <ST1:STATE u1:st="on"><ST1
LACE u1:st="on"><st1:State w:st="on"><st1lace w:st="on">Cal.</st1lace></st1:State></ST1LACE></ST1:STATE> machine guns and ammo cans. Ammo cans are loaded outside the aircraft and then simply set into place in the wing. Their doors become the top surface of the wing. This allowed for rapid reloading by the ground crew.<o></o><o
></o><o
></o><o
></o><o
></o>Mr. Park generously donated the first (cutaway) Corsair model to the Joe Martin Foundation. It can be seen in person in its display at the Foundation's museum in the Sherline building in <st1
lace w:st="on"><st1:City w:st="on">Vista</st1:City></st1lace>, <st1:State w:st="on">California</st1:State>. A collection of photos showing how the model was built and all the historical data on the Corsair Mr. Park collected to build it has also been donated and is available for viewing. In 2005, Mr. Park also donated the second corsair and it is also now on display in the Foundation's museum.<o></o><ST1
LACE u1:st="on"><ST1:CITY u1:st="on"></ST1:CITY><ST1:STATE u1:st="on"></ST1:STATE></ST1LACE><o></o>Showing the extent of his carving skills, Mr. Park sculpted a pilot's head and hands out of solid aluminum. The articulated figure is dressed in a custom made uniform and can be placed in any position to give a good sense of scale to the model.
P51 MUSTANG<o
></o><o
></o><o
></o><o
></o><o
></o><o
></o><o
></o>Inside the left wing you can see the 50 cal ammunition threaded into the three wing guns.
Each round is machined in 3 parts—brass cartridge with copper bullet and primer and is held together with a small copper feed jacket.<o
></o><o
></o><o
></o>engine exhaust ports....... pic taken during assembly.<o
></o><o
></o>Control wires are being threaded around their pulleys underneath the cockpit during construction. (Y. Park photo)<o
></o><o
></o>The radiator air intake sits under the fuselage ready for installation. Much of the detail of some of the parts is hidden once it is assembled. (Y. Park photo)<o
></o><o
></o>The wing being made.............. LOOKIT how SMALL it is
<o
></o> <o
></o>Each panel is hand formed over a wooden shape. The metal is annealed to the proper softness and then pounded and bent into shape. The plane is made up of many individual panels, and the fits between panels are just about perfect. (Y. Park photo)<o
></o><o
></o>Here we see the panel above in it's final position. Looks easy now, doesn't it? (Y. Park photo)<o
></o><o
></o>The form for the air intake and the final part. As is often the case in machining and model making, fixtures, moulds, formers and jigs to make the final parts can take a long time to make and are never seen by the public viewing the finished model. (Y. Park photo)<o
></o>END...
And now the pics - which will be across 3 posts...
</ST1
LACENAME>Attachments
-
 Art 2.jpg62.7 KB · Views: 386
 -
 Art 3.jpg31.7 KB · Views: 397
 -
 Art 4 Corsair.jpg18.3 KB · Views: 371
 -
 Art 5.jpg57 KB · Views: 360
 -
 Art 1.jpg44.3 KB · Views: 407
 -
 Art 6.jpg64.4 KB · Views: 347
 -
 Art 7 Tweezers George - credit F. Lee, Honolulu Star-Bulletin.jpg53.7 KB · Views: 368
 -
 Art 8.jpg52.4 KB · Views: 369
 -
 Art 9.jpg53.9 KB · Views: 351
 -
 Art 10.jpg42.5 KB · Views: 334
 -
 Art 12.jpg44 KB · Views: 352
 -
 Art 15.jpg34.7 KB · Views: 346
 -
 Art 14.jpg39.9 KB · Views: 370
 -
 Art 13.jpg41.7 KB · Views: 371
 -
 Art 11.jpg41.8 KB · Views: 318