The Regeneration of a Once Loved and Unique GT40

I have recently finished a full rebuild of my GT40. As I have a fairy decent photo record I thought I would now share the experience. Maybe there will be some things that could help people on a similar journey. One thing for certain, I have learned a lot. The next one would be easier for sure! It is not up to the standard of a lot on here but it's my car, built to my budget with my skills!

My GT40 journey started just over 3 years ago. I saw an old, pretty wrecked, GT40 on the UK Cobra Forum (I have owned a 427 powered cobra for nearly 40 years, but that's another story). The GT40's owner had recently died and a Cobra Club member had been asked if they could sell it on behalf of the estate. The previous owner had sadly died of dementia. The car had no doubt been well loved at one time but it appeared that the terrible condition had also taken a toll on the car, there being several very odd things, such as slicing off the rear arches with an angle grinder and some really questionable alterations done all over the place. In short, it was a mess. (The car was (is) on the GT40 Register of the Enthusiasts Club and it is possible that some on here know it or knew the owner. It would be interesting to hear if so as the identity of the owner/builder is not known to me and is not on the Register)

Whatever, it was a fairy low cost entry in to a GT40. The car was registered and came with a spare 302 and UN1 gearbox. We were locked down in the UK at the time, so I looked at the pictures, weighed it up and bought it blind on the phone! Why not!

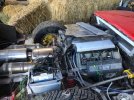
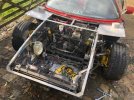
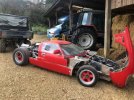
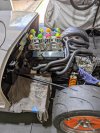
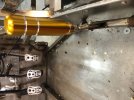
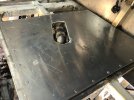
Below are a few pics of how it was. MK3 body in not good shape, BMW V8 and a totally botched up panelling job. On the positive side, it had a stainless chassis and a 1968 302 with it. The chassis panels and most of the car were a total mess. Windshield broken. Dash, seats and just about everything good only for junk. Lots of BMW E38 parts everywhere, virtually everything including the uprights, hubs and brakes, power steering, master cylinder, even mirrors and the engine!

It was clear a major overhaul was necessary if I was to get it where I wanted it. Dismantling begins...........

IMG_1068.jpg


IMG_0954.jpg


IMG_1063.jpg


IMG_1066.jpg


IMG_1070.jpg
IMG_1075.jpg
 

Attachments

  • IMG_1063.jpg
    IMG_1063.jpg
    43.4 KB · Views: 148
  • IMG_1063.jpg
    IMG_1063.jpg
    43.4 KB · Views: 130
  • IMG_1070.jpg
    IMG_1070.jpg
    43 KB · Views: 139
  • IMG_1068.jpg
    IMG_1068.jpg
    70.6 KB · Views: 142
So what have I got. At this stage I don't know much about GT40's (I only know a little bit now!) but I do know inboard dampers on the front is not usual! The rear looks more 'traditional' but the BMW E38 hubs and brakes are unusual I think. Here are some pictures in the shop before I started strip down. The stainless panelling is junk and all needs to come off. Not as easy as you might think, tough and sharp!

IMG_1122.jpg


IMG_1123.jpg


IMG_1121.jpg


On the positive side, everything is adjustable and has mounting bracketry to allow quite a lot of movement in order to get things right. On the negative side, I have not seen a GT40 like this and nor has anyone else I ask and show pictures too. Someone on here might know more. My challenge now is, do I press on and risk this suspension being satisfactory or do I cut the lot off and make up a new set in a more traditional arrangement. Will it handle?

I ask a friend who has built and raced a lot more cars than I have and it turns out he has some computer software that can help. We measure everything up and he goes away to produce some geometry

IMG_2624.jpg


IMG_2625.jpg


We decide it can be made to work and crack on with the intention of keeping as much as we can. I should move the top link mounts on the rear down and out a bit to improve things but that is not a big deal (although the stainless chassis makes welding a little more difficult).
 
Next to strip everything off and see what we have. I tidy up the suspension arms which are in stainless like the rest of the car. I don't know at this stage but later I will make the decision to remake the rear suspension completely. I also later improve things on the front end. But for now, I get everything off and tidy it all up

IMG_1112.jpg


IMG_1113.jpg


IMG_1114.jpg


IMG_1126.jpg


I get all the stainless sheet off too and reveal what's underneath. None of it is very pretty! I realise it's all going to take a bit more work than I first realised.

IMG_1167.jpg


I weld up aluminium panels, clean everything up and things look a lot better. Just have to get this done all over the car now!
 
So I keep on stripping things off and the more I strip the more I realise it's definitely going to be a full rebuild! As I reveal things some of the welding is excellent and some is absolutely dire. Everything looks a mess. What have I started! I just need to keep going now.

IMG_1193.jpg


IMG_1194.jpg


IMG_1236.jpg


At least with the BMW hubs I will have a decent handbrake! Not everything is rubbish!!

IMG_1103.jpg
 

Randy V

Moderator-Admin
Staff member
Admin
Lifetime Supporter
Maybe the stainless wouldn't be so bad if it were straightened out and painted with a Bedliner type of product?
 
I definitely don't want to use the BMW 4.0l engine so out with that. It's a big unit and not one I have ever heard of going in to a GT40. I admire the guy who tried but it's not for me!! I do want the UN1 gearbox though, so I start stripping that out. The homemade BMW/UN1 bellhousing will be no use either. Maybe the clutch will be salvageable but when I get the drive plate out I get a shock. Someone has welded a centre in to a plate that clearly had the wrong spline! I won't be using that then!!! So after a lot of dismantling I end up with a UN1 gearbox and not a lot else out of the drive train. I send the box off to Chris Cole for rebuilding, a leggy 5th gear and lsd included.

IMG_1093.jpg


IMG_1116.jpg


IMG_1117.jpg


IMG_1118.jpg
 
On to the engine. The BMW power unit has been consigned to a life of drifting after selling it on EBay. The car came with a 'spare' 1968 302 that had originally been the power plant. Superficially it looked in good fettle but I pulled the rocker covers and could see there were 4 bent pushrods. I guess this motor has been over revved. Everything looked clean though. I popped the inlet manifold off and again everything looks really clean and like it had not had much use. The oil drain back holes had been opened out and smoothed. Did someone who knew something put this together?
Lifters and cam all looked good but later I would find chips on the cam which was a shame as it was a decent grind. On to the heads. All good except one has a bent valve. No piston damage. Pistons look in good order but I can see there are some scratches in one or two of the bores.
Of course, I check the bore and stroke and confirm it's a 302.
Anyhow, it looks like I need to strip the whole thing and rebuild it. To be honest, the stock heads were not really good enough anyway.
When I get in to the crank there are scores on the shells. I am now wondering if this thing was assembled on a beach or by someone with dirty hands!!! No problem, nothing looks too bad.
I decide on a way forward, polish the crank, new shells, Eagle rods, new KB high comp pistons with floating pins, hone or re-bore as required, Edelbrock big valve RPM Heads, RPM Cam and RPM Manifold. Rotating assembly all balanced up. Off we go....................

IMG_1219.jpg

It wasn't too bad but probably suffered from a poor standard of cleanliness during assembly

IMG_1220.jpg

Existing pistons were standard fare

IMG_1517.jpg

Soon an engine building pal is letting me use his shop and helping get it back together. Polished the crank and put new shells. All rotating assembly was balanced.

IMG_1539.jpg

Those spiral clips are easier when the piston is clamped nice and tight and in the warm of the wife's kitchen! She's used to it!!

IMG_1536.jpg

Bump top pistons and big valve heads used. We only honed the bores. Due to the different tolerances we almost got 40 over KB's in the 30 over bores! Very tight piston to wall clearance on these pistons. You need to be careful and follow the instructions on the top ring gap as it needs to be a lot larger than normal. 26 thou I think from memory. Otherwise heat expansion tightens the piston in the bore and pulls the top off.

IMG_1544 (1).jpg


IMG_1545.jpg


IMG_1547 (1).jpg


IMG_1550.jpg


IMG_1554.jpg

I dumped the water pump and used the Davies Craig blanking plate. Worked really well and did a tidy job. New harmonic balancer too. Now to get it home and see if we can get it in the car..................
 
Next step is to see how I can mount this engine in the car. The BMW motor was a totally different concept. I need to start from scratch. I bolt up the transmission and prepare to see how it sits in there. My objective is to get it as low as I can with the driveshafts aligned as best they can be. The relationship between the output shaft and chassis rail is my governing factor. At this point I have decided to go for a new MK1 body and this is on order from Tornado Sports Cars. I don't want to wait for it so I am taking a bit of a gamble. Later, it doesn't pay off quite as well as I had hoped! But for now, here we go.......

IMG_1559 (2).jpg


IMG_1567.jpg


IMG_1568.jpg


IMG_1569.jpg

I set the output shafts just above the chassis rails

Then with the mounts on I fabricate a rail to support them in the right place. All I need to do now is tack it all in and weld everything up

IMG_1570.jpg


IMG_1574.jpg

Similar with the transaxle

IMG_1597.jpg
 
Time to look at some of the ancillary items! Anyone who has been near a GT40 knows that it's all a bit tight back there! I've got my output shafts lined up with the wheels but it leaves very little space behind the bulkhead for things like an alternator. Definitely no room for a water pump with this chassis. I have no drawings to work from but I suspect this bulkhead is slightly further back than some, not by much, but even 25mm makes a difference.
I need a small alternator. I begrudge spending £400 on a tiny race one and look for alternatives. A Kubota digger gives me an option. Compact and with a decent output. All for a lot less money! I set about making a bracket that will work. These things always take longer than you think but I eventually get there!

IMG_1592.jpg


IMG_1594.jpg


IMG_1627.jpg

It goes in there, just! I have to buy a special pulley to get my alignment far enough back at the crank end but it all works. I later trim the chassis upright a bit to give a little more clearance on adjustment

IMG_1719.jpg

I also have to 'scoop' a bit of the bulkhead out to give enough clearance for the distributor and leads

IMG_1729.jpg

I make up some stainless pipes and get the plumbing in. Also get a little drive belt for the alternator. Before anyone asks, no, I'm not running AC in this car. I have ordered the body with 't-tops' roof/doors. I prefer to keep things simple. It's a UK car. Some summers we get hot but often we don't even get hot in July! I intend to install a race car type cooling fan under the dash and with the t-tops out am reasonably confident it will be cool enough (for me). Time will tell!
 
Hi, don't go too small on alternator power, between the ewp +/-8 amps, msd ignition 7-8 amps, your radiator fans, fuel pumps, and headlights ,interior heater /demister etc.... you will have to make choices between headlights /wipers or ignition on a humid rainy day

just my thinking, and experience with alpine 310 v6 in the past
Paul
I think this will be OK, it's 65amps. I have LED headlights. In fact all bulbs are LED including indicators. I agree with lights, de-mister etc on a rainy night it might be tighter but I am not intending to do too many of those. It should keep up anyway. With the t-tops I should have plenty of air movement without fans for fine weather. I have the option of spending money and getting a high output race one but I am hopeful this one will do the job. I shall report back when the weather finally improves!
I had a 65amp one on my cobra for many years without issue although I did upgrade it when a chap in the cobra club had a h/o one going spare.
 
I seem to have a lot more room in font of the engine on my Roaring Forties?
 

Attachments

  • PXL_20240102_031351416.jpg
    PXL_20240102_031351416.jpg
    334 KB · Views: 98
Engine is in, gearbox is mounted, time to start looking at other things. At the front end the brakes were originally a very complicated unit from a BMW. Anti locking set up etc. I'm not going to use any of that. I have MGB unit with integral servo. The brake master cylinder on the original car ran across the chassis, the pedal pushing via a little 'turntable'. It's not something I would have naturally done myself but I look at it, think about it and decide to mount the MGB unit in a similar way. It gives me space to have an integral servo. I can't see any reason why it won't work.
I also decide to add a remote vacuum pump to provide vacuum for the servo. It just saves me running a vacuum pipe all the way to the back to the engine. It's wired in via a relay.

IMG_1442 (1).jpg


IMG_1443.jpg


IMG_1446.jpg

I tidy up the bulkhead and the pedals. I also make up a new mounting plate for the steering column. To future proof things I make this so it can be easily removed and adjusted if I need to. The rest of the bulkhead is in 2mm stainless sheet so I weld up where it needs welding

IMG_1723.jpg

I also hook up the gear change linkage using what was in the original car. It's not ideal and later I have a bit of hassle. With the benefit of hindsight it probably would have been easier to make up something new. Hey ho!

IMG_1724.jpg


IMG_1726.jpg
 

Attachments

  • IMG_1726.jpg
    IMG_1726.jpg
    92.1 KB · Views: 78
  • IMG_1727.jpg
    IMG_1727.jpg
    91.6 KB · Views: 66
I seem to have a lot more room in font of the engine on my Roaring Forties?
Yes, you definitely do. Without measuring things and comparing, it's difficult to know what exactly is going on with mine. It works, but in it's own way! I ended up with 'spare' room behind the seat which I packed with insulation and put another skin up on the cockpit side. The body fit will be coming soon..............
 
My body arrives and I can finally have a look at how the MK1 Tornado body will fit with my one off chassis (formerly MK3 KVA body). The problem I have is datum points. As everything is different I have to fix something and go from there. Andy Sheldon at Tornado gives me a few critical dimensions and I set things on for an initial view.
I know the height of the spider at the front bulkhead. I obviously know where the wheels need to be, it's just a matter of getting it all on!
First problem is that the chassis is too high to allow the front section to sit down low enough. The previous body was obviously higher in the nose section. I have to cut out some steelwork and bend the front down lower to allow the body to sit level above the rocker panels.

IMG_1830.jpg

I make some cuts and remove the metalwork to allow me to bend the front down. I go as low as I can and still allow the radiator to fit! I then weld everything up and brace accordingly.

IMG_1832.jpg

I also realise the headlight moulding internally is clashing with the chassis. In other words the chassis is a little wide for this new body. I decide to sculp a bit out, just enough to clear, and make good with stainless. I'm using stainless wire and a spool gun for the welding.

IMG_1833.jpg


IMG_1834.jpg

Front sorted, I have a look at the rear. I need to shorten the chassis here quite a bit. The MK3 body was a lot longer. Out with the grinder!

IMG_1836.jpg


IMG_1835.jpg


IMG_1837.jpg


Now I can get the rear section to sit on there. I can now see that my gamble with the engine mounting is not entirely successful!!! Well not if I want a rear window anyway! The engine is too high by about 40mm. If you remember, I went as low as I could without fouling the main chassis rails. I have to think the next stage through carefully. I have to get it down and clearly need to maintain the integrity of the chassis. I will show you how I solved the problem in the next post!
 
You are doing well seeing your pictures.
Just a few years back I did the same, fitting a GTD mk2 body on a KVA "B" type chassis that suited a KVA mk3 body kit.
Just a way of logical thinking, cutting & welding chassis points to merry both together.
Trial & error till "you" get satisfied.
 
Back
Top