Build Diary - RCR Lola T70 Spider

Ron Earp

Admin
Sandy said:
Looking good, and this might help -

1.1875 :)
Somehow I got a 1.175 in there, not sure what I was doing. Shhhhh, somebody will notice it is off by 0.01"! ;) Car won't be worth a damn now!
 

Ron Earp

Admin
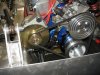
Engine Trial Fitment

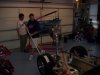
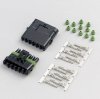
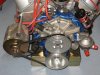
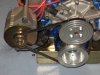
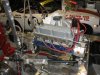
Got a fair amount done today. Motor mounts on, engine trussed up, bearings tight, rear brakes bolted up for real, bolts replaced with grade 8 in engine/tranny, and some other things finished up. Big thing was the first trial fitment of the motor. Notice slaves working in background. ;)

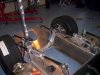
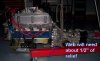
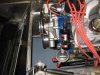
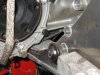
The motor didn't fit exactly as I'd planned though. Initial trials indicate that the rear pan/panel will have to be modified to fit the 016 into the frame. The 016 "hangs low" and will need a fairly large cutout in the rear panel. Another thing that is faily clear is that the 016 itself will have to be pruned down. The webbing underneth the gear box is going to foul on the bottom of the rear horseshoe. I thought we could pull the engine/transmission forward enough to avoid this, but, that is impossible.

The half-shafts from the transmission to the rear uprights pretty much defines where the engine and transmission have to be. If pretty much in line with each other the front webbing of the 016, right in front of the round section for the differential and LSD, will have to be cut out. How much I'm not sure but will mock up and measure accurated tomorrow, as well and take good photos. I would rather not cut out anything from the transaxle, but, I definitely don't want to cut anything from the frame.

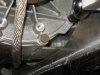
One could try and space the engine and transmission up in the chassis, but, that isn't a good idea. Besides, the RCR adapter plate also acts as a motor plate and is bolted to the chassis via two huge bolts. So, they dictate how low the whole assembly has to be, I'll get some more info tomorrow, maybe it won't take much modification. We made only a trial fitment today and didn't have a lot of time to tweak and think about it.

Other than that it appears that it will slide in nicely and has enough room. It'll be close on the firewall area but looks like it'll fit well. So, we're making some progress!
 

Attachments

  • 100_1339.JPG
    100_1339.JPG
    90.9 KB · Views: 1,987
  • 100_1340.JPG
    100_1340.JPG
    105.8 KB · Views: 1,856
  • 100_1341.JPG
    100_1341.JPG
    100.9 KB · Views: 2,040
Looking Good Ron,

we were taking a flyer on the undertray for the Lola.....at your request...winkwink

The RCR chassis was designed around the G50 or ZF package and the 016 was always the redheaded stepchild......

Keep the pics coming ......
 

Ron Earp

Admin
Hey, no worries on the fittment of pieces - that rear tray idea was last minute thing on my side and I appreciate you and RCR taking a guess at it. We are extremely pleased with the car and chassis and don't feel there is anything out there better for our purposes - track car with some street duty as we're building it.

All it needs for modification is about, I think, a 7" deeper cut and then for me to lay a 3/16" piece of ally across to strengthen where I cut. I'll get some pictures up. I'm pretty happy with it and think it'll be in tomorrow.

Once that is in place I think it'll fit with little drama. The engine/transmission sits much lower in relationship to the chassis than say an RF car that I fitted up before. As such, my oil pan *might* be 1/2-3/4" lower than the chassis bottom, but I'm not sure yet. I don't mind though, I'm quite pleased that it won't be high and won't have the engine tilted forward as the RF SB Ford/016 installation did. A new pan can fix it if it needs fixing.

The 016 is pretty small and compact, but where it is not compact is input shaft centerline to bottom of transaxle. This transaxle was clearly designed with an engine that had a crank up high in a block, or an engine that was going to sit high in a chassis. It's okay though, and she'll get in there before long.

Other things are coming along too. We're plotted out pedal positions, reservoir locations, and I've got the wiring harness all over the play room cutting out wires I don't need. Power Antenna. No. AC. No. Heater. No. Oil sender. No. Temp sender. No. Alternator field. No. No. No. No. The beauty of mechanical gauges and a race car setup.

These pictures will probably describe what I'm talking about so folks don't think I'm opening a chop shop here, really not a huge deal. Much thanks to both Jeffs for helping out today!
 

Attachments

  • 100_1342.JPG
    100_1342.JPG
    64.9 KB · Views: 1,756
  • 100_1343.JPG
    100_1343.JPG
    61.4 KB · Views: 1,766

Ron Earp

Admin
And a shameful picture........

This is a picture of my garage helper who in generally present throughout garage events, unless, of course, Ed The Dog is over.

And, here is a shameful picture of how NOT to bolt up your flywheel and pressure plate. What is missing in this picture?
 

Attachments

  • Image006.jpg
    11.2 KB · Views: 1,626
  • Image007.jpg
    11.9 KB · Views: 1,607

Ron Earp

Admin
Brake Pads

I spent some time on the phone with Wilwood to get some pad info for the brakes on the Lola. Assuming your RCR has a track pack brake setup and 6 pot front and 4 pot rear, same as mine, the part numbers for the calipers are:

Front 120-5961-RS Wilwood Pad 7420
Rear 120-7429-R Wilwood Pad 7420

Nice thing is it appears to use the same pad front and rear.

I chose a A Compound pad for the calipers which would be good for track work. The part number for that pad is 15A-5938K from Wilwood, about $169 a set (set covers one end of the car). Cheaper from distributors and all the major players make pads in that size shape format, Pad 7420. Hawk, Carbotech, etc.

Ron
 

Sandy

Gulf GT40
Lifetime Supporter
Ron -

I have run the 'J' compounds with very good results in the comparitivly heavy mustang with the 6 piston SL's and they work very well compaired to the crap that they shipped with the caliper (I'm guessing street pads).

I have got to the point where I have started putting the trans on the motor and can't figure out why it seems to be about 1/8" off. Then I look on the floor to spot the back block plate for the scatter shield. You would have found out sooner or later that it was missing something :)

Sandy
 

Ron Earp

Admin
Wiring

Been working on the wiring harness a bit. I want the front and rear clips to be easily removed with a single harness connected. I did my Jensen race car that way so that you can pull the engine by unpluging one 9 pin connector, and unbolting it. All sensors, harness, etc. is self contained.

Doing the same here with the clips and their lighting. Drew this up while waiting on some stuff and already want to change it since the fans won't be removed with the clip, they don't need there wires in the harness. But, thought I'd put it up anyhow.

These two subharnesses are what the main harness from RCR will plug into to make life easy.
 

Attachments

  • lolawiring.jpg
    lolawiring.jpg
    61.8 KB · Views: 1,544
Hey Ron,

That looks like what I wanted to do with Mike's RCR 40. I still haven't been able to find the connectors you mentioned. If you find the connectors, would you post them?

Thanks
 

Ron Earp

Admin
Summitt has these in 6 pin, might have to use two of them to get done. Look under weather proof connectors. I have some nine pin in the garage just like these that are arranged in a square so I know they exist. Thought I got them from Summitt, but I can't remember.
 

Attachments

  • prf-70406_w.jpg
    prf-70406_w.jpg
    21.6 KB · Views: 1,523

Sandy

Gulf GT40
Lifetime Supporter
Those are Packard Weather Pak Connectors. They are a very good connector. You can get them and some other that are good for automotive from Waytek Wire, you might have some minimums on some items, but it is usually enough to have some spares. Pretty good prices as well as other good stuff for doing automotive wiring jobs.

http://www.waytekwire.com/

If you do a lot of wiring it's worth it to get the specialized crimp that does both the seal and the wire in one shot. Otherwise care and a small pliers or crimp work ok.

Also I think Jegs has kits with a variety packs with a few different styles, terminals and seals.

Sandy
 

Peter Delaney

GT40s Supporter
Hi Ron, I used exactly the same connectors for front & rear clips - 2 x 4-way jobs for each clip. Bullet-proof, water-proof, & not too hard to separate & re-connect. (These connectors are also used extensively on post-84 Corvettes).

I went with 2 x 4-ways instead of a single big connector after seeing how hard the big ones under the dash are to separate - murder on the fingers !

To avoid confusion, I wired each end up with 1 x 4-way M=>F & the other one F=>M - now, even I can't stuff that up !

Re the terminations - I just crimped them on with long-nose pliers, then added a dab of solder on the bare-wire crimp area.

Kind Regards,

Peter D.
 

Ron Earp

Admin
A Recap

Since I have to stop work on the car for a couple of weeks due to business travel and prepping SMs for the 13 hour enduro, I thought I'd put together a quick summary.

Well, Jeff and I have been on the Lola build about two weeks now, roughly. The car got here July 4th weekend, but I wasn't quite free to work on it until about the first of September - race car work going as well as some parts hold up from KED and PAW. Finally, within about two days everything showed up and we got to work straight away using Saturdays and one night a week.

Thus far, everything has gone extremely smoothly. The car is, in my opinion, extremely easy to assemble and build. After having worked with the car I think it is easy to overlook the aluminum monocoque chassis in a written description of a product. But that would be a mistake, the chassis/suspension is fantastic and really make life easy. And what it does for your build time should not be underestimated. My old RF GT40 tube frame car that I sold (which I still like by the way) took me months to get to the point where this car came as delivered from RCR. You have no paneling to do of the chassis since it is a monocoque and it makes the build so much easier. No paneling ready strips hours and hours off a build and allows one to concentrate on the mechanics, rather that structural/cosmetic issues that I don't like dealing with so much (my preference, some of you know I don't do too well with making things pretty, making them work is hard enough for me! :)).

The pieces that RCR supply, like the cut, flared, and pre-bent brake lines, work really well. I do brake lines now easily (unlike four years ago) but having them like this makes installation a no-brainer. Our complete hydraulic system was up and running within about five to six hours, and that included pedal assembly, modification, and installation as well. SS lines all around, good Wilwood 6 pot/4pot calipers, etc. all go on without drama. Other bits have been equally as good such as all the suspension components, arms, and uprights. Fit very well and not having to do anything to them - such as coat, drill, tap, etc. as I've had to do on other builds, really speeds things up and lends a high quality fit to the car.

Anyhow, we're pleased with how it is going together. With a fairly low investment of time (and it is low because of build ease, direct communication with Fran, and the other RCR build threads I've pruned ideas from, thanks guys!) this is where we've gotten:
  • Body sprayed with guide coat and *some* sanding started - body seems to fit very well and will not require re-shaping to acheive a good fit. Was temped to polish the gel coat, put race graphics on it, and leave it be!
  • Glass cutout for most major things, shaped somewhat on cutouts
  • Brake lines, clutch lines, pedals, masters all installed
  • Electrical harness pruned, special connectors made, ready for installation
  • Engine and gearbox mated, clutch/pp/tb all installed - still have some dress and alternator installation to go
  • Engine test fit, mount positions fixated, ready for install
  • Fuel gauge installed
  • Fuel feeds drilled, still need to make tubes for feed
So, while it doesn't look like a lot on paper we don't have a huge number of hours invested either. Good to recap every now and again, keeps you focused on where you've got to go.

At any rate, I probably won't have any more updates for a bit as we have to shift onto the TR8 for racing next week at the SIC, and then on some SMs to get them ready for Nov. I'll try and go out and shoot a few more pictures to catch the thread up to date for stuff not featured.

Ron
 

Ron Earp

Admin
Well, it has been about two months since I've done anything on the Lola due to race car prep. But, the enduro is over and now I have time to focus on the Lola.

I've managed to clean the garage up, fabricate some brackets, mount up all the bits on the motor, and do a test fit of the engine. I'm pretty pleased!

The Ford engine and Audi transaxle sits a few inches lower in this chassis than it did in the Roaring Forties chassis and I like that aspect of it. My alternator is stuck too far out to the side of the motor so I'll need to fabricate another support bracket for it that brings it in closer. The alternator could be smaller for what we're doing here, but, I want to be safe if we run this in an enduro and we need to power an array of lights for nightime use.

And, as you can see, I'll need to trim a bit of webbing off the bottom of the Audi transaxle to clear the chassis. Firewall clearance seems to be just fine from the front pictures with the exception of the alternator hung out there on the side.

I'm going to do some more careful measuring, some grinding on the box, and then get the holes drilled for mounting of the motor. I'll need to re-index the fuel pump so it doesn't point at the torque box wall there, but all in all it looks to be on track. Here are a few pictures.
 

Attachments

  • alt2.JPG
    alt2.JPG
    135.7 KB · Views: 1,130
  • alt1.JPG
    alt1.JPG
    119.8 KB · Views: 1,103
  • engine1.JPG
    engine1.JPG
    150.3 KB · Views: 1,270
  • engine2.JPG
    engine2.JPG
    144.5 KB · Views: 1,102
  • pump2.JPG
    pump2.JPG
    133.5 KB · Views: 1,077
  • trans1.JPG
    trans1.JPG
    127.5 KB · Views: 1,061
  • trans2.JPG
    trans2.JPG
    120.3 KB · Views: 1,082
Ron,
While you are remounting the alternator take the time to find a water pump pulley that shifts the belt back towards the motor so that the loads will be over the pump bearing. Your alt looks like it can go rearwards by approx 1.25" and you appear to have a spacer between damper & crank pulley that could be removed to facilitate this. While your at it fabricate a triangle bracket for the main top pivot bolt of the alt that picks up on two of the water pump bolts. A larger alt pulley or smaller(4" dia ) crank pulley would help as well. Do all of those things and it may last the 13 hr distance.
Cheers
Jac Mac
 
Ron

Can you remove the right side thermostat housing bolt?
I had a problem...mine was too long and that water pump casting tab at 12:00 high would not allow it come out enough. Make sure you can get a wrench on it, and make sure you can get it all the way out. Otherwise cut off that tab.

MikeD
 
Back
Top