I am in the final phase of revising the 016 transaxle in my #40 CAV. Didn't like the high rpm's of the AAZ geared box. I had a new ring and pinion, new 5th gear(.72), a Wavetech LSD, along with a rebuild of the transaxle done by German Transaxles of America. I'll be writing a separate thread on this part after a few miles of test driving.
I wanted to write down a few things that might make this revision easier for anyone considering a similar project. This is a project you can do at home without any special tools or equipment. I do not recommend using air tools. Pre-planning and organizing will make this job much easier.
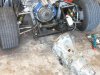
- Take photos of every nut, bolt, bracket and area you put a hand on.
- Bag and tag every nut/ bolt/ bracket removed.
- You do not have to strip the entire rear suspension to remove the trans.
- Jack the car under the adapter plate to support the rear of the engine.
* Remove the rear cam shell only, not the bracing.
* Remove the muffler, sway bar and mount, cross brace, CV joints,
shift linkage, rear trans mounting brackets and hydraulic clutch line.
* Unbolt the trans and with a friend pull trans back from motor. You
will have to move some stuff out of the way to clear trans.
- The re-installation is simply the reverse of the above. I advise having
2 people to do this. You might find the transaxle difficult to go into the
pilot bushing, but put trans in a gear and wiggle. Shouting and cursing
tends to help a lot.
- I did install a new throw out bearing because the old one looked tired.
- I did not touch the clutch, pressure plate, flywheel or pilot bushing.
These items looked to be in good condition. My car has 12K miles on
the odometer.
I'm planning on test driving the car today or tomorrow and expect to see a lot less rpm at highway speeds. So far it's been an interesting project.
I wanted to write down a few things that might make this revision easier for anyone considering a similar project. This is a project you can do at home without any special tools or equipment. I do not recommend using air tools. Pre-planning and organizing will make this job much easier.
- Take photos of every nut, bolt, bracket and area you put a hand on.
- Bag and tag every nut/ bolt/ bracket removed.
- You do not have to strip the entire rear suspension to remove the trans.
- Jack the car under the adapter plate to support the rear of the engine.
* Remove the rear cam shell only, not the bracing.
* Remove the muffler, sway bar and mount, cross brace, CV joints,
shift linkage, rear trans mounting brackets and hydraulic clutch line.
* Unbolt the trans and with a friend pull trans back from motor. You
will have to move some stuff out of the way to clear trans.
- The re-installation is simply the reverse of the above. I advise having
2 people to do this. You might find the transaxle difficult to go into the
pilot bushing, but put trans in a gear and wiggle. Shouting and cursing
tends to help a lot.
- I did install a new throw out bearing because the old one looked tired.
- I did not touch the clutch, pressure plate, flywheel or pilot bushing.
These items looked to be in good condition. My car has 12K miles on
the odometer.
I'm planning on test driving the car today or tomorrow and expect to see a lot less rpm at highway speeds. So far it's been an interesting project.