Colins Build Log

Ken Roberts

Supporter
The roll cage is bolted to the chassis with 3/8" x 24 grade 8 bolts.

I didn't take the hub nuts off when changing out my studs. The easiest method I found was using a air impact hammer. Use a pointed bit right on the end of the stud. They back out quickly and with very little stress on the hub assembly.
 
Ken unfortunately I don't have any air tools; so I have to try other methods with measly hand tools!

John you must have ordered something fancy; mine was just plain Jane with most of the interior options.
Thanks
 
Colin

Congrats

Do yourself a big favor and if you haven't taken the body off yet, take pictures and measure distances from the body to chassis at all points but especially at the side foot wells and rear bonnet/ fender wells.

It is one thing I did not do so when planning out the real estate, I had to put the body back on a couple of times to ensure stuff fit.

Good luck, enjoy the challenge.
 
Brake lines

Well I have finally started assembly after taking everything apart and hanging all the body bits from the ceiling in the garage.

Thought I'd start with something easy - figure out where the brake line residual pressure valves and brake switch go in the new configuration with everything outside the foot-wells.

The bits that came with the kit don't seem to fit together; I have the bits in photo 1.
Can't seem to make these work with the brake lines as they were installed at the factory (photo 2). There is a black 1/2" fitting on the end of the rear brake line.
1. Where should the residual valve for the front brake line go?
2. How can you attach the brake switch and residual valve for the rear brake line with the 3/8" and 1/2" ?? black fittings as they have been provided?

Thanks in advance.
 

Attachments

  • BrakeBits.jpg
    BrakeBits.jpg
    130.5 KB · Views: 209
  • BrakeLines.jpg
    BrakeLines.jpg
    141.8 KB · Views: 212
This is not a simple job. It's one of the most frustrating. Don't ask me why, but getting information on this topic is...difficult.

I mistakenly put the front valve inside the foot box and didn't realize until 8 months later that I did it "wrong". You need to buy fittings to complete all the connections. I went through so many iterations that I would need to check my receipts to see what finally worked.

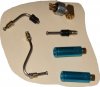
You may also want to try to remove the black fitting on the valves and ensure there is a rubber seal and spring inside. And that they move. You may have to heat up the valve to get the fitting off. If you heat it up too much, you may melt the valve. If the smaller brass fitting on the other end leaks, dont even bother with it. Throw it away. Those things are maddening. They're difficult to install, and to not leak. I wound up splitting the flare on the end of one of the short lines you pictured because I over tightened it. Thankfully it was simple to replace because it was small, but it wasn't exactly cheap.

Depending on your philosophy, you can resign yourself to making those damned things work, or make life easier and buy the Wilwood versions. But the Wilwoods are shorter in length and if they're surrounded by hard lines, that can be a difficult conversion.

A.J.
 
those valves are junk. I like inline tube's stuff, always buy their pre-flared stainless lines and never had an issue, but those valves are pure junk.

Buy Wilwood's.

There's 2 things I've grown to hate with a passion with brakes - that particular set of valves and the Wilwood remote reservoirs that will inevitably go leak leak leak leak leak leak leak leak leak (Tilton fTW!)
 
Back
Top