Doc's SL-C Build

Howard,

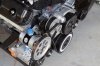
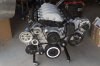
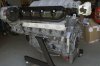
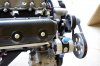
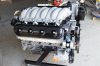
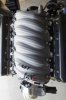
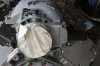
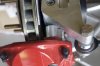
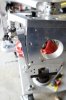
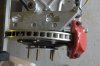
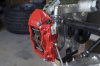
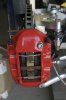
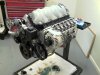
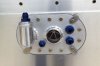
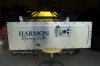
Here are some photos of the Rear Brembos (and a sneak peek at my LS7).
 

Attachments

  • Brembo2.jpg
    Brembo2.jpg
    195.6 KB · Views: 531
  • Brembo3.jpg
    Brembo3.jpg
    216 KB · Views: 518
  • Brembo4.jpg
    Brembo4.jpg
    185.1 KB · Views: 493
  • Brembo5.jpg
    Brembo5.jpg
    17.2 KB · Views: 496
  • Brembo6.jpg
    Brembo6.jpg
    21.5 KB · Views: 508
  • BremboRear.jpg
    BremboRear.jpg
    181.8 KB · Views: 546
  • BremboRear2.jpg
    BremboRear2.jpg
    21.6 KB · Views: 486
  • LS7dryfitted.jpg
    LS7dryfitted.jpg
    230.1 KB · Views: 601
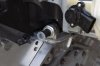
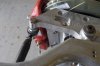
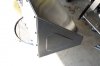
You may want to check with Fran, but you may be missing a spacer on your toe bar bolt

rearlcauca.jpg

Alex- thanks for pointing this out. Mine is also missing the spacer you have, and now that I look at it, I can see that the toe link isn't parallel with the LCA- but would be with a spacer like yours. I expect that there would be a bump steer issue without a spacer.

Can you measure the spacer length and post it?

Thanks!
 
What a disappointment....

Spent months waiting for the fuel cell to arrive. Sent a multitude of photos and measurements. When it arrived today I could tell I'd have problems.

The access plate is real pretty, but the "L"-shaped tube (vent?) is too short to bridge under the X-beam of the SL-C. It is right where the LS7 water pump T-stat outlet will be.

I showed photos, told them how critical this area was........

Is there any fix I can do locally rather than send back to CA and wait several more months? How about moving the access plate? I guess that's dependent on the bladder. How about blocking the "L"-tube flush and relocating? That might depend on the presence of a roll-over valve although I have no schematic. Any thoughts short of starting on anti-depressants?
 

Attachments

  • _DSC2561_2.jpg
    _DSC2561_2.jpg
    59 KB · Views: 474
  • _DSC2562_2.jpg
    _DSC2562_2.jpg
    60 KB · Views: 479
  • _DSC2563_2.jpg
    _DSC2563_2.jpg
    56.7 KB · Views: 410
  • _DSC2564_2.jpg
    _DSC2564_2.jpg
    48.9 KB · Views: 432
  • _DSC2565_2.jpg
    _DSC2565_2.jpg
    47.9 KB · Views: 461
Assuming the access plate can be removed from the cell & pickup tube etc it should not be a big deal to cut the 'L' fitting off & rework it if you can find or have a local guy who is handy with a tig & knows his alloy stuff....
 
Thanks guys.

I talked to Fran today and he said he'd fix it for me and test it on one of his SLC's before sending it back to me. I think the vent tube has to be redone and things will work. Drank a Negro Modelo and all is good now.
 
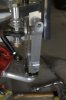
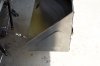
Is there any reason you cannot rotate the plate 180º and use additional hose to make up for the new configuration?


I don't think you could do that - the vent has to point up, not down.If you rotate 180 you end up with it pointing down which isn't good .... and there's no point rotating and cutting it because then you end up at square 1.

Hummmm. Odd pickle to be in.
 
Alex,

When Fran and I discussed this we concluded that the thing to do is cut the "L" off, plate it at the tank, put in a -6AN bung and fitting to direct the vent hose up.

Got to wrap it up and send out today.......going to Montreal for the Canadian GP this weekend. Oh, photos of my engine forthcoming (got to mow the yard first before the 100-degree heat hits).
 
OK,

Ready to ship out the Harmon Fuel Cell to Fran and took some debut photos of my engine:


LS7 crate engine, ported/polished heads, 5-angle grind, dual springs, Ti retainers, heads milled for Jesel 1.8's beam roller rockers, roller lifters, custom grind cam (Lunati), seamless roller timing chain, custom length push rods, crank pinned, ATI damper, ARE dry sump pan, Aviaid Gilmer Drive 2-stage scavenge pump, FAST 102mm manifold port matched to heads and Williams 105mm Drive-by-Wire Throttle Body, Katech reverse valley cover, AN water vapor ports, AN water pump inlet/outlet, AN heater in/out, Carbon Fiber tall valve covers. I'm relocating the coil packs to the rear heads. Hopefully, the header manufacturer will provide Fran with positive HP data and I can add them to the list.
 

Attachments

  • Aviaid.jpg
    Aviaid.jpg
    83.8 KB · Views: 657
  • FrontAccessories.jpg
    FrontAccessories.jpg
    77.4 KB · Views: 585
  • LeftSide.jpg
    LeftSide.jpg
    77.4 KB · Views: 552
  • OilPressurePort.jpg
    OilPressurePort.jpg
    52.2 KB · Views: 521
  • Rear.jpg
    Rear.jpg
    72.7 KB · Views: 509
  • RightFront.jpg
    RightFront.jpg
    77.3 KB · Views: 482
  • RightSide.jpg
    RightSide.jpg
    87.5 KB · Views: 647
  • TopView.jpg
    TopView.jpg
    25 KB · Views: 495
  • WilliamsTB.jpg
    WilliamsTB.jpg
    65.8 KB · Views: 460
The new mill is looking very sweet Doc.
Having a few gearbox problems here and could do with your help!
How do you make a Negro Modelo??
Woody.
 
Back
Top