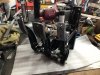
After months of waiting the Ecoboost motor is running and near completion can't wait to get her back from Calf she made at 6200 rpm 558 hp 528 lbs of torque at 14 pounds of boost just what I wanted.

You are using an out of date browser. It may not display this or other websites correctly.
You should upgrade or use an alternative browser.
You should upgrade or use an alternative browser.
Fat Larry's GTR Build
- Thread starter [email protected]
- Start date
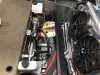
Ok thinks are slowly coming together the engine is packed and ready to make the trip home from Calf along with my extremely expensive ECU but I guess someone has to be the first in everything l installed my estop emergency brake system today very nice kit and works well.
Attachments
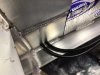
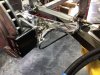

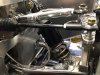
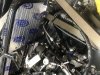
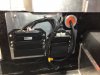
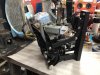
So this weekend finished up with the modifications to the front suspension that H and Kurtiss did to their cars and installed the Ramlift nice system just don’t like the braided lines they give you I will be switching them out for # 4 AN brake lines. I also received my ECU from Calf Danzio Performance so I started to make mounts for the system.
Attachments
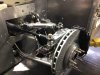
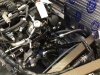
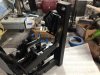
Ok motor made it back from California and now the fun begins putting the puzzle all back together and hopefully hearing the first start in the car after two yrs of working
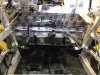
Normally I bolt the trans to the motor and put it in one piece but since everything is detailed now I am taking my time not too scratch anything up I am waiting on clutch to flywheel bolts from Audi just a word of caution don’t use the bolts from McMaster Carr even though they have a tensile strength of 170,000 lbs they break before being fully torqued down
"...just a word of caution don’t use the bolts from McMaster Carr even though they have a tensile strength of 170,000 lbs they break before being fully torqued down "
Something's wrong here. What bolts are they? What torque value breaks them? What torque wrench is being used? Are the threads lubricated and with what?
Something's wrong here. What bolts are they? What torque value breaks them? What torque wrench is being used? Are the threads lubricated and with what?
Neil M6 X 70 MM bolts used to bolt up the clutch to the flywheel, I tried to torque them to 70 ft lbs and they kept breaking.
Larry, 70 ft lbs is way way too much for a M6 bolt. M6 is about the size of a 1/4" US bolt. For one of the best out there (12.9 grade), 12 foot ponds is the requirement. Look here.
What is the torque spec on a 6mm bolt?
Torque. Different bolt sizes and grades have different torque specifications. For example, 6mm bolts with a 10.9 grade have a maximum torque value of 10 foot-pounds, while the same-size bolts with a 12.9 grade have a maximum torque value of 12 foot-pounds. Consult your shop manual for the most precise listings.
Reference: www.ehow.co.uk/facts_7677450_metric-torque-specifications-bolts.html
Regards Brian
Ron McCall
Supporter
70 lb/ft??? For a M6 bolt?? Max torque should be like 12-13 lb/ft.Neil M6 X 70 MM bolts used to bolt up the clutch to the flywheel, I tried to torque them to 70 ft lbs and they kept breaking.
No wonder they broke.
Ron
Ron you are correct when I looked into the proper torq for the bolts I thought it was ft lbs it turned out to be inch pounds so 71 inch lbs is equivalent to around 6 ft pounds no wonder they snapped well what’s the old saying you learn something every day
Thanks guys for all the info slight oversight on my part or should I say a brain fart
Ken Roberts
Supporter
McMaster Carr actually sells ARP bolts too. I have bought them in the past.
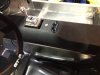
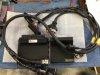
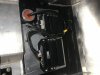
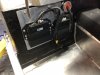
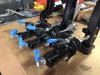
So today I was able to finish the fabrication of the ECU mounts and then I powder coated everything I also changed out the hydraulic lines for the Ram Lift system with 4 an brake lines more confident knowing there will be no leaks. I also changed the clutch master to a 1 inch dia bore cylinder hopefully make it a little easier on the left leg
Attachments
-
 71DB80ED-B3DD-45CE-8E52-BCE403569216.jpeg567 KB · Views: 395
 -
 AEB3BD5F-E0FB-4775-87A9-ED0A1B3EAE6F.jpeg307.1 KB · Views: 375
 -
 1CCADD24-961C-43FD-9761-ED84E63C5830.jpeg505.2 KB · Views: 370
 -
 6413AD32-B5B1-40DA-AAAD-89E8EF898073.jpeg367.6 KB · Views: 382
 -
 D0A47B19-7B6E-42EA-AA2B-F7338BD8E36C.jpeg357.2 KB · Views: 376
 -
 0E3A7AE8-871D-4D3F-A4B4-1E687D0A634D.jpeg435.4 KB · Views: 416
Larger Piston more hydraulic pressure
Joel K
Supporter
Larger Piston more hydraulic pressure
Larry. I think this explains what I was trying to say better. But I think the 1” bore will increase the pedal effort and not reduce it.
Master cylinder bore size determines the amount of fluid that will be displaced as the clutch is depressed. With equal travel, a 7/8-inch master moves more fluid than a 3/4-inch master. While a larger-bore master cylinder displaces more fluid, it takes more pedal force to create the same pressure as a smaller-diameter bore.
Similar threads
- Replies
- 12
- Views
- 885
- Replies
- 38
- Views
- 10K
- Replies
- 0
- Views
- 738