
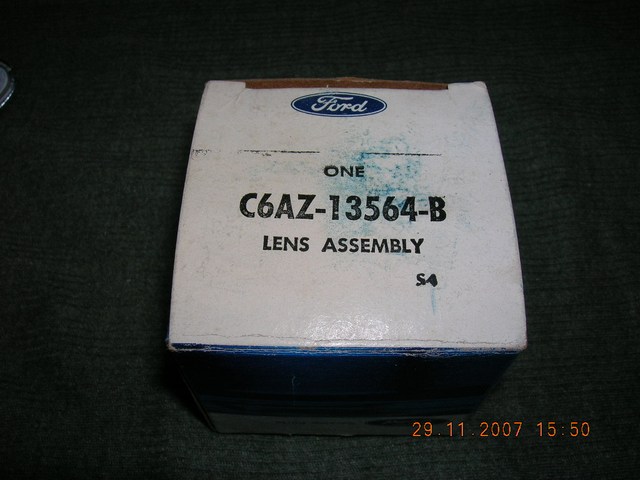
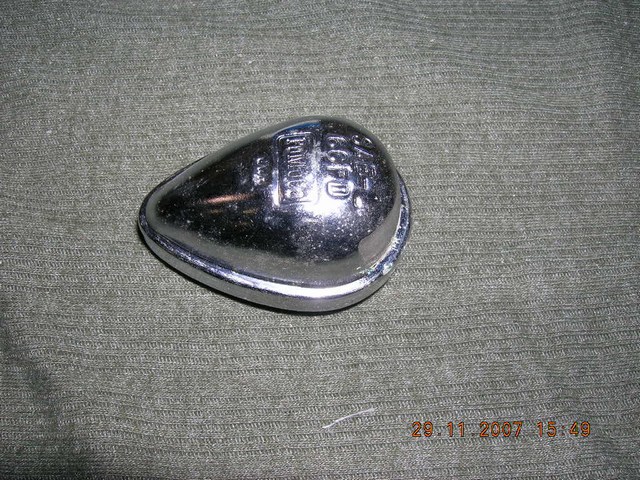
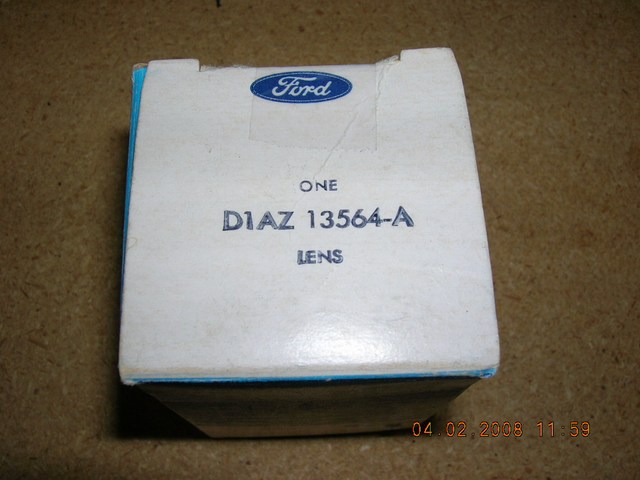
This “How To” is going to detail two different techniques I used to put number lights on the doors and rear deck of a SPF GT40 Mark II. The Mark I uses a different style light that is readily available and the install is much easier than that described here. If there is a desire from someone on how to do a Mark I, let me know and I can tell you where to get the parts and how to put then on. There are also threads on this forum detailing where to find MK I style lights. These techniques apply to any GT40 MKII. The first method I used was on my own car (P2133) using Ford part number C6AZ-13564-B. These are the “early” style lights that have FoMoCo embossed in the shell. The second method used Ford part number D1AZ-13564-A on Steve Cioffi's (P2125). These are the later version that has the FORD “script” logo embossed on the shell. I made all the parts for Steve also and I'll post pictures of his install after he finishes it. My thanks to Steve for his thoughts on this project. As you view this work, you may think it trivial. It was anything but. There were several hours just trying to source the sockets and bulbs that would fit not to mention the fastening hardware in Steve's application. However now that we've done the heavy lifting you can approach this with a great deal more ease. There are certainly other ways to get this job done. I have no idea how these were installed originally. If you've got a better/different way, let me know and I'll add it to this post.
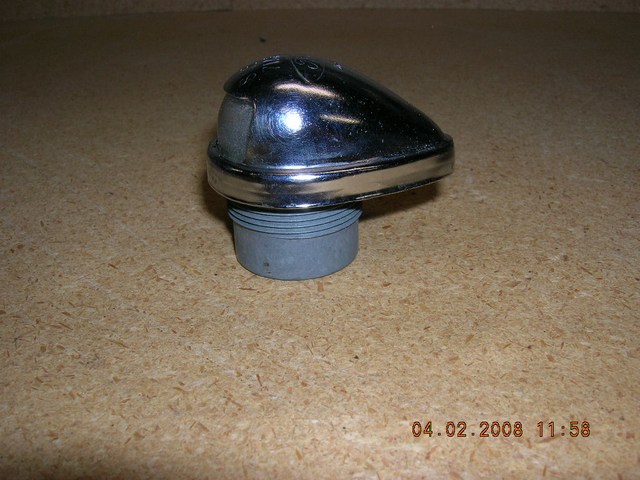
Your biggest challenge is finding the parts. These were OEM rear bumper license plate lights for 66-71 Rancheros and Torinos. These WERE NOT used on Falcons. I've been told there are other years and models where these were used but I can find no reference to back up this claim. I spent months searching all over the world via the web and Hemmings Motor News to no avail. I called bone yards, vintage parts suppliers, and re-pop outfits from coast to coast – border to border with not one found. I even called Europe, Australia, and NZ............nothing. Almost by chance I stumbled into a old auto shop in Portland OR and the guy had four NOS C6AZ's on the shelf. I have also seen them on eBay periodically. Prices vary dramatically form about $20 ea to over $50 ea. Mike Gelb (P2136) is looking into having them re-popped but your best bet for now is to just start looking. Mike has done an extensive search also and tells me he thinks he's found the last 8 on the planet. Steve found his D1AZ's on the web but they are as rare as the C6AZ. The problem with the D1AZ's is that they are much harder to work with. None of the parts we've found come with the original sockets or mounting hardware which creates the next challenge. I detail here how to get around these problems once you find the lights.
From Rick Muck-Mark added 25 Feb 08
A further bit of information: The NOS Ford light C6AZ 13564 B WAS used on Falcons, i.e. the wagons. In fact, the part was used on ALL full size Ford station wagons 1966 to 1970 and the same years of Fairlane and Falcon wagons (as well as the Mercury versions) so the obvious place to look for these used, is on those models. The 1966 to 1970 Rancheros were also home to these lights. Note that the later D1AZ type light would NOT have been used originally on a GT40 as that part was not released until 1970 for the 1971 models, but it is very close in style and does work well.
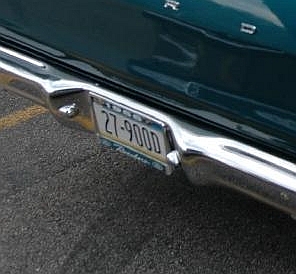
Below is a picture from a post by JimmyMac I snipped from this forum over a year ago to carry with me to parts outlets so I knew what to look for.
I'm not going to detail how to wire these lights as it is vehicle specific and relatively easy irrespective of the problems of routing which can be a real pain in the a$$. As a note to the SPF owners: the wires that go to the panel switch are located just above your right knee on the passenger side (left hand drive). There is a Gray/Red wire and a Brown wire. Brown is ground. The two wires are wire tied to a bundle so they may not be too obvious. Run wires as required to get them where you need them.
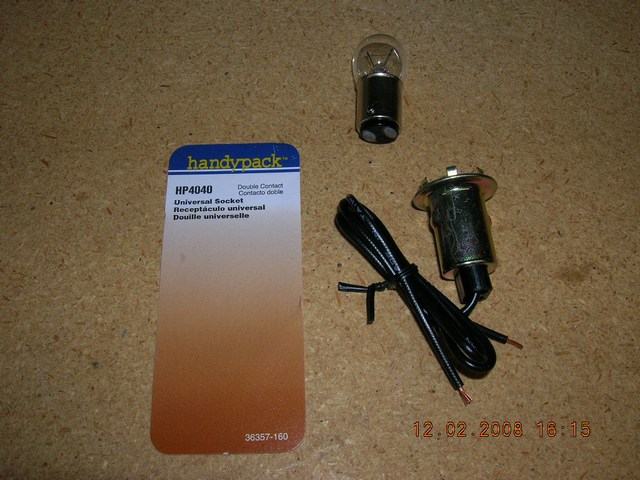
The bulbs I used are # 1004. These bulbs are rated at 15 CP which is the brightest bulbs I could find that will fit into the hole. The sockets can be purchased at nearly any auto or marine parts store. These are two wire sockets so you must use a two terminal bulb like the 1004. The 1004 has only one element but two terminals on the bottom. The ground is through one of these terminals....not the bulb base. This makes them perfect for applications in fiberglass.
Here is what you want to look for:
Or try these:
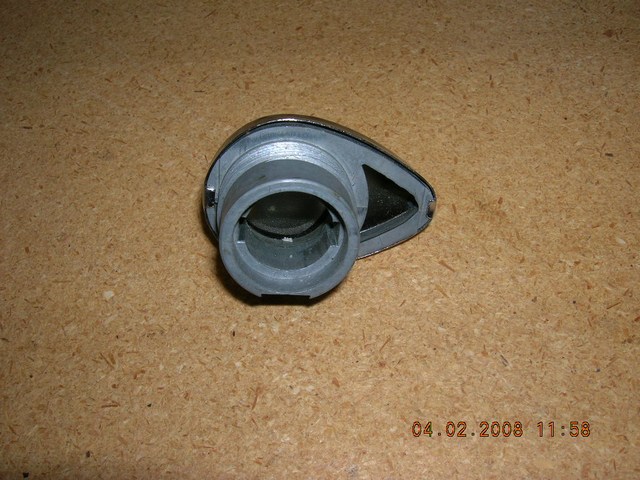
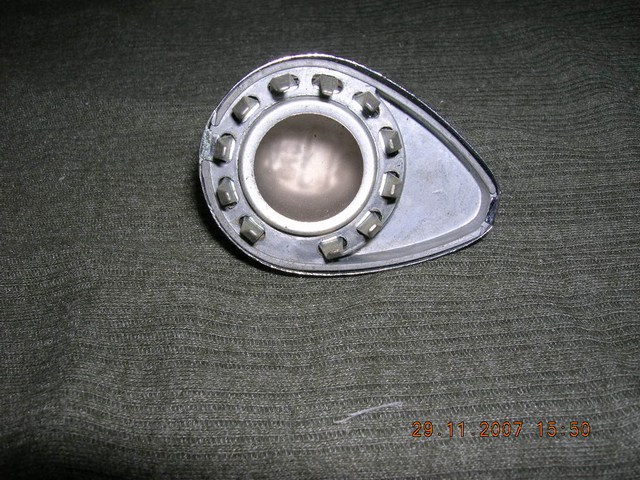
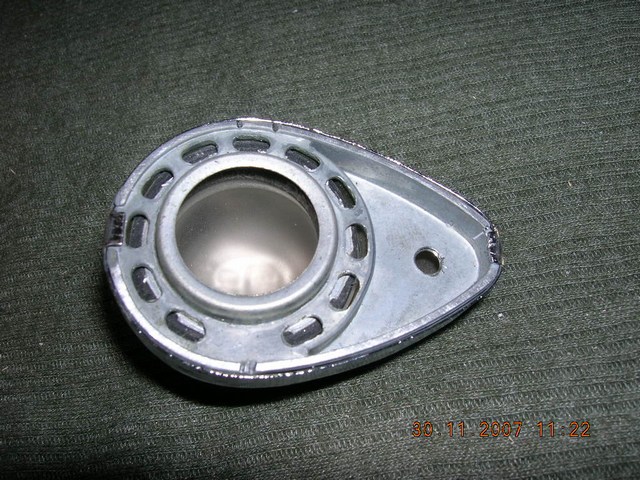
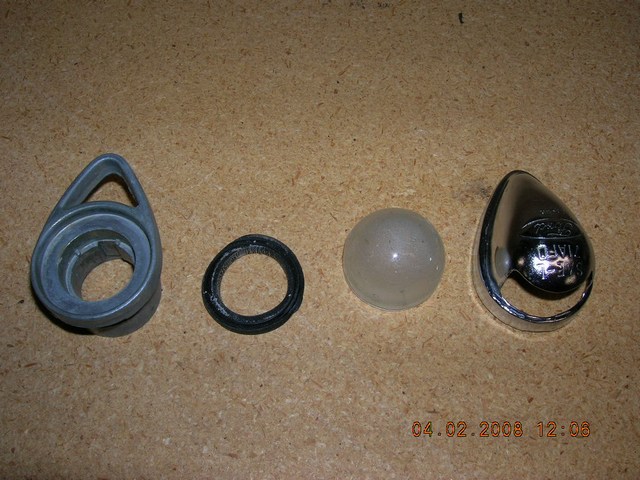
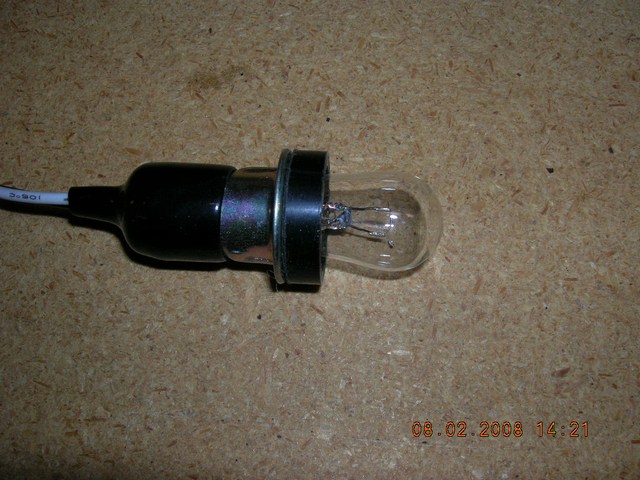
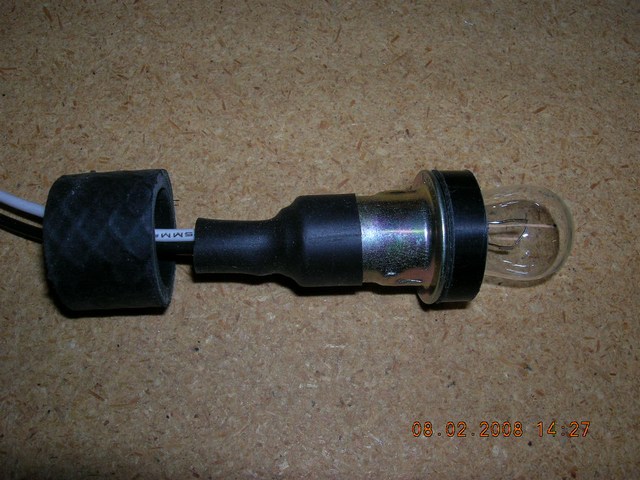
Lets get started. I'll do the C6AZ style first. Start by disassembling the light. To do this, VERY carefully bend the tab on the tapered end just enough to get the guts to lift out from that end. This is important. There is no need to bend the tabs at both ends and you will only be able to bend the tab up and back down once before they break off so think before you act. Wash the parts because they get pretty funky after 40 years. I also buffed the chrome shell before reassembly.
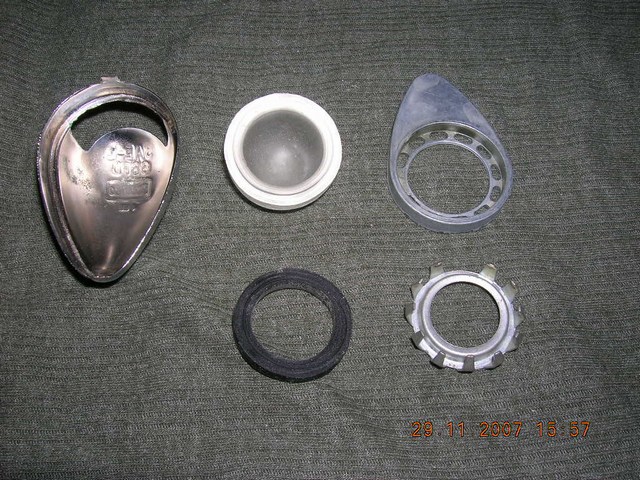
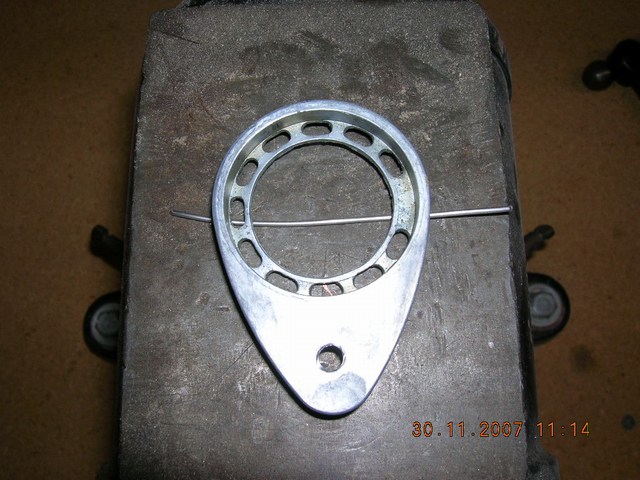
I photo copied the piece below and blew up the image to make a correct contour template
Next, I drilled and tapped a 10-32 hole to give me something to fasten the light assembly to the door for easy removal if needed.

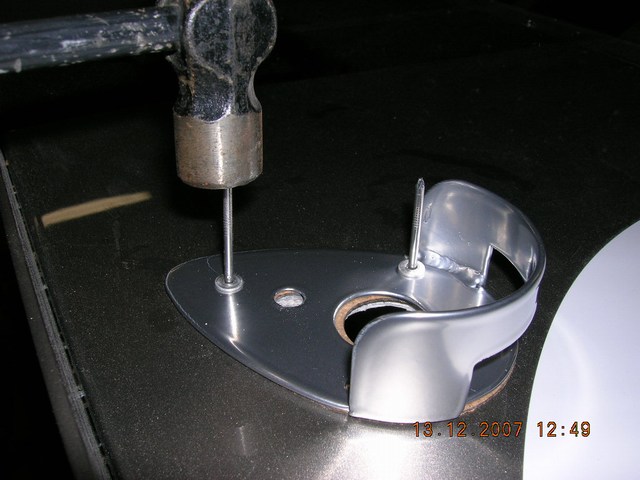
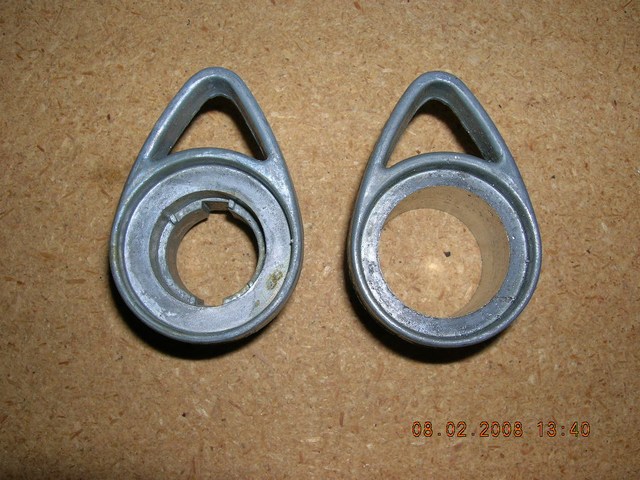
One area of trouble I had was that the zinc casting was not flat on two of the three lights I was using. Zinc doesn't like to bend and breaks very easily, so rather than put them in a vice then whack on them with a hammer, I used the method shown below. Using this technique, you can't “over bend” and break the part. I used a piece of 0.032 safety wire on an anvil. I placed the casting on it where it needed to bend. Then I cut a notch in a block of wood so the pressure would be on the two ends. Then tapped it gently with a rawhide mallet to make it flat.

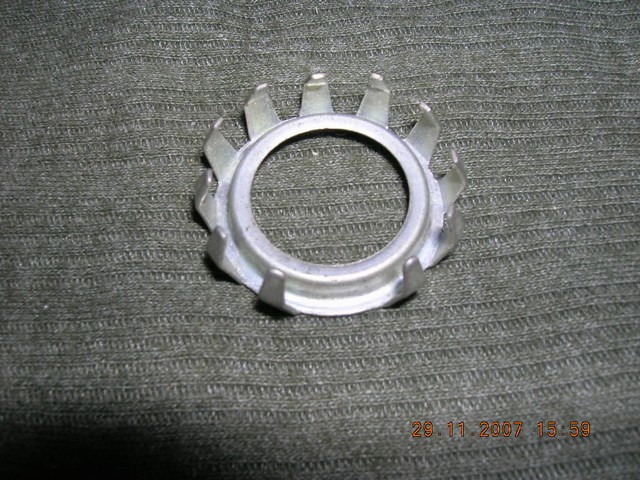
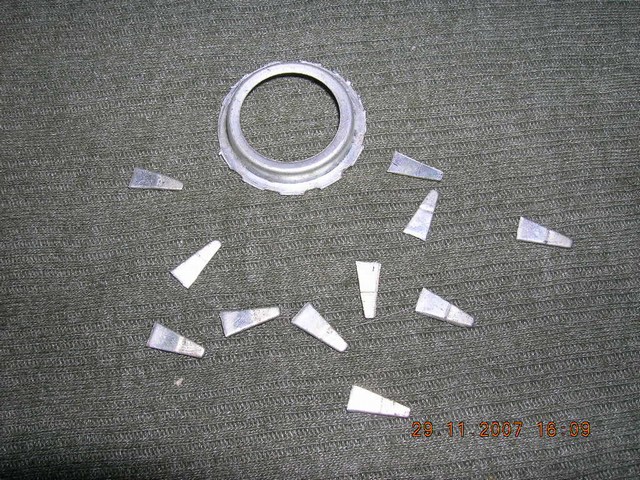
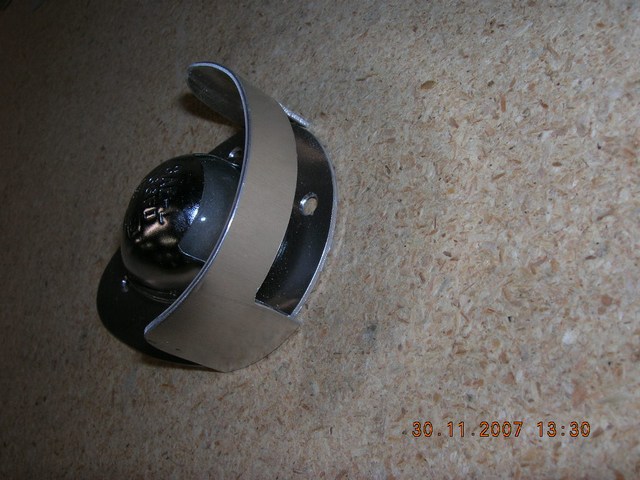
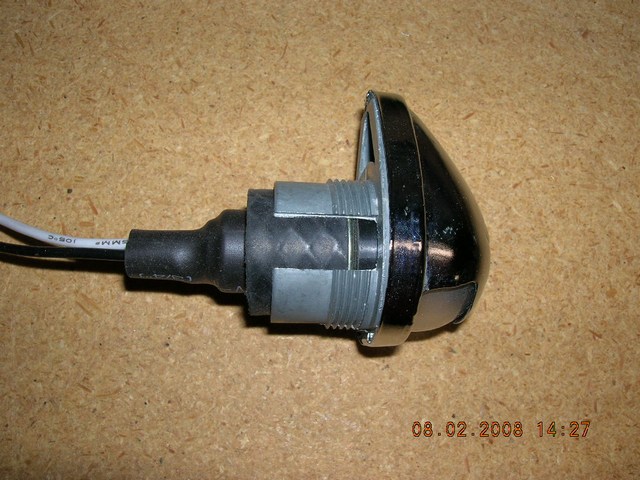
As you can see below, I broke off all the fingers that were used in the OEM application to hold the light in the bumper. I did not like the idea of using the fingers because they interfered with the sockets and did not provide a very positive “lock” in position so off they came. If mounted in a steel bumper they would be fine but not in a 0.062” thick piece of aluminum. However, this is likely how the originals were mounted but they had the benefit of the original sockets....I didn't.
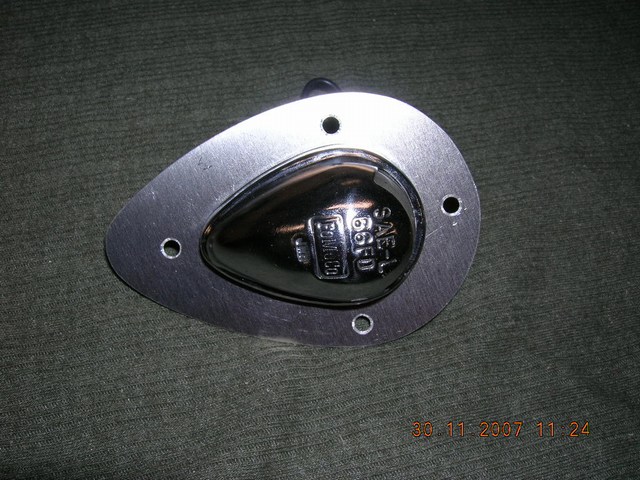
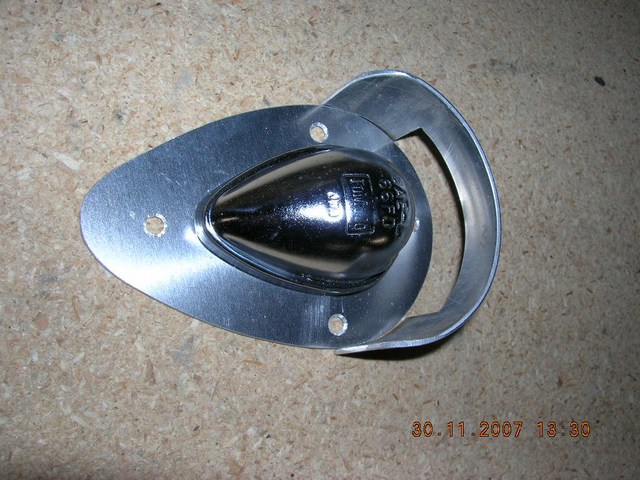
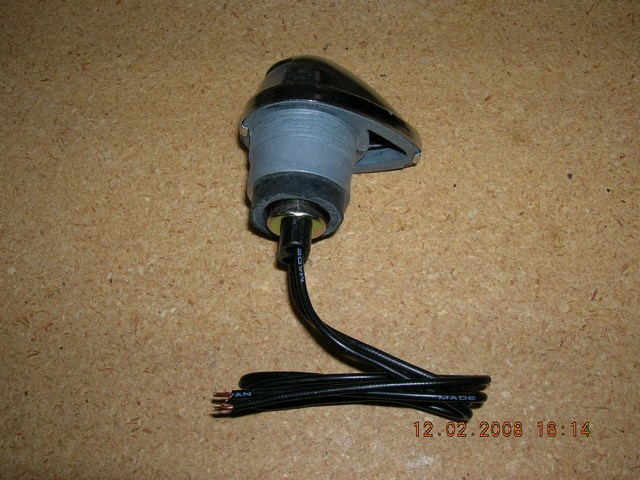
After all the mods here is what it looks like reassembled.
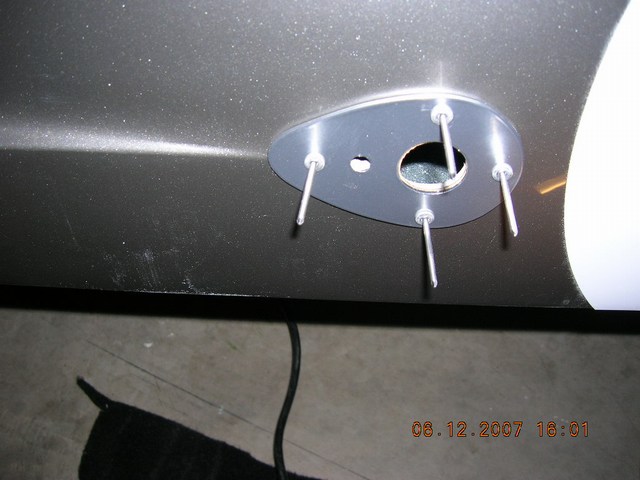
Now dry fit into the plate making sure everything squares up the way you want.
Now is a good time to note that like I say in nearly every How To post; no two original cars seemed to be the same. Some used mounting plates like these, other cars did not. As you will see in the write up later for Steve's car, the only location where a plate was used was on the rear deck. Keep this in mind if you are trying to replicate a particular car or look. It will affect how you approach this entire effort.
Set aside these parts for now.
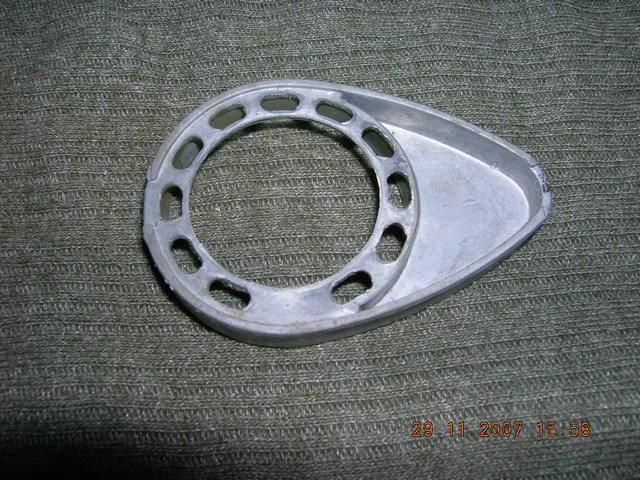
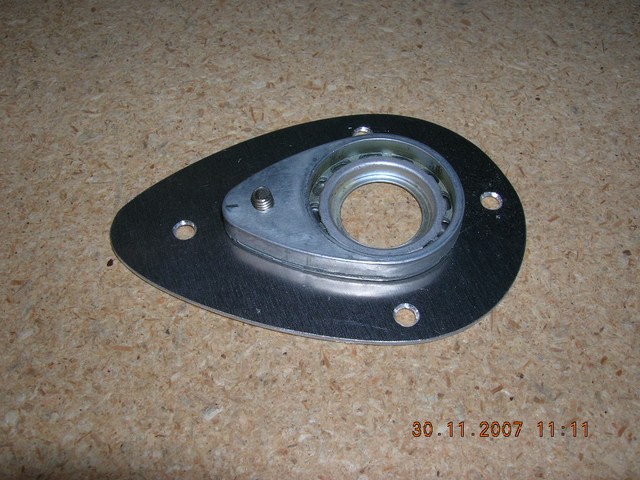
Next you need to make a plate for the rear deck. This plate is identical to the doors except it has a “shield” welded on. This shield was put in place so the light didn't shine in the driver's eyes through the rear view mirror. Below is a picture of an original.
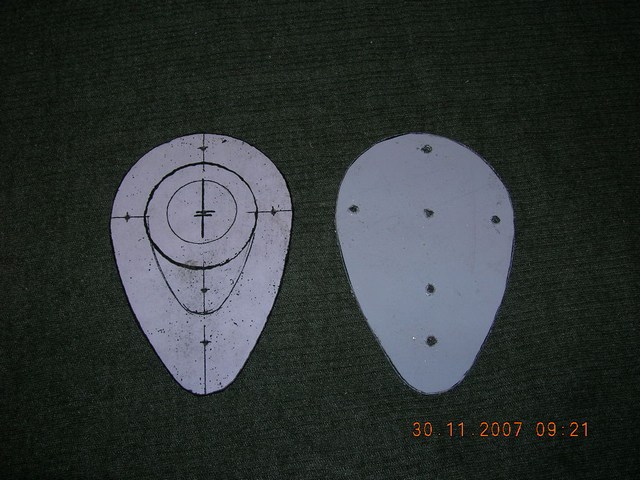
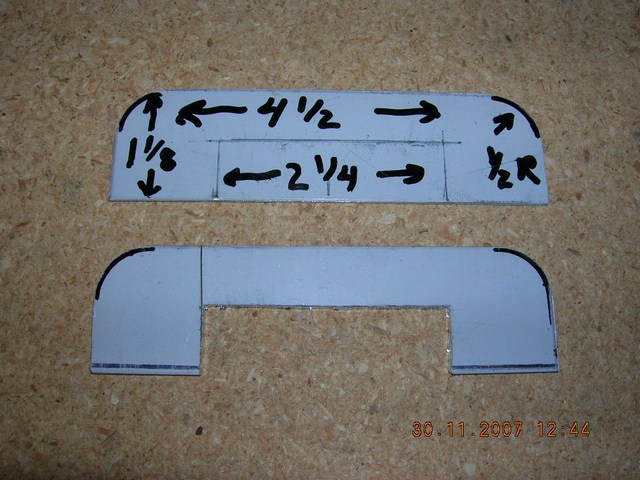
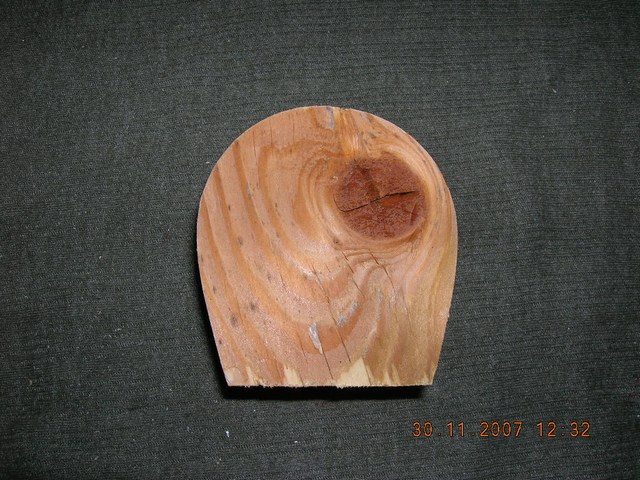
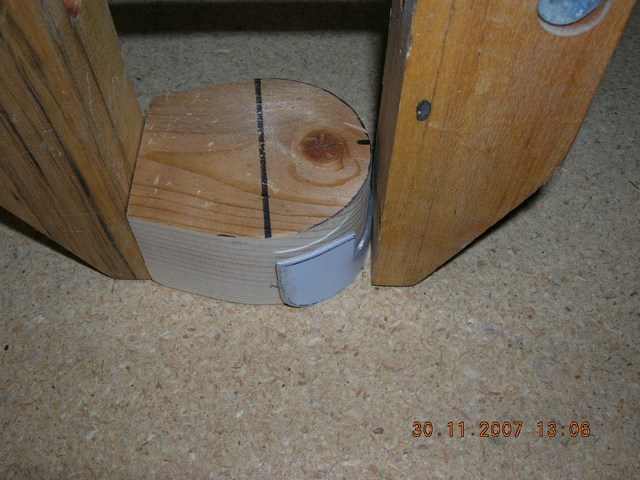
Below shows the dimensions to cut the aluminum. Then make a wooden “buck” to form the piece around. Use wood clamps, mallets, your hands...what ever it takes to shape the shield so it fits snugly on the plate. Don't use a hammer as it will leave marks on the metal.
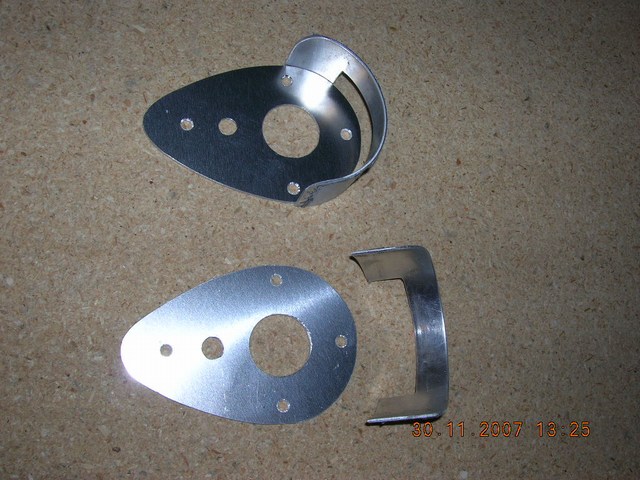
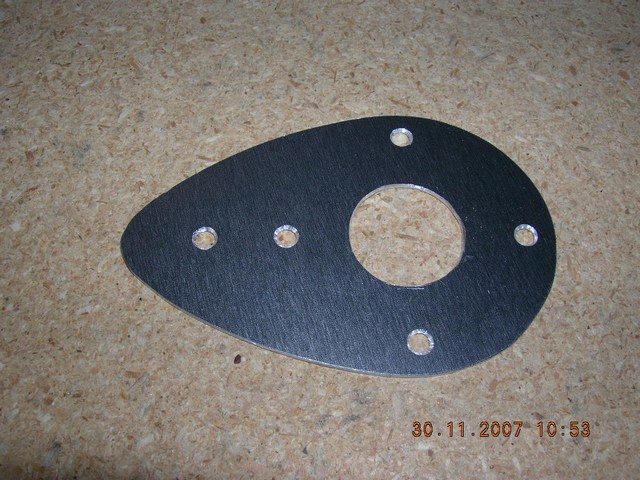
Now, weld the two parts together along the inside edge. At this point, clean up all the plates, break the edges and finish them as desired with either paint or as I did, powder coated them. I used Eastwood Reflective Chrome because my car is silver. I made one for Mike Gelb and powder coated his black. (See my Home Powder Coating - How To elsewhere)
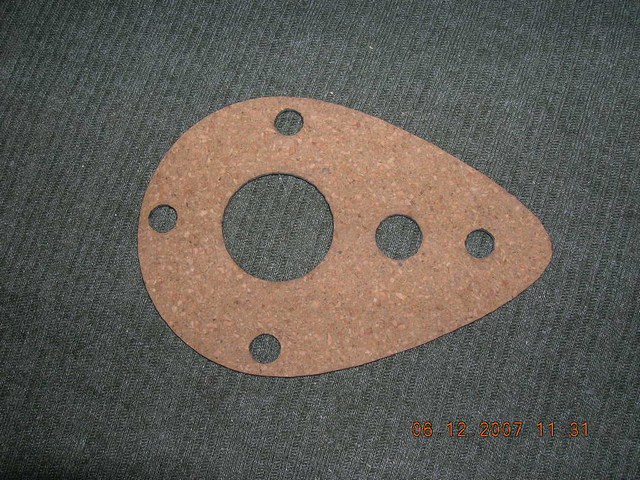
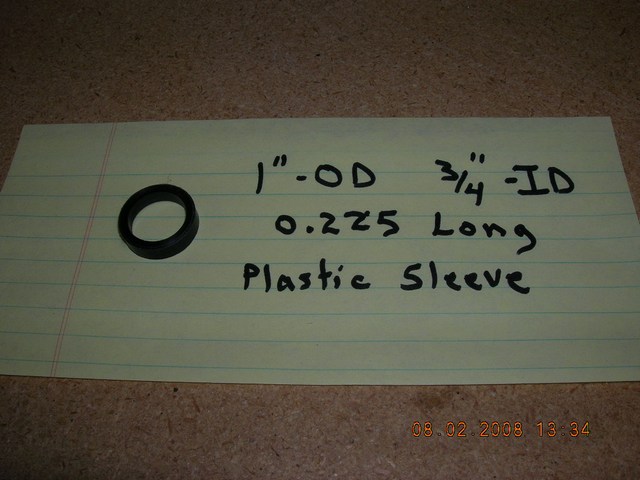
Next I made cork gaskets and put between the plates and the fiberglass. This is not really necessary I suspect but since I own a laser cutting machine, I figured why not?
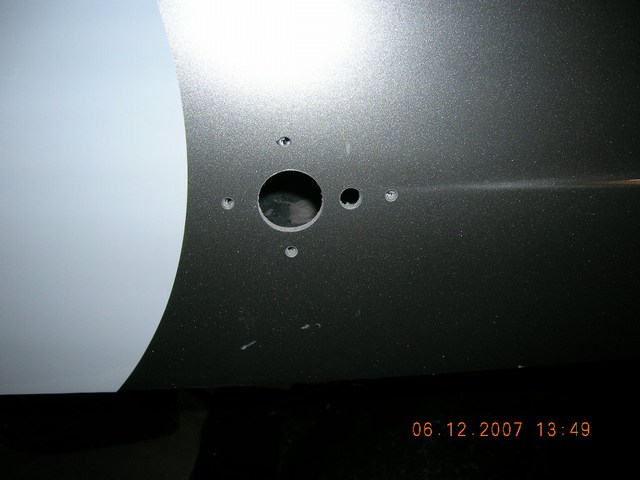
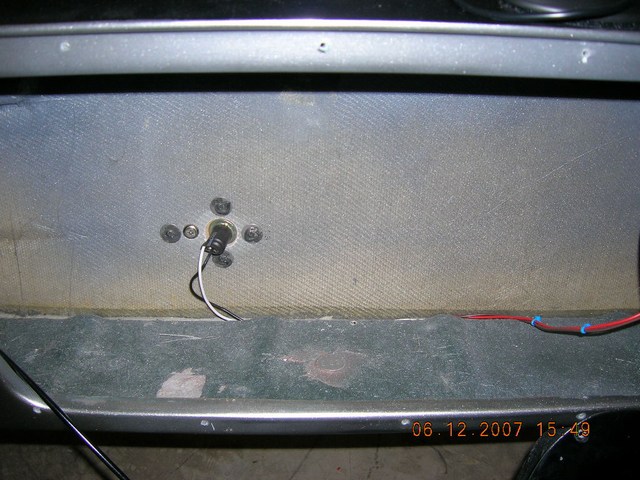
The actual placement on the car is very subjective. There is no “correct” place to mount them. I looked at many old photos and picked what I liked best for my car. Put the plate in place and make the holes. You only get one shot at this so double, triple, quadruple check where you want this and that everything is squared up before you drill that first hole. Also consider what is on the other side of the fiberglass before you drill a hole to ensure there is no interference with some piece on the inside.
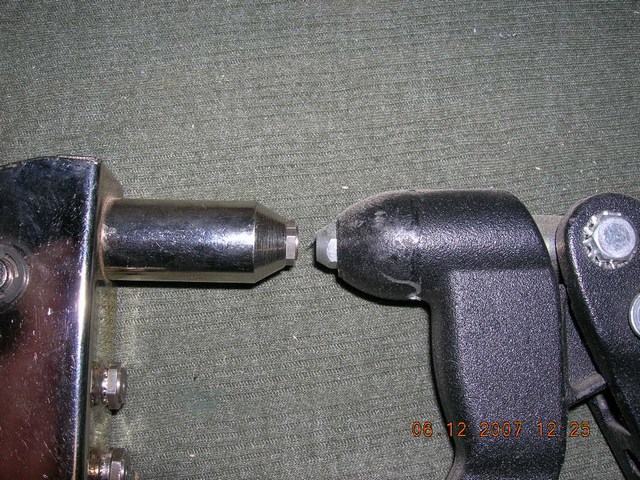
Because of the closeness of the rivets to the light, use a pop rivet gun with as small a head as you can find. I used a very cheap Sears brand unit as shown on the left below.
I used #8 Stainless Steel washers as something for the pop rivets to capture. Putting pop rivets directly into fiberglass with no backing is a bad idea. One thing I always do when using pop rivets in an application where it shows, is to “pull” the rivet just to the yield point where the “nail” is about to break and back off. Then I tap the nail back through the hole. This leaves a much more sanitary appearance. Next, I put a dab of black RTV on the rivet on the inside of the door to prevent water from getting in.
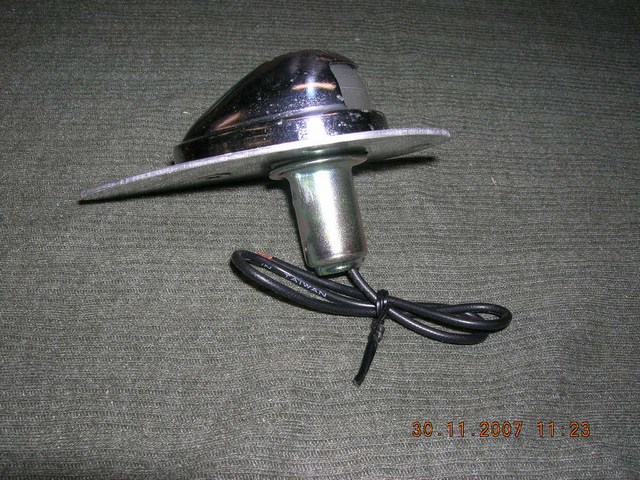
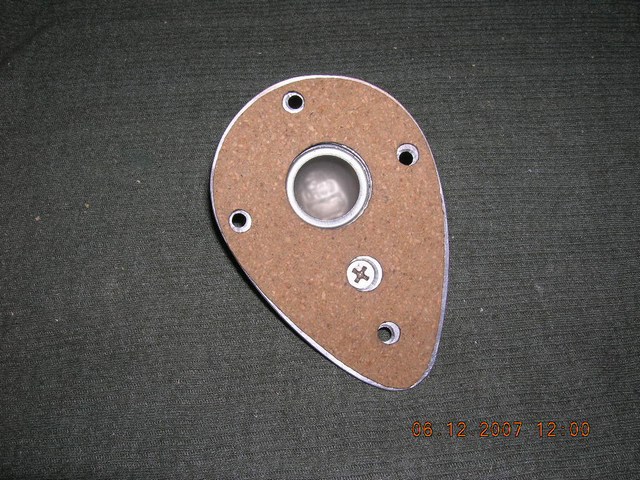
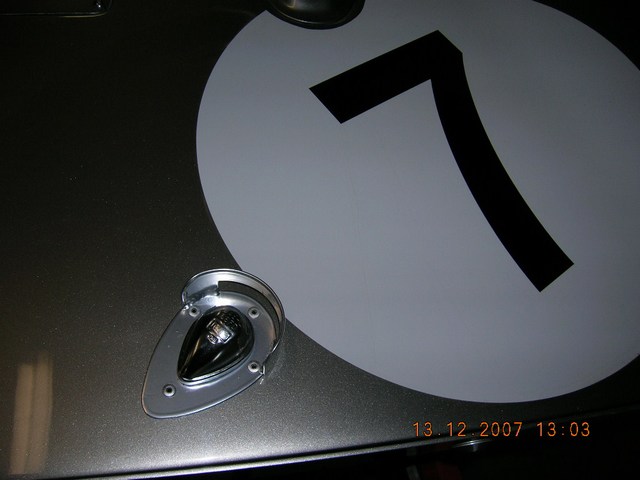
You can see below how the light is held in place with a countersunk screw and beveled washer. I used a drop of “Locktite” on the screw to prevent vibration loosening the screw. The socket is readily removed because it is held in place by the fingers on the socket allowing easy bulb replacement.
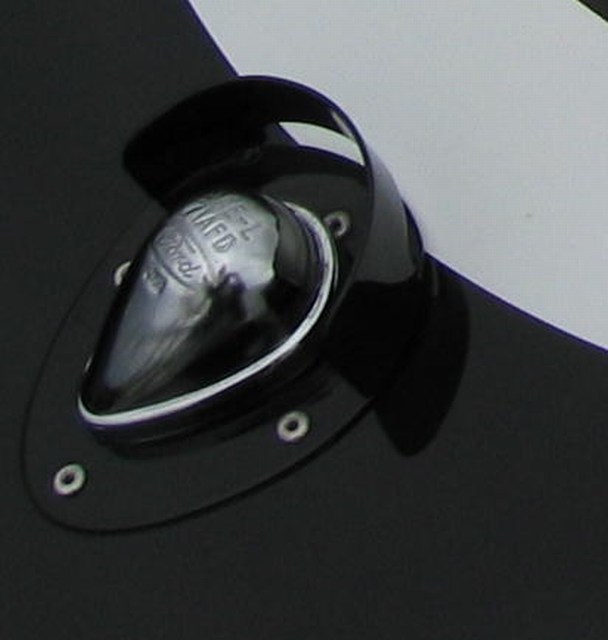
Finished job is shown below.
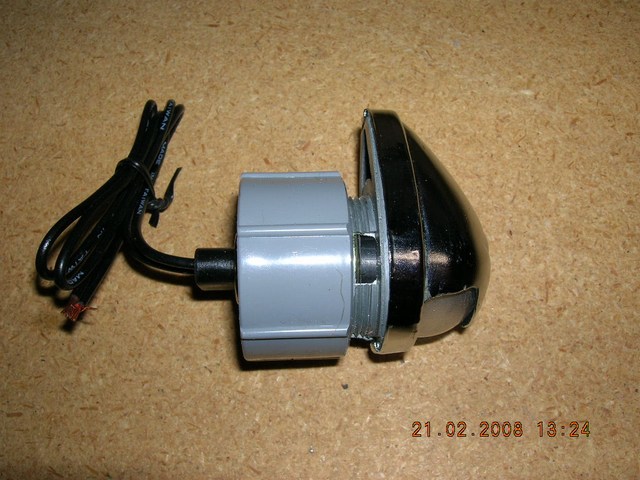
Now for the D1AZ install. Photos of these lights on Steve's car will be forthcoming.
Again, disassemble the lights and clean them up.
The next part requires a lathe. Chuck up the zinc casting and bore the hole size to 1.020 inches.
Now make a spacer for the socket to rest against the rubber washer inside the light. This spacer prevents the bulb from bottoming out when you place the bulb into the glass globe.
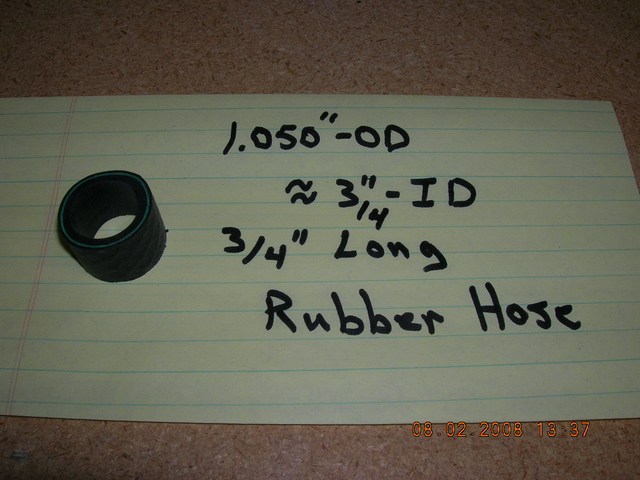
Next cut a piece of rubber hose as shown below. I know this may sound kludgey but it really works well and provides a great interference fit.
Put the spacer in place on the fingers of the socket. Slide the rubber sleeve over the socket and press into the casting for a very solid, snug fit.
Here again, I laser cut a set of cork gaskets for Steve's application.

Now came the real challenge on this method. Finding a nut to hold the light in place in the door. Steve didn't want door plates so another method had to be found. I'm not sure how the D1AZ were held in place on the OEM application but it must have been some sort of threaded nut because the barrel is threaded. They may have used a spring steel “Tinnerman” nut but I had no luck sourcing one this big in quantities of less than 1000 (a custom run). The barrel diameter is 1 ¼ inch. After many hours of research and digging around at local hardware stores. I came upon the idea of using 1 ¼ inch electrical conduit nuts.
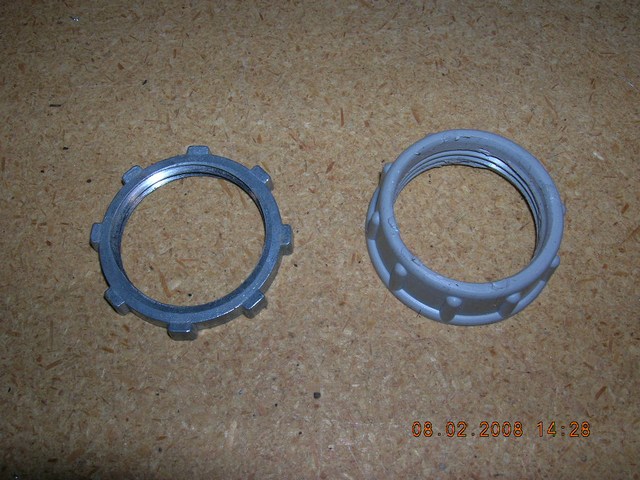
This looked like a great idea until I discovered they are not created equal. Of the hundreds I checked only a handful would work (sort of). They must be made to a very liberal tolerance. Then I found a plastic one that fit great. Thinking that since they are molded, they must all be the same....wrong again. I brought a bag of them home only to find out they have sloppy tolerance also.
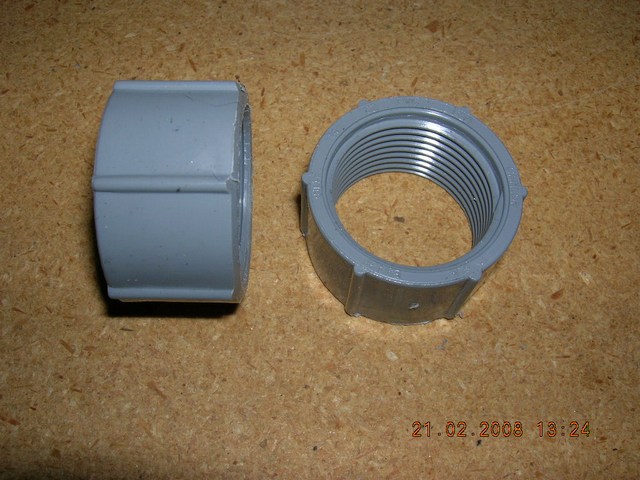
Back to town for more research. What ultimately worked were plastic conduit couplers cut down on the lathe. These ARE made to close tolerance and fit perfectly. They are big and “meaty” so they provide a surface to grab on to as well as provide good backing on the inside of the fiberglass.

After many hours of searching, researching and fabricating parts that wouldn't work, we have now a good solution. This makes reference to my comment at the very beginning of this article about all the heavy lifting has been done. Now it's a piece of cake for anyone following. I'll post Steve's finished pictures here when he installs the lights on P2125.
Your biggest challenge is finding the parts. These were OEM rear bumper license plate lights for 66-71 Rancheros and Torinos. These WERE NOT used on Falcons. I've been told there are other years and models where these were used but I can find no reference to back up this claim. I spent months searching all over the world via the web and Hemmings Motor News to no avail. I called bone yards, vintage parts suppliers, and re-pop outfits from coast to coast – border to border with not one found. I even called Europe, Australia, and NZ............nothing. Almost by chance I stumbled into a old auto shop in Portland OR and the guy had four NOS C6AZ's on the shelf. I have also seen them on eBay periodically. Prices vary dramatically form about $20 ea to over $50 ea. Mike Gelb (P2136) is looking into having them re-popped but your best bet for now is to just start looking. Mike has done an extensive search also and tells me he thinks he's found the last 8 on the planet. Steve found his D1AZ's on the web but they are as rare as the C6AZ. The problem with the D1AZ's is that they are much harder to work with. None of the parts we've found come with the original sockets or mounting hardware which creates the next challenge. I detail here how to get around these problems once you find the lights.
From Rick Muck-Mark added 25 Feb 08
A further bit of information: The NOS Ford light C6AZ 13564 B WAS used on Falcons, i.e. the wagons. In fact, the part was used on ALL full size Ford station wagons 1966 to 1970 and the same years of Fairlane and Falcon wagons (as well as the Mercury versions) so the obvious place to look for these used, is on those models. The 1966 to 1970 Rancheros were also home to these lights. Note that the later D1AZ type light would NOT have been used originally on a GT40 as that part was not released until 1970 for the 1971 models, but it is very close in style and does work well.
Below is a picture from a post by JimmyMac I snipped from this forum over a year ago to carry with me to parts outlets so I knew what to look for.
I'm not going to detail how to wire these lights as it is vehicle specific and relatively easy irrespective of the problems of routing which can be a real pain in the a$$. As a note to the SPF owners: the wires that go to the panel switch are located just above your right knee on the passenger side (left hand drive). There is a Gray/Red wire and a Brown wire. Brown is ground. The two wires are wire tied to a bundle so they may not be too obvious. Run wires as required to get them where you need them.
The bulbs I used are # 1004. These bulbs are rated at 15 CP which is the brightest bulbs I could find that will fit into the hole. The sockets can be purchased at nearly any auto or marine parts store. These are two wire sockets so you must use a two terminal bulb like the 1004. The 1004 has only one element but two terminals on the bottom. The ground is through one of these terminals....not the bulb base. This makes them perfect for applications in fiberglass.
Here is what you want to look for:
Or try these:
Lets get started. I'll do the C6AZ style first. Start by disassembling the light. To do this, VERY carefully bend the tab on the tapered end just enough to get the guts to lift out from that end. This is important. There is no need to bend the tabs at both ends and you will only be able to bend the tab up and back down once before they break off so think before you act. Wash the parts because they get pretty funky after 40 years. I also buffed the chrome shell before reassembly.
I photo copied the piece below and blew up the image to make a correct contour template
Next, I drilled and tapped a 10-32 hole to give me something to fasten the light assembly to the door for easy removal if needed.
One area of trouble I had was that the zinc casting was not flat on two of the three lights I was using. Zinc doesn't like to bend and breaks very easily, so rather than put them in a vice then whack on them with a hammer, I used the method shown below. Using this technique, you can't “over bend” and break the part. I used a piece of 0.032 safety wire on an anvil. I placed the casting on it where it needed to bend. Then I cut a notch in a block of wood so the pressure would be on the two ends. Then tapped it gently with a rawhide mallet to make it flat.
As you can see below, I broke off all the fingers that were used in the OEM application to hold the light in the bumper. I did not like the idea of using the fingers because they interfered with the sockets and did not provide a very positive “lock” in position so off they came. If mounted in a steel bumper they would be fine but not in a 0.062” thick piece of aluminum. However, this is likely how the originals were mounted but they had the benefit of the original sockets....I didn't.
After all the mods here is what it looks like reassembled.
Now dry fit into the plate making sure everything squares up the way you want.
Now is a good time to note that like I say in nearly every How To post; no two original cars seemed to be the same. Some used mounting plates like these, other cars did not. As you will see in the write up later for Steve's car, the only location where a plate was used was on the rear deck. Keep this in mind if you are trying to replicate a particular car or look. It will affect how you approach this entire effort.
Set aside these parts for now.
Next you need to make a plate for the rear deck. This plate is identical to the doors except it has a “shield” welded on. This shield was put in place so the light didn't shine in the driver's eyes through the rear view mirror. Below is a picture of an original.
Below shows the dimensions to cut the aluminum. Then make a wooden “buck” to form the piece around. Use wood clamps, mallets, your hands...what ever it takes to shape the shield so it fits snugly on the plate. Don't use a hammer as it will leave marks on the metal.
Now, weld the two parts together along the inside edge. At this point, clean up all the plates, break the edges and finish them as desired with either paint or as I did, powder coated them. I used Eastwood Reflective Chrome because my car is silver. I made one for Mike Gelb and powder coated his black. (See my Home Powder Coating - How To elsewhere)
Next I made cork gaskets and put between the plates and the fiberglass. This is not really necessary I suspect but since I own a laser cutting machine, I figured why not?
The actual placement on the car is very subjective. There is no “correct” place to mount them. I looked at many old photos and picked what I liked best for my car. Put the plate in place and make the holes. You only get one shot at this so double, triple, quadruple check where you want this and that everything is squared up before you drill that first hole. Also consider what is on the other side of the fiberglass before you drill a hole to ensure there is no interference with some piece on the inside.
Because of the closeness of the rivets to the light, use a pop rivet gun with as small a head as you can find. I used a very cheap Sears brand unit as shown on the left below.
I used #8 Stainless Steel washers as something for the pop rivets to capture. Putting pop rivets directly into fiberglass with no backing is a bad idea. One thing I always do when using pop rivets in an application where it shows, is to “pull” the rivet just to the yield point where the “nail” is about to break and back off. Then I tap the nail back through the hole. This leaves a much more sanitary appearance. Next, I put a dab of black RTV on the rivet on the inside of the door to prevent water from getting in.
You can see below how the light is held in place with a countersunk screw and beveled washer. I used a drop of “Locktite” on the screw to prevent vibration loosening the screw. The socket is readily removed because it is held in place by the fingers on the socket allowing easy bulb replacement.
Finished job is shown below.
Now for the D1AZ install. Photos of these lights on Steve's car will be forthcoming.
Again, disassemble the lights and clean them up.
The next part requires a lathe. Chuck up the zinc casting and bore the hole size to 1.020 inches.
Now make a spacer for the socket to rest against the rubber washer inside the light. This spacer prevents the bulb from bottoming out when you place the bulb into the glass globe.
Next cut a piece of rubber hose as shown below. I know this may sound kludgey but it really works well and provides a great interference fit.
Put the spacer in place on the fingers of the socket. Slide the rubber sleeve over the socket and press into the casting for a very solid, snug fit.
Here again, I laser cut a set of cork gaskets for Steve's application.
Now came the real challenge on this method. Finding a nut to hold the light in place in the door. Steve didn't want door plates so another method had to be found. I'm not sure how the D1AZ were held in place on the OEM application but it must have been some sort of threaded nut because the barrel is threaded. They may have used a spring steel “Tinnerman” nut but I had no luck sourcing one this big in quantities of less than 1000 (a custom run). The barrel diameter is 1 ¼ inch. After many hours of research and digging around at local hardware stores. I came upon the idea of using 1 ¼ inch electrical conduit nuts.
This looked like a great idea until I discovered they are not created equal. Of the hundreds I checked only a handful would work (sort of). They must be made to a very liberal tolerance. Then I found a plastic one that fit great. Thinking that since they are molded, they must all be the same....wrong again. I brought a bag of them home only to find out they have sloppy tolerance also.
Back to town for more research. What ultimately worked were plastic conduit couplers cut down on the lathe. These ARE made to close tolerance and fit perfectly. They are big and “meaty” so they provide a surface to grab on to as well as provide good backing on the inside of the fiberglass.
After many hours of searching, researching and fabricating parts that wouldn't work, we have now a good solution. This makes reference to my comment at the very beginning of this article about all the heavy lifting has been done. Now it's a piece of cake for anyone following. I'll post Steve's finished pictures here when he installs the lights on P2125.
Last edited:
")