Jag XJ13

Dave Bilyk

Dave Bilyk
Supporter
Neville, very interesting.
The first Ti car in racing was allegedly the Autocoast Ti22 designed by Peter Bryant, a CanAm car that raced first in 1970 at Laguna Seca.
Great video article here Autocoast Ti22

Dave
 
Last edited:
Neville, very interesting.
The first Ti car in racing was allegedly the Autocoast Ti22 designed by Peter Bryant, a CanAm car that raced first in 1970 at Laguna Seca.
Great video article here Autocoast Ti22

Dave

Thanks for the link Dave. I have since found that there is a XJ13 connection here as well because David Hobbs (XJ13 Test Driver) also raced the Ti22 car.
 
That just seems wrong! But for those seeking to make a close copy, that detail just got easier.

I wonder if the MotoLita is just temporary as the original is being refurbished?

I got it wrong *blush* :embarassed:

Turns out the "new" wheel was refurbished/restored by Peter Wilson himself (the man who made the original wheel). It isn't a Mota Lita even if it now looks remarkably similar to one. The temporary black wheel at Shelsley also belonged to Peter who placed it there while he worked on the original.

Interesting to note that, for most of the time during development, the steering wheel was covered in black leather because drivers complained the wooden rim was too thin. If you want your replica to look like the car between 1967 and 1971 use a leather-covered wheel!
 
I was privileged to be invited to a small gathering at Jaguar Heritage last Friday. The occasion was to mark the launch of Peter Wilson's new XJ13 book. I posted some pics/video here:

Jaguar XJ13 | XJ13 - The Book

Highlight of the day for me was being able to speak to some of the surviving original team who were involved in the project - Norman Dewis, George Buck, Frank Philpott, Jim Eastick, Ron Greves, Mike Kimberley, Roger Shelbourne, Robert Berry, Peter Taylor & Peter Wilson

I must emphasise that I have no commercial interest in Peter's book.
 
Neville, I just got my XJ13 books. I bought two (one regular edition and one special leather bound) and the book is fantastic. Full of great information and invaluable for anyone considering a replica. I was glad the extra special edition with part of the original car was instantly sold out as I would have been very tempted. Those funds will be better applied to my car.
I got Pauls Skilleters e-letter and saw that you were present at JDHT for the books launch. That must have been a truely momentous occasion with the assembly of such a distinguished group from the cars origin. I wish I was there.
I also noticed that Peter utilized some of your researh. Bravo!
My car is slow in progress but I shoud be updating my Build log soon.
 
Mike.
I hear that ther is an SCF/RCR XJ13 featured in the new book but its listed as a TWR car...

Hi - yes, one of your cars (or at least one that was supplied to TWR for completion) is included in Peter Wilson's book. The book has a chapter dealing with replicas of the XJ13. Peter is, generally, very complimentary about your car. The section includes 5 colour pictures of the finished car.

The section begins, "TWR (Trevor Williams Racing) .... now offers a very nicely finished replica, based on a 'kit' produced in the USA by the Sports Car Factory." He then goes on to say, " ... if you are looking for a nicely built and engineered 'budget' replica, then this is the one for you."

The chapter covers other replicas as well including the "Wingfield" replica, Proteus (visually the closest of all past and current replicas to the original shape but no longer available), TWR/SCF/RCR, Charles Motors, Tempero, Racing Green, Predator, AKZ, Vicarage, D&G Cooke's XJ13. There is another that Peter was unaware of made by Rod Jolley in the UK.
 
Mike.
I hear that ther is an SCF/RCR XJ13 featured in the new book but its listed as a TWR car...hope you can make it to see us soon.

Hi Fran
Of course I read the section on replicas in the book first. They do have photos of the car Trevor (TWR) built from your RCR kit and he did a super job with it. Of course to say buying one from him as a budget XJ13 replica would indicate one has quite the budget for toys. Peter did compliment the car but unfortunately only mentioned SCF. Readers would certianly be interested in knowing RCR is the place to go now.
I will call this week about my trip to RCR. I am looking forward to meeting you and seeing the shop. I am hoping to hit the Detroit auto show at the same time.
 

Chuck

Supporter
The book also has a fascinating discussion about how the XJ13 crew got hold of a GT40 for research purposes, taking it apart, wind tunnel testing it, etc. Some of their observations were quite interesting. Then there is the amusing story about 'losing' the GT40.

The critique of the various XJ13 replicas is noteworthy. The RCR came away with a good overall impression. Too bad RCR was not referenced specifically.

This is a really good book.

I find it fascinating that there is such a following and so much written about a race car of which only one was built and never raced.
 
... to say buying one from him as a budget XJ13 replica would indicate one has quite the budget for toys ...

I must admit Mike that Peter's comment made about a "budget" replica did surprise me when I saw it in print. I have seen the RCR car in the flesh and know they are proper well-manufactured cars and a loooong way from being considered "budget" - not just because of price but also because of quality. Perhaps if Peter commissioned one himself he may reconsider using the word "budget"!

I find it fascinating that there is such a following and so much written about a race car of which only one was built and never raced.

Perhaps its exclusivity and its "what if ..?" is part of its appeal? Whatever, last Friday really was a special day for me. As Peter Wilson said off-camera, "What you witnessed was a unique event. It was probably the first time in all the years since the car was built that the original team who designed, built and developed the car were together again (Well all of those who are left bar 3, Brian Martin, Peter Jones & Mike McElligott) and sad to say probably the last, unless some other event is organised." I would also add David Hobbs and Richard Attwood to this list.

One of my (many) short-term ambitions is to repeat the gathering when I can finally persuade my engine to breathe again. I need to be quick because some of these gentlemen are getting on in years!
 

Chuck

Supporter
Rebuilding a Jag V12

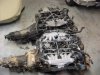
We found a couple of V12 engines on Craig’s list, not far from home, for a good price. They provided the starting point for our rebuild.

To rebuild the engine it must first be taken apart. No small task. The biggest challenges were removing the heads, head bolts and cylinder sleeves.

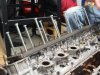
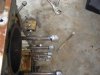
We are fortunate that a Jag engine expert lives close by and loaned us the tool for removing the heads. It is a heavy steel plate with threaded bolt holes. One bolts it to the top of the cylinder head and then turns long bolts into the threaded holes, cranking them down a quarter turn at time, gradually lifting the heads. One would expect the heads to slide right off once the initial seal is broken. But it did not work that way. It took several hours to remove the recalcitrant heads.

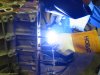
Removing the head bolts was also a challenged. Ryan welded nuts on the end of the head bolts to give us leverage to crank them out. We expected them to snap off with all the force applied, but eventually they all came out. Obviously we won’t be reusing the head bolts.

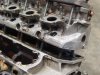
The cylinder sleeves were the final challenge. A small tool was fabricated from steel that fit on top of the sleeves to give us leverage for hammering. Most had to be heated with a torch to crack them loose. Another many hours time. The sleeves will not be reused.

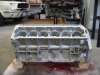
The engine is finally apart.
 

Attachments

  • EngineTwins.JPG
    EngineTwins.JPG
    166.3 KB · Views: 368
  • HeadBoltPlate.JPG
    HeadBoltPlate.JPG
    181.6 KB · Views: 348
  • HeadsPartialOff.JPG
    HeadsPartialOff.JPG
    188 KB · Views: 338
  • HeadboltsWeld2.JPG
    HeadboltsWeld2.JPG
    155.9 KB · Views: 335
  • HeadboltWeld.JPG
    HeadboltWeld.JPG
    134.3 KB · Views: 345
Hi Chuck - good to hear work is continuing. Separating the heads from the block certainly can be a bit of a pig! I had to make up my own tool to do the same thing - there are some pics here. I imagine it works in the same way as the tool you used? V12 Head Removal The tool is well-used now and is almost always out on loan here in the UK. I usually just ask for the cost of postage but some fellow-enthusiasts have been kind enough to offer small contributions towards the cost of fabricating it. It is a pretty basic tool and wouldn't be too hard to make another.

I was surprised to read you struggled to move the sleeves. I personally had to make up another tool to prevent them moving whenever I turned the crank. Perhaps I have just been lucky so far! I do have a collection of good used sleeves if you find yourself short. You probably already know that the later 6-litre stroked crank will fit straight into the 5.3 block although the "skirts" of the liners need to be turned a few mm shorter to clear the crank. Do you plan to use wider liners/pistons? Any ideas for your final spec yet?

I am working on assembling my quad-cam inlet manifolding at the moment. It is quite a basic setup (custom single throttle-bodies, custom metal-spun trumpets etc - all to the original design as used on my particular competition heads in 1967. It would be very easy to use throttle bodies with injection points (mine don't have any as the injection point is via an auxiliary venturi in the trumpet) so that you would end up with an almost identical "XJ13-look" albeit with EFI. Give me a shout if I can be of any help when you get to that point. Having already paid for the tooling spinning more XJ13 trumpets is relatively cheap now.

I am in correspondence with some German enthusiasts who are in the design stages of a quad-cam head that bolts straight on to the later 5.3 block. The aim is to end up with something that looks the same as the original quad-cam head complete with polished cam covers as in the XK engine (with cam chain drive as original). I am providing detailed dimensions of my heads as part of their project. Its a big project, and I am not sure how far their project will go but it is interesting nonetheless. One of the Germans is a professional engine builder who also has experience of aero-engines as well as vintage engines such as Bugatti so they certainly have plenty of knowledge and resources behind them. Should look pretty good if it comes off! The cost is another matter ..... :blank:
 

Chuck

Supporter
Neville

The tool for removing the heads probably functions the same as yours. Simply a very thick, heavy, piece of steel with threaded holes. It worked, but was a slow process.

This particular engine was the 'runt of the litter.' The crank was frozen, rust everywhere. Indeed that is why the iron sleeves were so difficult to remove.

I like the idea of an EFI system with copies of the original trumpets. Duplicating the look of the V12 in the XJ13 is a real challenge. It will be Interesting to see if the Germans can come up with a dual overhead cam copy. That would really dress up the looks and performance of the stock engine.

Keep us posted on your progress. You are raising the bar as high as it can go.
 
On a side note, John Wilson's immaculate replica has been invited to run demonstration laps in an event associated with the Australian F1 GP next weekend. The current owner being unavailable to drive, John has been given the seat.

AKZ Vehicle Engineering

Clive
 
On a side note, John Wilson's immaculate replica has been invited to run demonstration laps in an event associated with the Australian F1 GP next weekend. The current owner being unavailable to drive, John has been given the seat.
Clive

That engine John Wilson built is such an impressive piece of engineering. I am sorry I won't be there to hear it! Will the car be running with John's engine made using the AJ6 heads or will it have a SOHC fitted?

The body outline looks very reminiscent of the RCR body - do you know if this is the case?
 
The car will be running the quad cam motor. It is indeed a remarkable piece of engineering. One of the problems to be solved when built was that the motor required a particular grade of oil, and the more modern heads required a diferent brew. A compromise has obviously been reached. The body is fully aluminium.

This car was built from copies of the original plans, well before anyone had considered making kits. John apparently had input from Brian Wingfield, who's own replica is well known. Neither cars are carbon copies of the original. John deliberately increased the sill height from 4 to 6 inches (and reduced the door height in sympathy) to add a bit more structural stiffness, given the sort of roads we have here in Oz. The engine/trans sits in a subframe, unlike the stressed drivetrain in the original.

Clive
 
Last edited:
Please remember to take your camera if you go to see the car run - some posted pics would be excellent!

I was a little confused by your statement that "more modern" motors require a different oil? John's quad-cam motor uses 1980/1990's heads and quite a modern block also. Perhaps it is my age, but I would consider the engine/heads to be "modern" (but then again, the 1970s seem only yesterday to me :rolleyes:)

By the way, the sill of the original XJ13 is exactly 7.75" so John's car at 6" is possibly a little closer to the original than he realises. Did you mean the ground clearance rather than sill height? This 7.75" is from the floor to the top of the sill. I would be surprised if there would be a need to stiffen the structure any further from original as Norman Dewis' "unscheduled crash test" proved?
 

Chuck

Supporter
The block

The aluminum block is a rather substantial piece which weighed more than we expected. The block showed its age with an abundance of grease and stains. We spent much time cleaning it, first with cleaners, then a pressure washer, without much success.

So we took the block to our engine builder, who graciously offered to soak it in his cleaning tank. A week later it looked much better, but still not as good as we wanted. So a final cleaning with aluminum brightener brought it back to where we wanted it to be. A light dusting with Eastwood Aluminum paint (really good stuff) evened the sheen of the aluminum.

We could not resist detailing the name on the side of the block.
 

Attachments

  • BlockClean.JPG
    BlockClean.JPG
    156.1 KB · Views: 421
  • JagName.JPG
    JagName.JPG
    158.9 KB · Views: 318
Back
Top