Ken's SLC build thread

Ken Roberts

Supporter
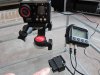
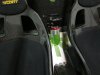
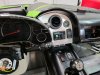
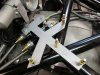
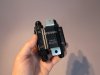
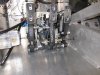
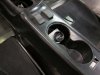
Finally decided on the placement of the Tilton billet brake bias adjuster. Every where I placed it around the driver side it would interfere with my knees or getting in and out of the car. I also didn't want anyone just spinning it for kicks. Best place that finally came to mind was in the center console (first cup holder location). To position it accurately I had to make various brackets. With the armrest in place no one will be tempted to spin it out of curiousity (and screw up my setting).
 

Attachments

  • 007_zps1ea3luyn.jpg
    007_zps1ea3luyn.jpg
    89.1 KB · Views: 277
Last edited:

Ken Roberts

Supporter
I fabbed up a heavy duty camera mount between the seats. It's location is now marked and it can be welded up. The goal is one forward facing camera and one rear facing.
 

Attachments

  • 006_zpsane1v8at.jpg
    006_zpsane1v8at.jpg
    102.8 KB · Views: 254
  • 008_zpsoedeur2x.jpg
    008_zpsoedeur2x.jpg
    101.9 KB · Views: 259
Last edited:

Ken Roberts

Supporter
The dash center section mock up is complete. Finally everything has it's place.
 

Attachments

  • 006_zpsciyn16fx.jpg
    006_zpsciyn16fx.jpg
    111 KB · Views: 289
Last edited:

Ken Roberts

Supporter
Mocking up the placement of the transaxle cooler oil thermostat. I am using a Improved Racing 165 degree thermostat FSM-165. This was a challenge trying to find a spot to fit this in. I can live with this design. It will be relatively easy to service from this position. Only thing left to do is splice in the stainless braided line.
 

Attachments

  • 002_zpsi73c2eyg.jpg
    002_zpsi73c2eyg.jpg
    110.1 KB · Views: 253
  • 011_zpsdtuipwc0.jpg
    011_zpsdtuipwc0.jpg
    59.6 KB · Views: 284
Last edited:

Ken Roberts

Supporter
To make mounting your condenser to the radiator more robust I recommend this mod. The C channel of the condenser can be strengthened by using these spacers from McMaster Carr (#92415A263). Grind it flat on one side as seen in the picture of me holding it in my palm. Three on the top channel and three on the bottom channel (at mounting points). They are a perfect fit once ground down as shown in the picture.
 

Attachments

  • 004_zpslcsg4p6f.jpg
    004_zpslcsg4p6f.jpg
    74.3 KB · Views: 244
  • 006_zps3qxmhg97.jpg
    006_zps3qxmhg97.jpg
    78.5 KB · Views: 263
Last edited:

Ken Roberts

Supporter
Covering all my coolant pipes with silicone heat sleeve from Mc Master-Carr. Here is a picture of it on some 1 1/2" coolant tube. It will keep the stone strike noise down in the front wheel wells too. Being that it is silicone it should be very durable as well. This stuff is pricey but well worth it in my opinion.

I saw "H Craft" use it on one of their SLC builds.

Here is a link to it McMaster-Carr
 

Attachments

  • 001_zpstxbmlodp.jpg
    001_zpstxbmlodp.jpg
    124.2 KB · Views: 246
Last edited:

Kelly

Lifetime Supporter
To make mounting your condenser to the radiator more robust I recommend this mod. The C channel of the condenser can be strengthened by using these spacers from McMaster Carr (#92415A263).


Very nice work Ken and a great build in progress. I cant see all of the mounting details but one word of caution from the voice of experience on rigid condenser and radiator mounting. It may be counterintuitive but it’s almost always better to go the other direction and mount them in rubber isolators that allow for a little thermal growth and chassis flex. You’d be surprised how much thermally induced growth you can get and how little it takes to create some really large stresses on the brazed aluminum heat exchanger. They can fail quickly when stressed. Same goes for even the slightest chassis/structural flex. Also you may want to look into precautions to reduce the galvanic couple in your (engine) cooling circuit if it is rigidly mounted and grounded.


Best,
Kelly
 
Last edited:
Ken,

Your car looks amazing! I am saving all the e-mails you have sent me for reference. I can not wait to see some more photos and info on the mods to your car.
 

Ken Roberts

Supporter
Finally purchased the video recording system. My finger is pointing to the obd2 plug that pulls certain info from the ecm then imbeds it into the video recording. The system has a built in GPS that takes readings 10 times per second for accuracy. In it's memory are almost all GPS locations of major race tracks in the world. You simply drive up to the starting area and turn it on. It then recognizes the start/finish line. It will display the track outline in the video and show your car as a dot going around the track.

This is also a good feature to have encase of an accident. All the recorded data and video including GPS location may save your ass from someone making false accusations against you.

You can see my post #522 for the intended location of the video camera mount. The display mounts up by the dash to show lap times and is called a AIM Solo DL. The HD camera is called a AIM Smartycam HD.
 

Attachments

  • 006_zpsane1v8at.jpg
    006_zpsane1v8at.jpg
    102.8 KB · Views: 246
Last edited:

Mark B.

Supporter
Hi Ken, do you have any pictures of how you routed the bias adjuster cable from the pedal assembly to the console? I'm mocking mine up and unless I run it through the center frame brace, it looks like it would have a pretty tight bend in the cable.
Thanks!
 

Ken Roberts

Supporter
Here is a picture Mark showing it going through the beam. (both sides the same). I chose to slot it so it can move a bit. Heat shrink tubing will be applied to the cable sheath at the beam wall locations to act as a sacrificial wear point. The cable goes right through both walls of the beam then makes a large gentle loop behind the passenger foot rest.

I purchased the fancier billet Tillet bias adjuster but regret the decision because I ended up mounting it in a hidden location. The knob is in the cup holder location. If I track the car the hinged arm rest is made to be easily removed. I wanted to keep it out of the reach of youngsters or anyone who might try and turn it without my knowledge.
 

Attachments

  • 006_zpsaqrmmg7f.jpg
    006_zpsaqrmmg7f.jpg
    124.1 KB · Views: 247
Last edited:

Ken Roberts

Supporter
In preparation for the initial coolant fill I purchased the following tool to make the process easier. Fran suggested it in a previous thread on the forum. It evacuates the air in the system (creating a vacuum) then draws the coolant in. UView 550000 or UView 550500 (economy version)

https://www.youtube.com/watch?v=FQnfUe6P5VI

How much antifreeze/distilled water do I need for a complete fill?
 
Last edited:

Ken Roberts

Supporter
Does 2 jugs of antifreeze and 2 jugs of distilled water sound about right?

Any recommendations on which brand?

Thoughts on DexCool? Anybody using it?

I was thinking of Zerex G-05.
 
Last edited:
Does 2 jugs of antifreeze and 2 jugs of distilled water sound about right?

Any recommendations on which brand?

Thoughts on DexCool? Anybody using it?

I was thinking of Zerex G-05.

The quantity sounds roughly right as I remember filling mine. I also have the vac filler and like it.

My experience is that it's easy to get the car burped in just a few tries. I have all 4 steam vents plumbed, and of course, a high-mounted coolant tank.

Assuming you have a heater circuit in the car, a good idea is to open it so you are filling and purging it as well as the rest of the system.
 

Ken Roberts

Supporter
What type of antifreeze did you use Will?

I suppose because it's a LS engine I should just go with Dex-cool. I haven't heard anything bad about it since the late 90s.
 
What type of antifreeze did you use Will?

I suppose because it's a LS engine I should just go with Dex-cool. I haven't heard anything bad about it since the late 90s.

I think I started with Dexcool. I did a coolant flush later, though, when a hose popped off, and I don't remember what I used the last time.
 
Back
Top