
- Forums
- GT40 Replica Manufacturers' Corner
- RCR Forum - RCR40/SLC/917/Superlite Aero
- The SLC Clubhouse
You are using an out of date browser. It may not display this or other websites correctly.
You should upgrade or use an alternative browser.
You should upgrade or use an alternative browser.
Ken's SLC build thread
- Thread starter KENS80V
- Start date
Ken Roberts
Supporter
Snow on ground + SLC = unusual photo!
Plus the picture was taken in 2013 and it's still not registered....ugh. The cost to build it is about 35% more due to the exchange rate. Thankfully when I purchased the kit in 2012 our dollar was only 5% less.
Ken Roberts
Supporter
Many thanks for this info Ken. Is there a E-marking in the glass of the side repeater lights.
I can confirm that. There is a circle with a large E and then a small 3 next to it in the circle. There is another circle with CCC as well.
Car builder Solutions has some nice choices as well. I bought my E marked license plate lights from them. Hella has a nice example with a cool shape.
https://www.carbuildersolutions.com/uk/hella-shield-shape-side-repeaters-indicators-65mm
You might be required to have the side marker lights as well. Red in the back and amber in the front. (at least for us here in North America)
I see a circled E11 mark on the front ones but no E Mark on the back ones. Be aware that the supplied projector lights are not E marked as well unless Fran made special arrangements with you.
Canada can use E marked headlights but they are not legal in the USA.
Last edited:
Johan
Supporter
I couldn’t use any of the RCR supplied lights, bought new headlights (Hella) as well as tail. The only thing that was E-marked was the halogen bulbs on the projectors.
I got hold of the C6 repeater lights at Micksgarage.com in Ireland, same part number as the Opel Astra here in EU but they are just $10 each for the Opel.
Guess when GM needed the repeaters for the EU market they looked within the family.
Thanks again for your help.
I got hold of the C6 repeater lights at Micksgarage.com in Ireland, same part number as the Opel Astra here in EU but they are just $10 each for the Opel.
Guess when GM needed the repeaters for the EU market they looked within the family.
Thanks again for your help.
Last edited:
Ken Roberts
Supporter
Here is a link to a LS7 engine manual.
https://redirect.viglink.com/?forma...www.bakesonline.com/images/M...epairSpecs.pdf
https://redirect.viglink.com/?forma...www.bakesonline.com/images/M...epairSpecs.pdf
Ken Roberts
Supporter
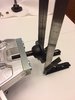
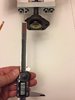
I did a more accurate measurement of the difference in mounting height from the original ball joints and the Moog K6136.
The first picture shows that the Moog joint is beefier.
The second picture shows the care I took in making sure the measurements are repeatable and fairly accurate.
The third picture shows the measurement of the stock ball joint.
The fourth picture shows the measurement of the Moog K6136.
The difference is .060" or about 1/16". These measurements were taken from the bottom of the ball joint flange as shown in the picture.. The Moog flange is about .10" thicker. The ball joint gets mounted to the bottom of the A arm. As a result the "real"difference is .010" less. This means the actual difference .050". In my opinion no shims are required to take up this difference.
I repeated the tests with the front upright as well. Same results were produced.
I sampled one stock original front ball joint comparing it to the stock rear one as used in the above test and found the front one was 2.193". The difference compared to the stock rear ball joint was .022" less for the front one.
I then sampled the three remaining new Moog ball joints I purchased and they were all within a few thousands of each other. Tomorrow I'll remove the other front and rear original ball joints and post the results.
Attachments

Last edited:
Ken Roberts
Supporter
Final result is that three original ball joints measured approx 2.215. One of the original front ball joints came in at 2.193. All the new Moog ball joints were approx 2.275. The difference is .060 minus the difference in mounting flange thicknesses between the models (Moog was .010 thicker) for an actual difference of .050. I'm not going to bother with making a .050" shim at each position.
I'll post a picture of the clearance between the wheel barrel and bottom of the Moog ball joint once I get things back together. I am using OEM GM Z06 wheels (rear wheel is 19").
The 4 original unused ball joints will be for sale shortly if anyone is interested.
I'll post a picture of the clearance between the wheel barrel and bottom of the Moog ball joint once I get things back together. I am using OEM GM Z06 wheels (rear wheel is 19").
The 4 original unused ball joints will be for sale shortly if anyone is interested.
Last edited:
Ken Roberts
Supporter
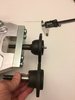
First picture is original front ball joint. Second picture is the rear.


Howard Jones
Supporter
Ken you may find that you have reduced clearance from the top of the threads (moog BJ) to the inside of the cathedral in the upright once the BJ is tighten down in place. This prevents removal of the nut. I removed a bit of the threads on the end of the BJ above the through hole. Thereafter I could remove the castle nut where as I could not before without loosening the BJ.
In the end I went to the Spherical bearing retrofit so this all became moot.
By the way the Moog castle nut is taller and reduces the clearance and makes the removal issue worse. The original nuts are shorter and fit better so I would recommend you save and reuse them.
In the end I went to the Spherical bearing retrofit so this all became moot.
By the way the Moog castle nut is taller and reduces the clearance and makes the removal issue worse. The original nuts are shorter and fit better so I would recommend you save and reuse them.
Ken Roberts
Supporter
Posting this again to remind builders using a LS engine. Wicked deal on factory OEM lifting brackets. Can be used with the valve covers on as well.
https://www.smcautoparts.com/GM-Production-Line-LSX-Engine-Lift-Hooks-p/lifthooks-bxx007.htm
https://www.smcautoparts.com/GM-Production-Line-LSX-Engine-Lift-Hooks-p/lifthooks-bxx007.htm
Ken Roberts
Supporter
I finished the gurney flap for the nose.
The first picture shows the rivet nuts installed in the lip. The lip is 1 inch tall (keep that measurement in mind when you are trimming the nose). The rivet nuts are then bonded on the backside with epoxy for additional strength.
The second picture shows the aluminum flap installed with the stainless large allan head screws . I chose 316 stainless because the screw heads are exposed when viewing the car. It's glass bead blasted and ready for coating. The flap was made from a 2" by 24" sheet of 6061 aluminum .090" thick.
https://www.mcmaster.com/91223a218
https://www.mcmaster.com/89015k221
https://www.mcmaster.com/94020a347
The third picture is a view from the front. I might trim it a bit more once the hood is installed on the car.
Last edited:
Ken Roberts
Supporter
I bonded in aluminum pockets I made to mount the BMW side marker lights in the fenders.
The first picture shows the pocket bonded into the backside of the rear fender.
The second picture shows the pocket from the outside. The holes were drilled to help give the epoxy bonding strength.
The third picture shows a press I made to straighten out the slight curvature of the rear marker lights. I sandwiched the lens in the press and then snugged the bolts up. I placed it in a boiling pot of water for a few minutes and then into cold water. The lens was now straight when I took it out of the press. It matches the contour of the fender perfectly now. The front marker lights matched the contour of the fender and didn't need the press.
Fourth picture is the final result.
Last edited:
Joel K
Supporter
I bonded in aluminum pockets I made to mount the BMW side marker lights in the fenders.
The first picture shows the pocket bonded into the backside of the rear fender.
The second picture shows the pocket from the outside. The holes were drilled to help give the epoxy bonding strength.
The third picture shows a press I made to straighten out the slight curvature of the rear marker lights. I sandwiched the lens in the press and then snugged the bolts up. I placed it in a boiling pot of water for a few minutes and then into cold water. The lens was now straight when I took it out of the press. It matches the contour of the fender perfectly now. The front marker lights matched the contour of the fender and didn't need the press.
Fourth picture is the final result.
View attachment 95869View attachment 95870View attachment 95871View attachment 95872
Very nice work Ken. Would never have thought to boil a side marker light and press it.
Ken Roberts
Supporter
Thanks Joel. The trick was to just soften it enough to relieve the stress. It had a 3/16" curve over the 6" length.
Ken Roberts
Supporter
Mounted the canards today. The right side canards had a slightly different curve to them compared to the left. Not too noticeable but you would think both sides should be identical for balance reasons.

Ken Roberts
Supporter
Can anyone answer this question for me. Can 3/4"(19mm) socket hex lug nuts be used with Forgestar wheels or do I need 17mm hex socket lug nuts? Does your Forgestar wheels come with centering rings or are they made hub centric?
Cam, That is something you should reconsider. The weight of the car should be supported by the cars hub and the center of the wheel. The lug studs aren't designed to support the weight of the car on the conical ends of the lugs. In my years of experience as a service manager I've seen many ill fitting "custom" wheels come loose because of improper hub tolerances.
Similar threads
- Replies
- 5
- Views
- 1K
- Replies
- 1
- Views
- 2K