looking very good

You are using an out of date browser. It may not display this or other websites correctly.
You should upgrade or use an alternative browser.
You should upgrade or use an alternative browser.
Mark Reid RCR-40 Build
- Thread starter MReid
- Start date
Ron
I also need to adjust the front caster. In order to get it close enough for fine tuning, I need to move about 3/4" of shims from in front of the bottom control arms to behind the lower control arms, effectively moving the front wheels further forward a little bit. This will center the wheels even more.
I also need to adjust the front caster. In order to get it close enough for fine tuning, I need to move about 3/4" of shims from in front of the bottom control arms to behind the lower control arms, effectively moving the front wheels further forward a little bit. This will center the wheels even more.
Moving the LCA all the way forward and the UCA all the way back has given me a sum total of +3 Caster - There is no more to be had without modifications on my car - yours may be different.
Pics and information available as soon as I can update my website.
3 degrees of slop....
I owe you guys and Fran / RCR an apology....
After posting this - I was told by Fran that no one has had any trouble getting more caster than this...
I believe in the RCR product or I would not have bought it...
I went back out into my shop a while back and examined my Caster/Camber gauge...
When I pulled the gauge from it's sock and wiped the vials off of dust I found the gimbal mount for the caster vial is (was) loose and flops..
I mounted it and observed the action of the vial when turning the spindle from right to left, the gimbal would flop exactly 3 degrees..
How can this be?
Since my new Caster Camber gauge is on loan - I took the one from my racecar trailer to use. Evidently the screws securing the gimbal mount had vibrated loose while riding in the trailer - or - while it was on loan to someone at the track.
Suffice it to say - I borrowed my own "New" Longacre Caster Camber gauge back from my neighbor across the alley and re-measured. Camber is still where I thought. Testing the Caster at ride height returned a spectacular +6 Positive caster. Coincidently - this is exactly the figure I was hoping to achieve.
So - I've learned a lesson and will be checking my equipment more thoroughly from here on out - and particularly the equipment that leads a rougher than normal life - in my trailer...
So - Guys , Fran - Please accept my apology...
Fran - Thanks for reaching out to me...
Moving the LCA all the way forward and the UCA all the way back has given me a sum total of +3 Caster - There is no more to be had without modifications on my car - yours may be different.
Pics and information available as soon as I can update my website.
I owe you guys and Fran / RCR an apology....
After posting this - I was told by Fran that no one has had any trouble getting more caster than this...
I believe in the RCR product or I would not have bought it...
I went back out into my shop a while back and examined my Caster/Camber gauge...
When I pulled the gauge from it's sock and wiped the vials off of dust I found the gimbal mount for the caster vial is (was) loose and flops..
I mounted it and observed the action of the vial when turning the spindle from right to left, the gimbal would flop exactly 3 degrees..
How can this be?
Since my new Caster Camber gauge is on loan - I took the one from my racecar trailer to use. Evidently the screws securing the gimbal mount had vibrated loose while riding in the trailer - or - while it was on loan to someone at the track.
Suffice it to say - I borrowed my own "New" Longacre Caster Camber gauge back from my neighbor across the alley and re-measured. Camber is still where I thought. Testing the Caster at ride height returned a spectacular +6 Positive caster. Coincidently - this is exactly the figure I was hoping to achieve.
So - I've learned a lesson and will be checking my equipment more thoroughly from here on out - and particularly the equipment that leads a rougher than normal life - in my trailer...
So - Guys , Fran - Please accept my apology...
Fran - Thanks for reaching out to me...
Randy,
glad to be of assistance..
Just dont ask me to check out your "Faulty equipment"..and at your age too.....
glad to be of assistance..
Just dont ask me to check out your "Faulty equipment"..and at your age too.....
Randy,
glad to be of assistance..
Just dont ask me to check out your "Faulty equipment"..and at your age too.....
Fran - you've had my equipment in hand since the first moment I laid eyes on an RCR....
") :stunned:
:stunned: Thanks again... Lesson learned... :embarassed:
Now that is too much information.....eeeww!!!!
So far, I've seen a sawsall, circular saw, and now router used on my car. I'm not sure if Ron is running an auto shop or carpenter shop!
Here, Jose is using the router to slightly deepen the mounting flange for the rear clip vent grill. We want it to sit flush to the body. It will end up the same colors as the body, so it need three different colors and must align perfectly with the stripes on the rear:
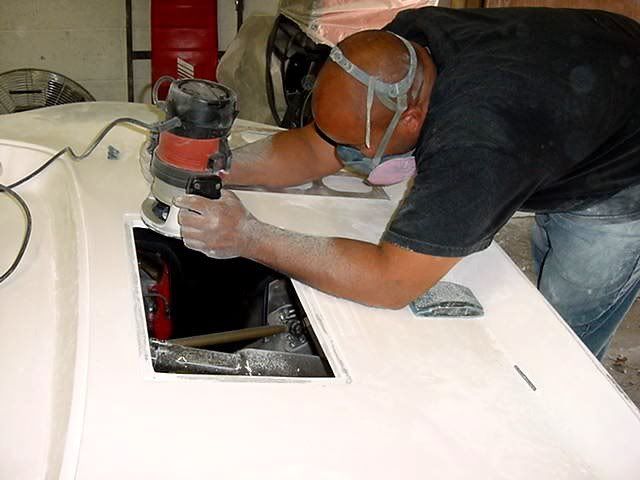
Here, Jose is using the router to slightly deepen the mounting flange for the rear clip vent grill. We want it to sit flush to the body. It will end up the same colors as the body, so it need three different colors and must align perfectly with the stripes on the rear:
The car will be painted on Friday!!!!
My color selection is basically the same as Bill's, but I will not have the numbers and will have a sill stripe and white pinstripe separating the blue and orange.
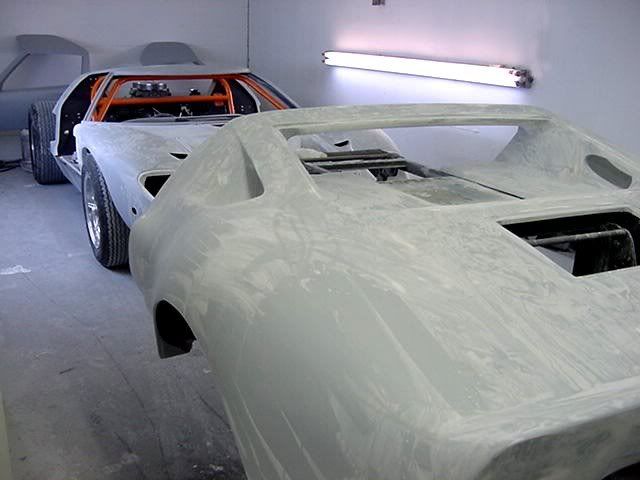
Here are the first body sections fresh from wet sanding. They do need a good wash down.
The side windows will be installed with screws making them removable. We bonded brass wood inserts into the window frames using epoxy:
Once they are cured, grind the tops off, fill the area, and finish for paint:
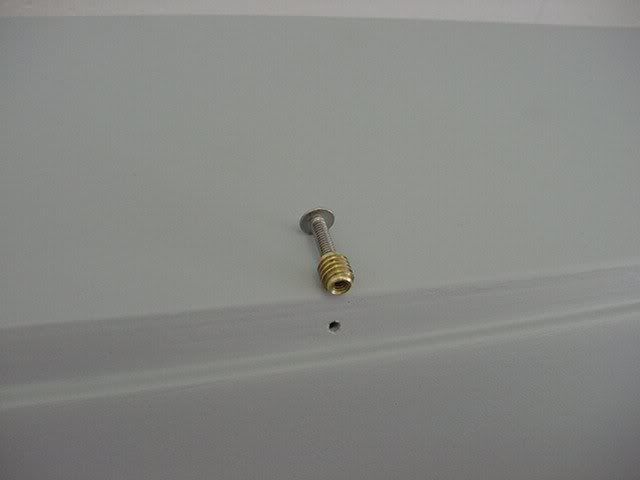
The top of the window frame requires care. It has an acute angle towards the interior and the edge is all gel coat. The insert calls for a 1/4" drill bit for wood. I drilled 9/32" holes and used epoxy to bond the insert to the body. This will aloow these windows to be removable. The rear exterior window, rear interior window, headlight covers, and fog light covers will all be bonded inplace.
My color selection is basically the same as Bill's, but I will not have the numbers and will have a sill stripe and white pinstripe separating the blue and orange.
Here are the first body sections fresh from wet sanding. They do need a good wash down.
The side windows will be installed with screws making them removable. We bonded brass wood inserts into the window frames using epoxy:
Once they are cured, grind the tops off, fill the area, and finish for paint:
The top of the window frame requires care. It has an acute angle towards the interior and the edge is all gel coat. The insert calls for a 1/4" drill bit for wood. I drilled 9/32" holes and used epoxy to bond the insert to the body. This will aloow these windows to be removable. The rear exterior window, rear interior window, headlight covers, and fog light covers will all be bonded inplace.
Mark, I have been watching your build and you are doing a fantastic job. Can't wait to see it in person. My only comment would be to not bond the remaining plexi glass (except the interior rear window) to the car. Stone and road debris can crack your headlight and fog light covers. I will follow with a pm.
Gregg, I talked Mark into using a foamed center 2 sided tape that I use for attaching body side moldings. If Mark should have to remove it for a repair, a heat gun will soften up the glue on the tape and with some care it can be pulled off. To hide the back of the tape threw the transparent lens we are going to paint a 1/2 in reveal the same color as the body.
Ron
Ron
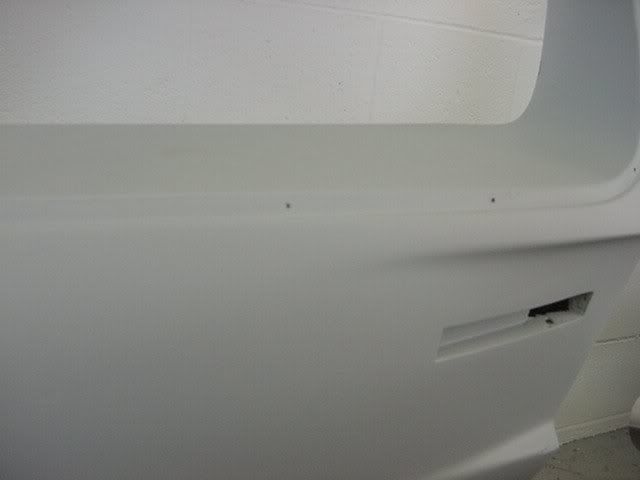
Was the picture of the door with the small hole drilled in taken after the brass grommet was installed? if so its almost undetectable
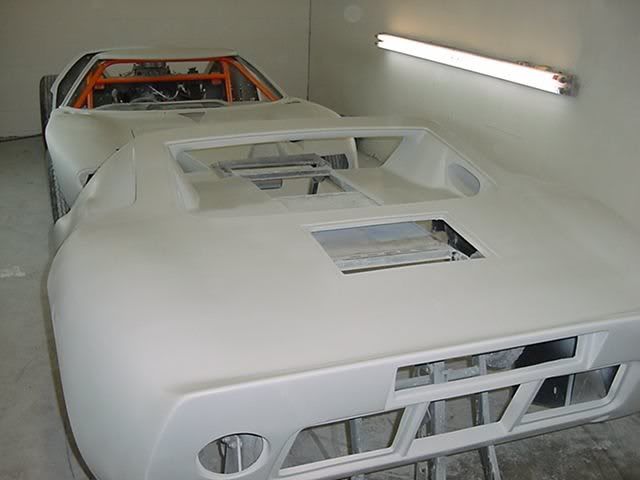
I spent the day at Ron's today. This was this morning with all body parts in final guide coat and the rear clip 80% wet sanded:
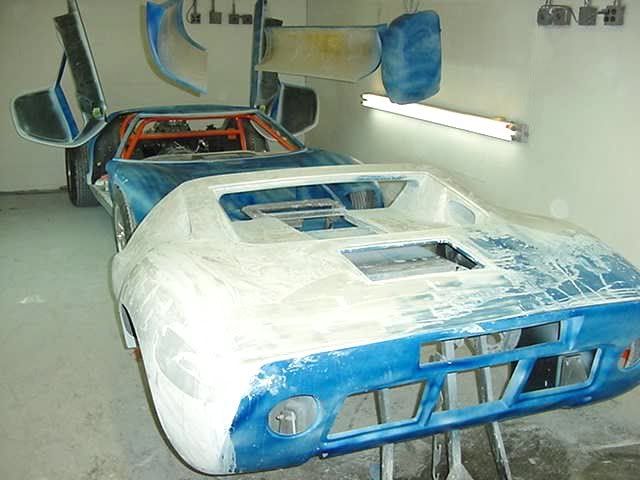
By the end of the day, three of us had all parts wet sanded with 400 grit and all traces of the blue are gone. Of course, so are my finger prints!
Painting starts tomorrow!
By the end of the day, three of us had all parts wet sanded with 400 grit and all traces of the blue are gone. Of course, so are my finger prints!
Painting starts tomorrow!
Similar threads
- Replies
- 25
- Views
- 7K
- Replies
- 3
- Views
- 978