Pete B's Build Thread

PeteB

GT40s Supporter
I've been working on getting the A/C and heater installed.
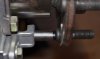
First, I bought a new tool :)


A/C lines assembled:


I made a bracket to install the evaporator unit, drilled the holes, and used some foam tape to make sure it seals:


A/C and heater hoses coming out the side. I bought some bulkhead fittings for the heater hoses and the #10 suction line.


Mounted the drier and safety switch up front:
 

PeteB

GT40s Supporter
Adding circuits to ISIS system

I'm getting ready to start wiring, so I spent some quality time with my ISIS system. I laid out the harness in the living room, hooked everything up, and labeled all the wires so I won't have to be constantly referring to the manual while installing things.

With some help from Jay at ISIS Power, I also added some wires to make use of the four empty circuits (outputs 4, 7, 8, & 9) in the rear Powercell.

I ordered the required pins from Mouser Electroics:
Input pins for Mastercell connector: 12084912-L Delphi Connection Systems | Mouser
Output pins for Rear Powercell connector: 12129493-L Delphi Connection Systems | Mouser
Seals for output pins: 15324982 Delphi Connection Systems | Mouser

Mastercell Switch Inputs (MCI) and connector pins (MCP) numbers corresponding to the Rear Powercell outputs (RPCO):
MCI 15, MCP 8, RPCO 4
MCI 16, MCP 24, RPCO 7
MCI 17, MCP 9, RPCO 8
MCI 18, MCP 25, RPCO 9

Pre-programmed logic for all four circuits is Track (Input ON = Output ON).

I plan to use the additional circuits for the Accusump valve, engine compartment cooling fans, and dome light. I don't know yet what I'll use the last one for, but I'm sure it will get used.

I'm probably going to add a couple more input pins for the dome light so it can be activated by door switches or a dash switch. I'm going to add the input pins/wires now, but making the door switches functional will require some Powercell reprogramming, so that will be a later project.
 
Last edited:
Where did you order the stainless steel pipes for the radiator set-up and did they come already with the retaining bead on the ends? I am looking to do the same thing on my SL-C.
 

PeteB

GT40s Supporter
Although I haven't posted in a while, I am making progress!

Modified the mounting bracket to rotate the tilt motor 90 degrees to allow more room for the pedals:


Made an access panel for the fuel pump compartment:


Insulated the passenger compartment:


I think using the front wheel studs for the Koso speed sensor (or any sensor like it that looks for flux changes) will be unsatisfactory, because the hub doesn't have a smooth surface, and the depressions are read as a flux change, like the bolt heads. You can't just add another "bolt head" to the instrument setup because the depressions are in an irregular pattern, which has the effect of confusing the sensor. You'll see the evidence of this in irregular speed readings, and an inability to obtain and retain accurate speed readings.

One solution is to use something else to read. In my case, I am reading the bolt heads that fasten the rotor ring to the hat (you'll have these if you upgrade to 2-piece rotors, in addition saving lots of unsprung weight).

Perhaps some experimentation in filling in the depressions, or adding an entirely new wheel to read will yield reliable results as well.
 

Fran Hall RCR

GT40s Sponsor
The driveshaftshop makes a small tone wheel that can be mounted between the CV joint and the stub axle or output flange on the transaxle....maybe just what you need.
 
I positioned the sensor on the outside edge of the hub - it is smooth there.

Mine seems to work spot-on so far.
 

Attachments

  • IMGP2100.jpg
    IMGP2100.jpg
    181.9 KB · Views: 560
  • IMGP2101.jpg
    IMGP2101.jpg
    168.3 KB · Views: 534

PeteB

GT40s Supporter
Well, I now have a goal for having the SLC drivable - https://www.staceydavid.com/news/gearznation-autorama-car-show-open-house-and-swap-meet-4281?
utm_source=Stacey+David+GearZ&utm_campaign=e9bc7bf0bb-April_1_Sale4_1_2014&utm_medium=email&utm_term=0_429e7ae1c1-e9bc7bf0bb-298733217&mc_cid=e9bc7bf0bb&mc_eid=21df71dfab


Stacey David is having a show at his shop on Oct 10. I think I'm making good enough progress to make it.

I've got the shifter and e-brake installed and most of the interior fiberglass pieces fitted. ISIS Mastercell and front Powercell installed and all the wiring run. I'll post pictures later.
 

PeteB

GT40s Supporter
Shifter and e-brake:


Progress on fitting the interior panels. This is like a big jigsaw puzzle, but it's coming together:


Mocking up the console:


PeteB

GT40s Supporter
Today I fabricated a defroster control using the electric heater control that comes with the Vintage Air unit in the kit.

I mounted the actuator from the electric heater valve on top of the anchor:


Made a "door" with aluminum, the post from the heater valve, and a some JB weld:


Closed:


Open:


Looks like you are moving right along, what is that anchor looking part? Is Kentucky where Stacy Davids place is at? Thats where I first saw one, was going to buy something else till I saw it on there.

Mine is not going to be as much luxury as yours, I just want to get mine running this year and finish the interior over the winter if all goes well.

I had two new knees put in last year, from to much moto X back in the 70s, i'm still having a hard time getting in and out of the car, but painting it next weekend. Here at work wet sanding till time for Easter dinner.

Looks nice what you are doing.
 

PeteB

GT40s Supporter
Looks like you are moving right along, what is that anchor looking part? Is Kentucky where Stacy Davids place is at? Thats where I first saw one, was going to buy something else till I saw it on there.

Mine is not going to be as much luxury as yours, I just want to get mine running this year and finish the interior over the winter if all goes well.

I had two new knees put in last year, from to much moto X back in the 70s, i'm still having a hard time getting in and out of the car, but painting it next weekend. Here at work wet sanding till time for Easter dinner.

Looks nice what you are doing.

Stacey David's studio is in Kentucky. It's about a 4.5 drive from Dayton. Seeing the SLC on Gearz was what made me consider one, so I think I'd be great to take it to his show.
 
We should keep in touch about it, I am 4 hours away from you up by Akron, drive 2 in would be cool. Were you going to drive or trailer close then drive in?

Not sure my back could go for 8 hrs in one, but I could be up to go.

My hands are like prunes from wet sanding for the past 5 hours.
 

PeteB

GT40s Supporter
I was planning to drive the entire way.

I admire you for doing your own bodywork. I know my limitations and I'm just not patient enough to do that. Paint and bodywork was the only thing I didn't do myself on my Cobra.
 
Im just cheap and then hear the chin music from the wife about spending money on CARS, O MY, she is still pissed I bought this thing. In the past I have made pro street stuff, put lots of money into them then sell them, my motto is BUY HIGH, SELL LOW, MAKE IT UP IN VOLUME, so far its not working out to good and she dont let me forget it.

I want to get mine driving this year, take it to Nelson Ledges and Waterford to see how it handles, im sure its like a go kart which I used to race, but want to drive it around as much as I can, then if I like it ill finish up the interior over the winter. My friend is going to paint it here next Saturday, I did the primar yesteday, not to much to fix, im more worried how to align the body for painting and be able to get the hidden areas after you take it apart.

Here is my paint scheme I am going with but no lettering.
 

Attachments

  • PAIN.jpg
    PAIN.jpg
    179.5 KB · Views: 511
Back
Top