Hector for critical bolts you may want to look into Nordloc washers. I’ve been wrenching for 50 years and am genuinely impressed by how effective they are. One spot that was always a sore point on the Dirt late model I was crew chief for was the header bolts. These were the only things that would keep them tight.

You are using an out of date browser. It may not display this or other websites correctly.
You should upgrade or use an alternative browser.
You should upgrade or use an alternative browser.
Restarting my SLC project in West Texas
- Thread starter felizguy
- Start date
Yes I am familiar with those, expensive but fantastic. Thanks for reminding me .Hector for critical bolts you may want to look into Nordloc washers. I’ve been wrenching for 50 years and am genuinely impressed by how effective they are. One spot that was always a sore point on the Dirt late model I was crew chief for was the header bolts. These were the only things that would keep them tight.
I have been working hard figuring out all the electrical connections. One of the questions I have is that people have suggested using the dakota digital GPS interface speed sensor instead of the mechanical sensor that comes with the koso unit. Any feedback from that setup? the unit available now is the GPS-50-2.
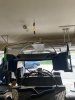
Hi guys I saw somebody hanging the spider with straps from the roof, I am thinking of doing the same thing but can't find the pictures on how to properly support it and easily drop it on and off the frame for fitting, ( I did try the search button a ton of times) such as adjusting the height of the dashboard, and so on . Thanks
Hi guys I saw somebody hanging the spider with straps from the roof, I am thinking of doing the same thing but can't find the pictures on how to properly support it and easily drop it on and off the frame for fitting, ( I did try the search button a ton of times) such as adjusting the height of the dashboard, and so on . Thanks
A.J.'s SL-C build thread
Scott, that is a very sweet Merc! Excellent color. Incidentally I have switched my powertrain choice over to the 1UZFE. I think you and I are going to be playing in the same sand box. Yes Pete, there's a nice concentration of SLCs in the area. I dream of the day we can all do meet-ups, much...
www.gt40s.com
AJ’s build thread, post 35
Thank youA.J.'s SL-C build thread
Scott, that is a very sweet Merc! Excellent color. Incidentally I have switched my powertrain choice over to the 1UZFE. I think you and I are going to be playing in the same sand box. Yes Pete, there's a nice concentration of SLCs in the area. I dream of the day we can all do meet-ups, much...www.gt40s.com
AJ’s build thread, post 35
Joel K
Supporter
Hector,
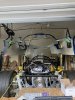
Ha e a question for you. Was wondering what the white material is between the fitting and the condenser? Is that Teflon tape? Is that standard practice for Vintage Air AC Fittings?
If so, is it the really thin stuff? I know Home Depot sells blue, red, and black where blue is the thinnest and black is much thicker.
Thanks
Joel:
I believe is Teflon tape, came with the condenser and I did not bother to remove it. These are O ring fittings so the sealing is done with the o rings I don't think the Teflon is necessary at all . I did not use Teflon in any of the other a/c line fittings. However I used new O rings and lubricated them very well with the lube provided by vintage air (a set of rings was 3 dollars) used a ziplock bag full of oil and gave a bath to all the rings and kept them there until used, I discarded all the ones that came with the fittings. Fingers crossed. Hope I am right . Thanks for the observation though, you really do your homework well. Keep up the good work.
I believe is Teflon tape, came with the condenser and I did not bother to remove it. These are O ring fittings so the sealing is done with the o rings I don't think the Teflon is necessary at all . I did not use Teflon in any of the other a/c line fittings. However I used new O rings and lubricated them very well with the lube provided by vintage air (a set of rings was 3 dollars) used a ziplock bag full of oil and gave a bath to all the rings and kept them there until used, I discarded all the ones that came with the fittings. Fingers crossed. Hope I am right . Thanks for the observation though, you really do your homework well. Keep up the good work.
Joel K
Supporter
Joel:
I believe is Teflon tape, came with the condenser and I did not bother to remove it. These are O ring fittings so the sealing is done with the o rings I don't think the Teflon is necessary at all . I did not use Teflon in any of the other a/c line fittings. However I used new O rings and lubricated them very well with the lube provided by vintage air (a set of rings was 3 dollars) used a ziplock bag full of oil and gave a bath to all the rings and kept them there until used, I discarded all the ones that came with the fittings. Fingers crossed. Hope I am right . Thanks for the observation though, you really do your homework well. Keep up the good work.
Thanks Hector, I appreciate the info.
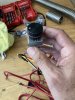
Found these great anodized aluminum knobs on some electronics website had to drill the back a little, but they work
Finally got all the a/c wiring figured out , a HUGE thanks to Dan Carter for all the diagrams, will not use the blue wires from the trinity switch and will use an invert mini, so that I can use it with the infiniti box system. Also got the master cell programmed to run both fans
Finally got all the a/c wiring figured out , a HUGE thanks to Dan Carter for all the diagrams, will not use the blue wires from the trinity switch and will use an invert mini, so that I can use it with the infiniti box system. Also got the master cell programmed to run both fans
Attachments
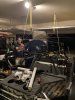
Had to find a way to lift the spider to make more room and also to put it on and off to measure and fit the dashboard and a/c venting system .
Used a $15 harbor freight game hoist ( as in deer) with extender wires so that the lift points would be right over the corner vents for lifting without much side stresses.
Had not touched a welder in 30 years, not too bad I think!! but feel free to point otherwise .
Tested it with two 40lb dumbbells I figure the spider is about 100 lbs , so close to a 2x safety factor of sorts. Again not the prettiest, but functional .
Attachments
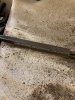
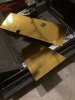
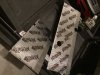
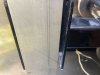
Fabricated the lower part of closeout panels posterior to fuel tank, absolute PIA with engine in place, should have done it a long time ago, needed opening for the fuel tank filler hose, the clutch cables and the fuel lines.
anyway all done, will add a couple of layers of insulation in addition to the gold tape and the kilmat, making my own luxury liner pro with 1/8" mass loaded vinyl plus 1/4" closed cell foam. Will also use melamine foam under carpeting. Thanks to Cam for all the sound and temp insulation pearls.
anyway all done, will add a couple of layers of insulation in addition to the gold tape and the kilmat, making my own luxury liner pro with 1/8" mass loaded vinyl plus 1/4" closed cell foam. Will also use melamine foam under carpeting. Thanks to Cam for all the sound and temp insulation pearls.
Attachments
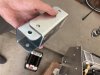
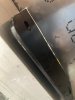
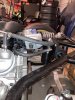
Wanted to install the lower part of the motor mount brackets, come to find out they are off center and there is no way to move the engine without major modifications to the front brackets. Fran assembled the engine prior to transport. So I am going to add spacer and bolts and not the bottom brackets, it will take a hell of a jump to shear the bolts off.
Attachments
Joel K
Supporter
Wanted to install the lower part of the motor mount brackets, come to find out they are off center and there is no way to move the engine without major modifications to the front brackets. Fran assembled the engine prior to transport. So I am going to add spacer and bolts and not the bottom brackets, it will take a hell of a jump to shear the bolts off.
Hector, my front engine mount looks like it had a similar problem. That is the mount was a good 1/8”-1/4” too narrow and there was no room for the lower brackets. I wound up fabricating my own since the LT4 engine mounts have a different geometry than the LS.
One thing you may want to do is take it out and widen the bracket a bit.
Take a look at Kurtiss’s GT-R build page twenty five, he did a nice mod on his front engine mount to change the centering of his engine.
Kurtiss' GT-R
David, thank you for the info. I was using the Astro rivnut tool today in a tight spot and could have use the tool from Pegasus. Time to order this tool.
www.gt40s.com
Here is one of his pics..
Last edited:
Thanks Joel, I will look into that .Hector, my front engine mount looks like it had a similar problem. That is the mount was a good 1/8”-1/4” too narrow and there was no room for the lower brackets. I wound up fabricating my own since the LT4 engine mounts have a different geometry than the LS.
One thing you may want to do is take it out and widen the bracket a bit.
Take a look at Kurtiss’s GT-R build page twenty five, he did a nice mod on his front engine mount to change the centering of his engine.
Kurtiss' GT-R
David, thank you for the info. I was using the Astro rivnut tool today in a tight spot and could have use the tool from Pegasus. Time to order this tool.www.gt40s.com
Here is one of his pics..
View attachment 109085
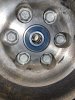
have been stuck figuring out and gathering electrical components, I felt the need to accomplish some task, so I pressed the pilot bearing, very happy that it fits nice and tight, major relief.
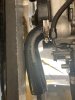
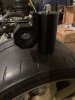
I also followed Cams lead on the PVC oil catch can on the dirty side , found a nice set of brackets to fit over the rear support bar. Very happy how it turned out , needed to use bigger screws, rethread the can, modify the holes on the brackets and trim the rubber a bit.
I did not have the right size oetiker clamps, so worm clamps will have to do for now. Now I feel better I accomplished a task. Keep on.
Attachments
Similar threads
- Replies
- 18
- Views
- 2K