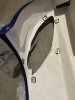
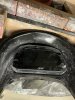
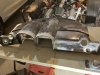
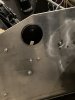
Here is another view of the mounting T nuts as well as the final fiberglass work on the clam viewed from the inside , notice how the thickness of the fiberglass matches the clam thickness

You are using an out of date browser. It may not display this or other websites correctly.
You should upgrade or use an alternative browser.
You should upgrade or use an alternative browser.
Restarting my SLC project in West Texas
- Thread starter felizguy
- Start date
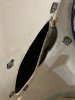
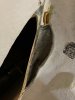

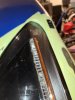
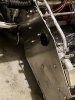
and finally after a ton of sanding and polishing the end product, I Figured it was the right time to fix all the fiberglass defects , bubbles, pits, (there was a ton of them) as well as the mold lines , therefore the front clam is ready for paint or wrap. I guess I should take some pictures from the side, to help you appreciate the corner detail and the little side step where the vent fits.
Attachments
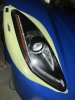
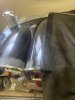
Well, before and after . Which do you rather have?
I just hated the kit car riveted look of the original headlight covers. I guess we all have to choose our battles on this project.
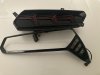
And in case you did not read my previous posts, these are 2014-17 Jaguar F type headlights. Around $300 each from junkyards. Happy to move on to the next thing . That took a while
I just hated the kit car riveted look of the original headlight covers. I guess we all have to choose our battles on this project.
And in case you did not read my previous posts, these are 2014-17 Jaguar F type headlights. Around $300 each from junkyards. Happy to move on to the next thing . That took a while
Attachments
Joel K
Supporter
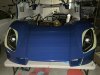
Well, before and after . Which do you rather have?
I just hated the kit car riveted look of the original headlight covers. I guess we all have to choose our battles on this project.
And in case you did not read my previous posts, these are 2014-17 Jaguar F type headlights. Around $300 each from junkyards. Happy to move on to the next thing . That took a while
Hector, a ton of work and the results are really well executed. The Jag lights look right at home on the SLC.
I think lights are one of the biggest drawbacks to almost every kit/component car available, they always make the car look slapped together instead of polished and clean. Taking the time to add in OEM lights always takes the build to another level, and your's look fantastic. Now to figure out what you are going to graft in for tail lights ")
Alan:
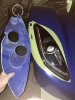
Of course I could not agree more at this point. LOL. Thank you. It does take tons of hours to do it right, especially if you are a novice fiberglass designer and fabricator like myself, more grit than talent. I got the corvette lambo style sequential tail lights. trying to decide what to do with the backup lights , it is nice that are separate triangles. There is a little curve to the main assembly so it may be a little tricky. But with a bit of luck I may be able to use the original mounting tabs , which is a massive bonus. I am doing the dashboard next and then I will tackle the rear clam and tail lights.
Of course I could not agree more at this point. LOL. Thank you. It does take tons of hours to do it right, especially if you are a novice fiberglass designer and fabricator like myself, more grit than talent. I got the corvette lambo style sequential tail lights. trying to decide what to do with the backup lights , it is nice that are separate triangles. There is a little curve to the main assembly so it may be a little tricky. But with a bit of luck I may be able to use the original mounting tabs , which is a massive bonus. I am doing the dashboard next and then I will tackle the rear clam and tail lights.
Attachments
Well, I don't post as often as I want to, I just feel that getting a significant step done is the time, unfortunately days and weeks go by fast, it took me 2 months to finish the dashboard, that is a bit disheartening, but that is how this project goes . Of course using leather over soft touch paint added the level of complexity, especially trying to do it without stitching and using a single piece. Do not recommend it. On a positive note my son Miguel got accepted to Stanford for Electrical Engineering and Computer Science. Very proud of him, waiting to hear from MIT, tough choices, smart kid!!! Much smarter than dad . So here it goes :
I choice to mount the AIM unit from the rear instead of the front like Cam, I designed the dashboard components to mount to the back of the dashboard and the entire unit can be removed in 5 minutes. In theory anyway
I choice to mount the AIM unit from the rear instead of the front like Cam, I designed the dashboard components to mount to the back of the dashboard and the entire unit can be removed in 5 minutes. In theory anyway
Attachments

Last edited:
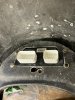
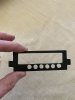
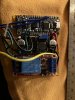
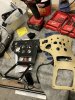
Miguel made a nice case for the traction control unit , but the 3D printed plastic does not have a nice finish, so I made a black anodized aluminum plate cover, turned out very nice , I have a tiny CNC machine, unfortunately not quite strong enough to cut aluminum , so all done by hand. I will make nice buttons and engrave labels on the aluminum face plate later.
Attachments
the 3D printed plastic does not have a nice finish
try rubbing some acetone across the surface, it will shine (assuming it is ABS). or skim with bondo, sand, and paint.
Thanks Dave, that would have been a lot easier, on the bright side, the aluminum is much stronger on the edges and it is a tight fit on the fiberglass .try rubbing some acetone across the surface, it will shine (assuming it is ABS). or skim with bondo, sand, and paint.
had to made a few changes to the dashboard to improve fitment and clear gaps with the body, it needed a dimple to allow the bright light lever to slide all the way forward, (I figure it was easier than move the steering column again, which I did several times already ") ) I had to add fiberglass to the back,
) I had to add fiberglass to the back,
I also reinforced the mounting tabs at both ends of the dashboard, they were already cracked.
I had to add some flat surfaces to the areas where the stereo and the AIM unit fit, you can tell where the bondo is. Also cleared all the mold seams and fiberglass defects,
Mounted the plastic mounts for the tweeters and blended them in with bondo. That was a bit tricky, had to bend them a little, the dash on those areas is not flat. Nothing ever easy!!!
finally mounted the vents ,
then ready to wrap with leather, much more involved and time consuming than soft touch paint. Now I know
) I had to add fiberglass to the back,I also reinforced the mounting tabs at both ends of the dashboard, they were already cracked.
I had to add some flat surfaces to the areas where the stereo and the AIM unit fit, you can tell where the bondo is. Also cleared all the mold seams and fiberglass defects,
Mounted the plastic mounts for the tweeters and blended them in with bondo. That was a bit tricky, had to bend them a little, the dash on those areas is not flat. Nothing ever easy!!!
finally mounted the vents ,
then ready to wrap with leather, much more involved and time consuming than soft touch paint. Now I know
Attachments
Then wrap this baby in beautiful leather. Doing it without stitching with a single hide was super hard, and in some areas you can see where it was impossible to stretch any further and I had to make cuts, then repair it with a leather repair kit. I still have to fine touch some areas , but I am getting much better at it .
Adding the tan leather inserts and making good fits between the tan leather and the black leather was far form trivial, having the right tools to trim leather was super helpful, I bought a cheap leather trim set form Amazon, totally worth it.
Adding the tan leather inserts and making good fits between the tan leather and the black leather was far form trivial, having the right tools to trim leather was super helpful, I bought a cheap leather trim set form Amazon, totally worth it.
Attachments

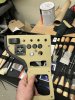
Miguel wanted a fancy horn system, so in addition to a compressed air horn, designed a sound board , sounds can be downloaded easily, and we have 3 horn buttons, the red one is the air horn. super loud. Can't wait to get besides someone texting and driving or cutting me off
I added 2 super thin midrange speakers to the front, one on each side, the sound board is connected to the amplifier,. and the amp drives the outside speakers via a separate channel. horn video coming later
I added 2 super thin midrange speakers to the front, one on each side, the sound board is connected to the amplifier,. and the amp drives the outside speakers via a separate channel. horn video coming later
Attachments
The idea of the tan leather inserts was so that the dashboard will flow well with the center console , so wrapped the center console with tan leather that matches the seats . I tried wrap , but it was too fragile for center console use , so decided leather was the best option. First try did not go well, , once I had the right tools it was much easier
Attachments

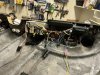
Rear view of the completed dashboard. Note that I mounted as many things as possible to the dashboard. The stereo, , AIM unit , 2 crossovers, amplifier, twitters, Sirius XM unit and antenna , and traction control unit . all the connections to the mid range speakers and subwoofer, outside speakers and power connections are quick connects, it literally takes 5 minutes to remove the entire dashboard.
Attachments
I painted the gated shifter and the shifter shaft black since the aluminum finish did not match my black and gold theme, however the paint is not going to hold out well, if anyone has any tips on how to black anodize the gate please let me know, otherwise I will to continuously touch it up, but I like the black finish a lot better.
Attachments
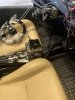
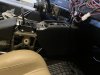
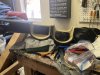
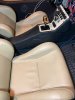
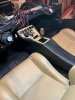
Since the upgraded gated shifter does not fit the standard center console I had to offset it to the passenger side and create closeout panels , I wrapped them in leather and the end result is not bad, I wanted the center console to be easily removed with the shifter in place and that is the only solution I could see
I like the design and curves of the original center console and I was able to blend it in with my control panel modification.
Of course everything is much cleaner on the driver side. Overall I give it a 9 out of 10. For a novice, not too shabby, I think.
What about the ironman start button cover . Yes I know a bit cheesy, but I am still a kid
I like the design and curves of the original center console and I was able to blend it in with my control panel modification.
Of course everything is much cleaner on the driver side. Overall I give it a 9 out of 10. For a novice, not too shabby, I think.
What about the ironman start button cover
. Yes I know a bit cheesy, but I am still a kidAttachments

Similar threads
- Replies
- 18
- Views
- 2K