
You are using an out of date browser. It may not display this or other websites correctly.
You should upgrade or use an alternative browser.
You should upgrade or use an alternative browser.
Restarting my SLC project in West Texas
- Thread starter felizguy
- Start date
Here is a video of the horns. I think is pretty funny. sound board has a USB interface any sound files can be downloaded

 youtube.com
New horns for the Superlite SLC
Enjoy the videos and music you love, upload original content, and share it all with friends, family, and the world on YouTube.
youtube.com
And to keep things going, just started the tail light project. It certainly is going to be interesting .... Morimoto lambo style C7 sequential tail lights . Lights are a bit curved, which is not a big deal, the length on the other hand is going to be a serious challenge... so here I go again . So hopefully this will not take as long as the headlights and the dashboard.
Attachments
Joel K
Supporter
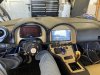
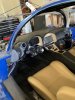
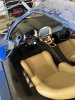
I painted the gated shifter and the shifter shaft black since the aluminum finish did not match my black and gold theme, however the paint is not going to hold out well, if anyone has any tips on how to black anodize the gate please let me know, otherwise I will to continuously touch it up, but I like the black finish a lot better.
Nice mega update! You don’t mess around. The interior looks terrific!
With regard to anodizing, you should be able to find a metal plating/painting shop which a lot of times also do anodizing. You would need to take the piece(s) off you want anodized. My guess is they can strip the paint and prep it correctly to anodize.
Great work Hector!!
Congrats to your son on whichever school he chooses.
It is great to see your successful leather application on your dash. I plan to do the same (except I plan to purchase a leather sewing machine as I am doing my own seat covers as well) and am very scared about getting the leather to stretch over all the curves. I now am a little less concerned seeing how yours turned out. I may need to make a trip to you when I am ready to cover mine.
Great work Hector!!
Congrats to your son on whichever school he chooses.
It is great to see your successful leather application on your dash. I plan to do the same (except I plan to purchase a leather sewing machine as I am doing my own seat covers as well) and am very scared about getting the leather to stretch over all the curves. I now am a little less concerned seeing how yours turned out. I may need to make a trip to you when I am ready to cover mine.
Thanks Kurt.
You are welcome any time, you can stay at my place. We have an extra bedroom. My goal is to drive to the midwest in the SLC this summer (my dad lives in Evansville IN) . Lofty goal, we'll see.
Thanks Mark, it just takes time and going through the learning curves. And always be willing to compromise a little. your paint job is not bad at all.Holy crap, Hector -- those updates were like binge-watching a season of Game of Thrones! nice update and congrats to your son! I wish I had your skill/patience for bodywork and interior finish. Awesome job!
A friend has her PhD in EE from Stanford, attended her dissertation. That was a momentous event for sure. Same friend attained a degree from Harvard as well, which is literally a stones throw from MIT. Best to you proud Dad and your son whichever school he selects.
Side note -
If we came across students in a crosswalk on campus she would often quip - "Don't hit those, they're expensive"")
Side note -
If we came across students in a crosswalk on campus she would often quip - "Don't hit those, they're expensive"
A friend has her PhD in EE from Stanford, attended her dissertation. That was a momentous event for sure. Same friend attained a degree from Harvard as well, which is literally a stones throw from MIT. Best to you proud Dad and your son whichever school he selects.
Side note -
If we came across students in a crosswalk on campus she would often quip - "Don't hit those, they're expensive"
Thanks Rob, Wow , a PhD dissertation, I never attended one, I bet that was cool. Although probably was way over everyone's head. Yes, proud dad for sure, can't wait to see what he does. He certainly has helped me a lot with all the electrical stuff. I will miss him A LOT!!!
I have been following your build for a long time, I am hoping to eventually take a long drive on the SLC when I finish, like you did. You certainly set the bar high with your build form the early days, just curious, how did you build your center console and the modifications on the dashboard, amazing job !!! I did not seem to find it on your build.
CONGRATS TO YOUR FAMILY! Building the SLC is a great accomplishment but I'm sure you know you'll never be more proud than of your family's accomplishments.
That being said wait until that random stranger refuses to believe that you built your car. My wife took my iPhone to the shop for a new battery recently and when the tech turned the phone on and saw my car he said "Oh I have pictures of that car too." Turns out he took the family out for ice cream the same night we were there. He couldn't believe someone could build something like that when the wife explained it was totally built in our garage. He even videoed us driving away unbeknownst to us. Your car is coming out great and is truly a one of a kind. Your work is even inspiring other builders!
That being said wait until that random stranger refuses to believe that you built your car. My wife took my iPhone to the shop for a new battery recently and when the tech turned the phone on and saw my car he said "Oh I have pictures of that car too." Turns out he took the family out for ice cream the same night we were there. He couldn't believe someone could build something like that when the wife explained it was totally built in our garage. He even videoed us driving away unbeknownst to us. Your car is coming out great and is truly a one of a kind. Your work is even inspiring other builders!
Thanks for the kind words Rich. I have been dreaming for a long time about the first drive to work, the gas station and the first car show. Especially after the long days and nights in the garage. It certainly has been a labor of love and lots of learning curves. Some of it very enjoyable, some of it not so much. Working full time and doing this project on the side is pretty tough, but obviously doable. I can see the light !!!!CONGRATS TO YOUR FAMILY! Building the SLC is a great accomplishment but I'm sure you know you'll never be more proud than of your family's accomplishments.
That being said wait until that random stranger refuses to believe that you built your car. My wife took my iPhone to the shop for a new battery recently and when the tech turned the phone on and saw my car he said "Oh I have pictures of that car too." Turns out he took the family out for ice cream the same night we were there. He couldn't believe someone could build something like that when the wife explained it was totally built in our garage. He even videoed us driving away unbeknownst to us. Your car is coming out great and is truly a one of a kind. Your work is even inspiring other builders!
I can see the light (at the end of the tunnel) !!!!
It's probably a train.....

Well it has been almost a year since my last post, sorry, just busy. Working full time and tackling this project is a bit crazy . I will try to catch up in the next few weeks
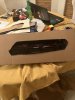
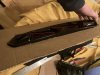
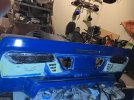
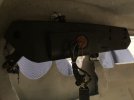
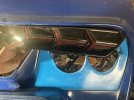
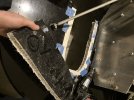
I was wrong again, the tail light project was not faster or easier than the headlight project , it was slow and super time consuming , but at the end I like how it all turned out .
So roughly this is how it happened: Cut holes to size , used the same mounting technique by mounting Tee nuts to aluminum plates then epoxy them to the fiberglass and use the existing mounting tabs. I used the mounting plates for the dodge lights , just cut them and filled the holes .
Since the lights were wider than the area allocated, I had to move the openings for the exhaust tips, kept the same contour, just moved it over a couple of inches. Less room for the exhaust, but no other way to do it.
The backup lights were crazy difficult as they are curved and at different planes but made them fit. not supper happy with them but they are functional .
The third brake light is from a mustang , it is a bit curved , so it will be under a little tension to make it straight, but It works
Attachments
-
 IMG_1313.jpeg375.5 KB · Views: 183
 -
 IMG_1363.jpeg402.5 KB · Views: 176
 -
 IMG_1354.jpeg174.2 KB · Views: 166
 -
 IMG_1360.jpeg610 KB · Views: 188
 -
 IMG_1330.jpeg283.4 KB · Views: 180
 -
 IMG_1307.jpeg291.7 KB · Views: 181
 -
 IMG_1223.jpeg327.4 KB · Views: 172
 -
 IMG_1221.jpeg356.3 KB · Views: 178
 -
 IMG_1210.jpeg297.4 KB · Views: 191
 -
 IMG_1240.jpeg402.3 KB · Views: 180
Holly crap, I just realized it took me a month and a half of solid work to do the tail lights back in February and March , no wonder this is taking so long LOL
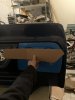
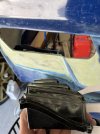
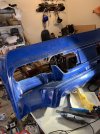
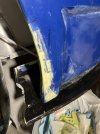
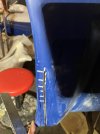
here is a picture of the back with all the Tee nuts in place . I also cut the rear clam hinge to make room for the transmission when the rear clam is open and reinforced it with aluminum angle plus lots of layers of fiberglass cloth

here is a picture of the back with all the Tee nuts in place . I also cut the rear clam hinge to make room for the transmission when the rear clam is open and reinforced it with aluminum angle plus lots of layers of fiberglass cloth
My reward for finishing the tail lights was a trip to Denver to visit my friend and mentor Cam for spring break and see the second finished SLC in person (first one was Howard's)
It was an awesome trip with my son Miguel, on the way there on 3/14 ( as they call it Pi day at MIT ) we were in the middle of nowhere and pulled over to see if he got accepted at MIT, and he did!!! , one of my proudest and happiest moments as a parent. So, long story short he turned down Stanford and CalTech, and MIT gave him a killer scholarship to match the CalTech offer, another happy moment for dad.
Well seeing Cam's awesome SLC in person was just what I needed to stay motivated. Thanks Cam!!!
Last edited:
I am going to try to do little progress reports at a time to keep it interesting and to give me time to actually work on the car
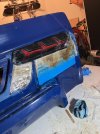
Next I connected the lift system , which is awesome , but quickly discovered that with the front lift up you can't turn the front wheels without rubbing on the front spoiler and the front wheel well, I know that some people choose not to do this mod, but I know I will forget and turn the wheel with lift up and make a mess out of the front clam, so....
I followed Cam's lead again , trimmed the spoiler and also trimmed the wheel well, I also realized that the tires I have will not work , they are too wide , so , dismounted the Michelin pilot sport cup 285/30/19, and bought the pilot sport 4S 275/30/19 and that made a big difference.
Taking a chunk out of the wheel wheel and keeping the contour edge is much easier tan trying to re-do the edge , I agree with Cam on the approach .
I also cut the holes for the front diffusers
PS. Let me know if you anyone is interested on the pilot sport cup tires 285/30/19 with less than 1k miles , they may be a good option for someone that needs to use them while they build the car like I did.
Attachments
I like Michael Fling's idea to name the car. Mine is going to be black with gold accents (I am a Purdue boilermaker)
So the first name that comes to mind is "boilermaker" , but most people won't get it, ideas welcome ....
I will let you hit it with a champagne bottle and name it aloud , LOL . I am realistically expecting to be done within the next couple of months, so excited about driving it to work and my first car show, updates will keep coming .....
Joel K
Supporter
I like Michael Fling's idea to name the car. Mine is going to be black with gold accents (I am a Purdue boilermaker)
So the first name that comes to mind is "boilermaker" , but most people won't get it, ideas welcome ....
I will let you hit it with a champagne bottle and name it aloud , LOL . I am realistically expecting to be done within the next couple of months, so excited about driving it to work and my first car show, updates will keep coming .....
Great updates Hector. Can’t wait for your first road report!
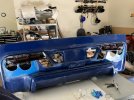
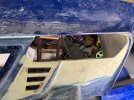
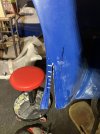
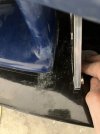
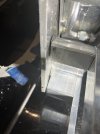
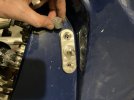
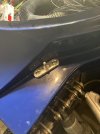
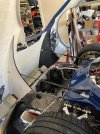
So , finally received my front hinge and decided to mount it prior to designing the front air duct , as it would save a lot of time .
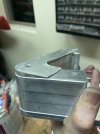
like everything else in this project, nothing is straight forward , as it turns out the front hinge mounts to the walls of the radiator box, and those are not perfectly parallel to the frame, so , decided to make aluminum wedges to make the front hinge hinge work correctly.
Also it turns out that the spider does not sit against the footbox, so created some aluminum spacers underneath the strut mounts, that served to secure the mounts as well as the spider. Obviously this has to be done after the spider , front and rear clams and wheel wells were perfectly aligned with the tires.
Front hinge is a must when you are designing the front air duct and outlet , otherwise taking the front clam on and off several times is an absolute PIA, especially if you are working alone.
Attachments
Similar threads
- Replies
- 18
- Views
- 2K
- Replies
- 10
- Views
- 2K